
In the past, retouching faces was left to the professionals.
To soften skin without being an expert in photoshop was just not an option.
Luckily today editing has become a lot more accessible.
In this tutorial, we will teach you how to soften skin in Lightroom,
Easily and effectively.
By the end of this tutorial, you will be able to achieve a realistic edit and smooth skin in any photo.
How to soften skin in Lightroom
To soften skin in Lightroom use the “Healing” (H) tool to remove blemishes from the skin. Next, select the “Brush” (B) tool, click on the Preset button and select “Smooth Skin”. Brush over the skin avoiding eyes and mouth. Decrease the Clarity and Texture sliders until you reach the desired result.
In this tutorial, we will go through two seperate editing processes in order for us to achieve a natural smooth skin.
Firstly we will focus on removing any visible blemishes on the skin.
Secondly, we will utilize the “Brush” (B) tool to smooth and soften the texture of the skin.
Step 1: Import an image
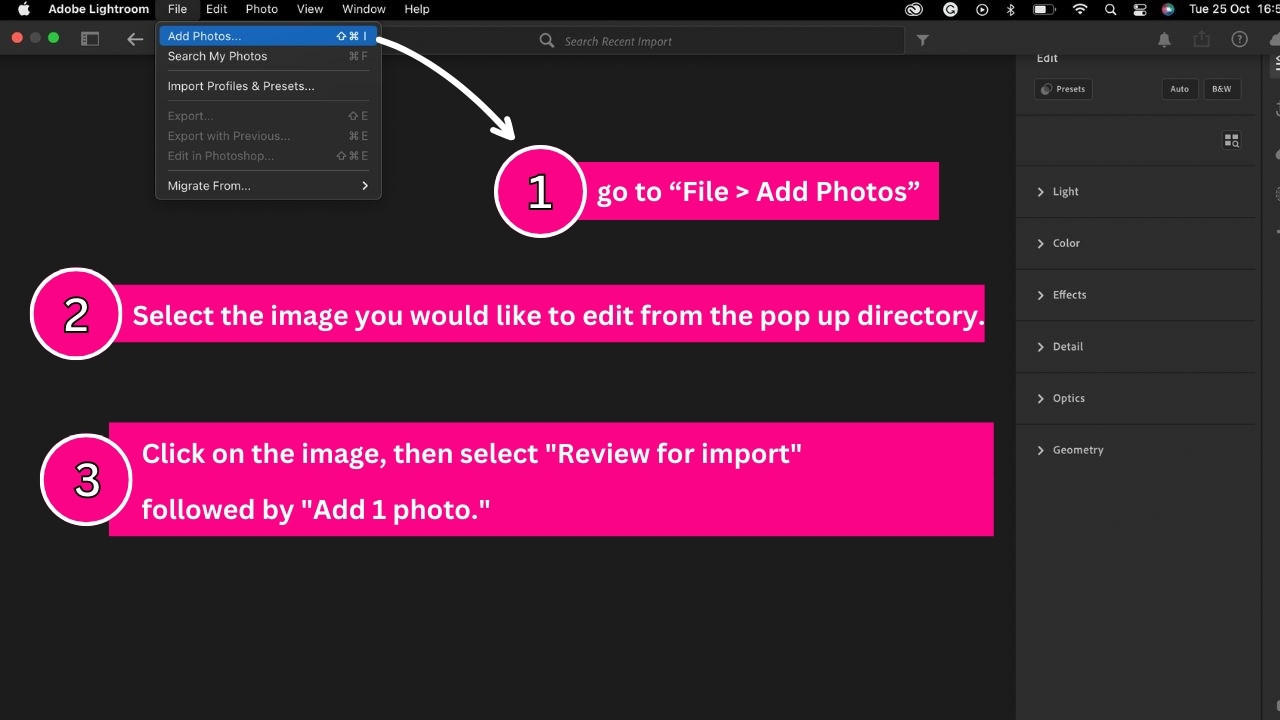
Before we begin editing, we need to import the image which we want to edit, onto Lightroom.
To do this, simply go to “File > Add Photos” on the menu at the top of the screen.
Alternatively, you can press the “Ctrl + Shift + I” command to shortcut it.
Now select the image you would like to edit from the pop-up directory.
Lastly, click on the image and select “Review for import” followed by “Add 1 photo.”
You are now ready to begin the editing process.
Step 2: Select the “Healing” (H) tool on the right side toolbar and adjust the brush size and feather
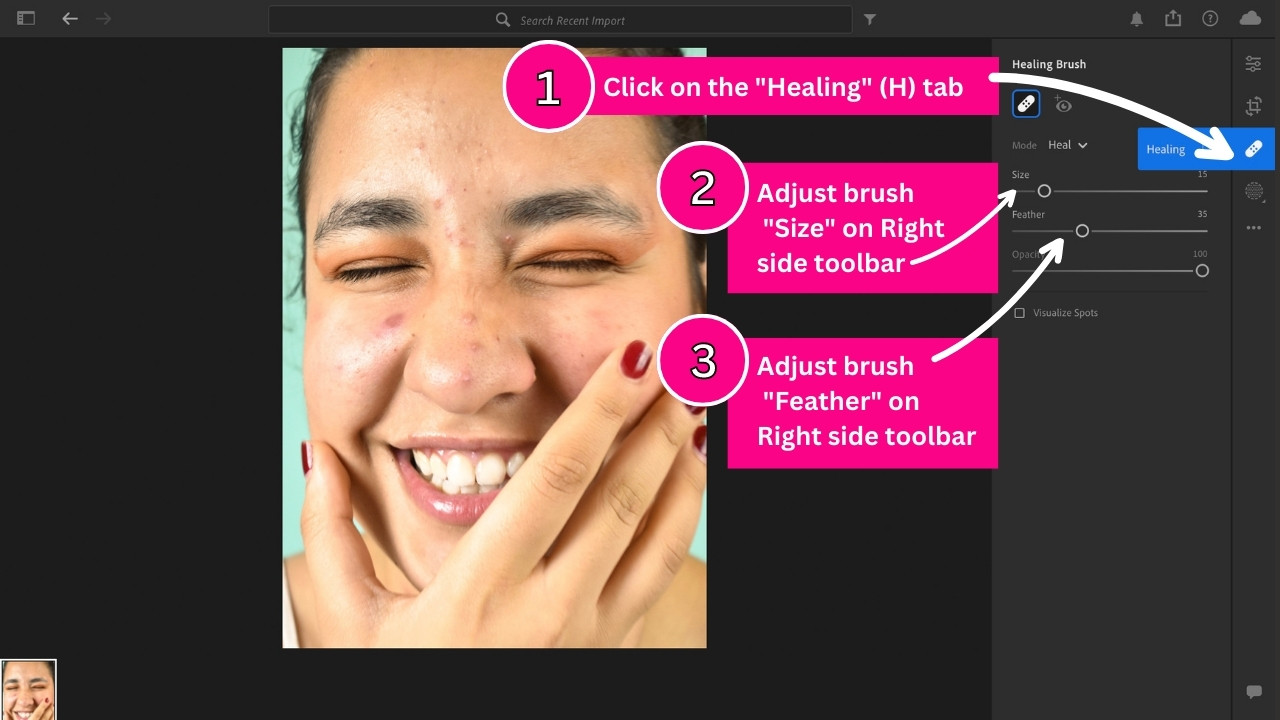
Now that we have imported our image it is time to select the appropriate tools to begin the editing process.
Firstly, we need to click on the “Healing” (H) tab on the right side toolbar.
Lightroom will automatically select the “Heal” mode for you.
However, If you click on the “Heal” mode button a dropdown menu will appear and you will notice another option called “Clone”.
The “Clone” tool works by taking an exact copy of one set of pixels and copying them somewhere else.
In this case, If we were to utilize the “Clone” tool to remove the skin blemishes, we would be copying exact pixels from an area of clear skin and copying them over the blemish.
In Contrast, the “Heal” tool works by taking an exact copy of one set of pixels and then blending it with the existing pixels.
For this tutorial, we are trying to achieve smooth natural looking skin.
We therefore want to use the “Heal” tool.
The “Heal” tool will blend the blemish with the selected clear skin and create more of a realistic skin texture.
This will help us keep the skin looking realistic and avoid making our edits too noticeable.
We also do not want any harsh circles appearing on the face, which can sometimes happen when utilizing the “Clone” tool.
The “Clone” tool is great for needing to copy objects in an image, for example cloning a bird in an image in order to have two birds.
However when it comes to removing multiple objects in one area of an image, the “Heal” tool is always recommend.
Before we begin editing our image, we need to adjust the settings of our “Healing Brush”.
Begin by adjusting the brush size under the “Healing Brush” panel.
You will need to adjust your brush size according to the size of the blemishes you are trying to remove.
The bigger the blemish, the bigger you need to adjust your brush size.
Try to use the smallest possible brush size for each blemish to avoid removing too much surrounding skin.
We want to avoid removing too much “blemish-free” skin because Lightroom will automatically select nearby skin to replace the area we choose to remove.
We therefore need to leave majority of the clear skin in tact so that there are realistic samples for Lightroom to copy from.
In this case, a brush size of 25 was selected to best match the size of the blemishes in the image.
Remember you can also change your brush size as you go, according to each individual blemish.
To change the brush size, simply slide the “Size” slider or alternatively press “]“ to increase the brush size and “[” to decrease the brush size.
Once you have the correct brush size selected, it is time to adjust the brush “Feather”.
You will also find the “Feather” slider on the right side toolbar under the “Healing Brush” panel.
The “Feather” slider affects how soft the brush edges are.
The “Feather” of the brush is displayed as a second circle around your brush.
The area between the edge of the inner circle and the edge of the outer circle is where the feathering will take place.
For example, if you adjust the “Feather” to a high value close to or equal to 100, the brush edges will be soft, subtle, and indistinct because the effect will be feathered.
If you however adjust the “Feather” to a lower value close to or equal to 0, the brush will be harsher and have distinct edges because there will be no feather.
If you would like to use shortcut keys to adjust the “Feather”, Press “]” to increase the “Feather” or press “[” to decrease the “Feather”.
In this case, our main aim is to remove skin blemishes.
We, therefore, want to have a brush with more distinct edges because we want to ensure that we remove the whole blemish.
If our brush is too soft, the edges of our brush will become blurry and the area surrounding the blemish may appear blurry or too smooth.
However, if our brush is too hard, we will be able to see the brush strokes on our image and it will look overly edited and unnatural.
We will select a brush “Feather” of 35 for this tutorial.
Step 3: Remove the blemishes on the skin by utilizing the “Healing Brush” tool
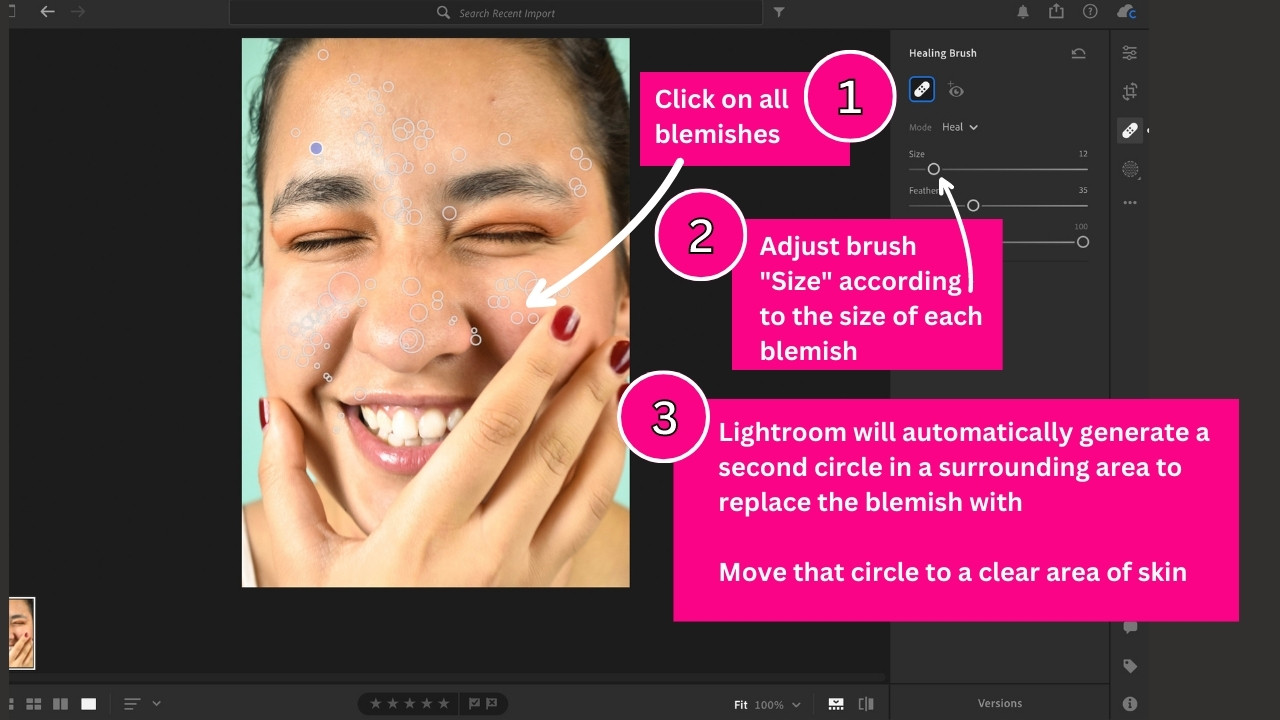
Now that we understand how the “Healing Brush” works we will now utilize the “Healing Brush” tool to remove the blemishes on the skin.
The “Healing Brush” tool works by replacing the selected area with a similar surrounding area.
Before clicking on the blemishes, make sure you have the correct brush size.
Remember, you can change your brush throughout the editing process according to the sizes of the various blemishes.
When you click on an area of the skin, a circle will appear around the area you selected, together with a second circle that Lightroom will automatically generate.
The area within the second circle will then replace the area within the first circle that you selected.
You can also click and drag the cursor over an area to edit a larger area in one go.
This can also be done instead of changing your brush size.
You could select a smaller brush size and then just click and drag the cursor to brush over bigger blemishes.
However, it is highly recommended to be consistent and do smaller one-click movements.
This will create a more consistent look and ensure that the edit looks natural.
As previously mentioned, we do not want to remove too much of the surrounding skin.
If we remove too much, the skin may appear flat and lose its natural definition.
Although Lightroom will automatically choose a surrounding area to replace the blemish with, if you are not happy with the chosen area you can select a different one.
To do this, simply click the second circle and drag it to a different area of smooth skin.
Continue removing all of the blemishes until you are happy with how the skin looks.
If you would like to delete any of your brush strokes, simply click on the adjustment and press the delete key.
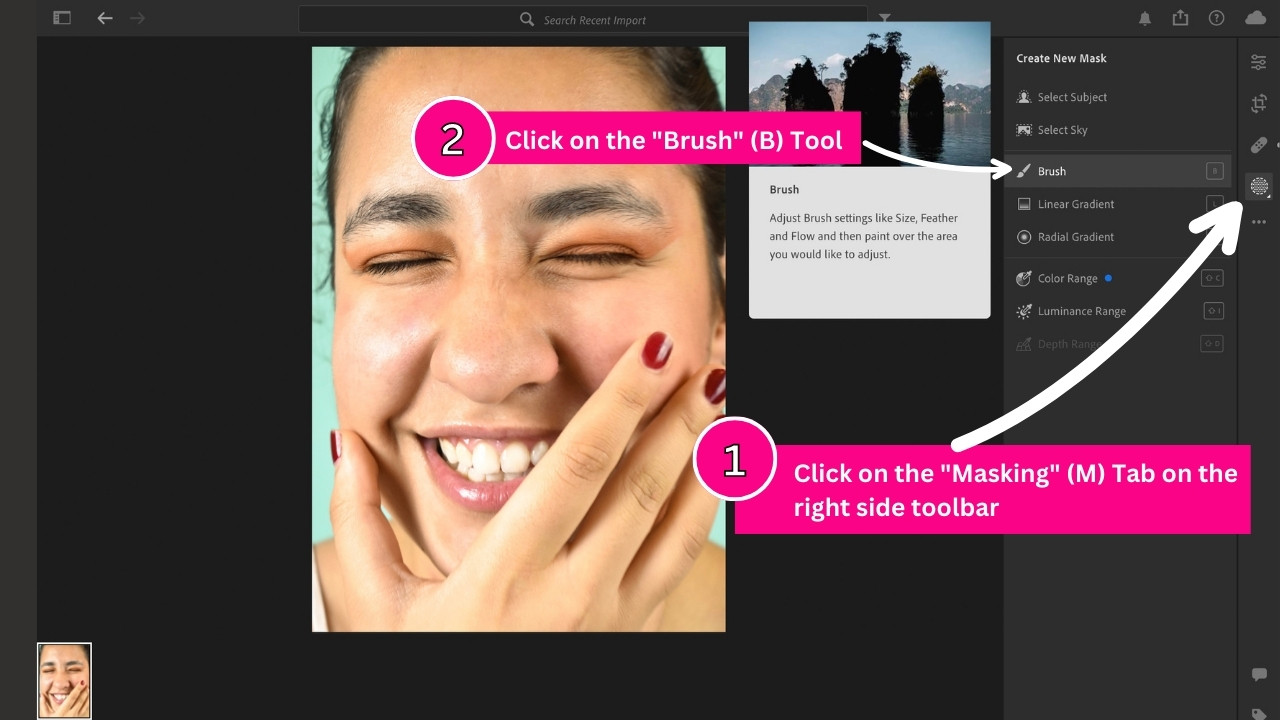
Step 4: Select the “Brush” (B) tool under the “Masking” (M) tab
Okay so we have now successfully removed all blemishes from the skin but we can still see some unwanted texture and redness.
To fix this, we will need to utilize some Lightroom tools to properly soften and smooth out the skin.
Many people actually utilze frequency separation in Photoshop which separates the colour information in an image from the other details in an image.
You can read up on how frequency separation works if you are interested.
This is a longer and more intricate process and requires a lot of practice.
However, there is actually a much easier and quicker way to soften skin and you can do it all within Lightroom, utilizing the adjustment “Brush” tool.
Again, no need to be a professional.
To do this we need to start by clicking on the “Masking” tab on the ride side panel.
Then select the “Brush” (B) tool from the list of Mask tools.
This will create a new Mask.
Step 5: Select the “Smooth skin” filter
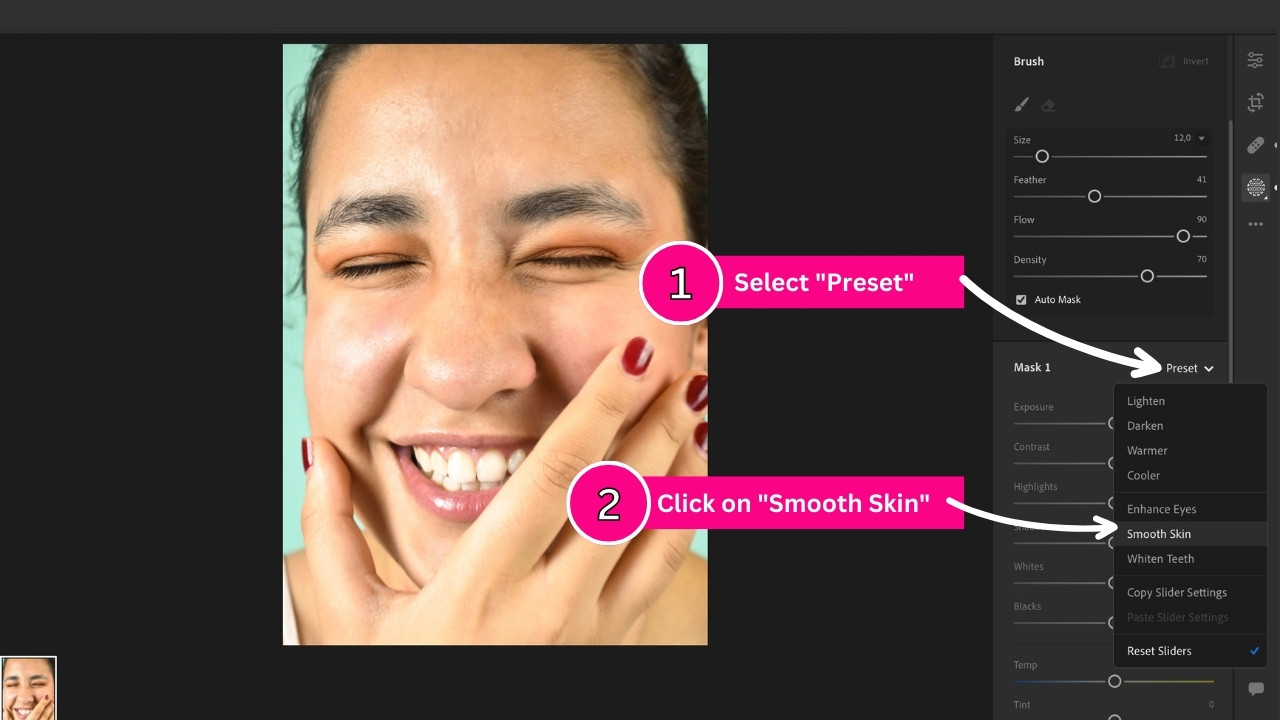
Next, we need to click on “Preset” and select “Smooth Skin” from the drop-down menu.
This will automatically change the “Brush” settings by reducing the “Clarity” and “Texture” sliders.
Step 6: Adjust the brush “Size”, “Feather”, “Flow” and “Density” sliders and toggle on “Auto Mask”
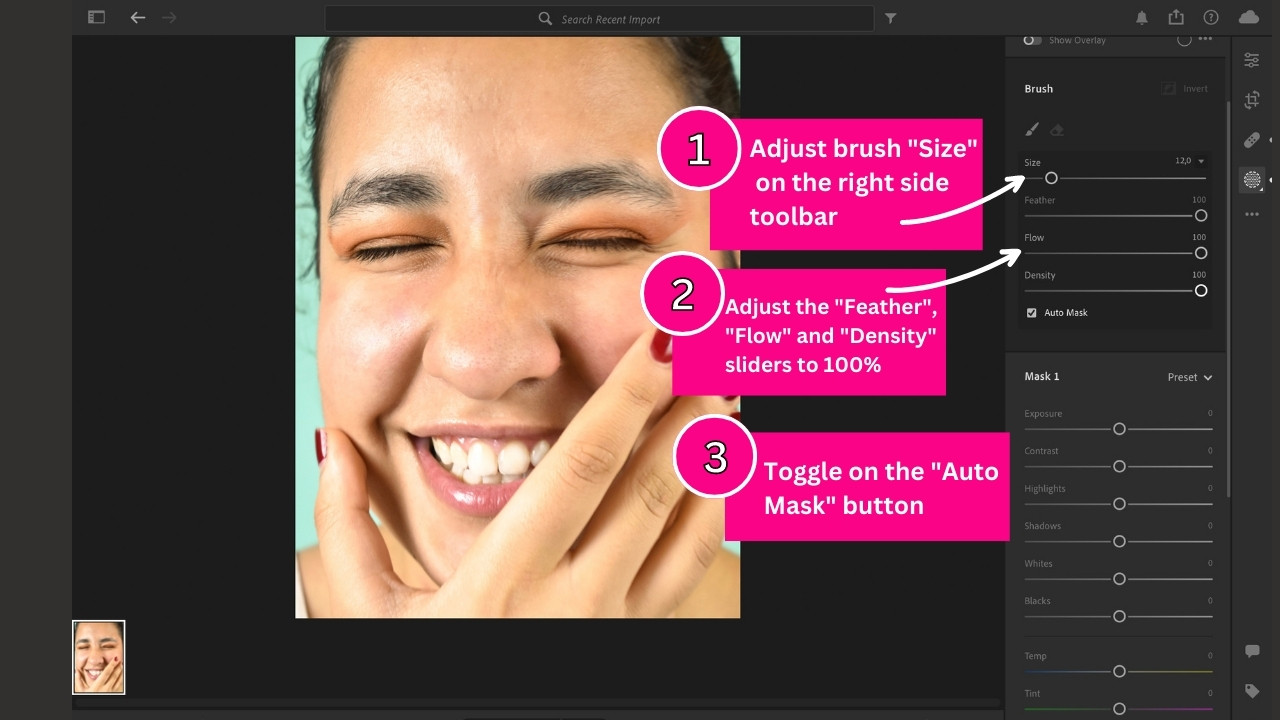
Before we soften the skin, we need to adjust our brush settings.
Firstly, start by adjusting your brush “Size”.
For this tutorial we will start with a brush size of “12” but you may need to change this according to your own image.
Although it is quicker to utilize a big brush try to avoid making your brush too big as this will make it difficult to get into smaller areas of the face.
Next, we will adjust the “Feather” “Flow” and “Density” sliders to 100.
The “Feather” slider affects the softness of the brush edges whereas the “Flow” slider controls how much the brush will affect the brushed area.
The “Density” slider controls the effect transparency and will limit how much of the effect is applied to the image.
For this tutorial we want to have a brush with soft edges because we want our brush strokes to be subtle and smooth.
We do not want to have any visible brush strokes on the skin.
Which is why we are setting the “Feather” to 100.
We are also setting the “Flow” and “Density” to 100 because in order for us to remove unwanted texture and redness we need the brush to apply the effect strongly.
You can also adjust these sliders using shortcut keys.
Simply Press “]” to increase the sliders or press “[” to decrease the sliders.
Underneath the “Density” slider you will notice that you can select “Auto Mask”.
This is a very helpful tool and works by automatically assisting you in creating your mask.
Lightroom will help confine your brush strokes to specific areas that share the same exposure and colour.
For example, if you brush over the skin surrounding the eye,
Lightroom will automatically assist you in not accidentally brushing over the eye because the eyes have a different exposure and colour than the surrounding skin.
Step 7: Brush over the face to soften the skin, avoiding the eyes and mouth

Now we need to create the mask by brushing over the skin.
The brush will work by reducing the clarity and texture of the areas you brush over.
This will help us get rid of any unwanted texture and redness.
Simply click and move your cursor over the skin to apply to effect.
Be careful not to brush over the eyes and mouth or any other details you want to remain sharp.
If we brush over the eyes they will also become smooth and lose their clarity.
This will make your whole image appear blurry and over-edited.
We only want to smooth the skin, no other facial features.
To help you keep track of where you have brushed over you can toggle on the “Show Overlay” button.
This will highlight in red the areas you have brushed over, as seen in the above image.
You can toggle it on and off as you go to help you get the most accurate edit.
Step 8: Refine the “Clarity” and “Texture” settings to achieve desired result
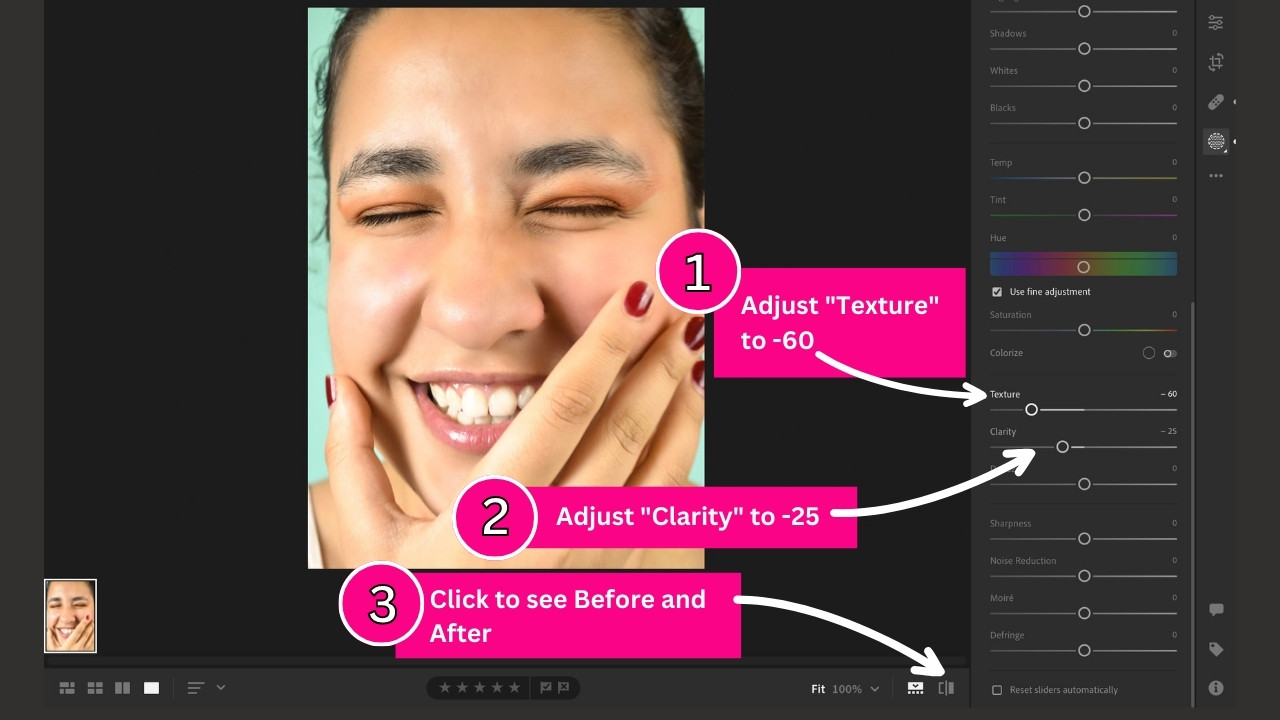
When you select the “Smooth Skin” preset, lightroom will automatically set the “Clarity” slider to -15 and the “Texture” slider to -35.
Although this is quick and easy, you may not be 100% satisfied as the effect may not be strong enough for the look you are trying to achieve.
Alternatively, the effect may be too strong.
The higher the clarity and texture, the less intense the skin smoothening/softening effect will be.
So at 100% clarity and texture, the brush will not soften the skin at all and at -100% clarity and texture the skin will be extremely smooth with zero clarity or texture.
To achieve the desired look you can go back and refine the settings under the adjustment panel.
For this tutorial and specific picture, we will reduce the texture and clarity further because there is quite a lot of texture we need to remove.
We will set the “Texture” to -60 and the “Clarity” to -25.
As you adjust these two sliders you will be able to see the changes on your image.
This is helpful because you can continue experimenting until you are happy with the result.
Although we want the effect to be strong,
we also do not want to smooth the skin too much because you might end up making the skin texture look very unrealistic.
It is always better to go with a more subtle look.
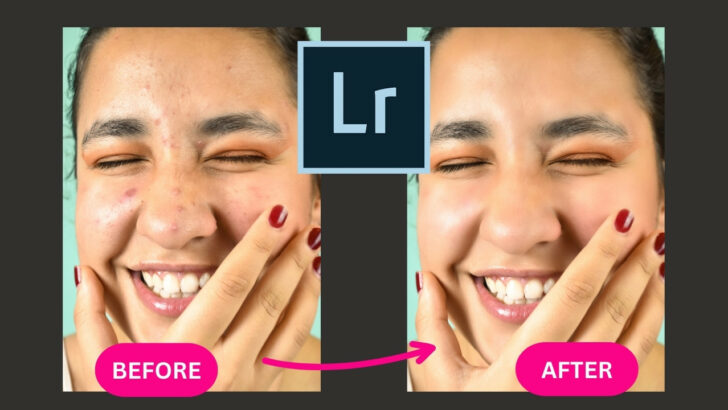
The Result
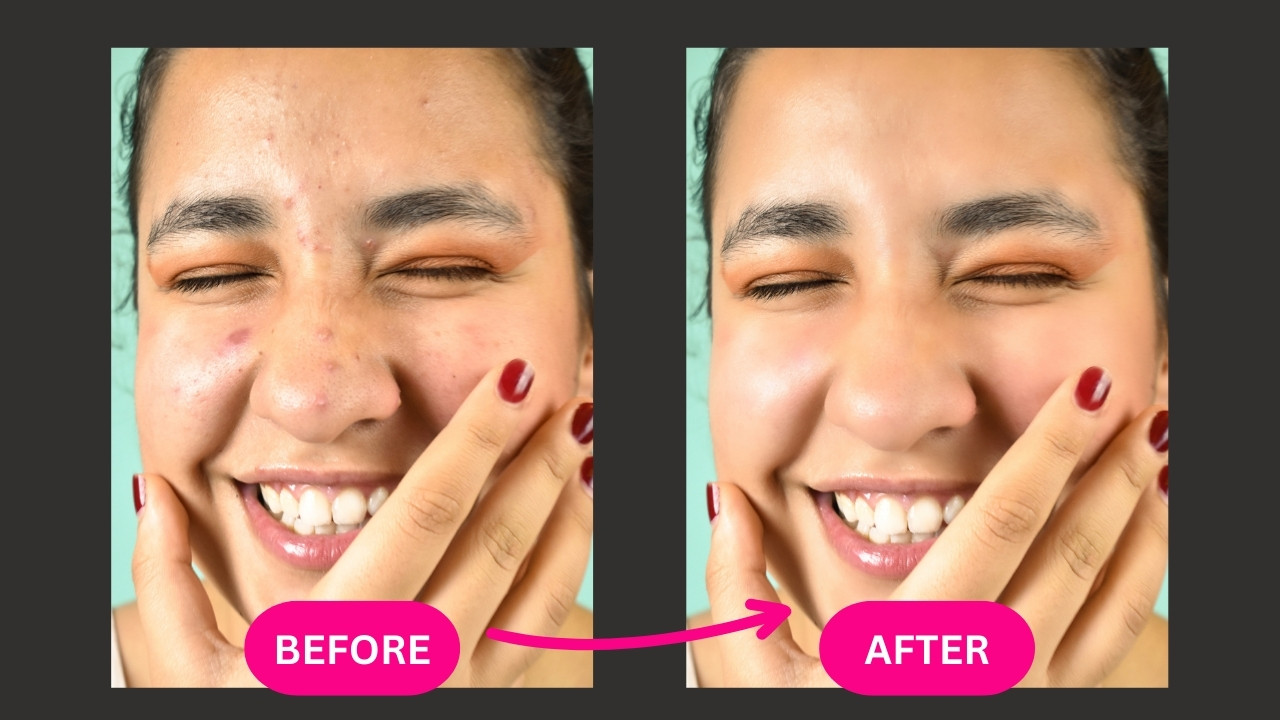
Here is the final before and after of how to soften skin in Lightroom.
We were able to achieve a realistic smooth skin without losing the natural skin appearance.
Frequently asked questions on “How to soften skin in Lightroom”
Why can’t I find the “Smooth Skin” brush preset in Lightroom?
Brush presets are only supported in Lightroom Classic. Unfortunately Lightroom CC desktop does not yet support brush presets. Try switching to a different Lightroom version or adjust the Clarity and Texture sliders yourself to create your own skin-softening preset.

I am a professional blogger and entrepreneur with a strong interest and passion in photo editing. On MindRelic, I happily share my expertise in the photo editing niche with all of you guys!