
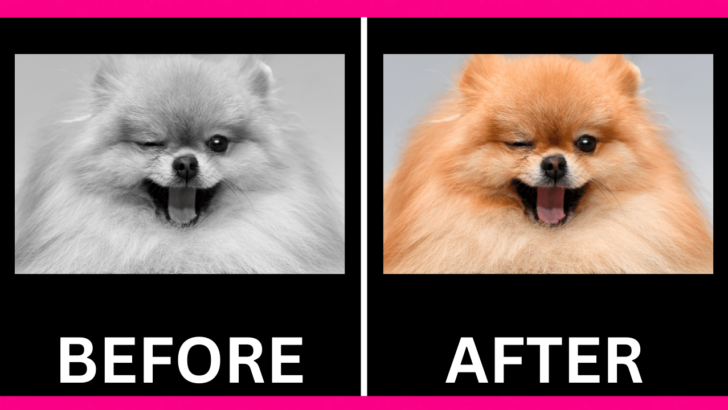
Have you ever found a vintage black and white photo in your album and you felt like it would be great to add some punch to it? If that’s your case, this is your lucky day!
As a matter of fact, some old iconic photos and golden era classic movies were colorized using a very similar method, like for instance: Casablanca, Citizen Kane movies, The Three Stooges, El Zorro series, photos of Anne Frank, Albert Einstein, Abraham Lincoln, or the Victory Over Japan Day in Times Square photo.
Colorizing a photo can be done by manually filling each different area of the picture with color, but nowadays we thankfully have some AI assistants that automatically colorize black and white photos for us.
In this tutorial we’ll learn how to colorize a black & white image using two free online apps (deepai.com and img2go.com) in a very simple way.
Then, if you are looking for better results, at the end of this tutorial we’ll learn how to fix some bugs that could come up when following these methods, with the help of pixlr.com.
Let’s start and find out how to spice up our black and white photos.
How to Colorize a Black & White Photo Using Deep AI App
Go to the “DeepAI” website and click on the “Colorize Black and White Photos” option. Click on the “Image” option to upload an image and then, once the colorized image displays, right-click on the image and select “Save Image As” to download the image.
Step 1: Go to the Deep AI App
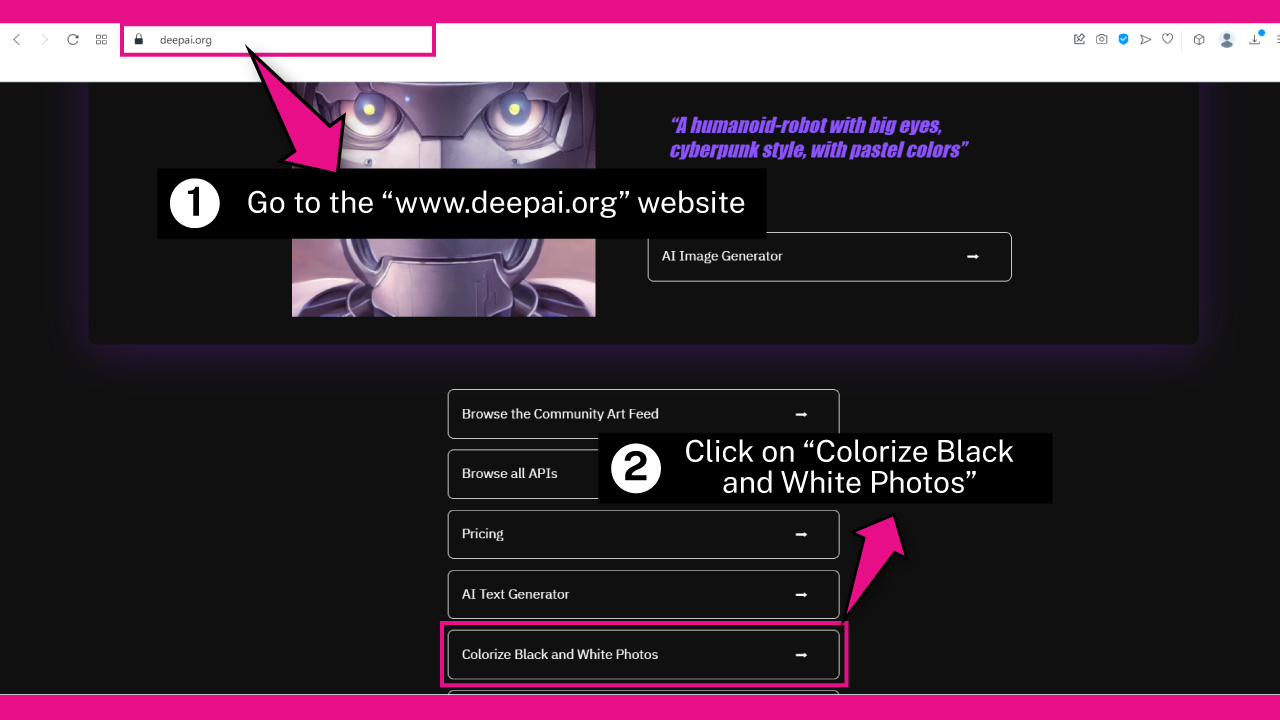
Open your favorite browser, and go to the deepai.org website.
Scroll down and click on the “Colorize Black and White Photos” button.
Step 2: Upload an Image
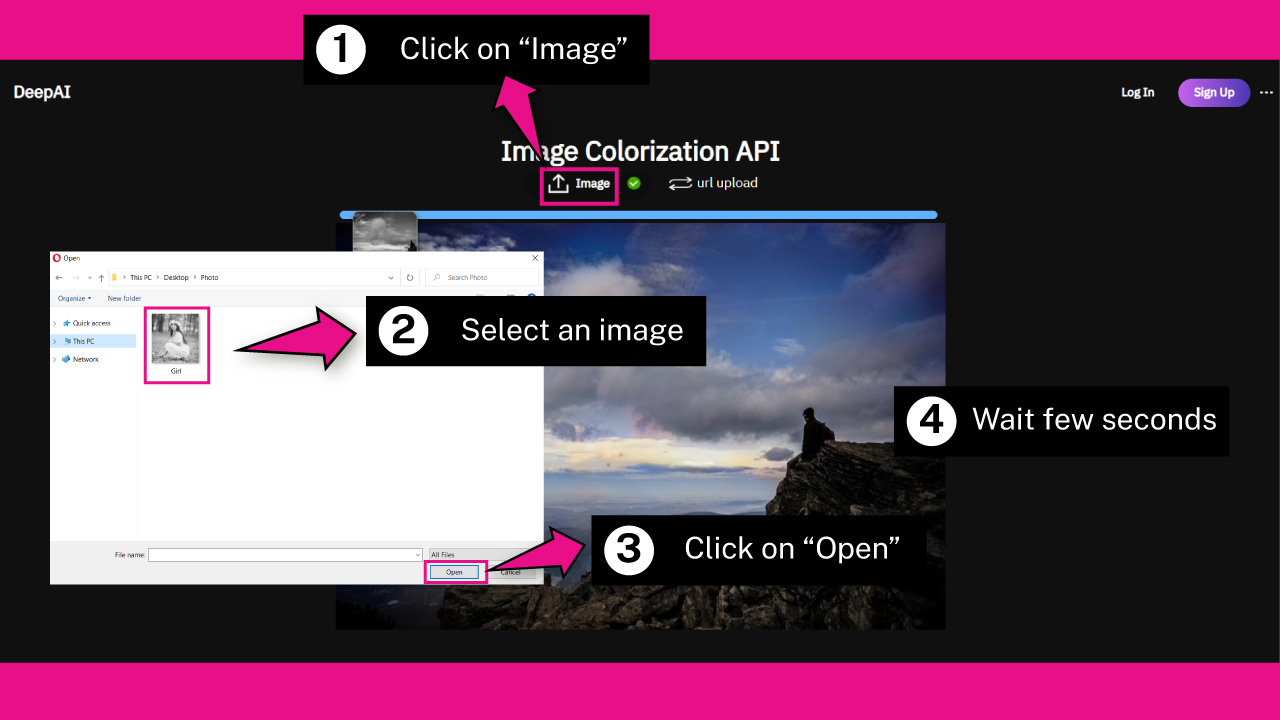
Click on the “Image” option at the bottom of the screen to upload an image from your local files.
You can also use an URL image if the image you want to use is online.
I’ll click on the “Image” option since the image I’ll be using is on my local files.
Once you click on the “Image” option, a window will pop up.
Browse in your directory and locate the image you want to work on.
Select the image, and then click on the “Open” button.
Now, wait a few seconds until the image gets processed.
Step 3: Download the Colorized Image
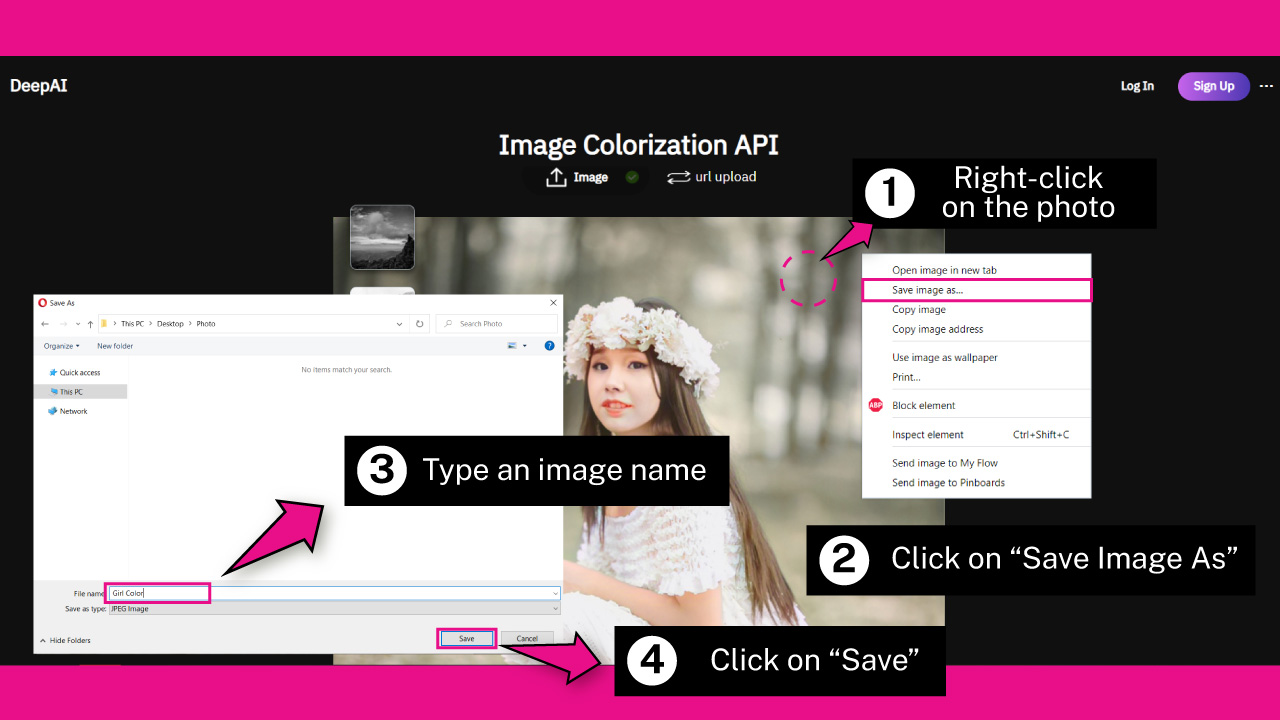
Once the image is ready, right-click on the image to unfold its options menu.
Then, select the “Save Image As” option.
On the pop up window, type your desired image name on the “File Name” field, and click on the “Save” button to download your image.
The Result
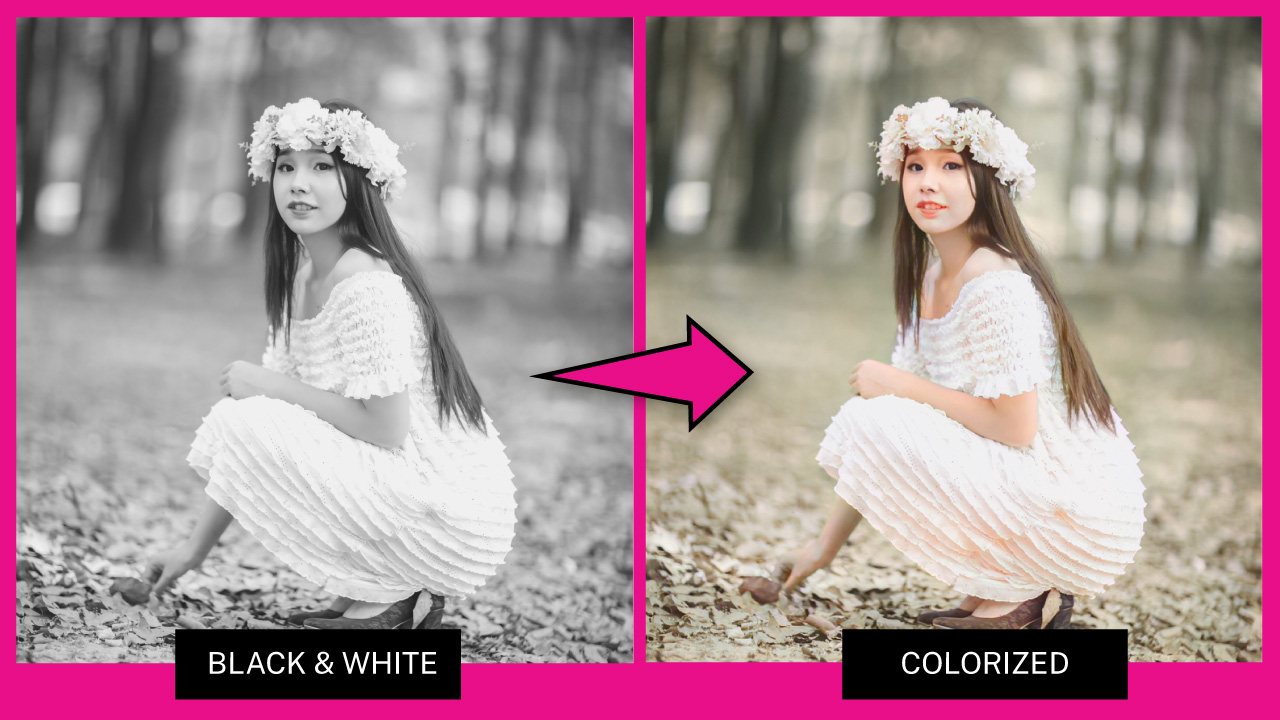
This is the result of how to colorize a black and white image using the Deep AI App.
How to Colorize a Black & White Photo Using Img2Go App
Go to the “Img2Go” website and click on the “Colorize Image” tool. Upload an image and select your desired output format on the “Settings” field. Click on “Start”. Wait a few seconds until the image is processed, and once it’s ready, it will be automatically downloaded to your computer.
Step 1: Go to the Img2Go App
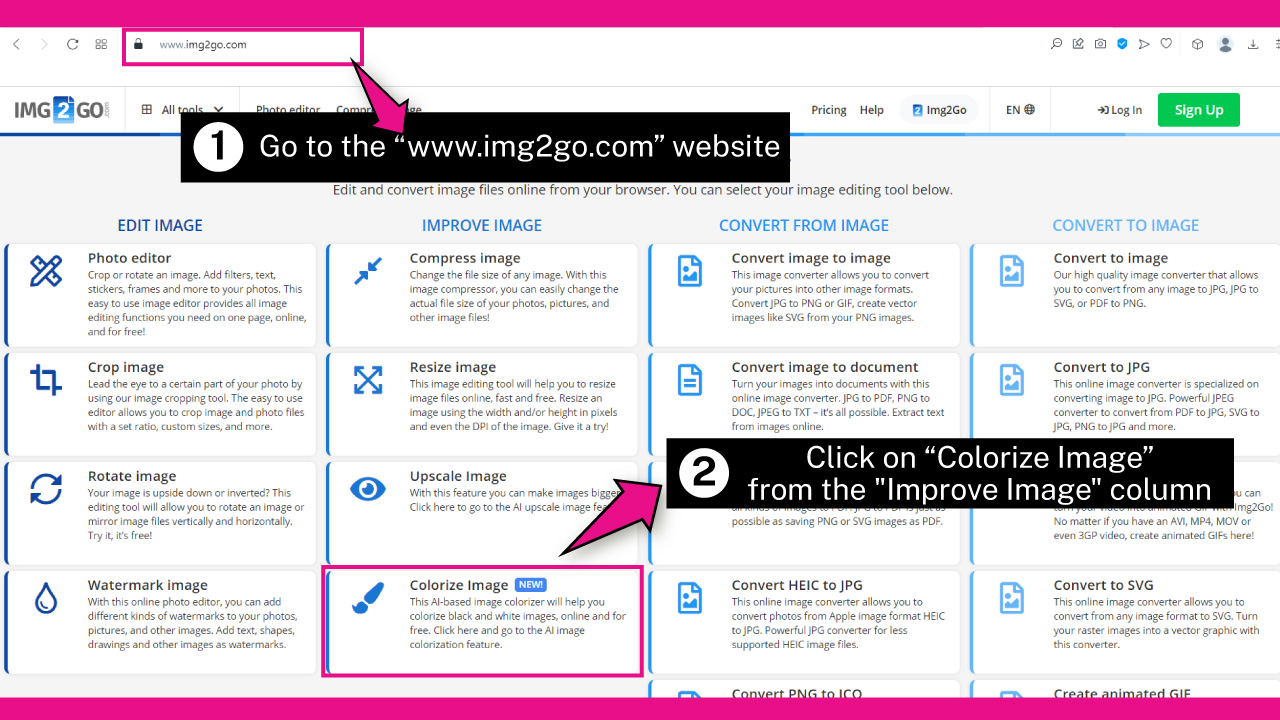
Open your browser, and go to the img2go.com website.
On the “Improve Image” column, click on the new “Colorize Image” tool.
Step 2: Upload an Image
You can use an image from your computer, Google Drive, Dropbox, or enter an image URL if it’s online.
If you use Google Drive or Dropbox, you need to log into your account.
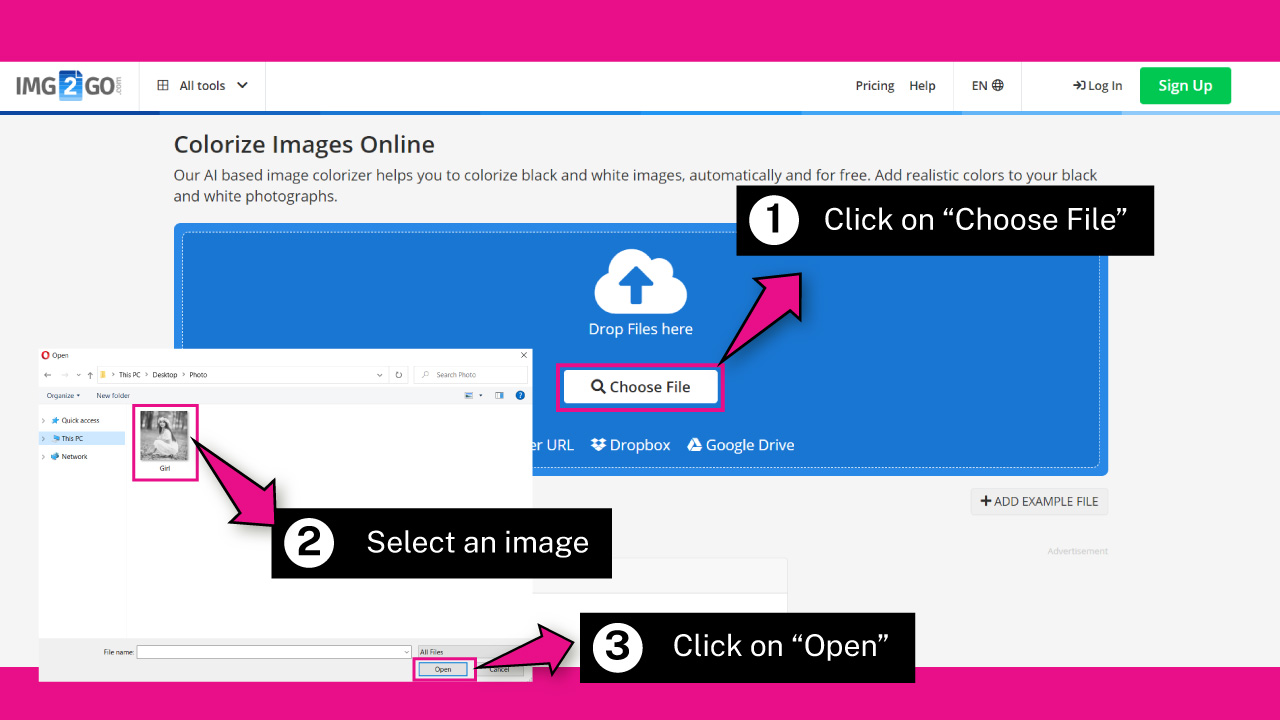
I’ll use an image from my local files, so I’ll click on the “Choose File” button.
Once the window pops up, browse in your directory and locate the image you want to work on.
Select the image, and then click on the “Open” button.
Wait a few seconds until the image gets uploaded.
Step 3: Adjust the Settings
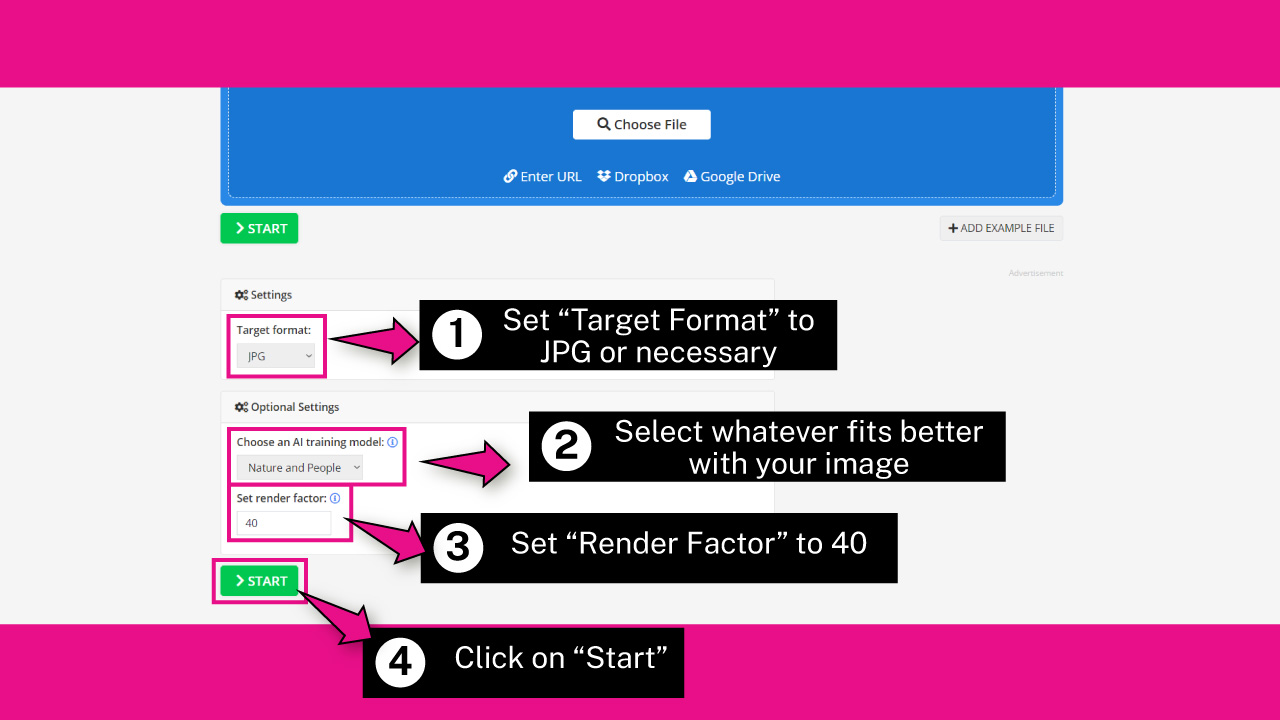
Scroll down a bit, and on “Settings” you’ll find the “Target Format” field where you can select the extension for your image. I’ll select JPG for this example.
Then, adjust the “Optional Settings”. On the “Choose an AI Training Model” pick between “Nature and People” or “Generic”, whatever fits your uploaded image better. I’ll pick “Nature and People” for this example.
Then, set the “Render Factor” to 40.
Finally, click on “Start”.
Step 4: Download the Colorized Image
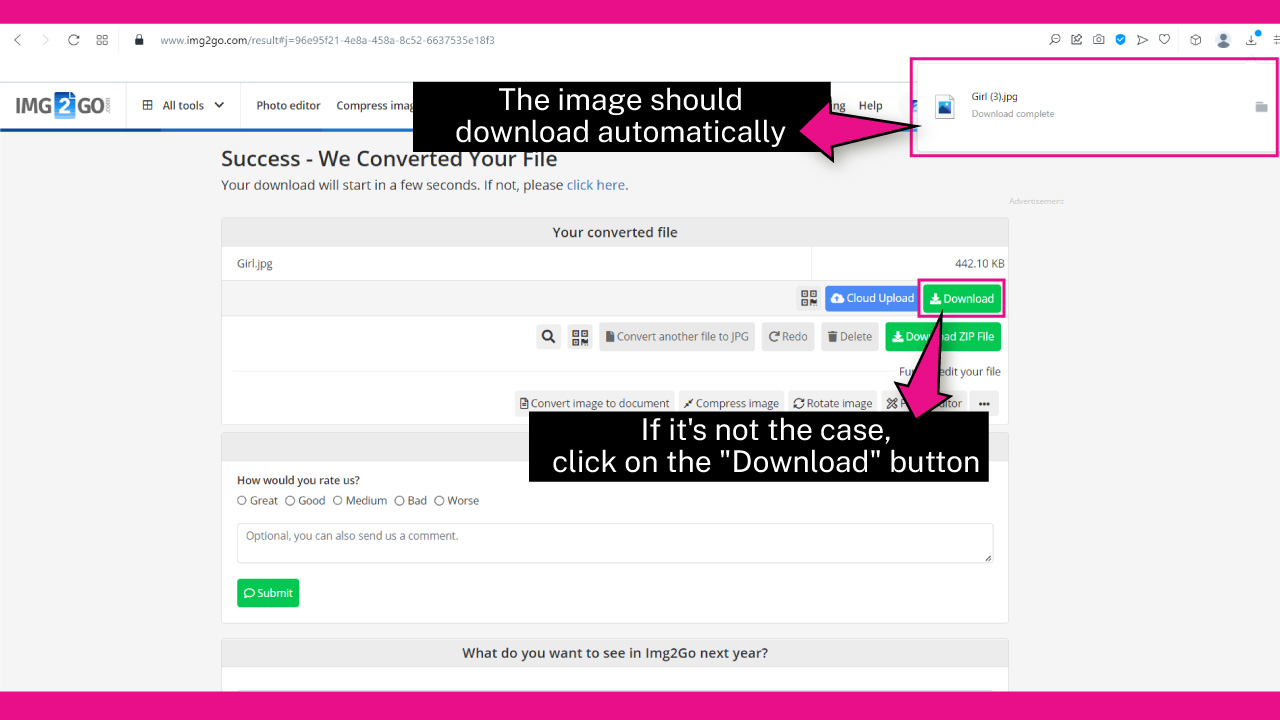
Once the image is processed, it should be downloaded automatically to your computer.
If for some reason it doesn’t, click on the “Download” button to download it.
The Result

This is the result of how to colorize a black and white image using the Img2Go App.
How to Fix Automatically Colorized Images Using Pixlr App
Go to the “Pixlr” website and upload the colorized image. Add a new layer and set its “Blend Mode” to “Color”. Pick the closest color to the missing colorized area and use the “Draw” (B) tool to paint over it. Merge the layers. Set the “Vibrance” to a higher value. Finally, save the image.
Step 1: Go to the Pixlr Website
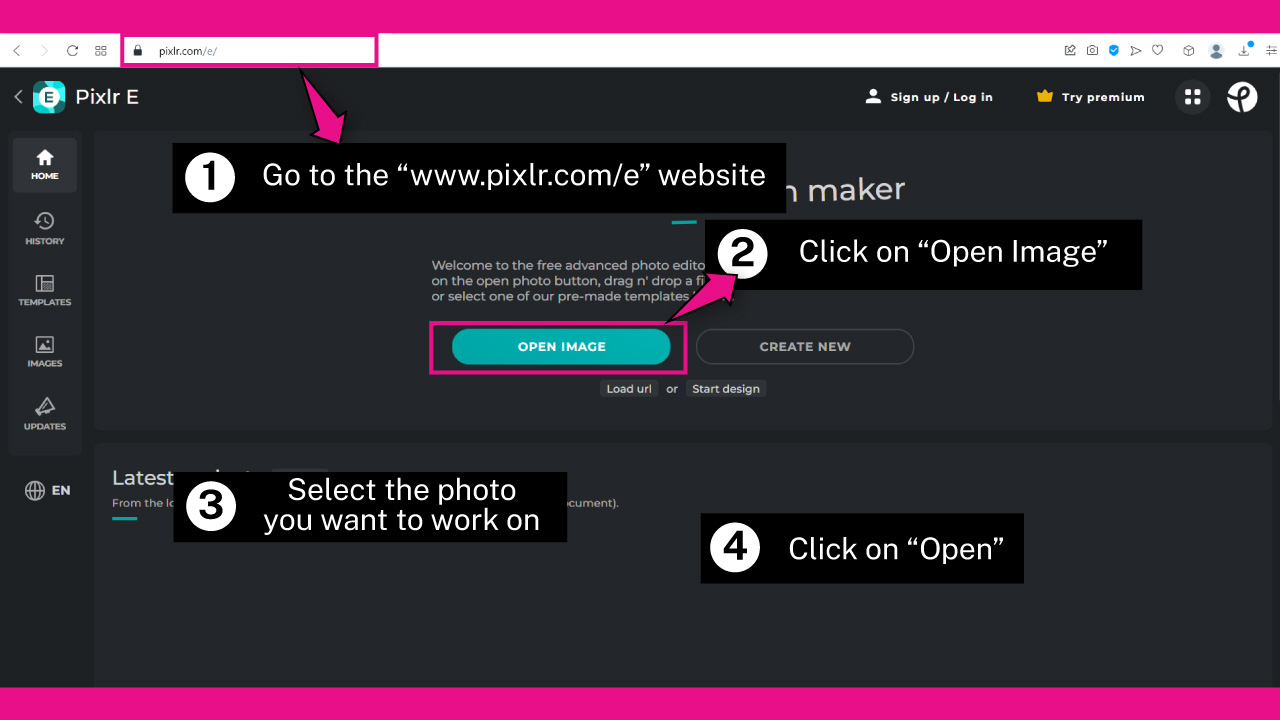
Go to the pixlr.com/e website and click on the “Open Image” button.
On the pop up window, browse in your directory and locate the colorized image you want to fix.
Select the image, and then click on the “Open” button.
Step 2: Add a New Layer

Go to the “Layers” panel located on the right side of the screen, and then click on the “+” button at the bottom of the panel.
On the unfolded menu, select “Empty”.
Then, right-click on the new layer, and select “Color” in the “Blend Mode” field from the unfolded menu.
Step 3: Pick the Skin Color
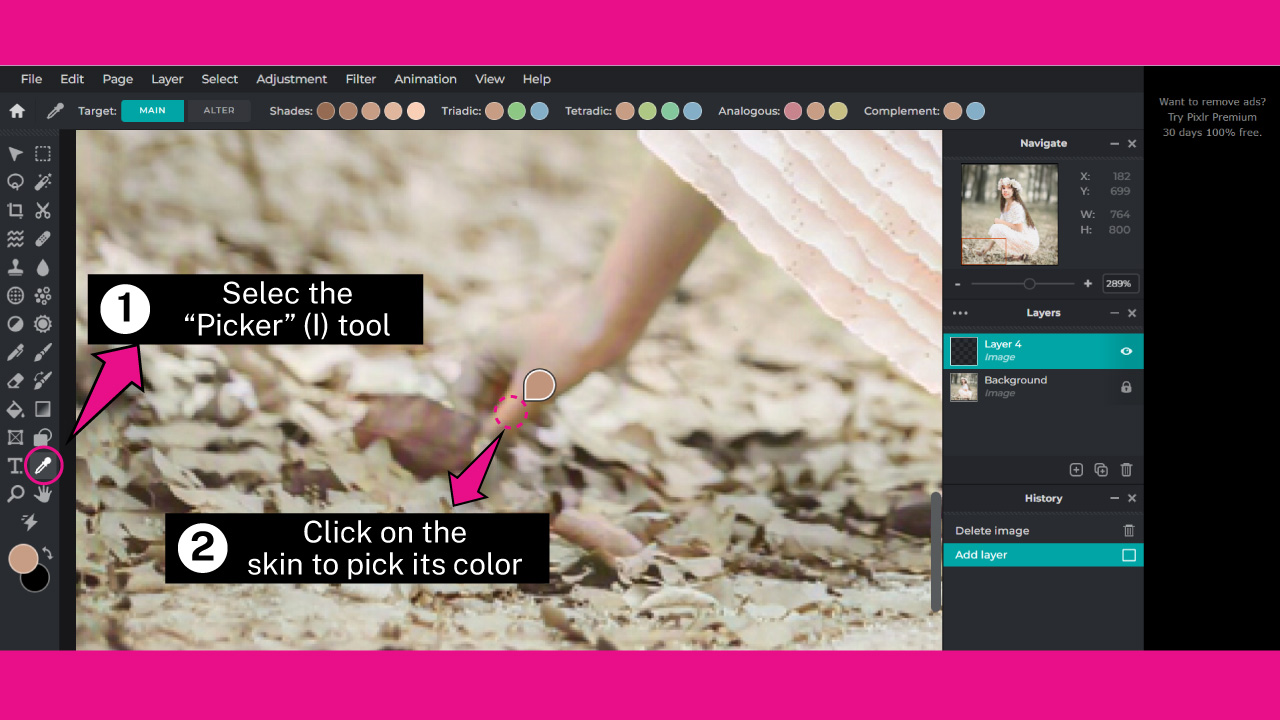
As you can notice, the colorizing of the hand has some flaws. Since we’re using an AI, these kinds of bugs may happen. To fix this, we need to paint over the hand to fill it with the right color.
First select the “Picker” (I) tool located on the left side toolbar.
Then, click over the closest color to the missing colorized area to take a sample of its color. We’ll use this color to fix the rest of the hand.
Step 4: Set the Brush Settings

Click on the “Draw” (B) tool located on the left side toolbar.
Then, click on the “Brush” thumbnail field located on the toolbar at the top of the screen.
On the unfolded menu, set the brush settings.
I’ll go:
“Size” to 40 px or necessary (this value may change through the color fixing process)
“Softness” to 20%
“Step” to 20%
Once your brush is set and ready, and with the right color selected (Step 3), paint over the desaturated area to colorize it.
Step 5: Merge Layers
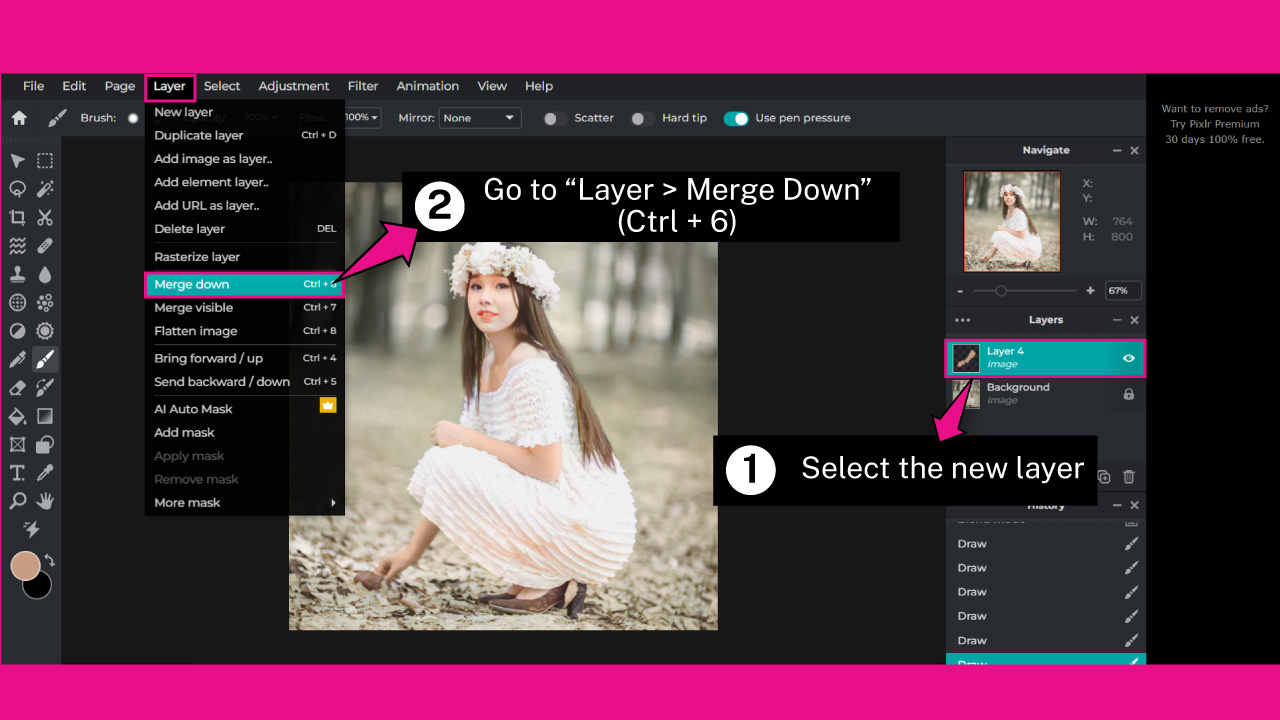
Once you’re done colorizing the desaturated areas, now is time to merge the layers, so we can adjust the color vibrance on the whole image in the next step.
To merge layers, first make sure to have the top layer selected on the “Layers” panel.
Then, go to “Layer > Merge Down” on the menu at the top of the screen.
Or press the “Ctrl + 6” command on Windows, or “ Cmd + 6” on Mac to shortcut it.
Step 6: Add Vibrance
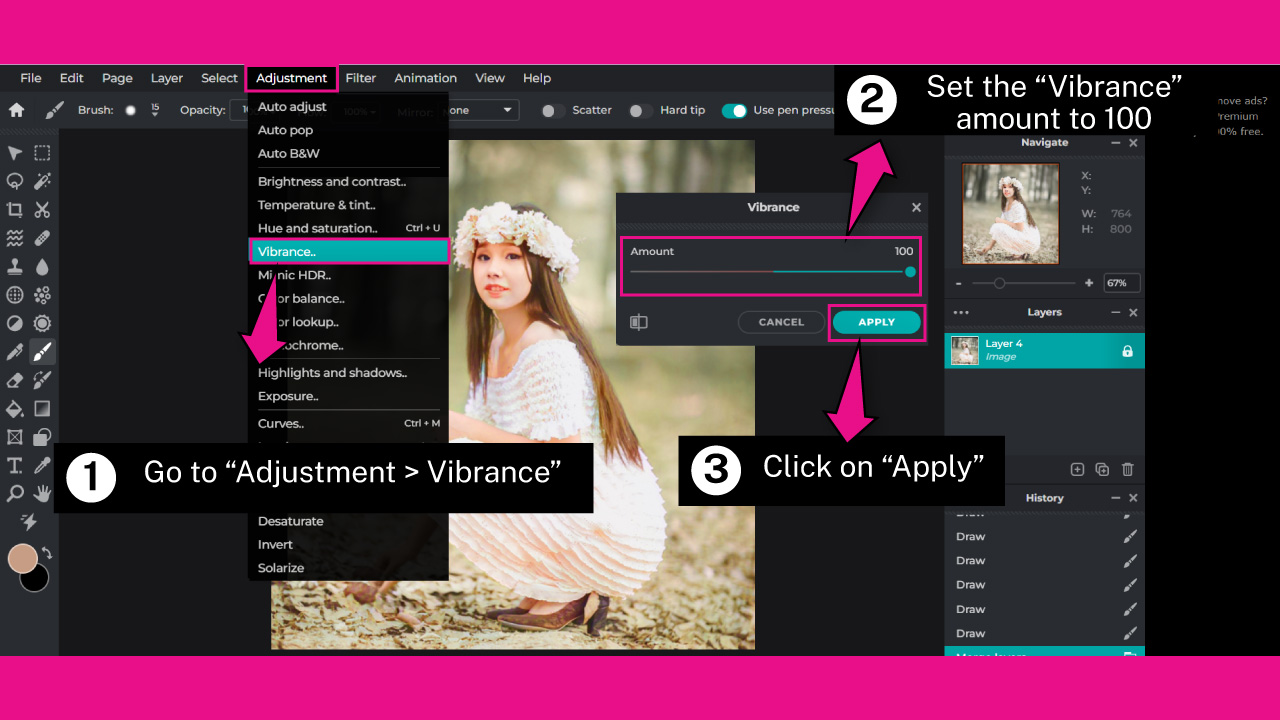
To make the AI colors more vibrant, go to “Adjustment > Vibrance”, also located on the menu at the top of the screen.
On the “Vibrance” pop up window, set the “Amount” slider to max (100), or to your desired spot.
Step 7: Save the Image
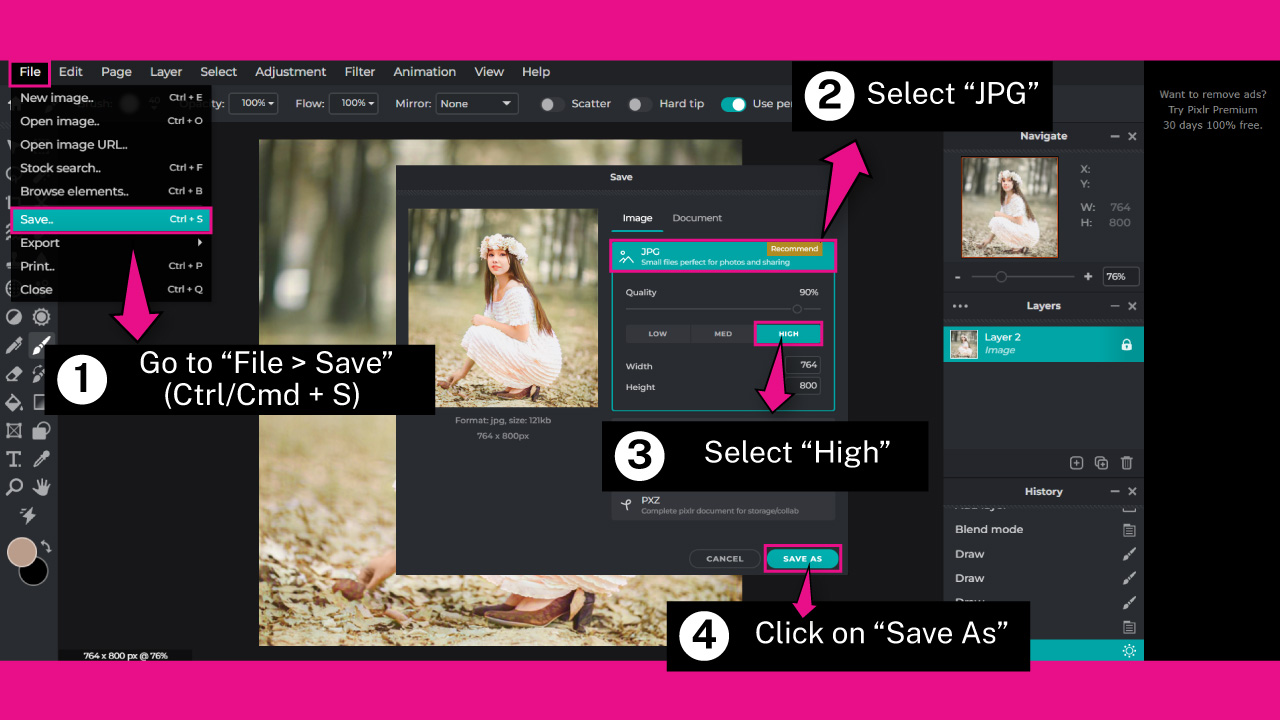
To save your image, go to “File > Save” on the menu at the top of the screen.
Or press the “Ctrl + S” command on Windows, or “Cmd + S” on Mac to shortcut it.
Select the “JPG” option, and then select “High” quality.
On the pop up window, type your desired name, and click on the “Save As” button.
You need to have an account to be able to download your edited image. You can create an account for free. The process is very quick and simple.
“Sing Up” registering an email address, or “Log In” using your “Google”, “Facebook” or “Apple” account.
Once you’re logged in, you will be able to download the image to your computer.
The Result
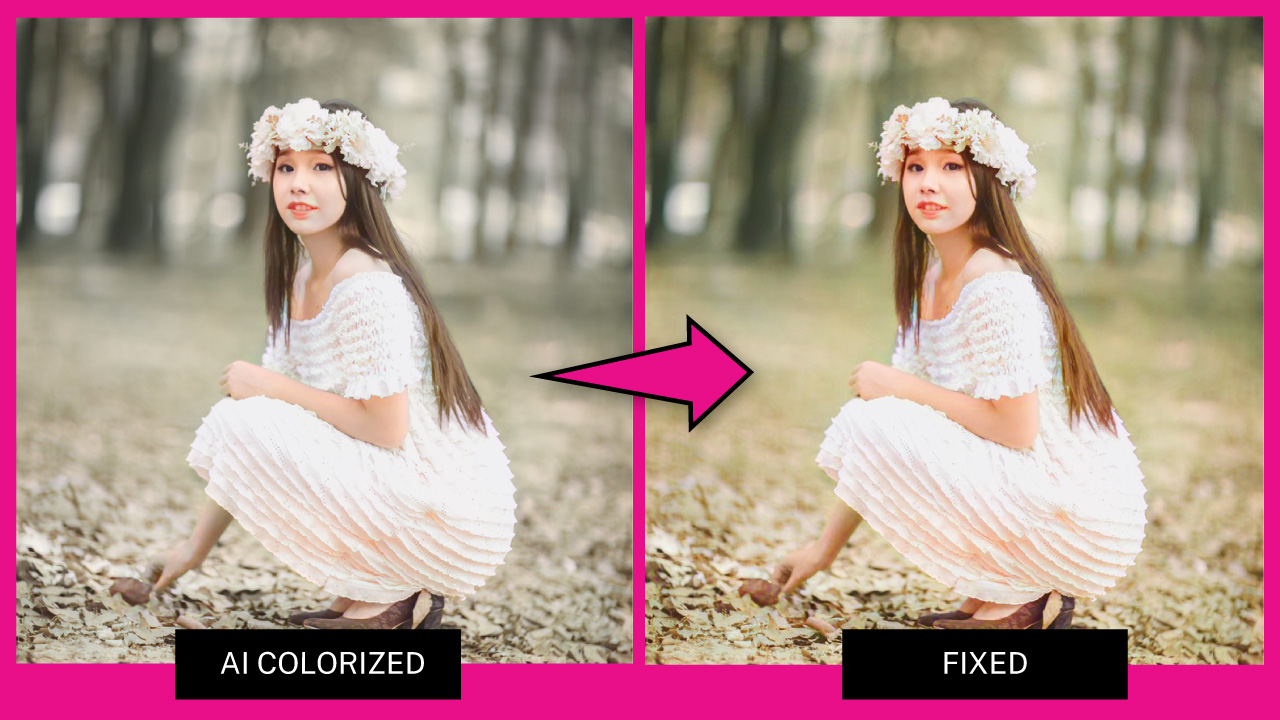
This is the result of how to fix an AI colorized image, painting desaturated areas and adding some vibrance.
Now, before we wrap this up, let’s summarize the findings in this article (see next paragraph).
How to Colorize a Black & White Photo Without Photoshop
Go to the “DeepAI” or the “Img2Go” website. Select the Colorize option. Upload an image and wait a few seconds. Save the processed image. Go to pixlr.com/e and upload the colorized image. Fill the colorized missing areas. Set the Vibrance to a higher value. Save the image.
Frequently Asked Questions on “How to Colorize a Black & White Photo Without Photoshop”
Is the black and white to color image AI colorizing process accurate when using apps like “DeepAI” or “Img2Go”?
Amazingly, they work pretty fine. However, they aren’t perfect. Sometimes the AI presents some flaws in certain areas, and in most cases some colors aren’t that reliable. This means it may fail when picking the right color, like for instance, when it comes to clothes or backgrounds.
Is there any other way to colorize images without AI’s like “DeepAI” or “Img2Go”?
Before AI colorizing was a thing, photo editors used to colorize black and white images manually. This is a more exhaustive work, but you will usually get way better, and more professional results, such as brighter and more vivid colors, and more accurate filling for your images.

I am a professional blogger and entrepreneur with a strong interest and passion in photo editing. On MindRelic, I happily share my expertise in the photo editing niche with all of you guys!