
Sometimes we come across photos in which the face appears too shiny, making it look oily. This phenomenon occurs frequently when using flash or harsh lighting.
There are many ways to get rid of shine on faces, however, the professional methods to fix this are not as easy as they may seem. Nevertheless, they are absolutely doable by following a few steps.
Some apps can remove shine with just a click, but they are usually paid apps.
Another way to get rid of shine on the face is by using “Healing” tools, but these methods are recommended only for small hotspots.
In this article, we will review how to get rid of shine on faces using Photoshop and GIMP so that you can choose whichever suits you better.
Finally, in the FAQ section, we will cover some other available methods to get it done.
Let’s dive into it!
How to Get Rid of Shine on Face in Photos
You can get rid of shine in photos using either Photoshop or GIMP. In Photoshop, patch the hotspots, and then adjust the “Curves,” constraining it to the image highlights. In GIMP, apply the “Frequency Separation” technique, and then select the hotspots and apply “Gaussian Blur”.
How to Get Rid of Shine on Face Using Photoshop
To get rid of shine on a face in Photoshop, we’ll patch the hotspots and then adjust the effect intensity by blending it. This way, we can matte the shine spots on the skin.
To get rid of shine in large areas on a face, we’ll reduce the highlights and whites. Then we’ll constrain the effect only to the brightest areas of the face, so it won’t affect the rest of the image
Step 1: Duplicate the Background
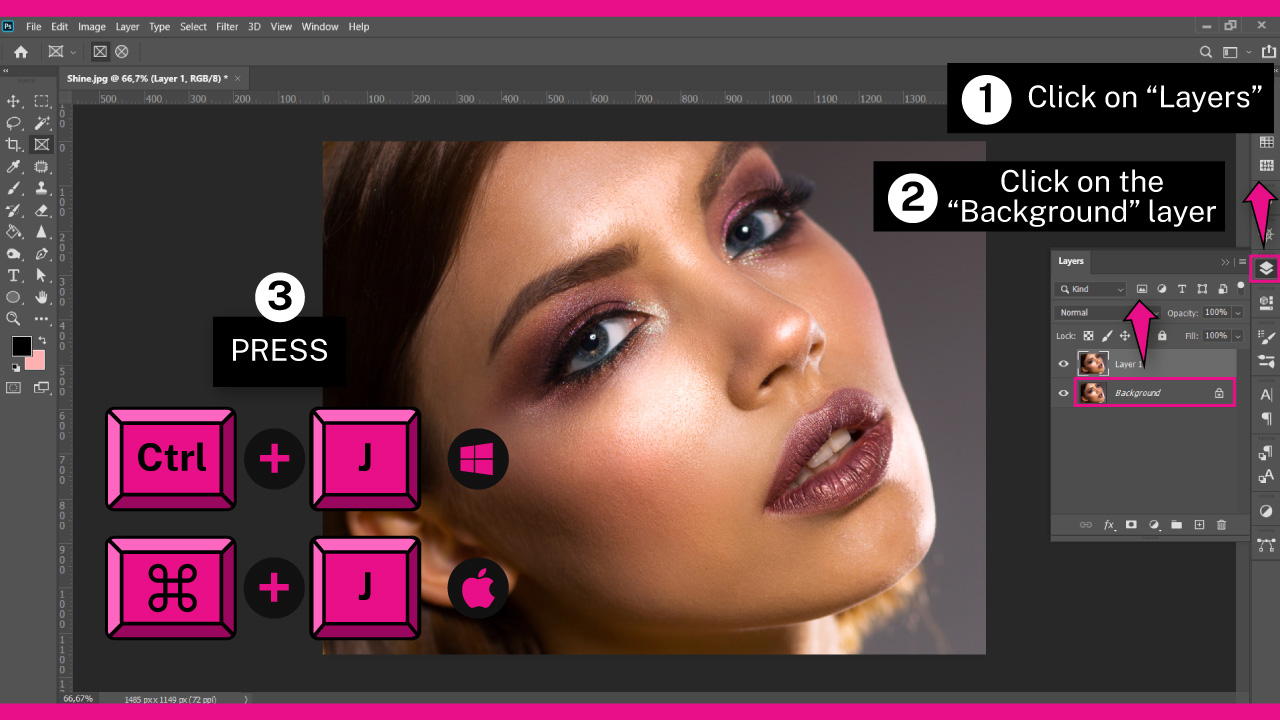
Since the edits we’ll make are destructive, we need to duplicate the background layer to keep the original layer as a backup.
First, go to the “Layers” (F7) panel located on the right-side toolbar. If you can’t find it, you may have to enable it first by going to “Window > Layers” on the menu at the top of the screen.
Alternatively, you can hit the “F7” key on your keyboard to shortcut it.
On the “Layers” (F7) panel, click on the “Background” layer and then press the “Ctrl + J” or “Cmd + J” command.
You can also do this by right-clicking on the “Background” layer and selecting “Duplicate Layer” from the options menu.
Step 2: Patch Hotpots
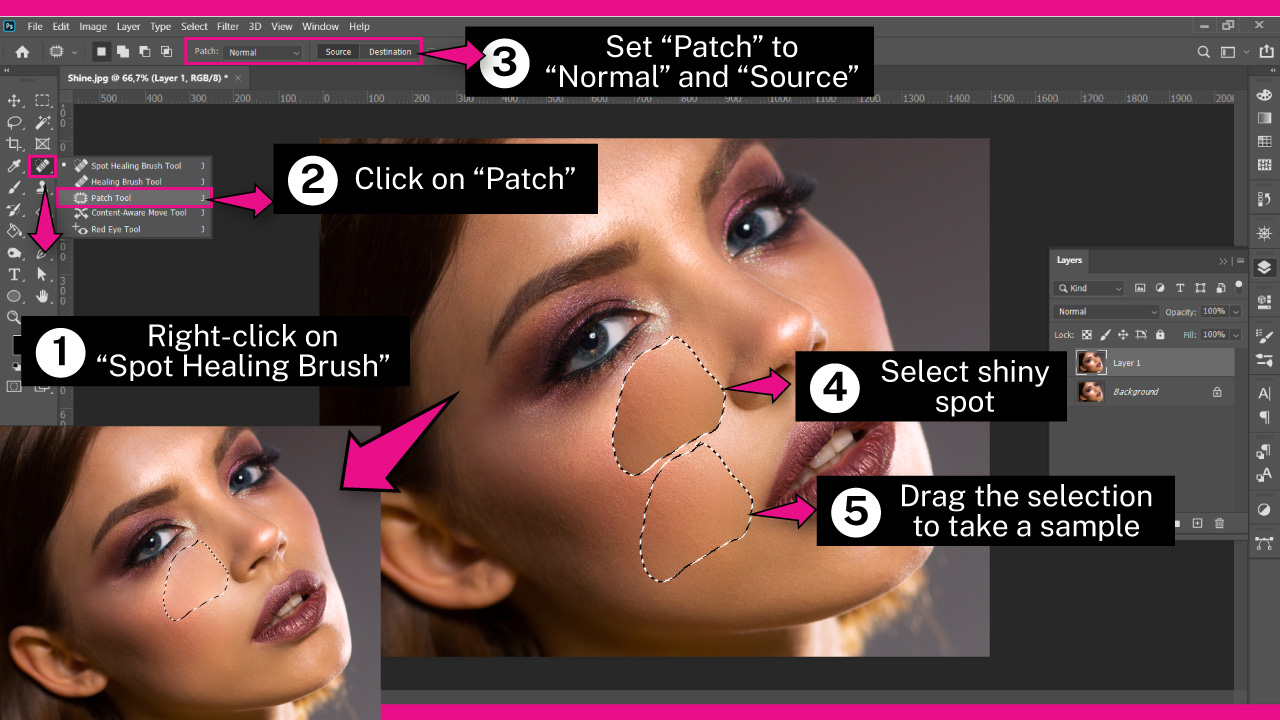
Next, we’ll use the “Patch” tool to get rid of the shine on the face.
To do so, right-click on the “Spot Healing Brush” (J) tool located on the left-side toolbar.
Once the hidden tool menu unfolds, click on the “Patch” tool.
On the toolbar at the top of the screen, make sure that the drop-down menu is set to “Normal” and the toggle is set to “Source”.
Now, use the “Patch” tool to select a hotspot. To select, click, hold, and drag the mouse to enclose a hotspot.
Once that area is selected, drag the selection to take a skin sample. This sample will patch the selected area.
The skin sample should have a texture similar to the area you want to patch, while the skin tone should be non-shiny, preferably a mid-tone.
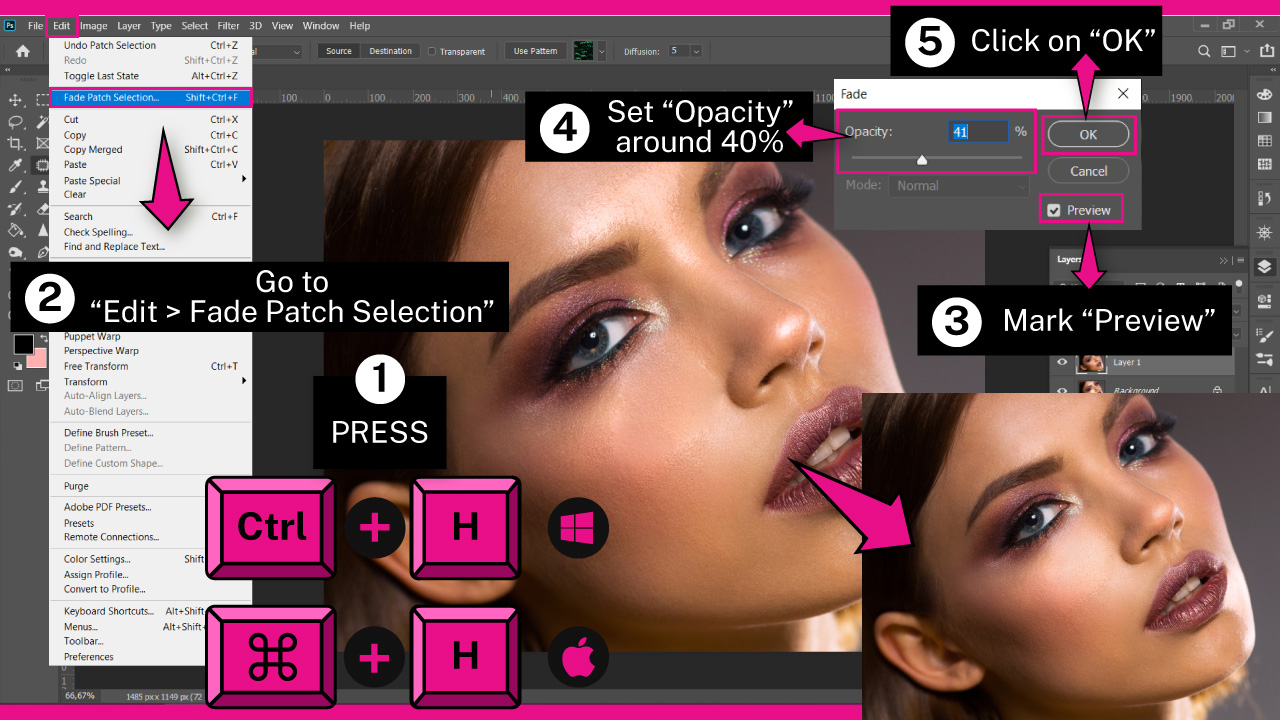
Step 3: Fade the Patch Selection
To see the result of patching without the distracting selection lines, press the “Ctrl + H” or “Cmd + H” command on your keyboard.
This command will keep the area selected but hide the selection lines. To turn on the selection lines again, simply press the “Ctrl + H” or “Cmd + H” command again.
As you can see, the patch has effectively hidden the shiny spot but it looks too harsh. To fix this, we need to fade the patch.
To fade the patch, go to “Edit > Fade Patch Selection” on the menu at the top of the screen, or use the shortcut: “Shift + Ctrl + F” or “Shift + Cmd + F”.
In the “Fade” pop-up window, make sure the “Preview” checkbox is checked.
Then, drag the “Opacity” slider to a point where the patch blends with the skin. I’ll set it to 41%, but the value will depend on your image.
Once you are satisfied with the result, click “OK”.
Step 4: Adjust Curves

Once you have finished patching and fading all the hotspots, the only thing left is to take care of the big shiny areas that cannot be fixed by the “Patch” tool.
In my example photo, that area would be between the cheeks and chin.
To fix this, go to the “Layers” (F7) panel and make sure that the duplicated layer is still selected.
Next, click on the “Create New Fill or Adjustment Layer” button at the bottom of the panel and select the “Curves” option from the unfolded menu.
On the “Curves” window, you will find a straight line graph.
Click, hold, and drag the middle of the line down to get an upward curve to darken the image.
Next, click, hold, and drag the top-right of the curve a little bit down to decrease the white areas.
Step 5: Adjust Blend Options
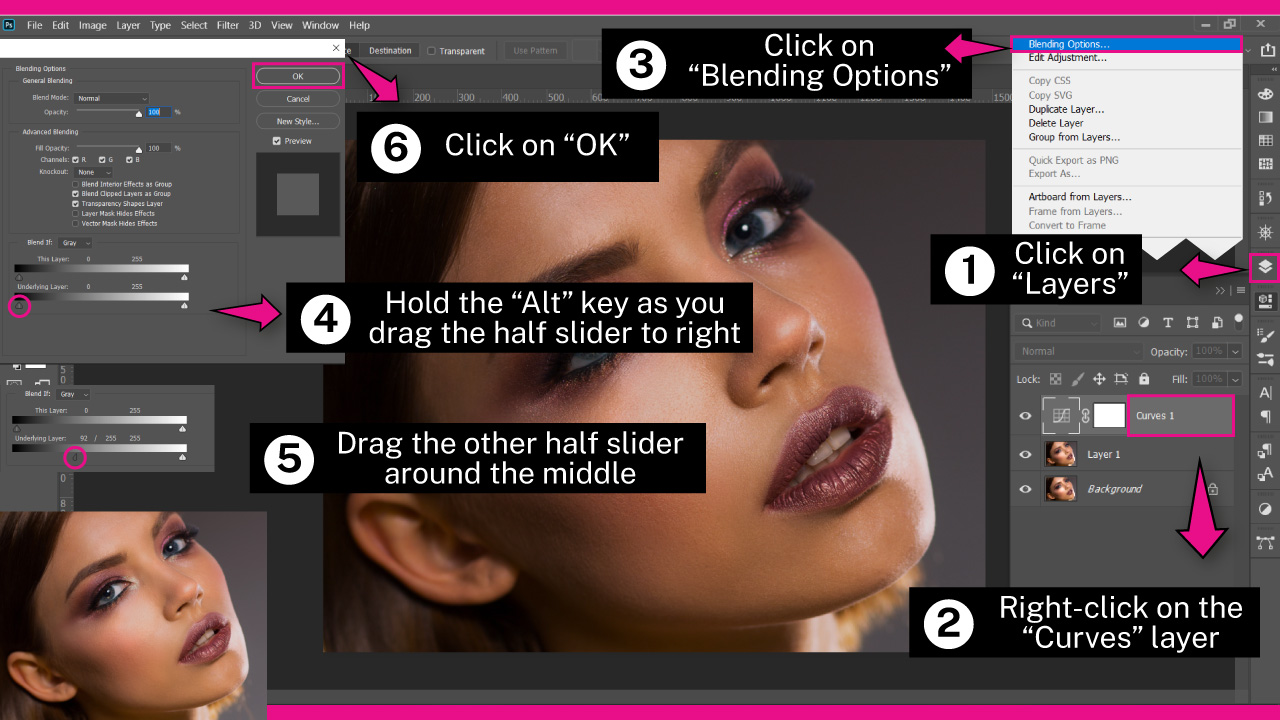
We have already adjusted the “Curves” panel, but now we need to restrict the darkened area just to the shiny spots.
To do so, go to the “Layers” (F7) panel and right-click on the right side of the “Curves” layer.
On the unfolded menu, click on “Blending Options”.
On the “Layer Style” pop-up window, go to the “Underlying Layer” slider.
While holding down the “Alt” or “Option” key on your keyboard, drag the left slider all the way to the right.
Holding the “Alt” key allows us to split the slider and get smoother results.
After dragging half of the slider to the right, drag the other half slider to a point where the dark filter only applies to the bright areas.
In my example, I’ll set the second half slider around the middle, but this will vary depending on your image. So, feel free to try several tests until you get your desired result.
Once you have finished, click on “OK” to save changes.
The Result
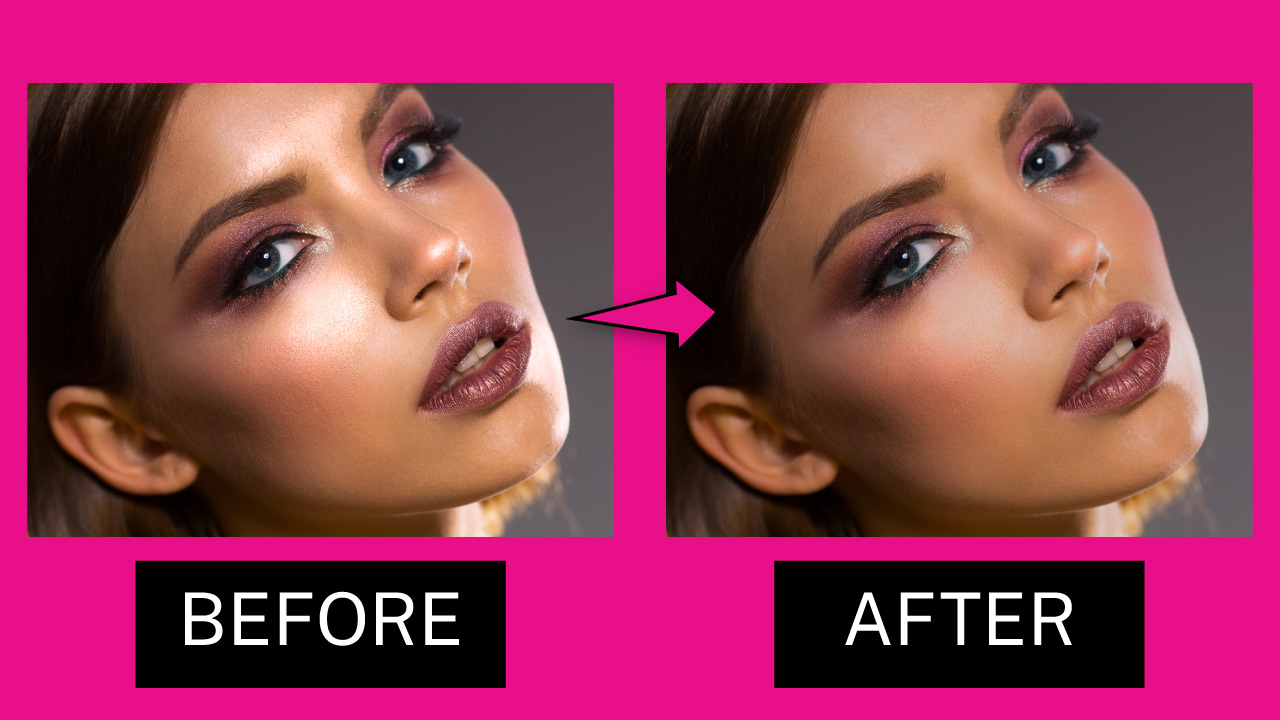
This is the before and after of getting rid of shine on faces using Photoshop.
If the photo has harsh shadows, keep in mind that you can also get rid of shadows in photos.
How to Get Rid of Shine on Face Using GIMP
In Gimp, to get rid of shine on a face, we will use the “Frequency Separation” method. This technique is commonly used by professional photo editors to smooth out blemishes on the skin.
To get rid of shine on a face, we’ll separate the skin color from its texture, allowing us to adjust the color while preserving the skin’s details.
Step 1: Duplicate the Background
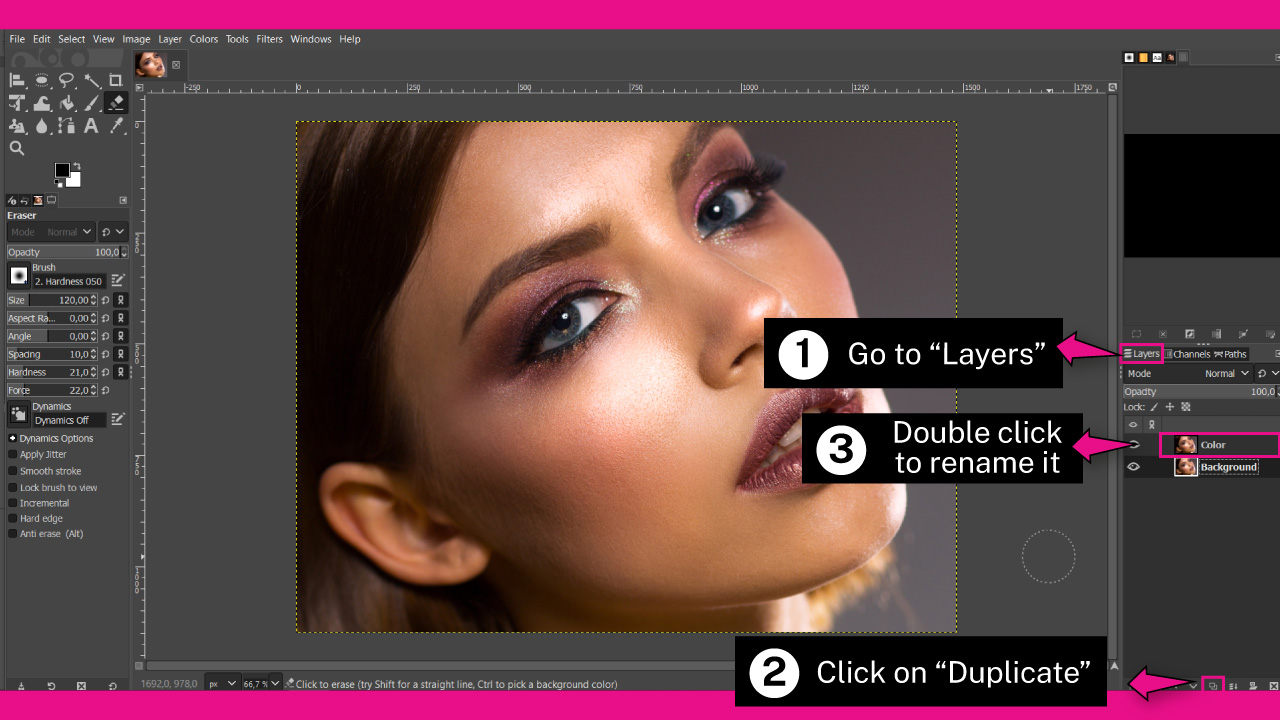
To begin, we need to duplicate the “Background” layer.
To do this, go to the “Layers” dock, which is typically located in the right-side toolbar.
If you can’t find it, you may need to enable it first by going to “Windows > Dockable Dialogs > Layers” in the top menu.
Alternatively, you can use the “Ctrl + L” or “Cmd + L” command on your keyboard.
Once in the “Layers” dock, click on the “Duplicate” button at the bottom of the dock.
Next, double-click on the duplicated layer and rename it as “Color” or whatever name you prefer.
Step 2: Apply Gaussian Blur to the Layer
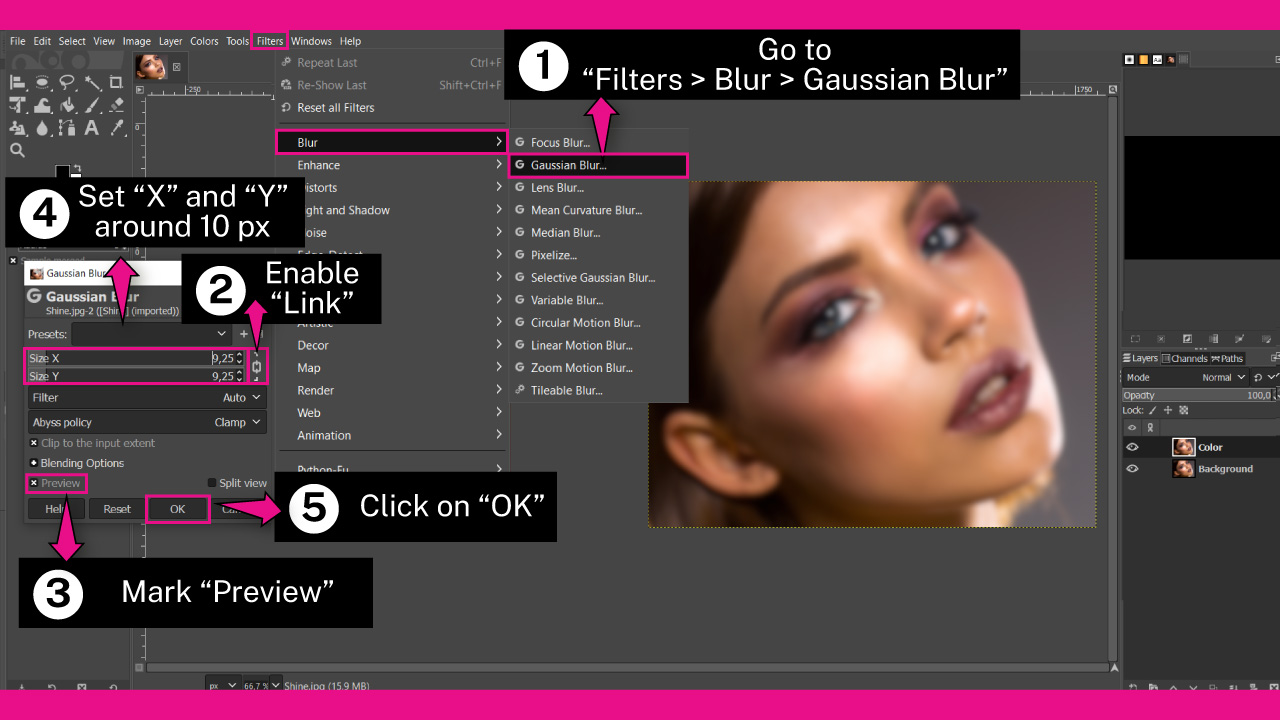
In the “Layers” dock, make sure you have selected the “Color” layer. Then, go to “Filters > Blur > Gaussian Blur” on the menu at the top of the screen.
In the “Gaussian Blur” pop-up window, ensure that the “Link” button is enabled to adjust the “X Size” and “Y Size” values simultaneously.
Also, make sure that the “Preview” checkbox is checked so that you can preview the applied amount of blur.
Next, drag the “X Size” or “Y Size” slider to the right to make the image slightly blurry while still maintaining recognizability of the face. I’ll set the value around 10 pixels, but keep in mind that this value may vary depending on your image.
Once you have finished, click on “OK” to save.
Step 3: Set the Blend Mode to Grain Extract

Go to the “Layers” dock once again, and set the “Blend Mode” to “Grain Extract” at the top of the dock.
Step 4: Add a New Layer From Visible

On the “Layer” dock, right-click on the “Color” layer and select the “New From Visible” option from the expanded menu.
This action will create a new layer that reflects all visible effects currently applied to the photo.
Select the new layer, which is named “Visible” by default, and set its “Blend Mode” to “Grain Merge”
Step 5: Set the Blend Mode Back to Normal
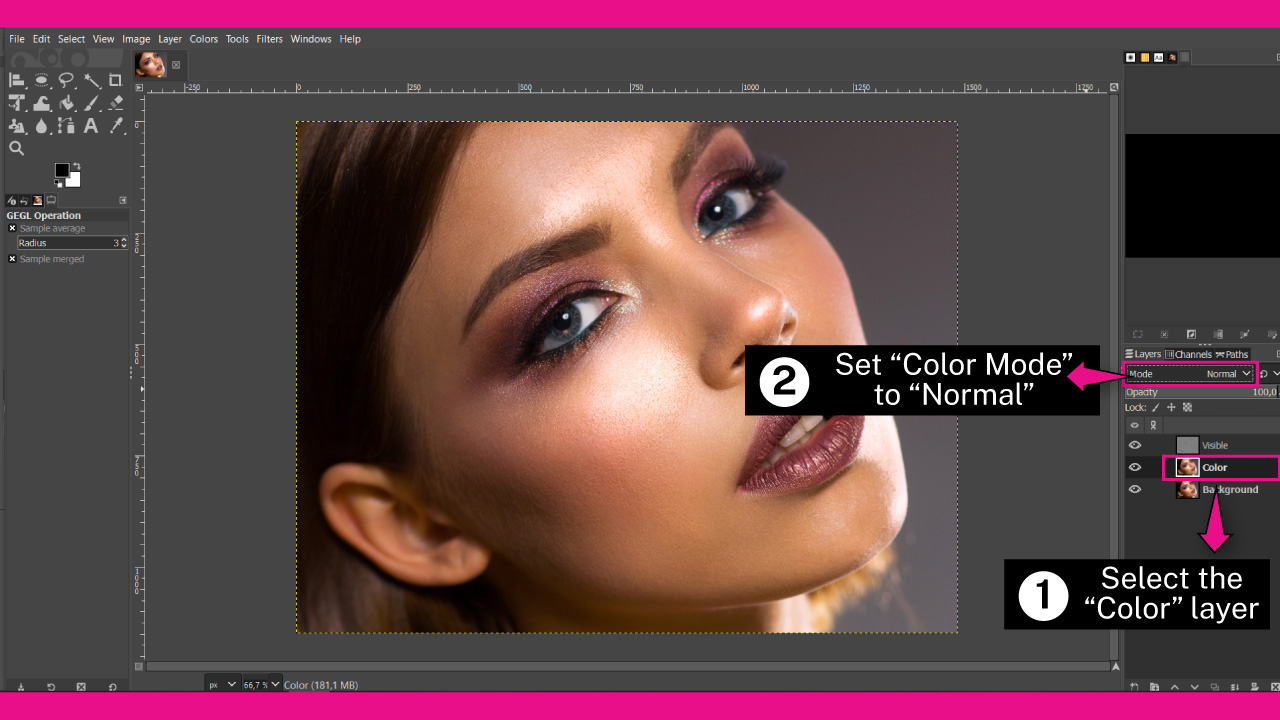
On the “Layer” dock, select the “Color” layer and then set the “Blend Mode” back to “Normal”.
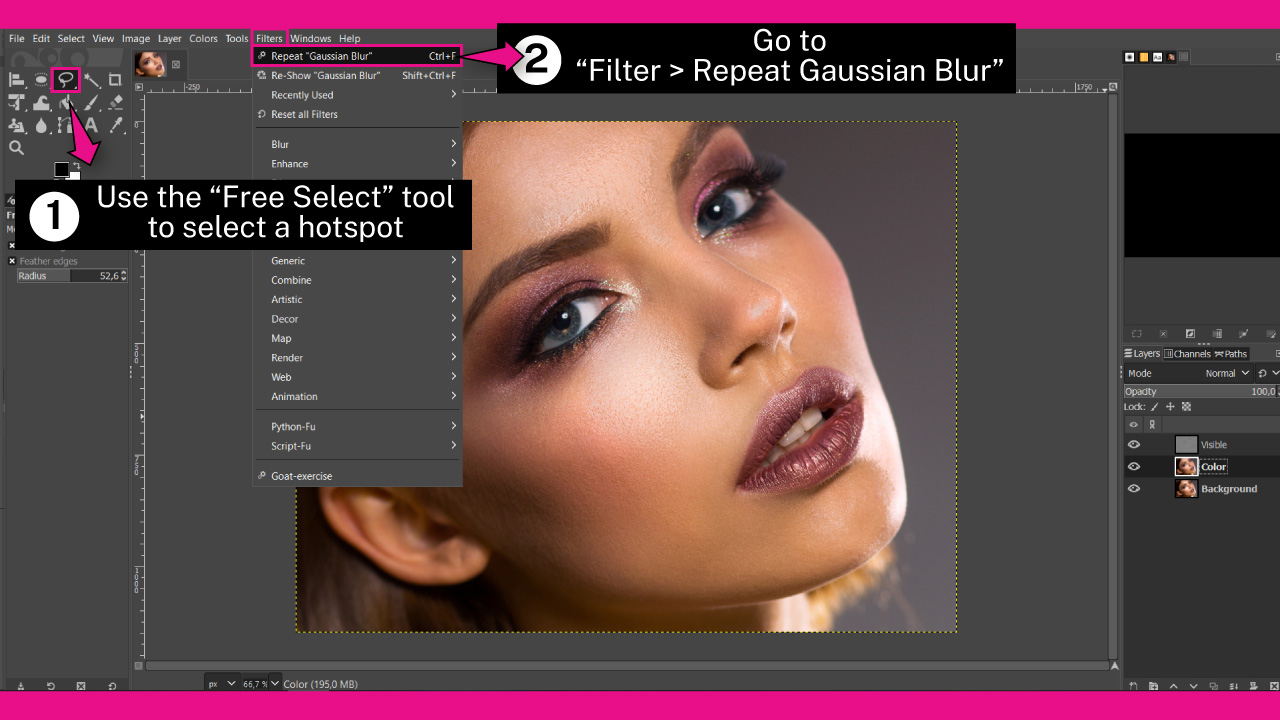
Step 6: Select Hotspots
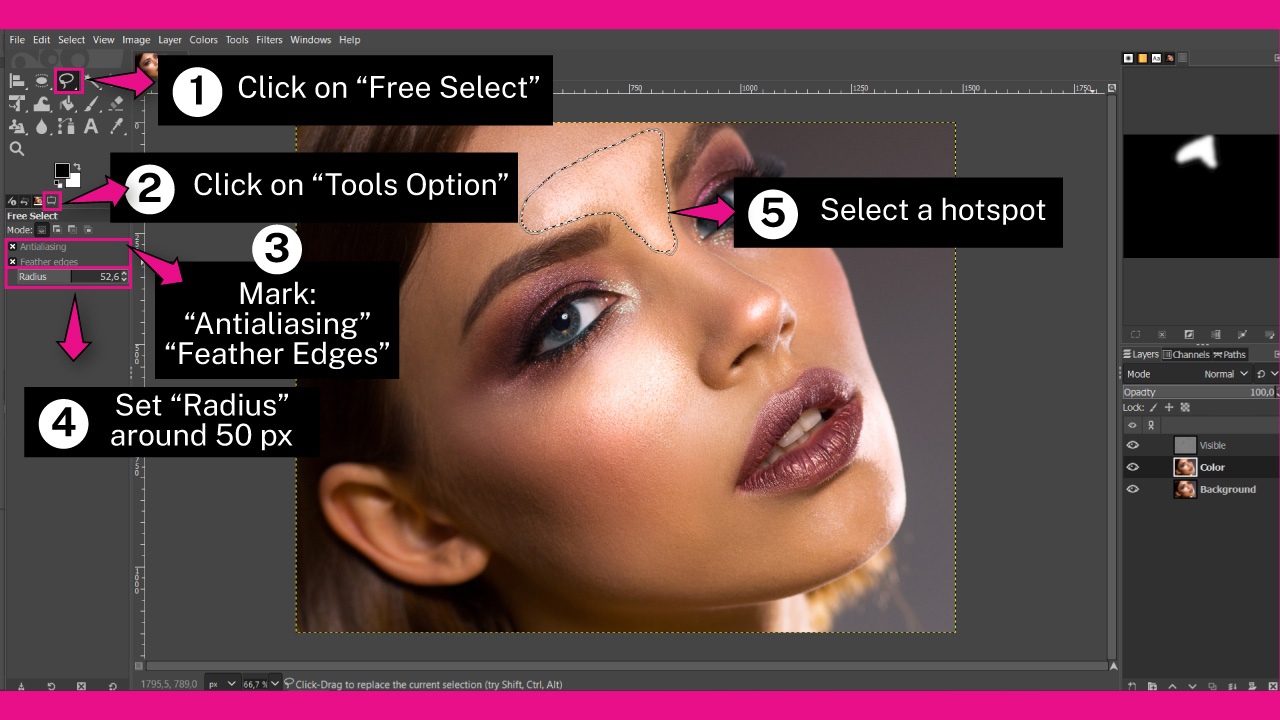
Now it’s time to select a shiny spot. To do so, first ensure that you are working on the “Color” layer by checking it on the “Layers” dock.
Next, click on the “Free Select” (F) tool located on the left-side toolbar or press the “F” key on your keyboard as a shortcut.
Under the left-side toolbar, you will find tabs. Click on “Tool Options”. If you cannot locate it, you can enable it by going to “Windows > Dockable Dialogs > Tool Options” on the menu at the top of the screen.
On the “Tool Options” dock, mark the “Antialiasing” and “Feather Edges” checkboxes.
Then, set the “Feather Edges” value to around 50 px to create a smooth selection.
Finally, select a hotspot that you want to get rid of the shine from on the face.
Step 7: Feather the Selection
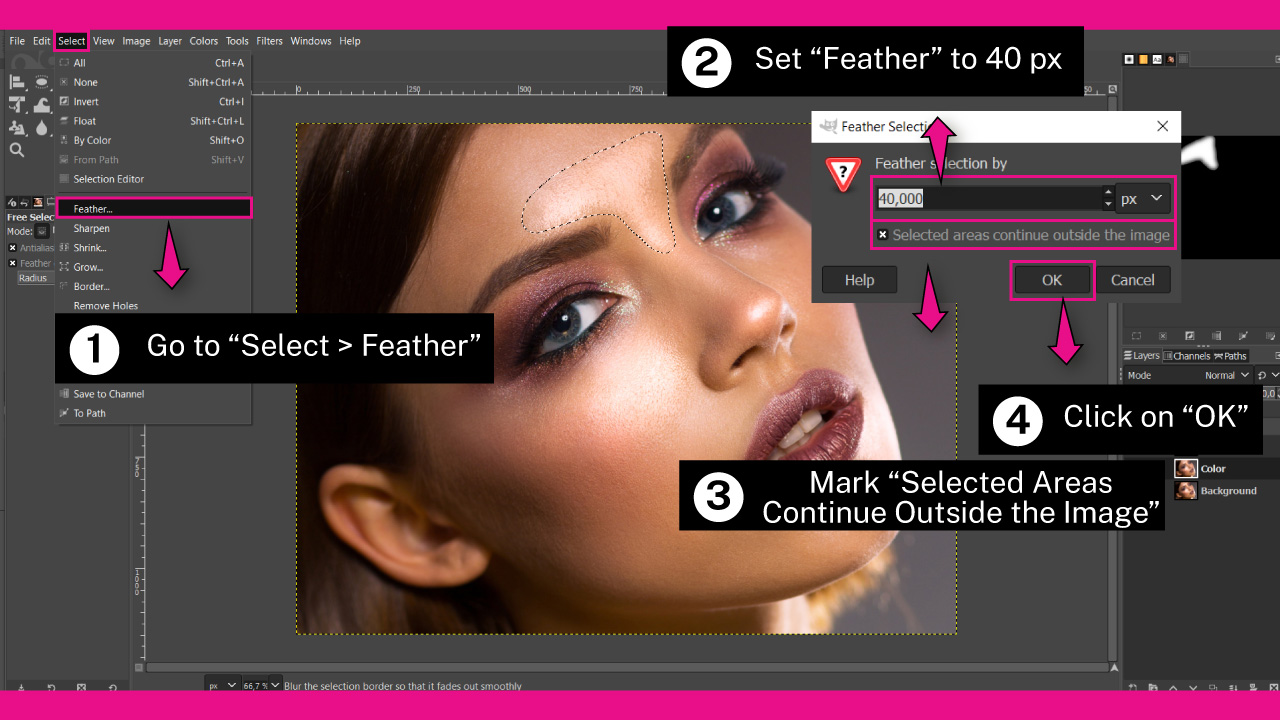
Since we need the selection to be really smooth, we also need the applied effect to blend into the photo to look realistic.
To get done, we’ll apply extra feathering to the selection.
So, go to “Select > Feather” on the menu at the top of the screen.
In the “Feather Selection” pop-up window, set the “Feather” value to around 40 px.
Mark the “Selected Areas Continue Outside the Image” checkbox.
Then click “OK” to save.
Step 8: Adjust the Mask
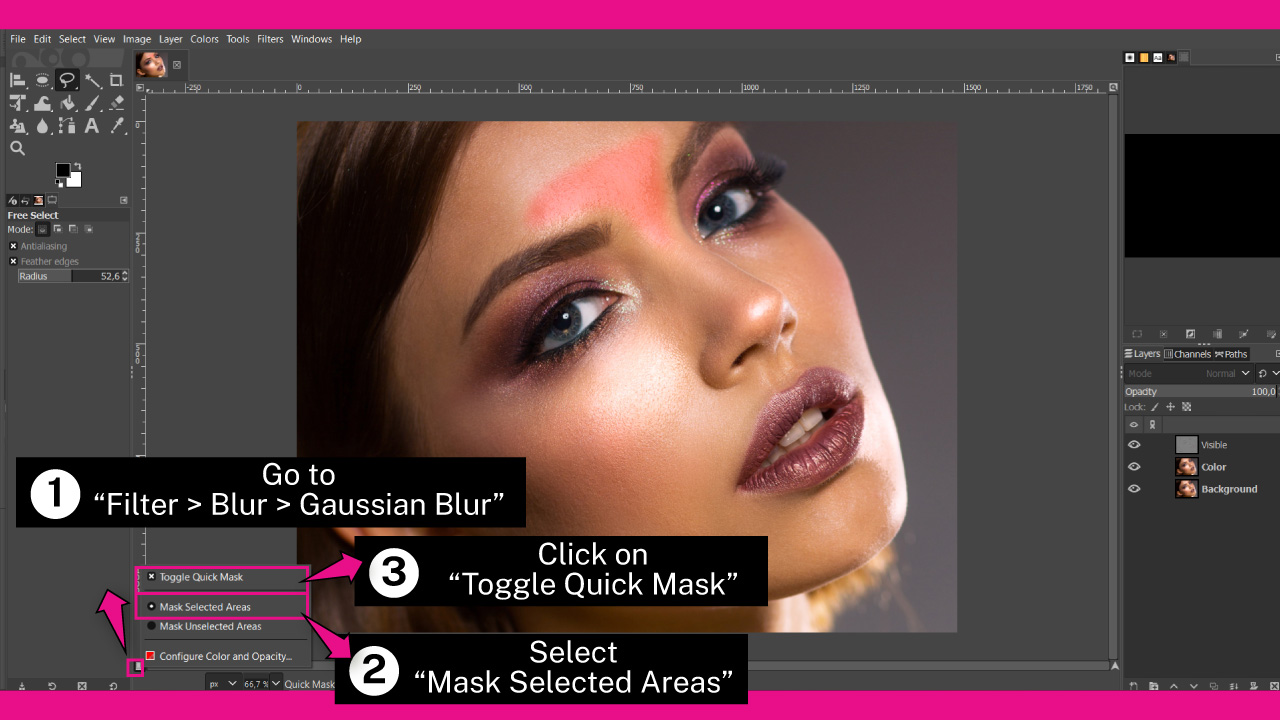
Right-click on the “Mask” button located on the bottom-left side of the screen.
From the unfolded menu, select the “Mask Selected Areas” option.
The selected area will be painted in red, allowing you to check the smoothness.
Finally, click on the “Toggle Quick Mask” option or hit the “Shift + Q” command to switch to mask mode.
Step 9: Apply Gaussian Blur to the Selected Spot
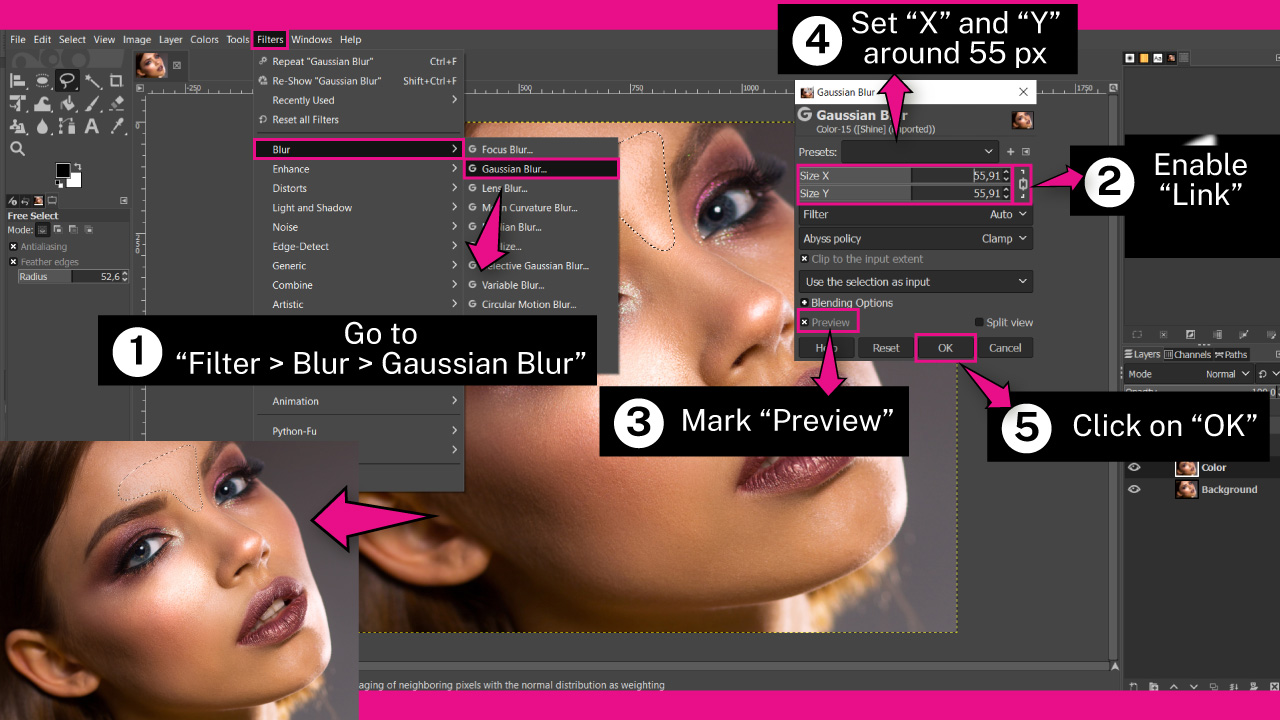
Now it’s time to get rid of the selected shine spot.
To do this, we’ll apply the “Gaussian Blur” filter again.
Go to “Filter > Blur > Gaussian Blur” in the menu at the top of the screen.
In the “Gaussian Blur” pop-up window, make sure that the “Link” button and the “Preview” checkbox are enabled. Then you can set the “Blur” amount.
To set “Blur”, drag the “X Size” or “Y Size” slider to the right until you find the exact point where the shine is hidden.
I’ll set it to around 55 px, but of course, the value will depend on the photo you are working on.
Once you are satisfied with the result, click on “OK” to save.
Step 10: Repeat Selecting and Adding Gaussian Blur
We have already fixed one hotspot, but now we need to replicate the process to the other shiny areas on the face.
So, continue using the “Free Select” (F) tool to select the shiny spots to remove and apply the “Gaussian Blur” filter.
If the last filter you applied was “Gaussian Blur”, you can repeat it by hitting the “Ctrl + F” or “Cmd + F” command on your keyboard.
Alternatively, you can do so by going to “Filters > Repeat Gaussian Blur” in the menu at the top of the screen.
Step 11: Adjust the Amount of Applied Effect
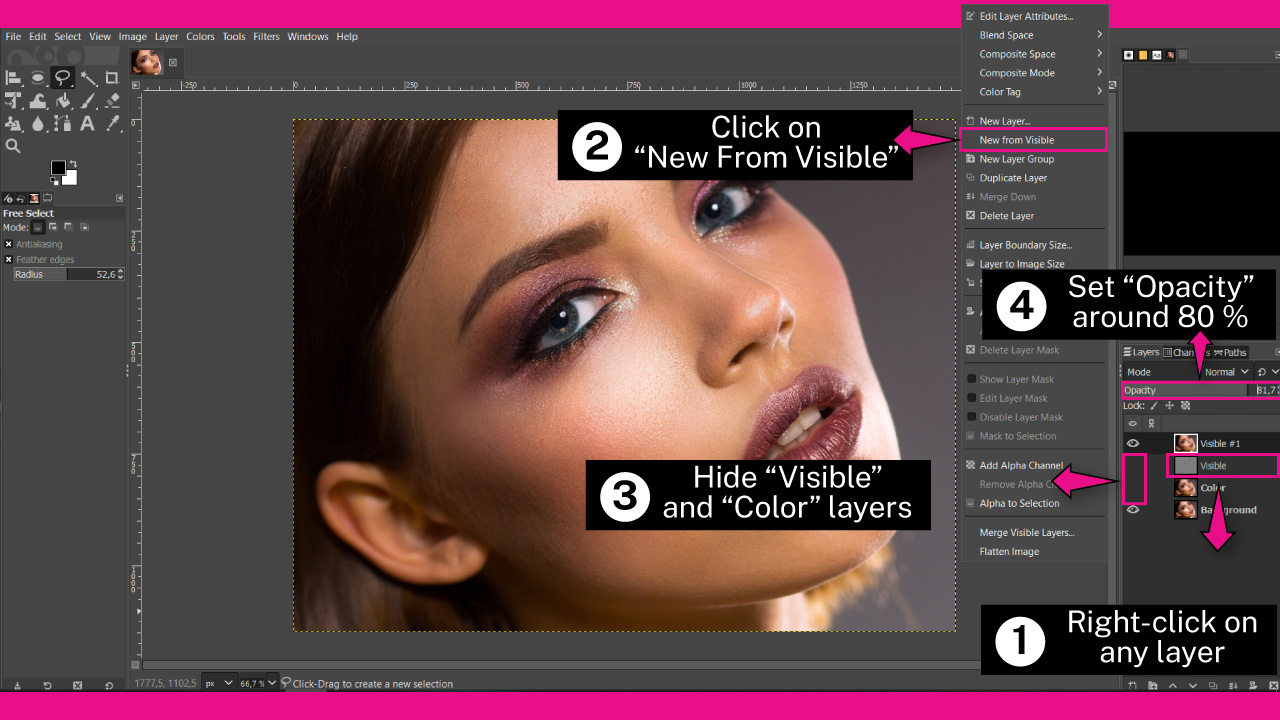
If you find that the filter is too harsh, you can follow these steps to fix it:
Go to the “Layers” dock and right-click on any layer to unfold the options menu.
Once the menu unfolds, click on the “New From Visible” option to create a new layer of the current visible effects as we did in “Step 4”.
Then, hide the “Visible” and “Color” layers by clicking on their “Eye” icons.
Next, click on the “Visible #1” layer (the brand new layer) and adjust its “Opacity” to some point where the effect blends with the original background photo.
I’ll set it, for example, to around 80%.
The Result
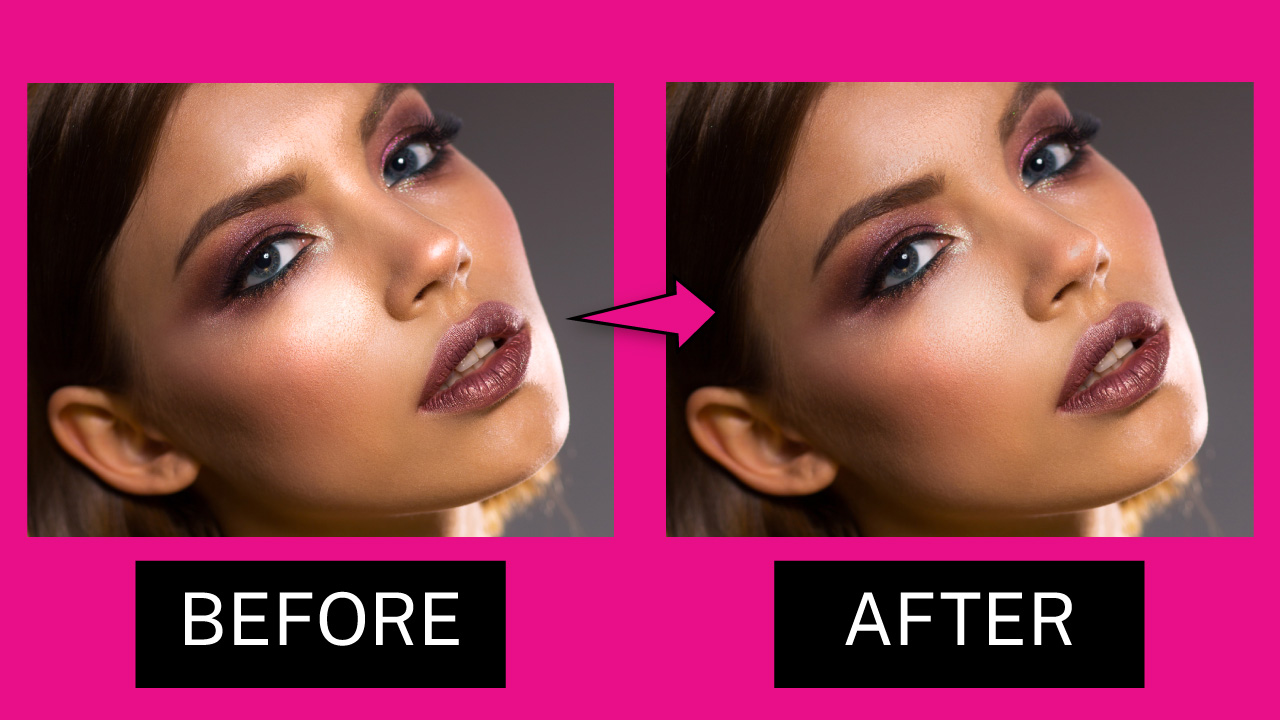
This is the before-and-after of getting rid of shine on faces using GIMP.
If the subject appears chubby, you may also want to get rid of a double chin in a photo.
If you have edited the photo as a commission for a customer and want to send him a client proof, keep in mind that you can also put a watermark on a photo without using Photoshop.
Frequently Asked Questions on “How to Get Rid of Shine on Face in Photos”
How to get rid of the shine on the face in photos using iPhone and Android?
You can remove specific shine hotspots on a face using the “Snapseed” app. To do so, open the photo on the app and tap on “Tools”, followed by “Healing”. Zoom in to the hotspot and cover it with small brushes.
How to get rid of the shine on a face in photos online?
Enter to fotor.com website and click on “Edit a Photo”. Upload the image you want to edit. Click on “Beauty” followed by “Blush” on the left side toolbar. Select the closest skin tone color and brush over the hotspots. Finally adjust the “Intensity” to blend.
How to get rid of the shine on a face in photos using Canva?
If you have a premium account, you can remove shine in Canva by entering the “Edit Photo” mode. Then, click on the “Magic Eraser” tool on the left-side toolbar. Next, adjust the “Brush” size and brush over the hotspots.

I am a professional blogger and entrepreneur with a strong interest and passion in photo editing. On MindRelic, I happily share my expertise in the photo editing niche with all of you guys!
elavil 10 mg weight gain
elavil 10 mg weight gain
cialis price south africa
cialis price south africa