
A blurry background is very popular in certain types of photography such as portrait or macro photography.
There are many benefits to having a blurry background.
For example, it can help hide distracting backgrounds as well as keep the viewer’s attention on the subject.
The best way to achieve a blurry background is in camera by adjusting specific settings.
However, if you haven’t managed to achieve a blurry background when taking the picture, don’t panic, there are also ways to achieve a realistic blurred background during post-production in Lightroom.
Follow this tutorial to become a pro at blurring any background in Lightroom.
How to blur the background of an image in Lightroom
To blur the background in Lightroom utilize the “Linear Gradient” (L) tool. Decrease the “Clarity”,“Texture”, “Dehaze” and “Sharpness” sliders. Next, click on the “Brush” (B) tool and then click erase. Brush over the areas you do not want blurry. Duplicate the Mask and reduce the amount to 40%.
As previously mentioned, the best way to achieve a smooth blurry background is to utilize a camera with a fast lens and the correct settings.
To Achieve a buttery blurry background you would need a camera with a maximum aperture of 1.4 or 1.8.
You can learn more about aperture settings if you are interested.
However this tutorial will teach you how to blur the background directly in Lightroom after you have taken the photo.
Step 1: Import an image
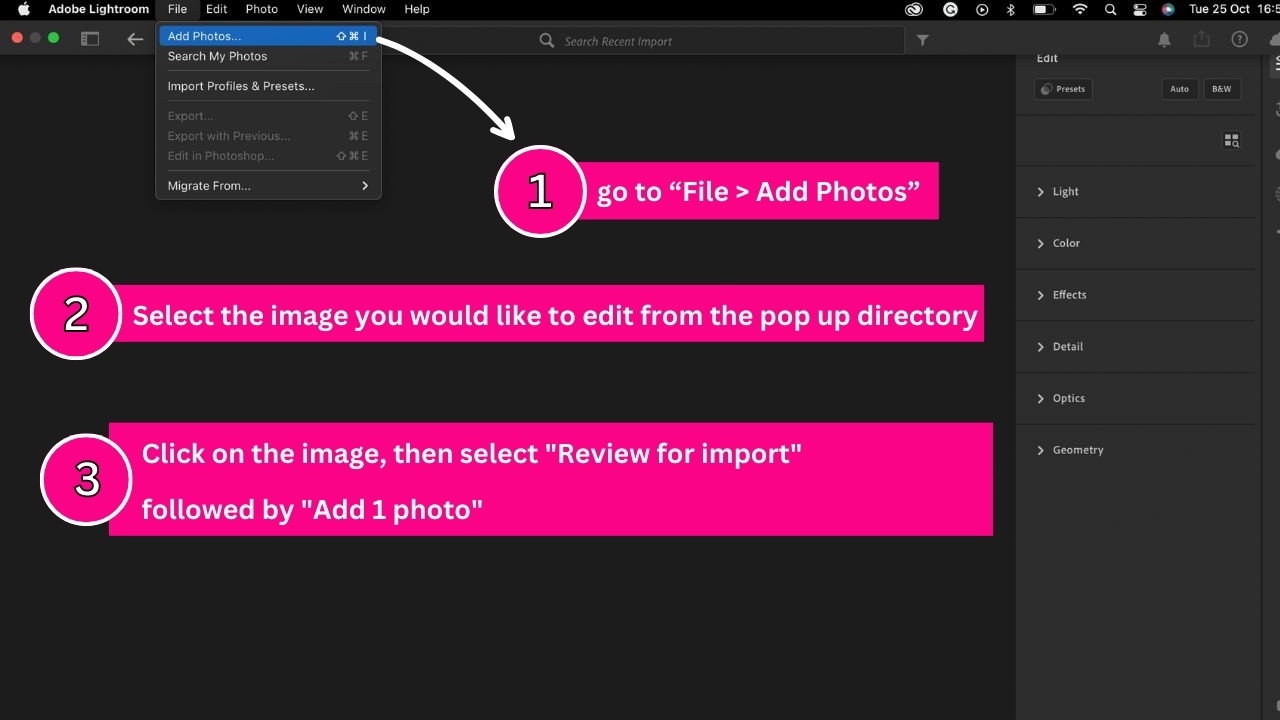
To begin the editing process, we need to import the image we would like to edit onto Lightroom.
Start by clicking on “File > Add Photos” on the menu at the top of the screen.
Alternatively, you can shortcut it by pressing “Ctrl + Shift + I”.
Next, select the image you would like to edit from the pop-up directory.
Click on the image and select “Review for import” followed by “Add 1 photo.”
You can now begin to blur the background of your image.
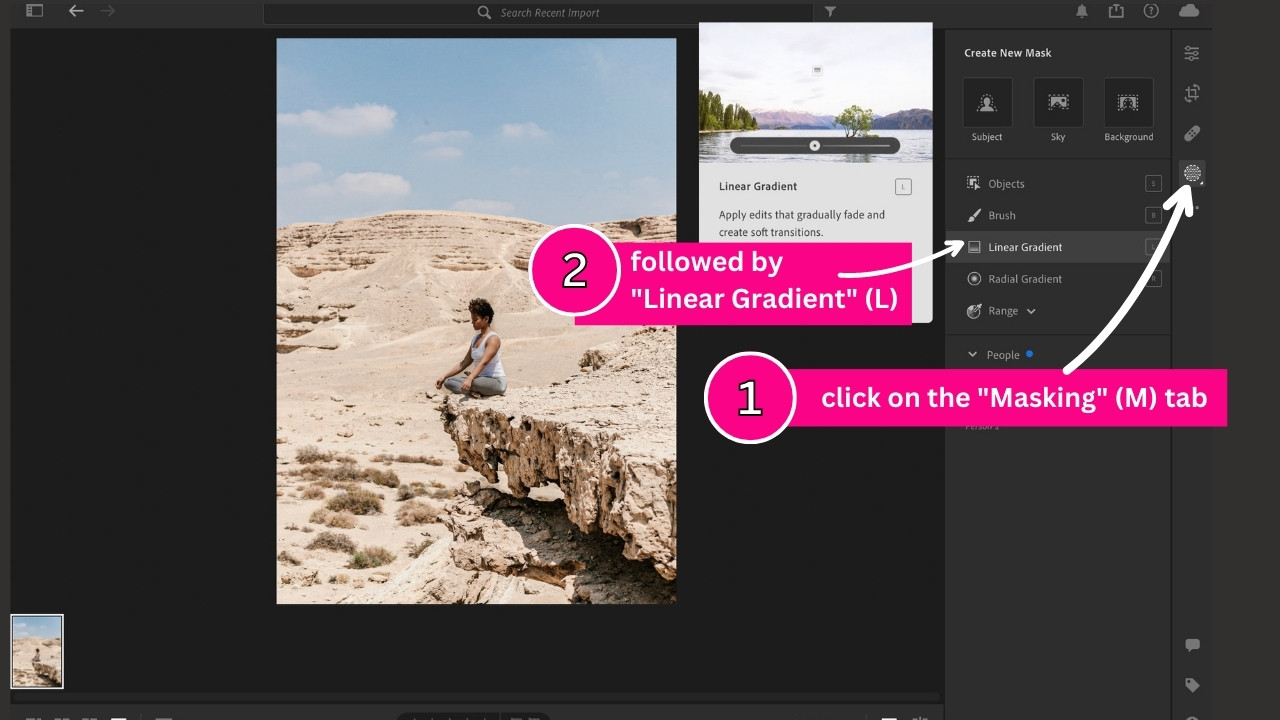
Step 2: Click on the “Masking” (M) tab followed by “Linear Gradient” (L)
Before we begin blurring the background, it is very important to take some time to assess your image.
You need to figure out which areas of the image need to be blurred and which areas of the image need to remain in focus.
You of course want to keep your subject in focus, but in order for your edit and blur to look realistic you can’t just go and blur everything else around the subject.
This will make the edit extremely obvious.
For this reason, in our edit, we do not want to blur anything in front of or in line with our subject.
Only the background.
We also do not want to blur the rock on which the subject is sitting or the ground in the foreground.
Once you have figured out which areas to blur, click on the “Masking” (M) tab followed by the “Linear Gradient” (L).
The “Linear Gradient” (L) tool works by gradually applying adjustments over an area of your image.
Step 3: Create a linear gradient by clicking and dragging from the top of the image downwards until the subject is covered, reduce the “Clarity”, “Texture”, “Dehaze” and “Sharpness” sliders
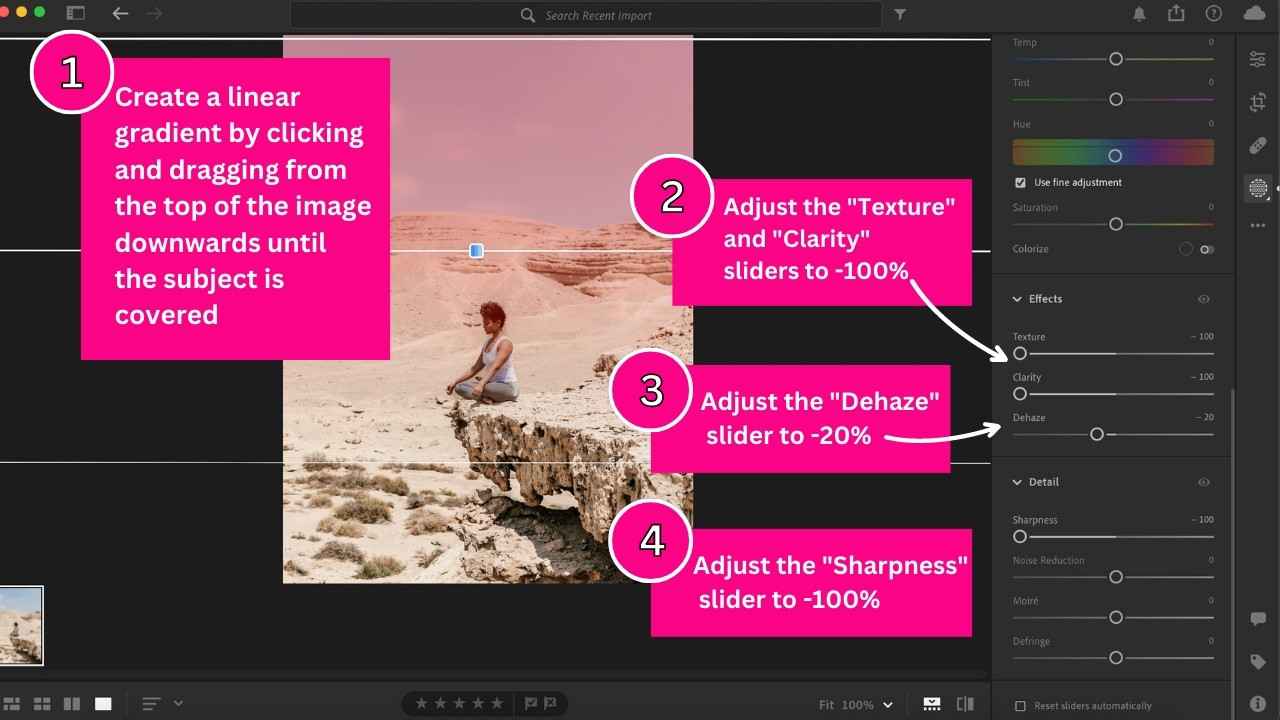
To utilize the tool, start by clicking on the top of the image, in this case, the top of the sky and then dragging down.
Stop once the linear gradient is just covering the subject.
The strongest adjustments will be applied on the top line of the Linear gradient.
The center line will be the center of the transition and the adjustments will be applied at 50% in this area.
The bottom line will have no effect applied.
The adjustments will therefore gradually fade out towards the bottom of the selected area.
Linear gradients can be drawn in any direction, even diagonally however something helpful to note is that you can hold down the “Shift” key as you drag in order to keep your linear gradient straight.
Once you have created your linear gradient, you can still make adjustments by dragging the outer white lines of the gradient.
If you want to move the entire gradient, simply click and drag the square in the center of the gradient.
If you hover over the center line, a red mask will appear which will indicate to you where the mask is being applied in your image.
You will be able to see how the adjustment gradually fades.
To rotate your gradient, click and drag the center line.
Once we are happy with the position of our linear gradient, it is time to adjust the settings and apply the blurred effect to our image.
On the right side panel, scroll down until you locate the “Effects” panel.
Reduce the “Clarity” slider to -100%.
Reduce the “Texture” slider to -100%.
Reduce the “Dehaze” slider to -20%.
Next, scroll down until you locate the “Detail” panel and reduce the “Sharpness” slider to -100%.
You will notice that the top half of your image has become blurred.
Step 4: Utilize the “Brush” (B) tool to erase the mask over the subject
Now that we have adjusted the settings of our linear gradient, we can see that the whole top half of the image is blurry.
We do not want our subject to be blurry because we are only trying to blur the background.
Therefore we need to utilize the brush tool to erase the mask over our subject.
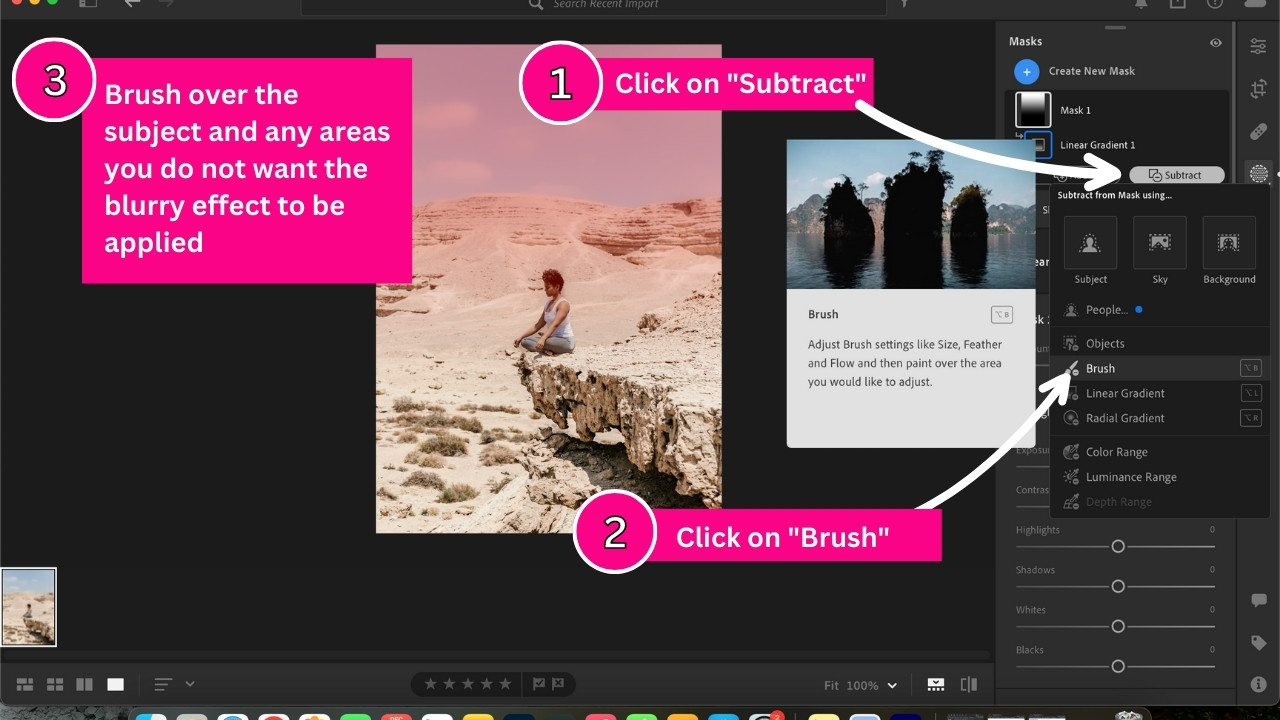
First, click on “Subtract”, then on “Brush” (B).
Adjust your brush size and brush over the subject as well as the rock on which she is sitting.
In an image like this one, where the subject is small and further away from the camera, we can get away with utilizing the brush tool to erase the mask.
However when the subject is closer to the camera or more detailed, we will need to be a lot more precise with our edit.
In the newer version of Lightroom, above “Brush” (B) on the drop down menu, you will see an option called “Objects”.
This is an extremely helpful tool.
If you click on “Objects” and then brush over the general area of your subject or object, Lightroom will assist you and automatically select the object for you.
It is extremely accurate however you may need to go back with the brush tool and make slight adjustments to the area that Lightroom has selected.
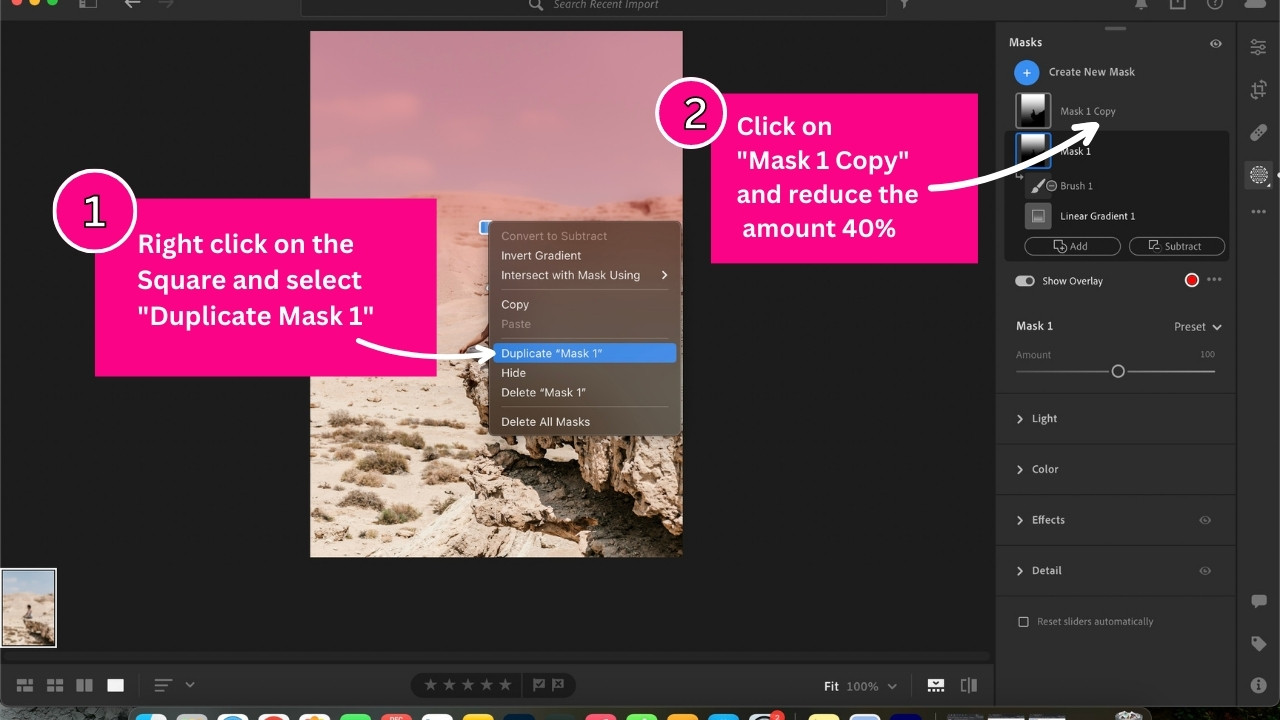
Step 5: Duplicate the Mask and turn the “Amount” down to 40%
Now that you have erased the mask from your subject, you are able to see the final result.
If you are not quite happy with how blurry the background is, you can duplicate the mask which will effectively double the blur.
To do this, right click on the square in the middle of the mask and select “Duplicate Mask 1”.
Your background will now be completely blurred.
Doubling the blur effect may make your image look over edited and unnatural.
Therefore if you do choose to duplicate the mask, it is recommended that you reduce the mask “Amount”.
For this tutorial, we reduced the mask “Amount” to 40% to maintain a natural blurred background.
You can experiment with the settings and amount until you are happy with the final result.
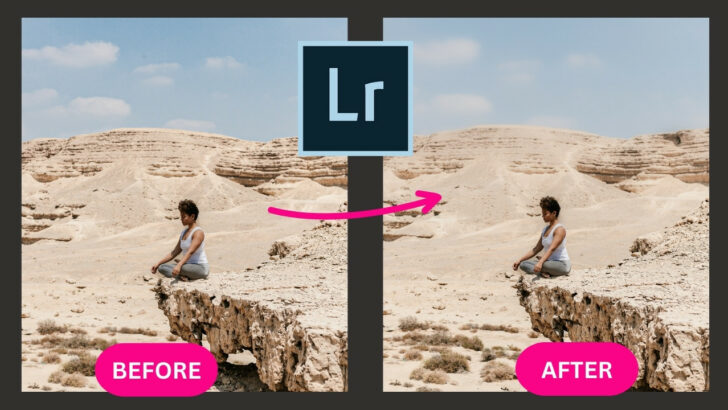
The Result
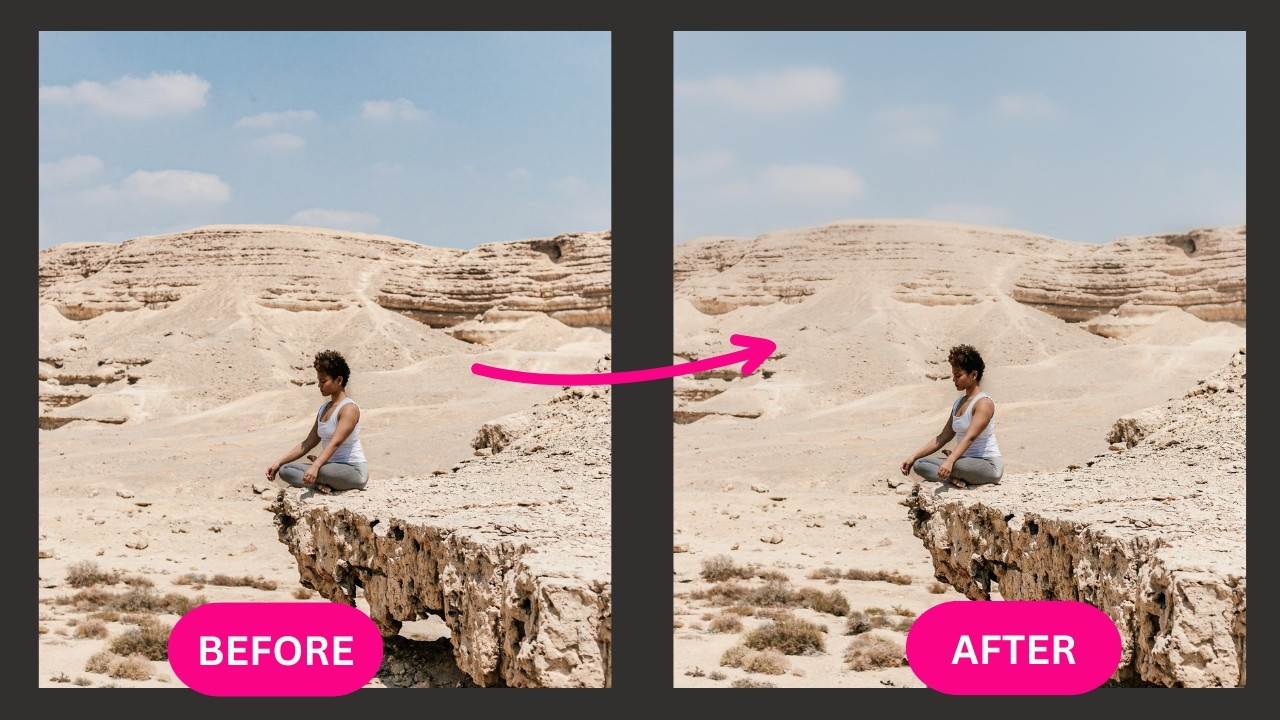
Here is the final result.
We were able to achieve a soft blurry background, while ensuring that our subject remains in focus.
Frequently asked questions on “How to blur the background of an image in Lightroom”
Can I blur specific objects in an image in Lightroom?
You can utilize Lightroom to blur any object in an image. Click on the Masking tab, create a new mask and select the “Objects” option. Roughly brush over the object you want to blur. Lightroom will detect and select the object. Next, reduce the clarity, texture and sharpness up to -100%.

I am a professional blogger and entrepreneur with a strong interest and passion in photo editing. On MindRelic, I happily share my expertise in the photo editing niche with all of you guys!