
Are there dark shadows ruining your perfect photo?
This is a very common problem, especially when taking photos outdoors with harsh lighting or no external flash.
The good news is, there are ways to fix this. Through this tutorial, we’ll walk through a few easy steps to remove those harsh shadows and rescue your photo.
How to remove shadows in Lightroom
Start by utilizing the “light” panel under the “Edit” Tab to make basic adjustments to the whole image. Bring up the shadows. Bring down the highlights. Move on to the “masking” tab and select the “brush” tool. Brush over the shadows in the photo. Adjust the mask settings, bringing up the shadows and exposure.
In this tutorial, we’ll use a photo of four girls with varying amounts of shadow and light on their faces.
This will teach you how to balance shadows even if there is more than one subject.
Throughout this tutorial we will be talking about “bringing up the shadows” because the contrast between shadows and light is what adds depth to a photo.
Therefore, Instead of removing all shadows completely, we will focus on making the shadows appear brighter.
Hence “bringing up the shadows”.
It is very important to have the right balance of shadow and light.
For photos like the one we will be looking at in this tutorial, it is very clear that the image was taken outdoors and that there will naturally be shadows.
Removing these shadows completely would make the photo appear fake and flat.
We therefore focus on “bringing up the shadows” in areas where they are too harsh.
Step 1: Import an image
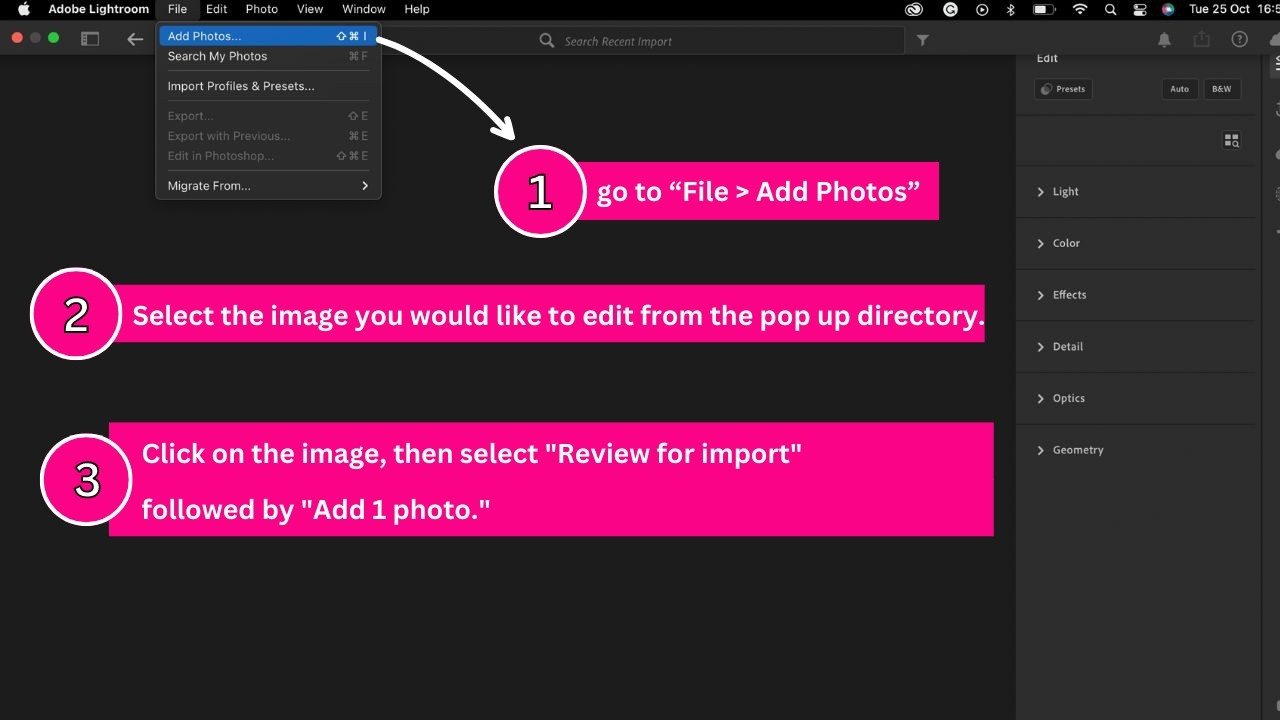
To import an image, go to “File > Add Photos” on the menu at the top of the screen.
Or press the “Ctrl + Shift + I” command to shortcut it.
Select the image you would like to edit from the pop up directory.
Click on the image, then select “Review for import” followed by “Add 1 photo.
Step 2: Utilize the “light” panel under the “Edit” Tab to make basic adjustments to the whole image
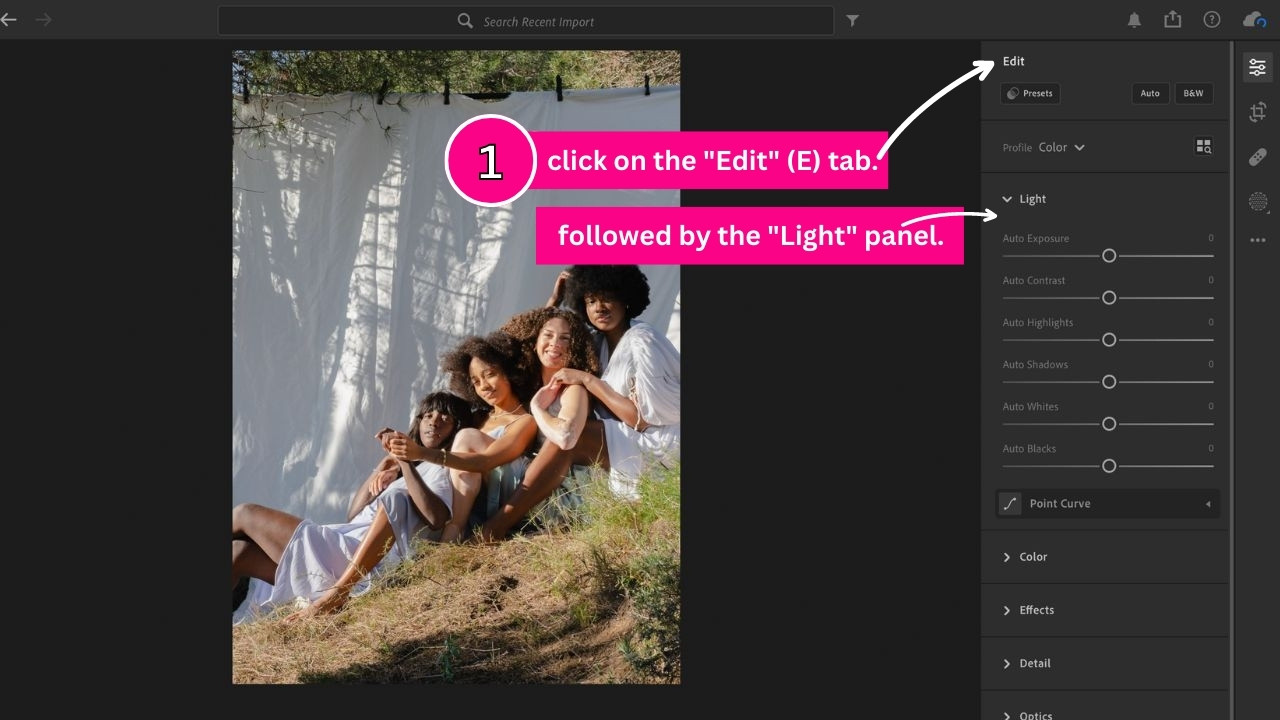
First we need to make some basic adjustments to the whole picture.
To do this, start by clicking on the “Edit” (E) tab followed by the “Light” panel.
Step 3: Bring up the shadows and bring down the highlights
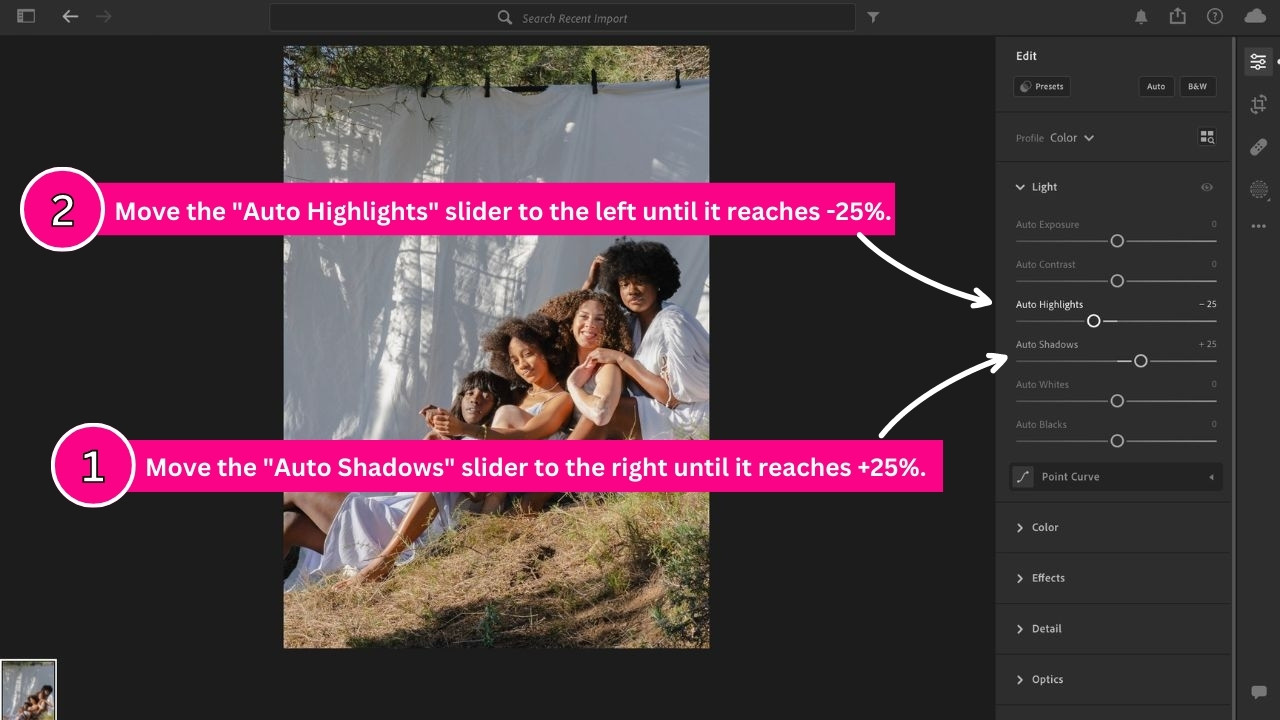
Now we can begin removing the harsh shadows in our photo. We want to start by adjusting the “Auto Shadows” slider.
Begin by moving the slider to the right until it reaches +25%. You will notice that the darker areas/ shadows in your photo will become lighter.
Remember that every photo will be unique and you will need to gauge how much to increase the “Auto Shadows” slider, based on your photo.
25% is a good place to start.
Be careful not to lift the shadows too high as this may increase the amount of grain while decreasing the amount of depth and definition of the photo.
The opposite of shadows in our photo is the highlights. Typically when there are harsh shadows there will also be harsh highlights.
For this reason it is helpful to make adjustments to the highlights in your photo. To do this, adjust the “Auto Highlights” slider by sliding it to the left and decreasing the highlights to -25%.
You will notice that the brighter areas/highlights will become slightly darker.
Again 25% is a good and safe place to start but you may need to bring them down or up further, depending on your photo.
The main purpose of global adjustments is to balance out the light in our image. We don’t want to see any harsh areas that appear black or areas that appear to be whited out.
We want to play around with the sliders until we are happy with the initial adjustments to our image.
Step 4: Locate the “Brush” (B) Tool under the “Mask” (M) Tab
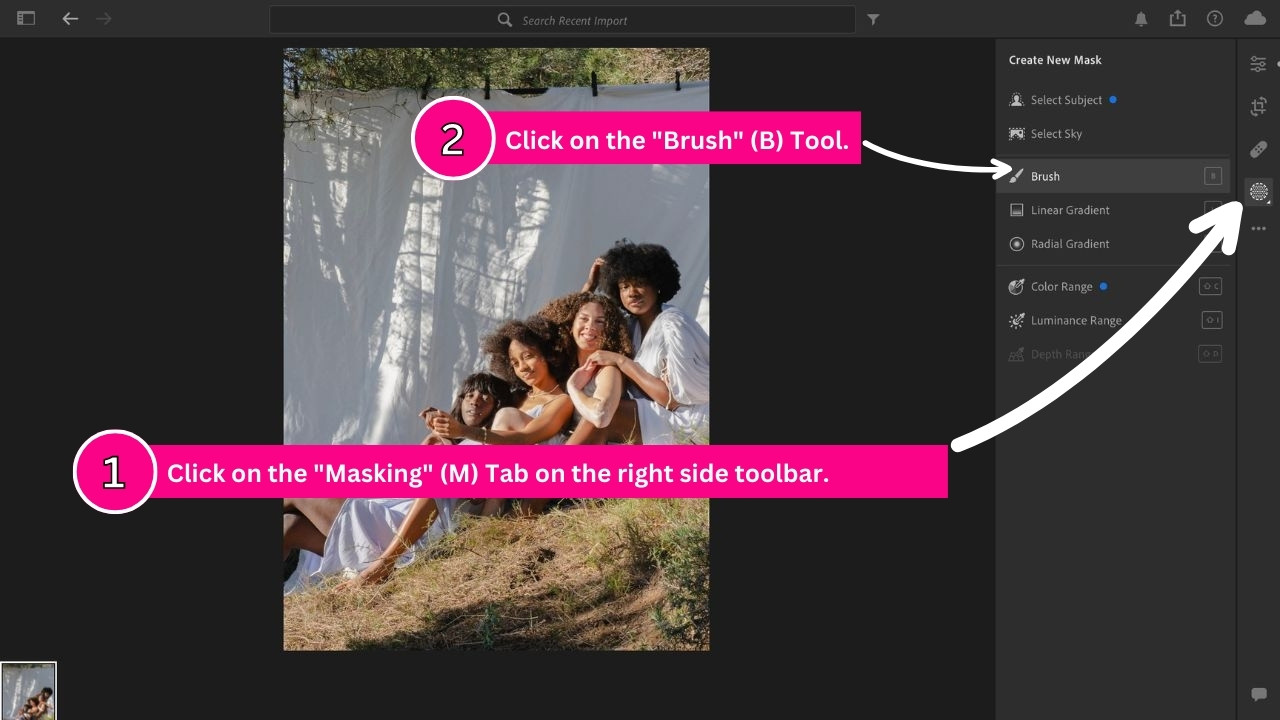
Begin by clicking on the “Masking” (M) Tab on the right side toolbar and then click on the “Brush” (B) Tool.
Step 5: Create a mask and brush over all the shadows that you would like to remove
Next, we want to pinpoint the harsh shadows in our image and edit them without affecting the rest of our photo.
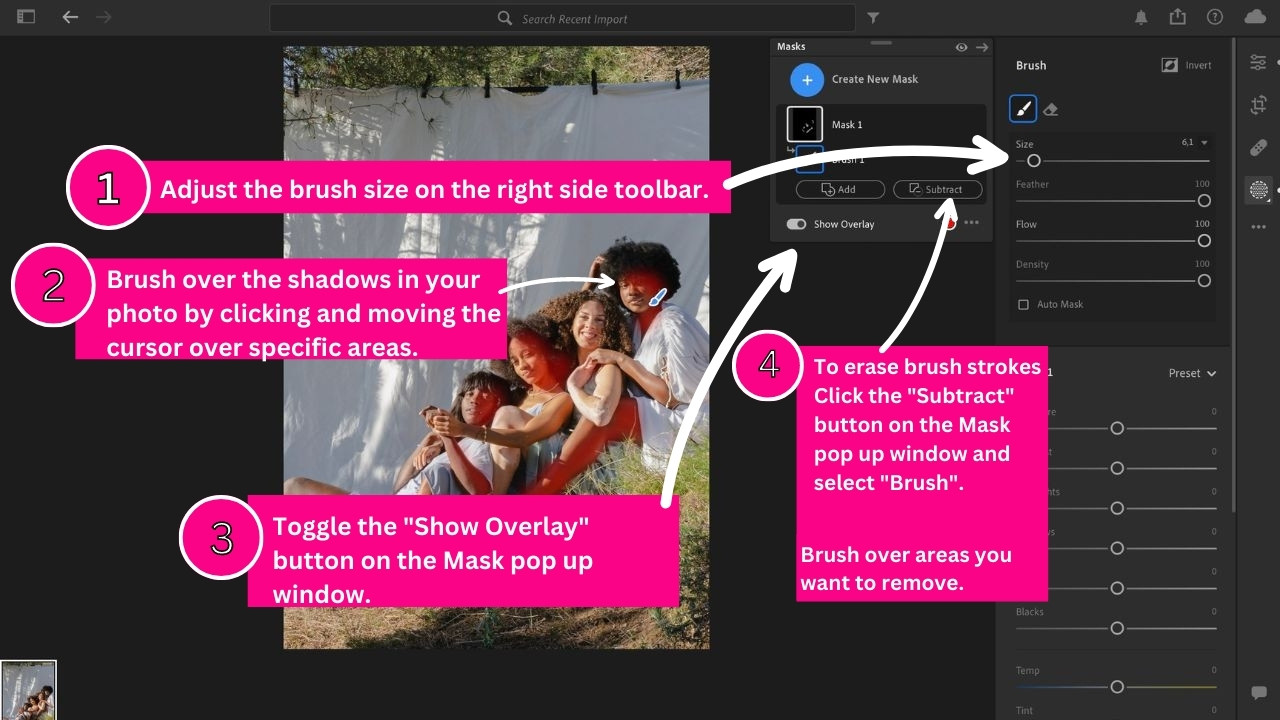
With the “Brush” (B) tool selected, begin by adjusting the brush size on the right side toolbar.
You can change the size of your brush as you go, to get into all the spots on your photo.
For this tutorial, we won’t be adjusting the “Feather”, “Flow” and “Density” sliders.
However, the “Feather” slider dictates the softness of the brush edge while the “Flow” slider affects the intensity at which the brush applies the effect.
The “Density” slider is similar to the “Flow” slider and affects the translucency of the brush.
It may be helpful to read up more on the specific uses of each adjustment slider.
Once you have chosen your desired brush size, begin brushing over the shadows in your photo by clicking and moving the cursor over specific areas.
You may toggle the “Show Overlay” button on the Mask pop up window.
This will show you the exact areas you have brushed over.
To erase your brush strokes click on the “Subtract” button on the Mask pop up window and select “Brush”.
Now follow the same step and brush over the areas you would like to erase.
Step 6: Adjust the settings of the Mask you have created
Now that we have created a mask and brushed over the shadows, it’s time to adjust the mask settings.
We will be focusing on the “Exposure” slider as well as the “Shadow” slider.
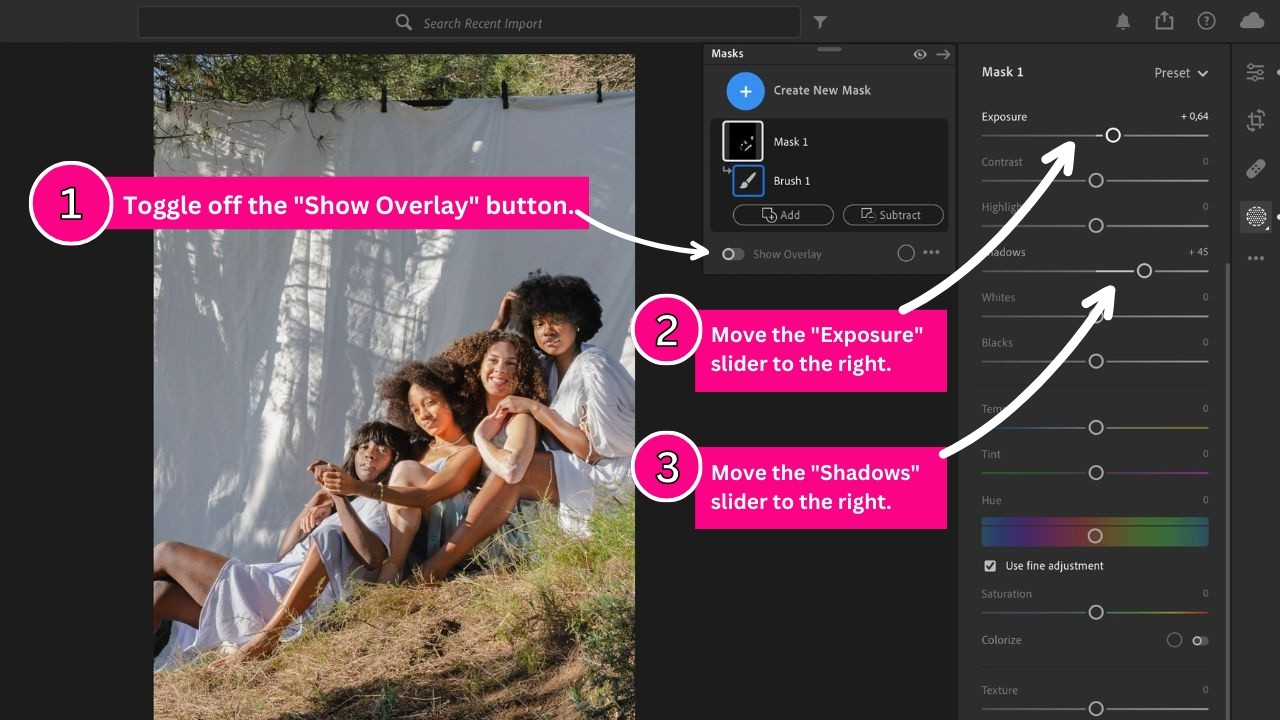
Before we start, it will be helpful to toggle off the “Show Overlay” button so that you are able to see the changes as you adjust the sliders.
Begin by moving the “Exposure” slider to the right, this will brighten the areas that you have brushed over.
Do the same with the “Shadows” slider, moving it to the right.
The amount of exposure and shadows you increase will be dependent on your photo and your desired outcome. You can play around with the two sliders until you find a combination that you are happy with.
Remember not to overdo and over-edit the image if you would like to maintain a natural look. Also, Increasing the exposure and shadows too much will produce grain.
With practice, you will begin to get the feel of the various sliders and what they do. It is highly recommended that you try out different setting combinations until you find what works best for your specific photo.
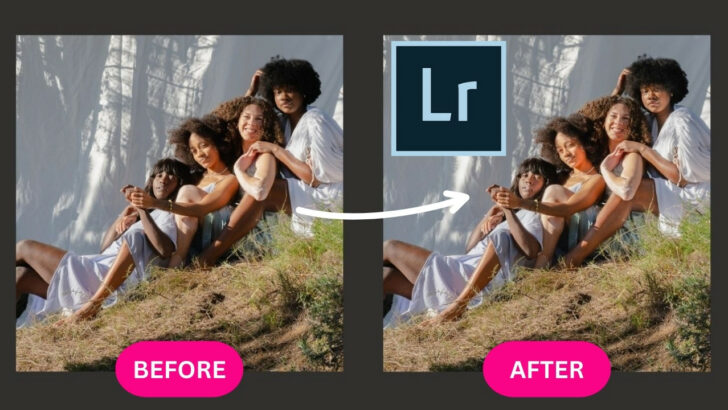
The Result
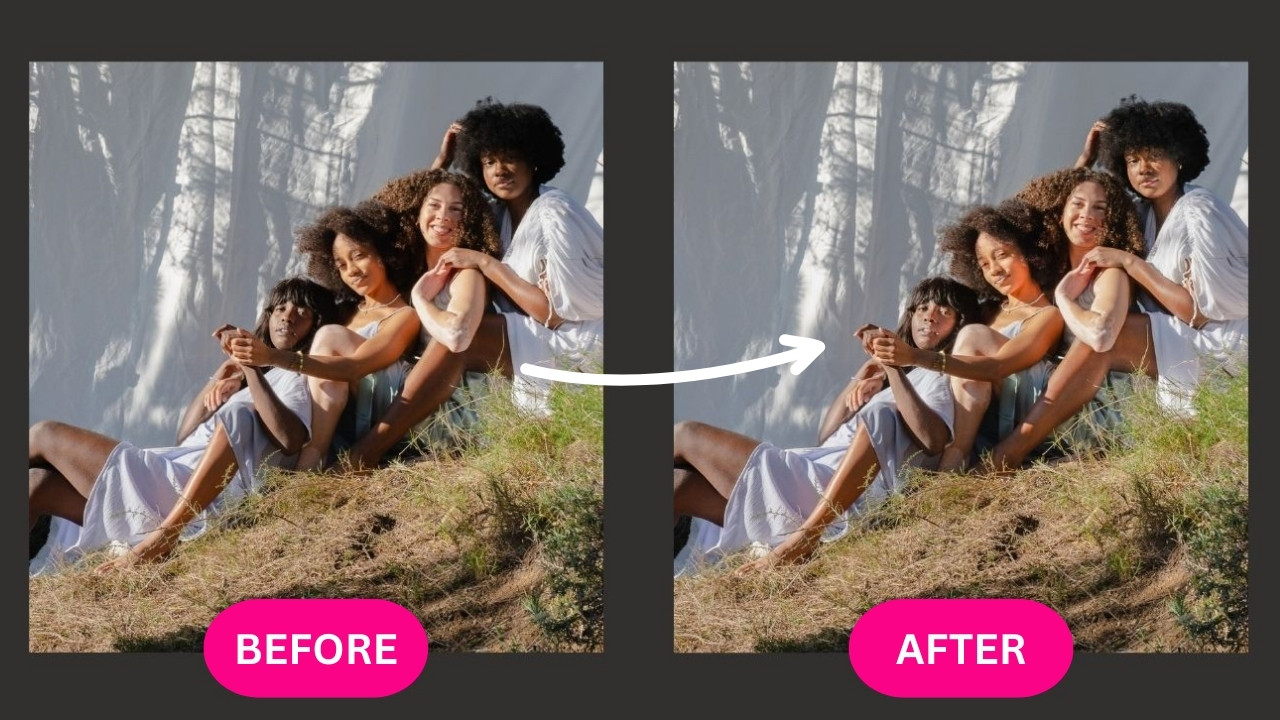
Here is a before and after of removing harsh shadows.
Frequently asked questions on “How to remove shadows in Lightroom”
How do you apply different edits to individual shadows in a photo in Lightroom?
Sometimes in a photo you may find varying shadows. Some might be very harsh and some might be subtle. To edit these shadows separately in Lightroom, you should create a separate mask for each shadow. Click “Create New Mask” each time you want to edit a new shadow with new settings. You can switch between your different masks under the pop up “Masks” menu.

I am a professional blogger and entrepreneur with a strong interest and passion in photo editing. On MindRelic, I happily share my expertise in the photo editing niche with all of you guys!