
Not all shadows are bad. Sometimes, shadows can be used creatively to add depth, contrast, or drama to a photo. However, some shadows can ruin a photo.
Shadows should be eliminated when they make it difficult to see certain parts of the photo, especially if they are cast over important elements like faces or objects.
Additionally, shadows can alter the mood and make a photo look darker and more somber than desired.
Shadows can also create an unbalanced composition or distract the viewer’s attention away from the main subject.
Removing shadows from some photos can be easier than from others. As a rule of thumb, shadows from a plain surface are usually easier to get rid of than those from important elements.
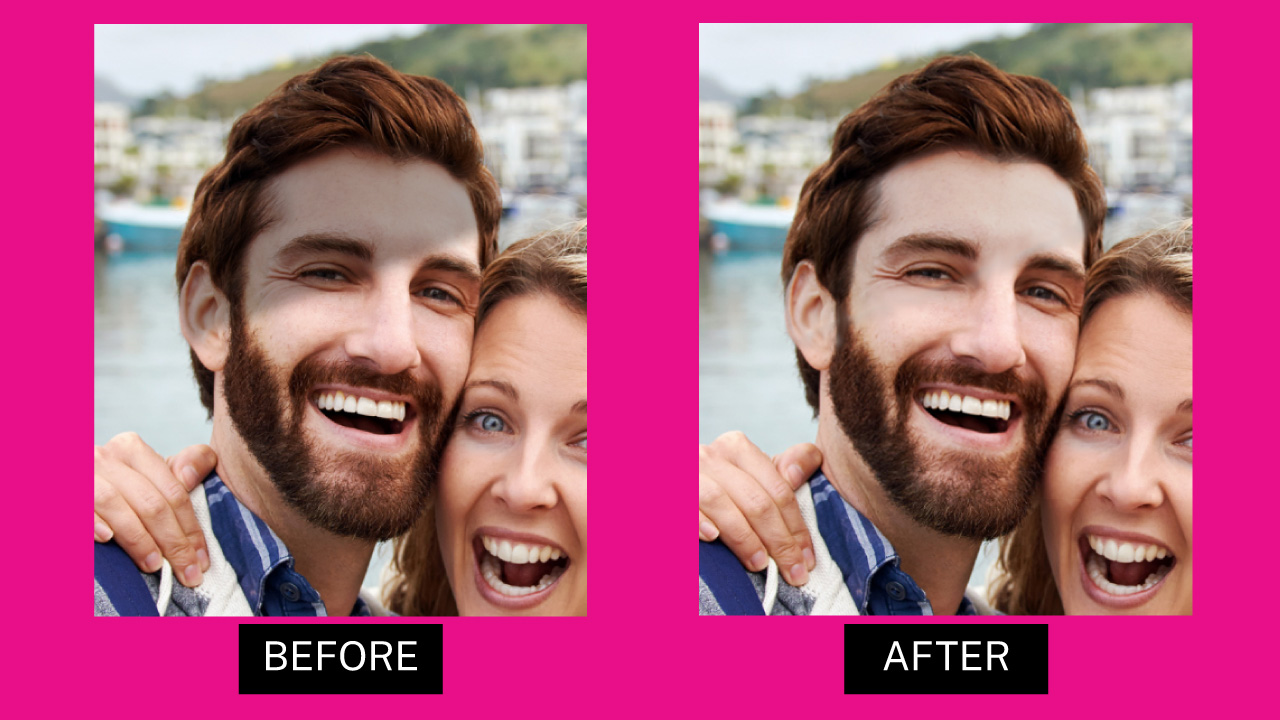
In this tutorial, we will cover two methods on how to remove shadows from important elements in a photo, such as a face.
The first method consists of using the popular photo editing software, Photoshop.
While the second method consists of using another famous photo editing software, GIMP, which is free.
So if you don’t have Photoshop, please use GIMP to get rid of shadows in your photos. It is actually free to use both on Mac and on Windows!
Finally, in the FAQ section at the bottom of the article, we will cover how to remove shadows using “Snapseed” (available for iPhone and Android) and “Fotor” (available online).
Keep in mind that these last methods work better for removing shadows from plain surfaces.
How to Get Rid of Shadows in Photos Using Photoshop
- Add a Grayscale Filter
- Adjust the curves to dodge
- Add Gaussian Blur
- Adjust the curves again
- Brush over the edges
- Delete the Grayscale filter
- Merge the layers
- Smudge the edges
- Patch the texture
- Add color
Step 1: Add a Grayscale Filter

First, open the image in Photoshop. Keep in mind that there is a way to remove shadows in Lightroom as well.
Before going straight to the main process, we need to add a grayscale filter so we can focus on the lightness and not get distracted by colors.
Once you have imported the photo you want to work on into Photoshop, click on the “Layers” (F7) panel, usually located on the right-side toolbar.
If you can’t find it, you may have to enable it first by going to “Window > Layers” on the menu at the top of the screen or by pressing the “F7” key from your keyboard as a shortcut.
On the “Layers” (F7) panel, click on the “Adjustment” button at the bottom of the panel. From the unfolded menu, select the “Solid Color” option.
On the “Color Picker” pop-up window, select any shade of gray, and then press “OK”.
Ensure that the gray color layer is still selected and then set the “Blend Mode” to “Color”.
Step 2: Adjust Curves to Dodge
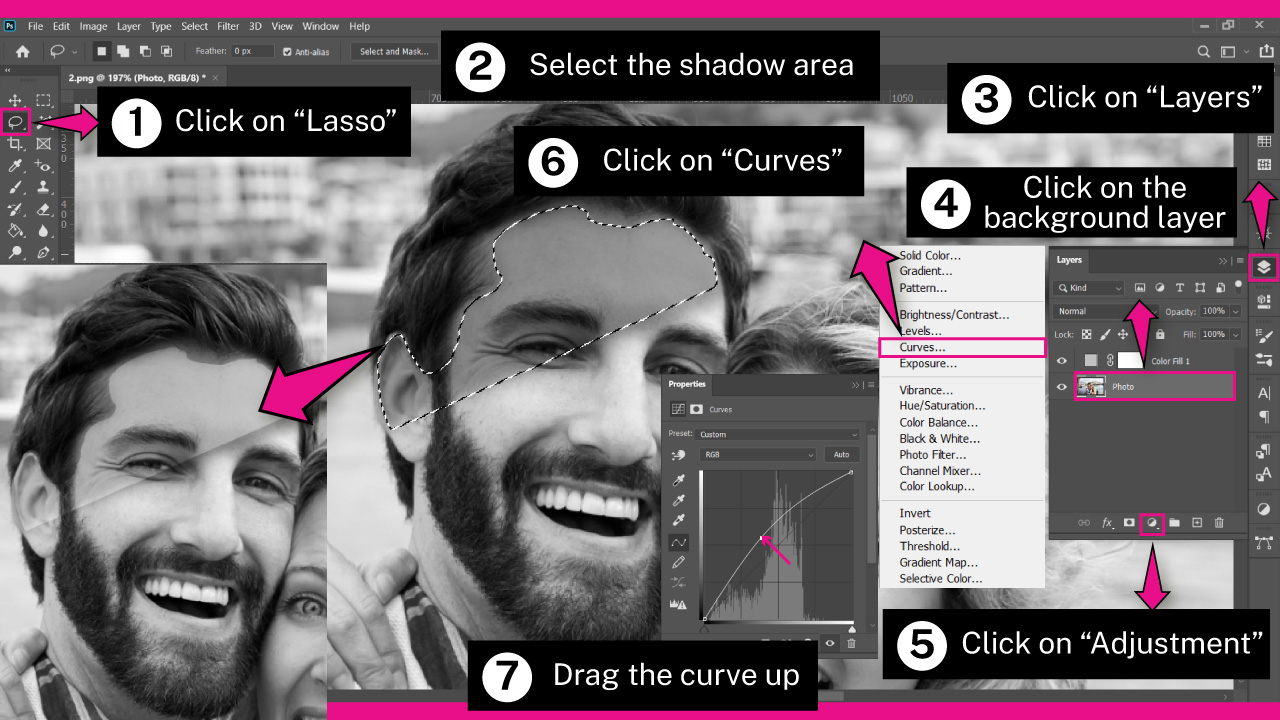
Select the “Lasso” (Q) tool located on the left-side toolbar, or you can press “L” to shortcut it.
Use the “Lasso” (Q) tool to make a rough selection of the shadow you want to get rid of. You don’t need to make a precise selection, but ensure that you stay inside the shadow transition.
On the “Layers” (F7) panel, select the background layer or the layer that contains the photo you have imported.
Next, click on the “Adjustment” button at the bottom of the panel, followed by the “Curves” option.
On the “Curves” pop-up window you will find a graph. Right-click, hold and drag the center of the line to get a concave curve to dodge shadows.
Adjust the curve so that the shadow area has the same lighting as the rest of the face.
Don’t worry about the harsh edges, we’ll fix it in the next step.
Step 3: Add Gaussian Blur
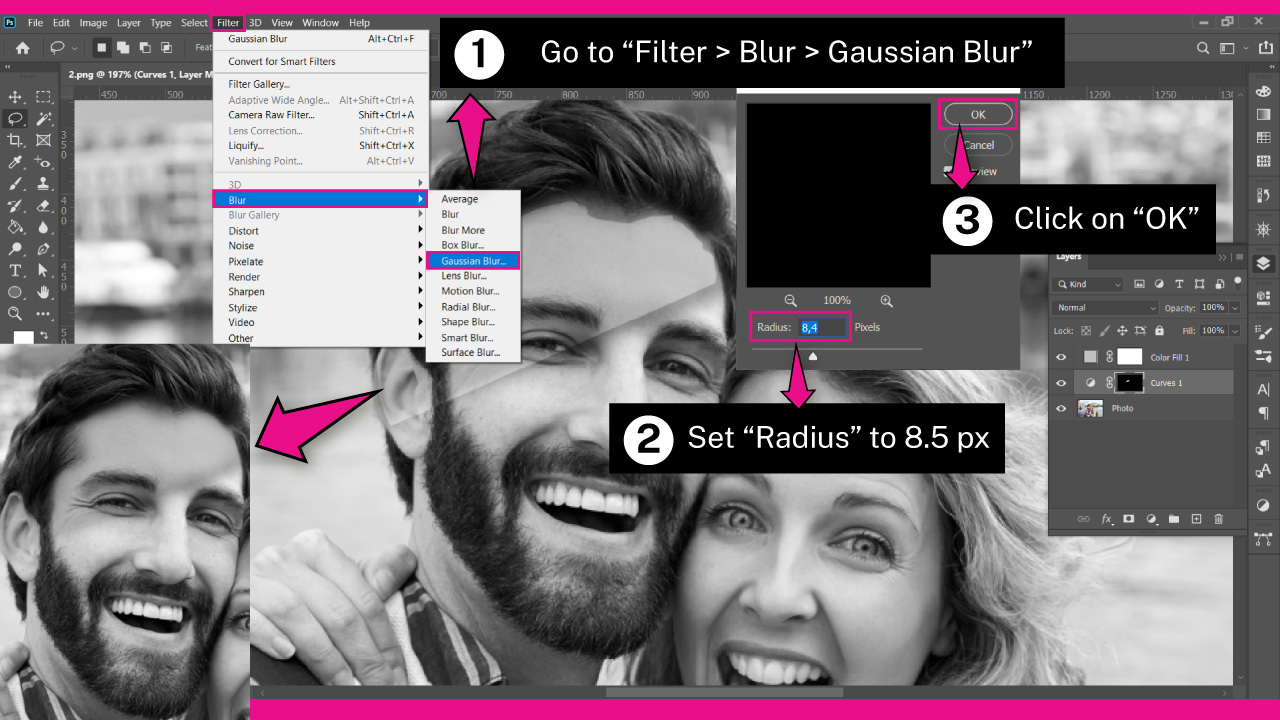
To smooth the edges, first make sure that the masked layer is selected on the “Layers” (F7) panel.
Then, go to “Filter > Blur > Gaussian Blur” on the menu at the top of the screen.
On the “Gaussian Blur” window, set the “Radius” value to around 8.5 px or the value that works better for you. This value will vary depending on your image.
Step 4: Adjust Curves Again
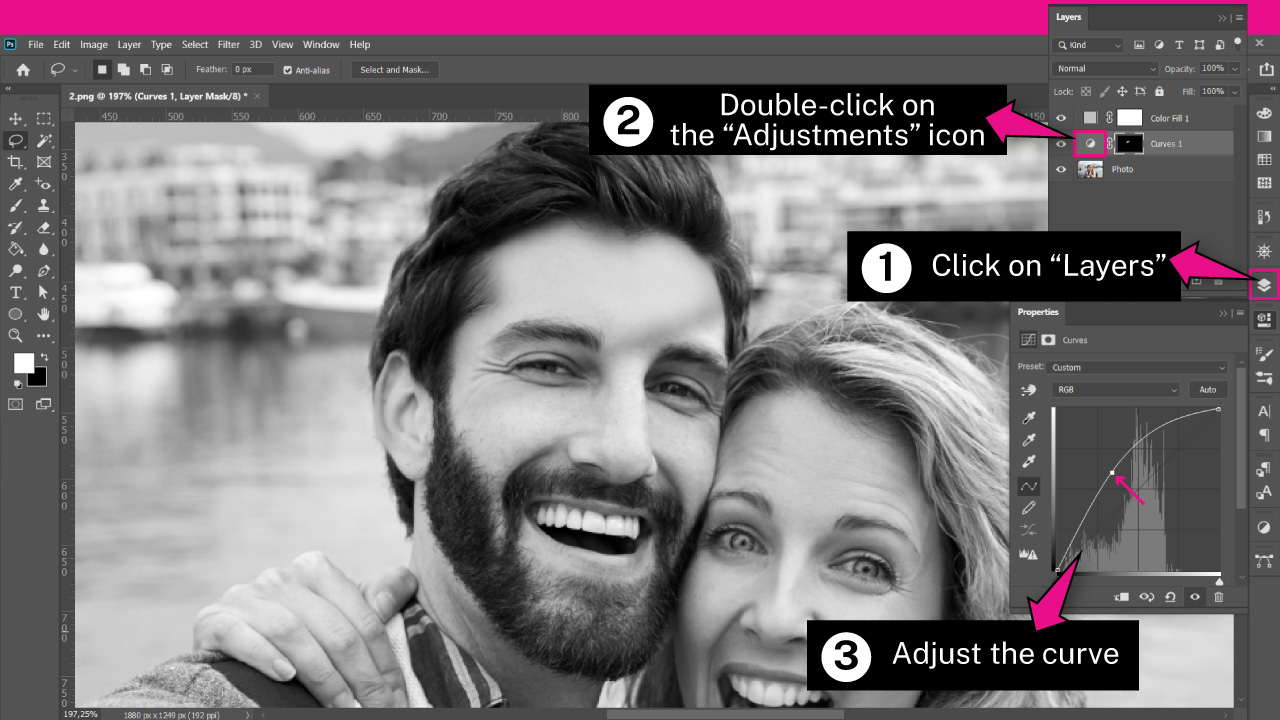
After blurring the edges, we need to readjust the curves to blend the lighting better.
To adjust the curve, go to the “Layers” (F7) panel, and on the masked layer, double-click on the “Adjustment” icon to open the “Curves” window.
On the “Curves” window, adjust the curve by left-clicking, holding, and dragging to blend the lighting better.
Step 5: Brush Over the Edges
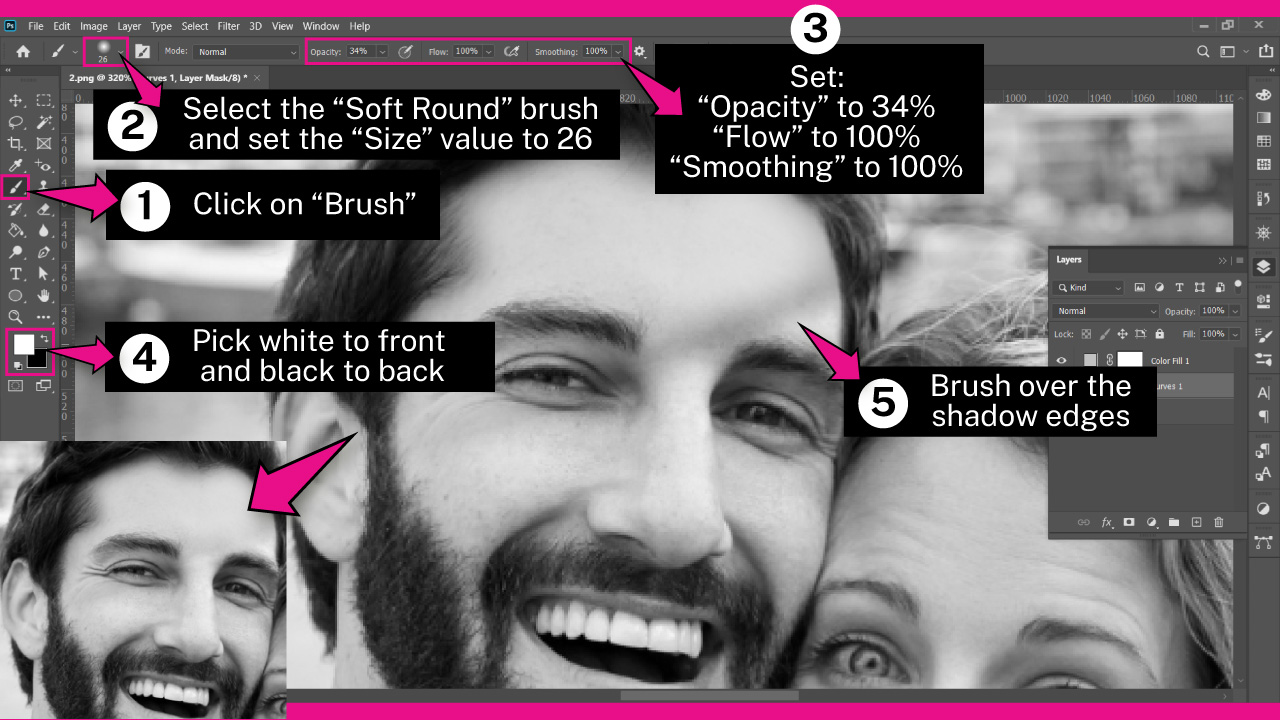
We are getting good results, but the shadow outline still remains. To remove the shadow outlines, select the “Brush” (B) tool located on the left-side toolbar.
Then adjust the “Brush” settings on the toolbar at the top of the screen. On the “Brush” thumbnail, select a “Soft Round” brush and set the “Size” around 25.
Then set:
- “Opacity” around 35%
- “Flow” to 100%
- “Smoothing” to 100%
Next, click on the “Default Foreground and Background Colors” (D) button next to the color boxes, located on the left-side toolbar, or press the “D” key from your keyboard to shortcut it.
Once you do this, the “Foreground” and “Background” color boxes will change to black and white. Just ensure that the “Foreground” is set to “White”, while the “Background” is set to “Black”.
If it’s displaying inversely, press the “X” key from your keyboard to invert the colors.
After setting the brush adjustments and colors, go to the “Layers” (F7) panel and select the masked layer. Finally, gently brush over the shadow edges.
We are using a black and white brush because we are working on a masked layer. Using a white brush will add more areas to the mask, while using a black brush will subtract areas from the mask.
That means if you brush over areas you don’t want to be masked, you can press the “X” key to invert the colors of the “Foreground” and “Background”.
Once the “Foreground” color box is set to black, brush over the areas you want to subtract from the mask.
Step 6: Delete Grayscale Filter
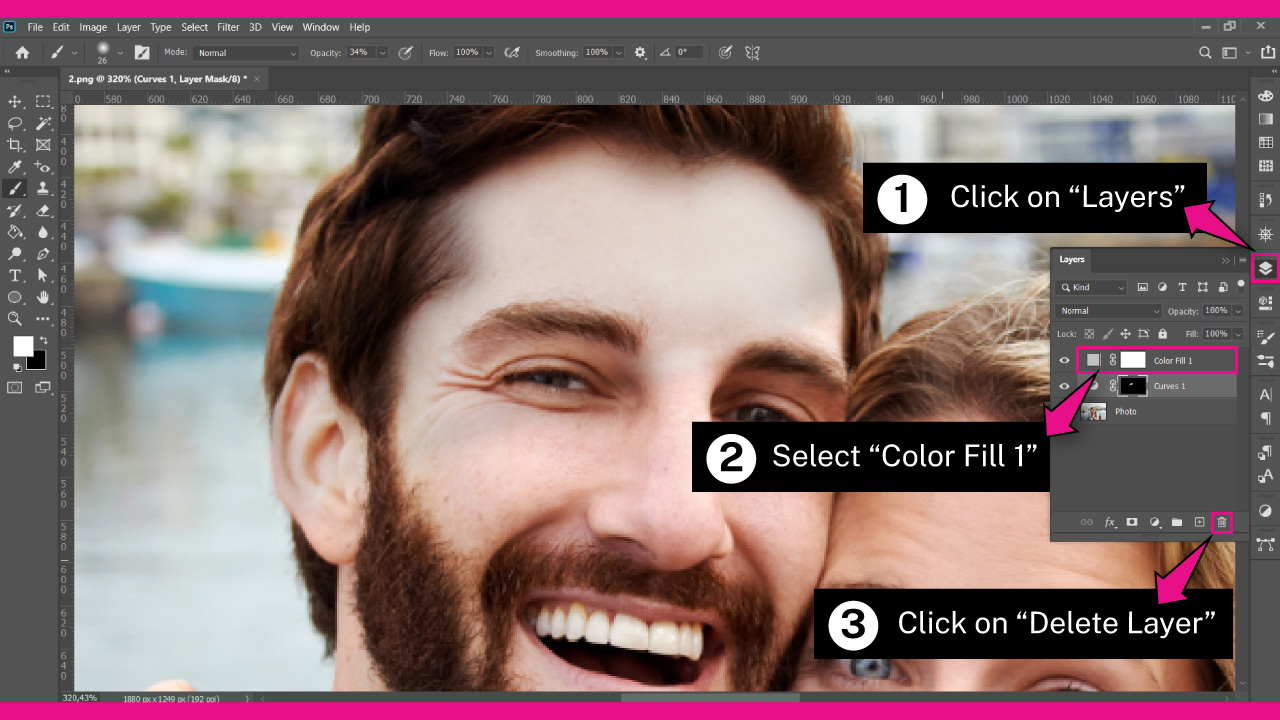
Now we will delete the Grayscale Filter layer to see the result of our edition.
To delete the Grayscales Filter, go to the “Layers” (F7) panel, select the Grayscales Filter called “Color Fill 1” layer and click on the “Delete Layer” button at the bottom of the panel.
Step 7: Merge Layers
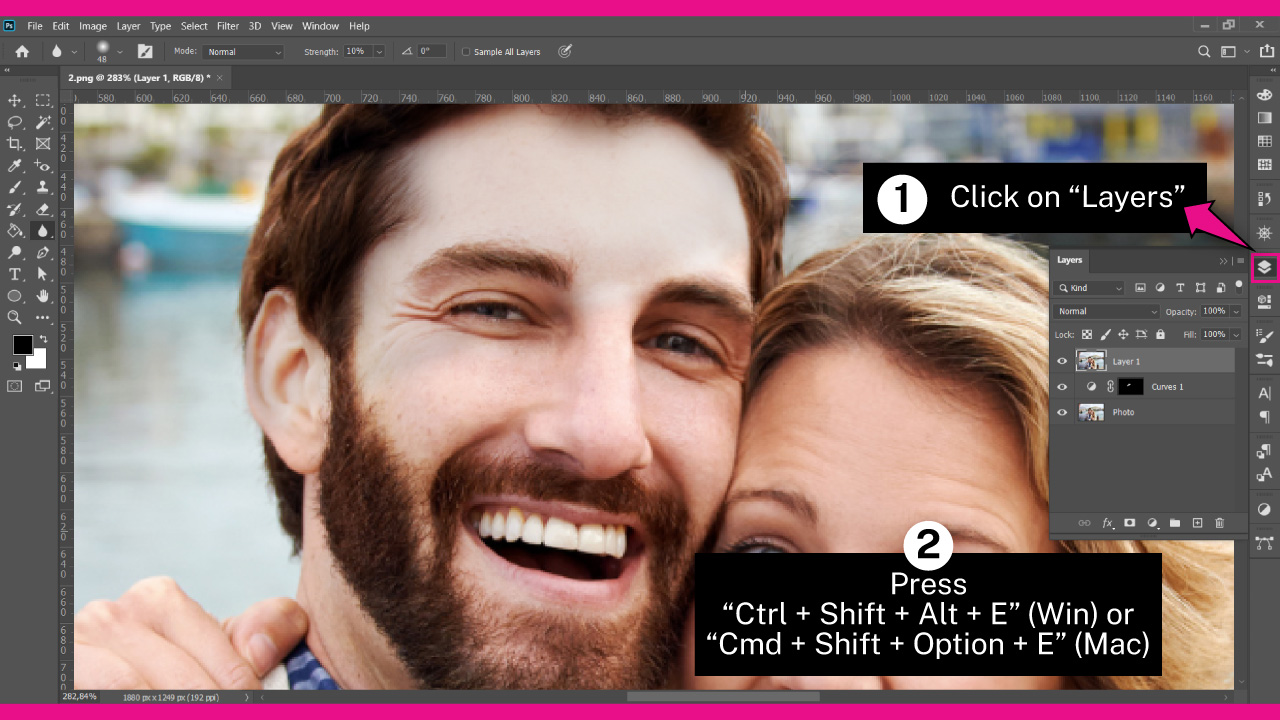
It’s looking pretty good, but there are still some leftover shadows near the edges that we need to fix. To do that, we need to duplicate the layers and merge them, so we can apply tools like “Smudge”, “Blur”, or “Healing”.
To duplicate the layers, go to the “Layers” (F7) panel and select all of them. You can do this by clicking on the first layer of the list and then holding the “Shift” key while clicking on the last layer.
Next, right-click on the selected layers to open the options menu and select the “Duplicate” option (or use the keyboard shortcut “Ctrl + J” or “Cmd + J”).
Then, select the duplicated layers and right-click on them again. From the options menu, select the “Merge Layers” option.
Alternatively, you can use the keyboard shortcut “Ctrl + Shift + Alt + E” or “Cmd + Shift + Option + E” to do this process. This command is called “Stamp Visible”.
Step 8: Smudge the Edges
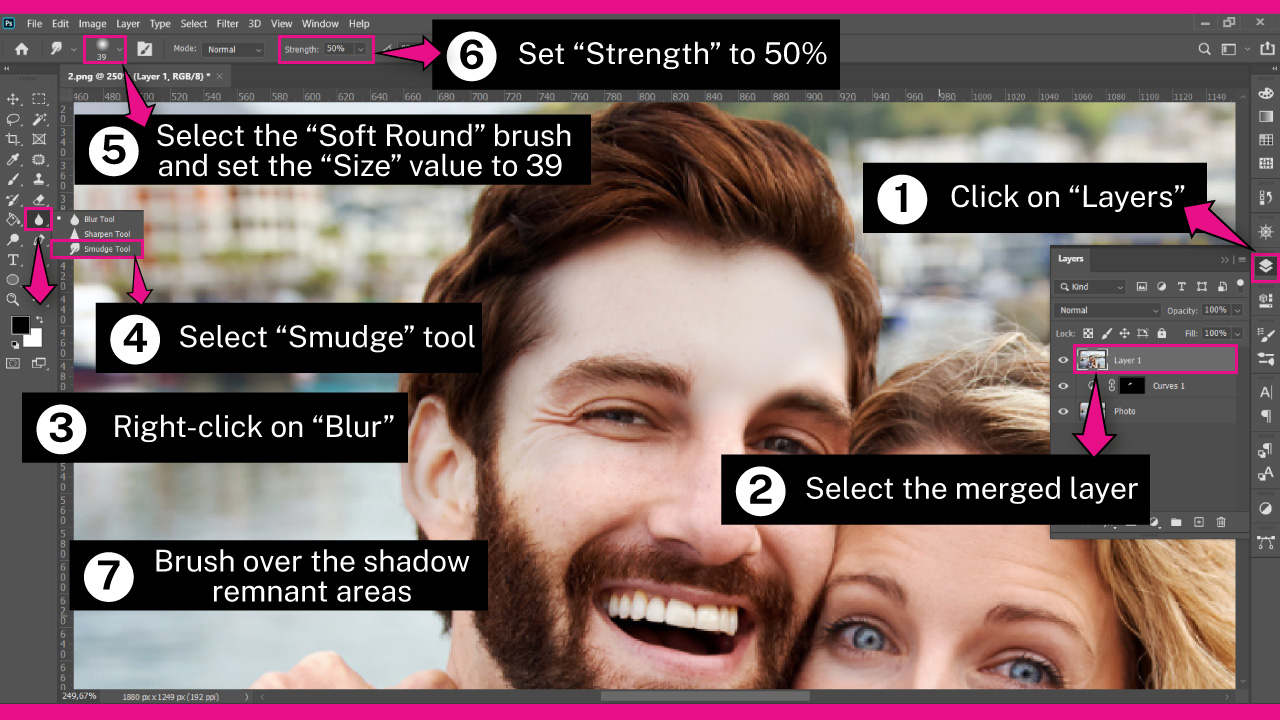
In the “Layers” (F7) panel, make sure you have selected the merged layer.
Next, right-click on the “Blur” tool located on the left side toolbar to unfold the hidden tools menu.
Select the “Smudge” tool from the list.
Then, adjust the “Smudge” settings on the toolbar at the top of the screen.
Click on the “Brush” thumbnail, select a “Soft Round” brush, and set the “Size” to around 40 px. This value will depend on your image.
Set the “Strength” to 50%.
Finally, gently brush over the leftover shadows to blend them with the photo.
You can also blend the leftover shadows using the “Blur” tool.
Step 9: Patch Texture
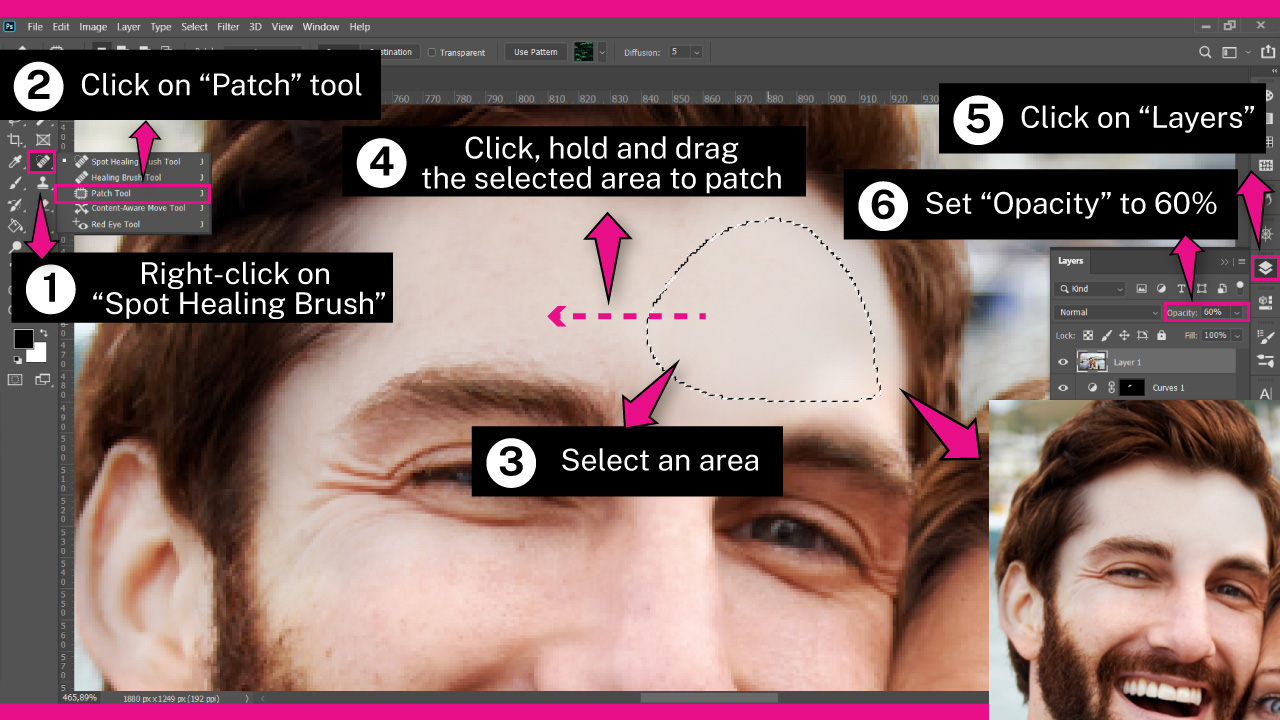
This step is optional. If, after completing these processes, the texture of your image has vanished (in my example, the skin texture), you can use the “Patch” tool to recover it.
To recover the texture, right-click on the “Spot Healing Brush” (J) tool located on the left side toolbar. On the unfolded menu, select the “Patch” (J) tool.
Use the “Patch” (J) tool to select an area where you want to add texture.
Then, click, hold, and drag the selected area to a spot where it has a texture you want to add.
Repeat this process as many times as necessary.
Next, go to the “Layers” (F7) panel and set the “Opacity” to around 60% or the value that suits your image better.
Step 10: Add Color
This step is also optional. If you feel that the area we have worked on has become desaturated, we have to add some color to fix it.
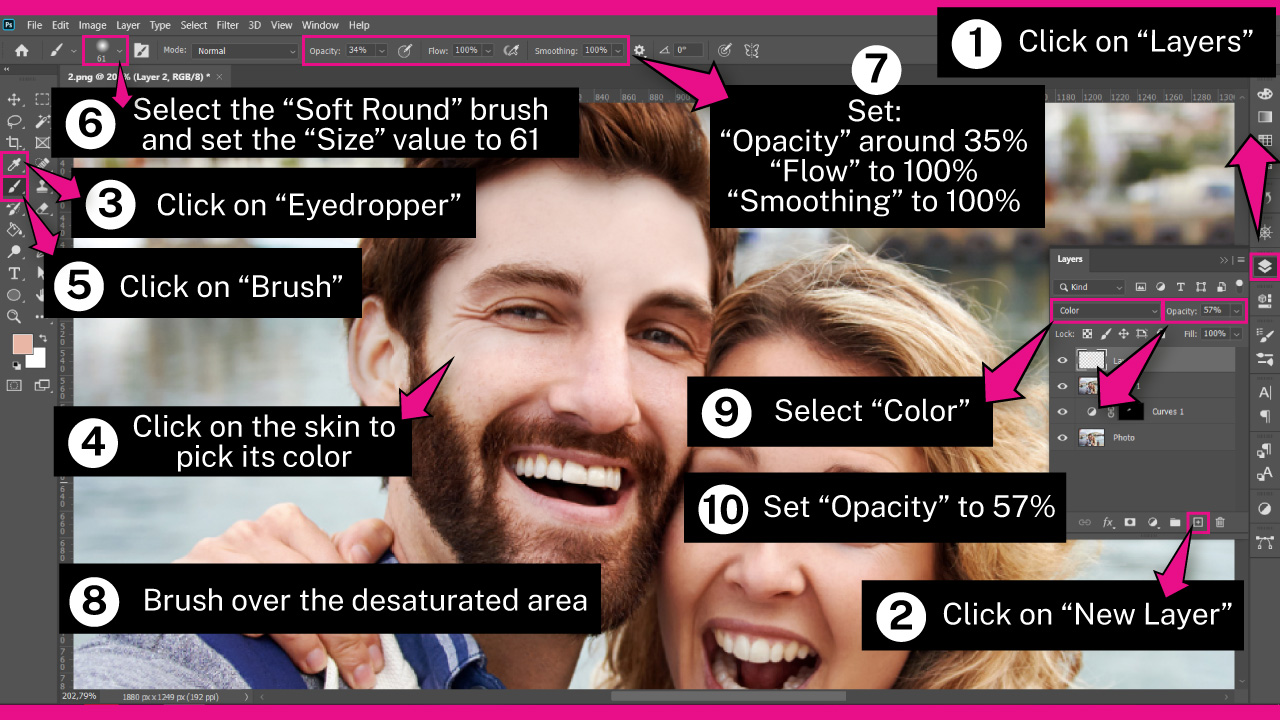
To add color to the desaturated area, first, go to the “Layers” (F7) panel and click on the “New Layer” button located at the bottom of the panel.
Then click on the “Eyedropper” (I) tool located on the left-side toolbar. Alternatively, you can press the “I” key on the keyboard to shortcut it.
Use the “Eyedropper” (I) tool to pick a color to fill the desaturated area. I’ll pick a shade of the skin color.
Next, select the “Brush” (B) tool and adjust its settings on the toolbar at the top of the screen.
First select the “Soft Round” brush.
Then set:
“Size” around 60 or your desired value
“Opacity” around 35%
“Flow” to 100%
“Smoothing” to 100%
Brush over the desaturated areas to recover color.
If you feel that the color looks too harsh, go to the “Layers” (F7) panel once again.
Then set the “Blend Mode” to “Color” and the “Opacity” value around 60% or the value that suits better for your image.
Once you have finished removing the shadow from the face, it’s recommended to edit the portrait in Lightroom to enhance the photo and make it eye-catching.
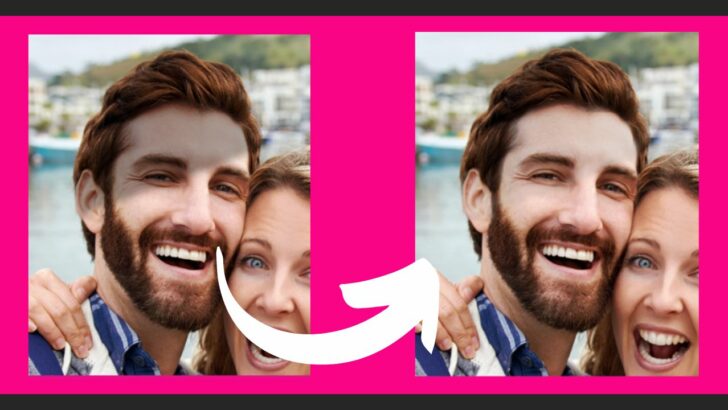
The Result

This is the result of how to get rid of shadows in photos using Photoshop.
After removing the shadow from the face, you may be interested in making the eyes pop in Lightroom.
How to Get Rid of Shadows in Photos Using GIMP
- Duplicate the layer twice
- Select the shadow area
- Mask the Above layer
- Smooth masked layer edges
- Apply layer mask
- Adjust the Curves to dodge
- Merge the layers
- Smudge the edges
- Add color
Step 1: Duplicate the Layer
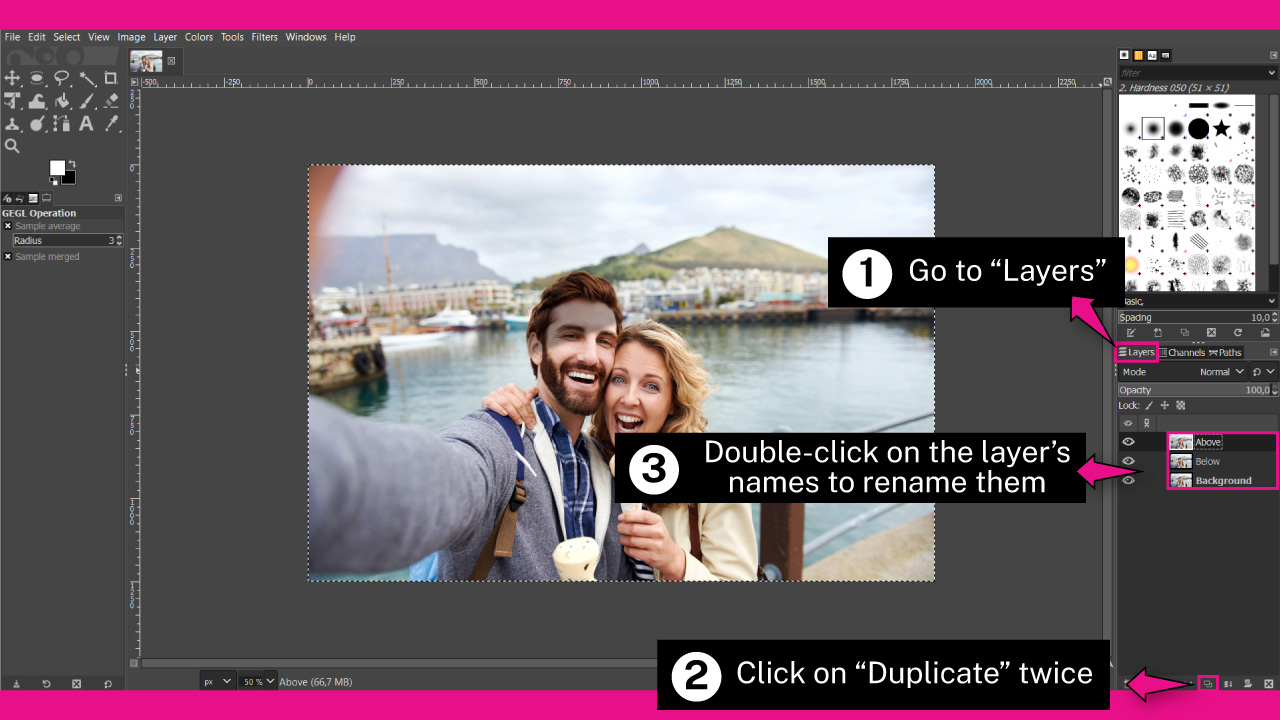
Once you have imported the image into GIMP, go to the “Layers” panel, usually located on the right side toolbar.
If you can’t find it, you may have to enable it first by going to “Windows > Dockable Dialogs > Layers” in the menu at the top of the screen.
Alternatively, you can press the “Ctrl + L” or “Cmd + L” command on your keyboard.
On the “Layers” panel, click twice on the “Duplicated” button to have a total of three layers.
Then, double-click on the layer’s name to rename them to keep your work neat.
I’ll go with “Above,” “Below,” and “Background.”
Step 2: Select the Shadow Area
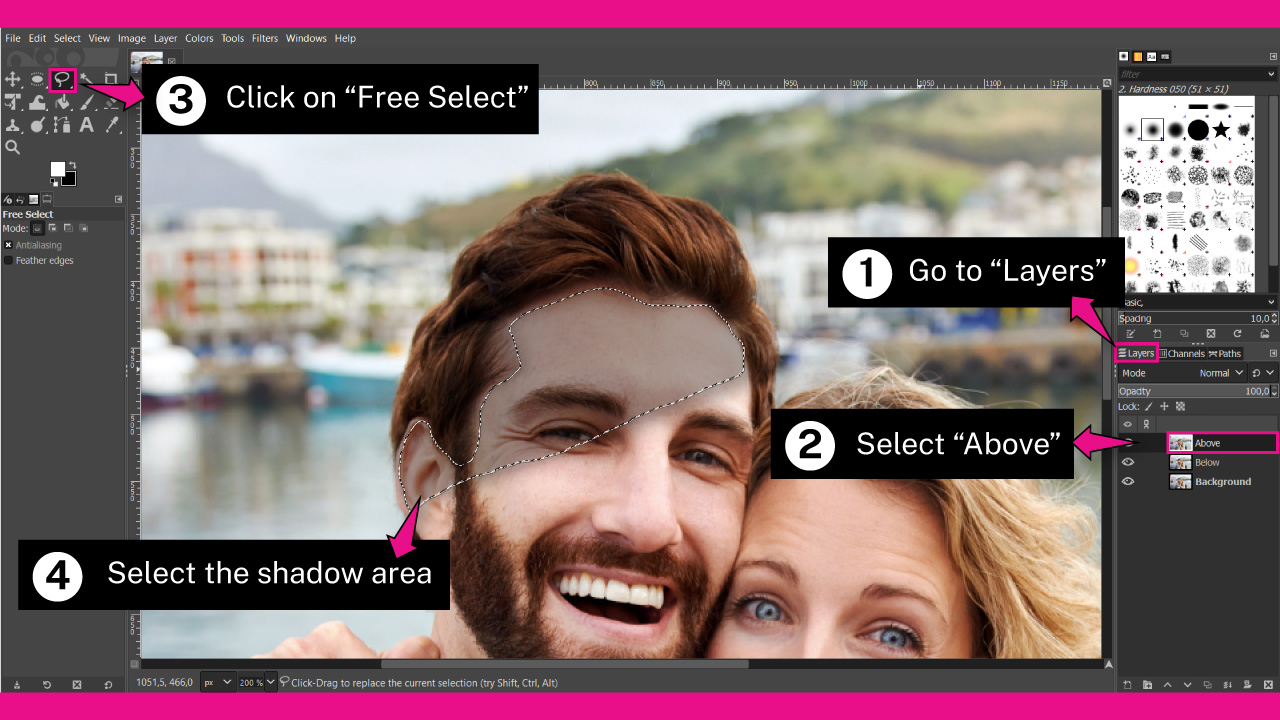
On the “Layers” panel, select the “Above” layer to work here from now on.
Next, click on the “Free Select” (F) tool located on the left side toolbar, or you can press the “F” key to shortcut it.
Use the “Free Select” (F) tool to make a rough selection of the shadow you want to get rid of. You don’t need to make a precise selection, but ensure you stay inside the shadow transition.
Step 3: Mask the Above Layer
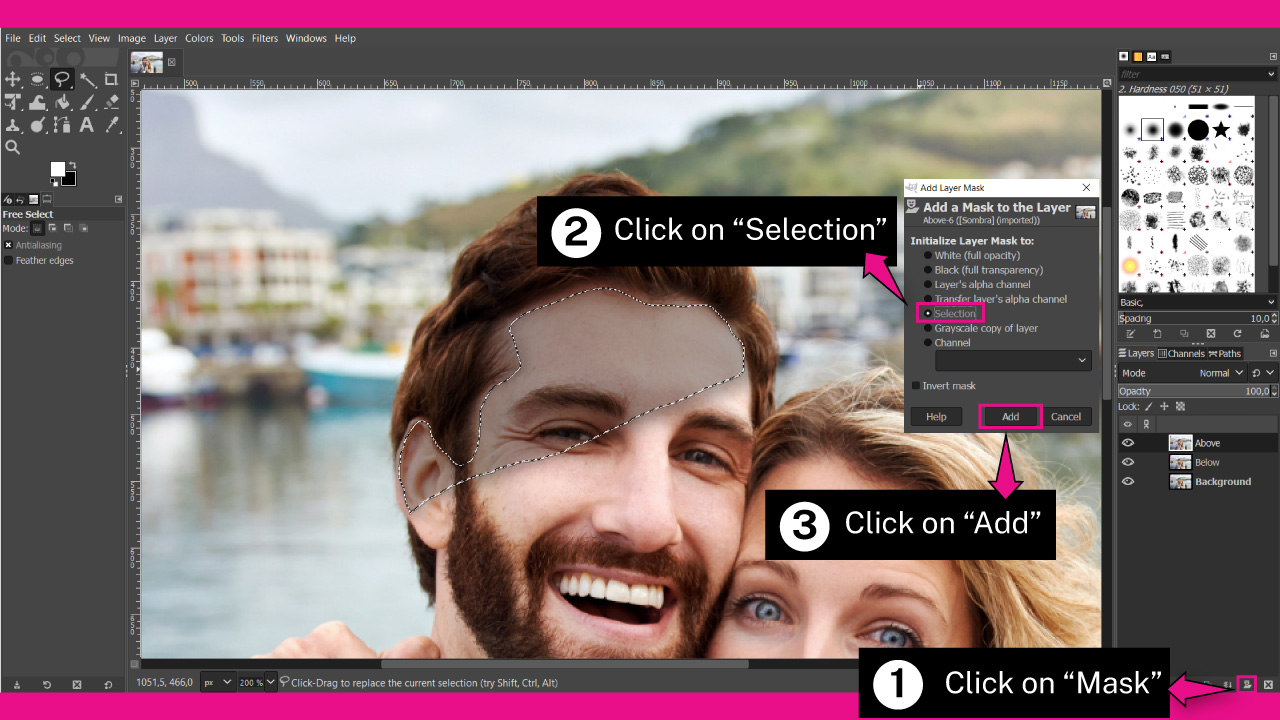
Go to the “Layers” panel and click on the “Mask” button at the bottom of the panel.
On the “Mask” pop up window, select the “Selection” option.
Make sure that the “Invert” checkbox is unmarked.
Then click on the “Add” button to save.
Step 4: Smooth the Masked Layer Edges
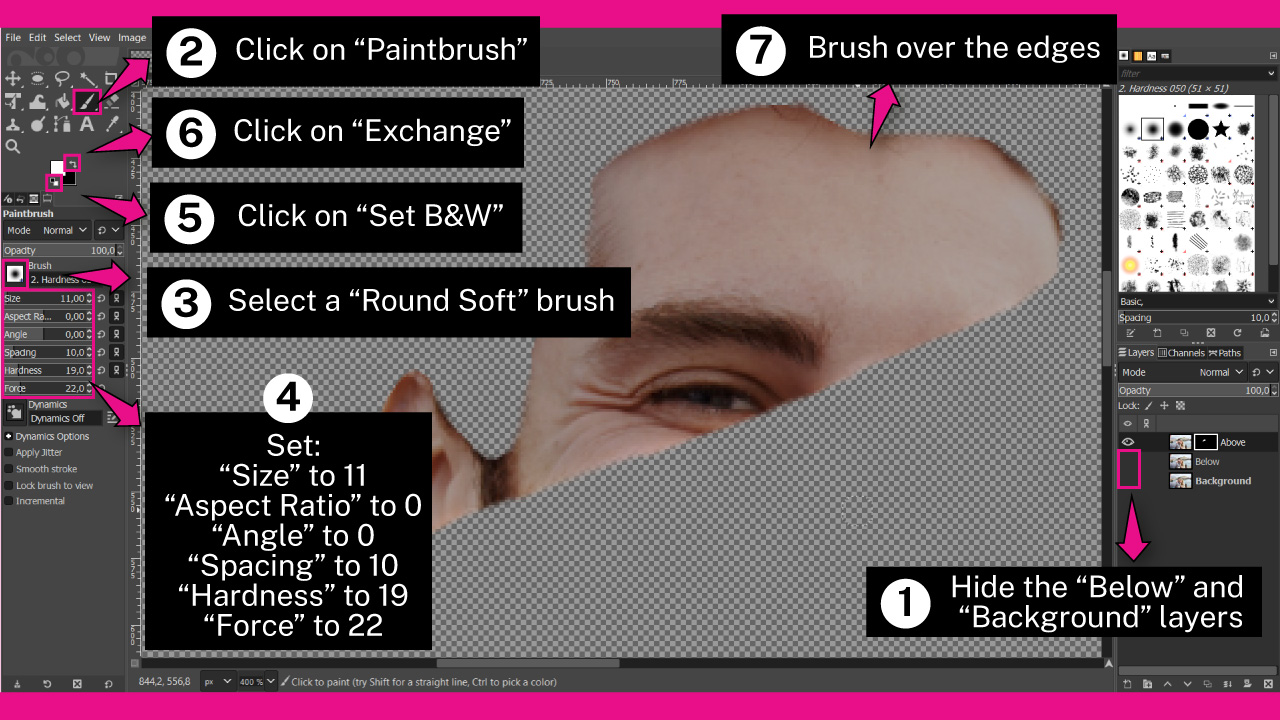
On the “Layers” panel, hide the “Background” and “Below” layers by clicking on their respective “Eye” icons. If the “Eye” icon is not showing, it means the layer is already hidden.
Make sure that the “Above” layer is still selected to continue working on it.
Next, click on the “Paintbrush” (P) tool located on the left side toolbar. Under the toolbox where the “Paintbrush” (P) tool is located, you can adjust its settings.
Select a “Round Soft” brush and set the following parameters:
- “Size” to 11 or your desired value
- “Aspect Ratio” to 0
- “Angle” to 0
- “Spacing” to 10
- “Hardness” to 19
- “Force” to 22
You may need to vary the size value several times during this step.
Then, set the “Foreground” and “Background” color boxes to black and white.
To do this, click on the small button at the left of the color boxes. You can also press the “D” key from your keyboard to quickly set them to black and white.
Next, press the “Exchange” arrow button at the right of the color boxes to swap the position of the colors. We want to set the “Foreground” to white while the “Background” to black.
You can also swap the color positions by pressing the “X” key.
Finally, brush over the edges of the masked layer to smooth them out.
Step 5: Apply Layer Mask
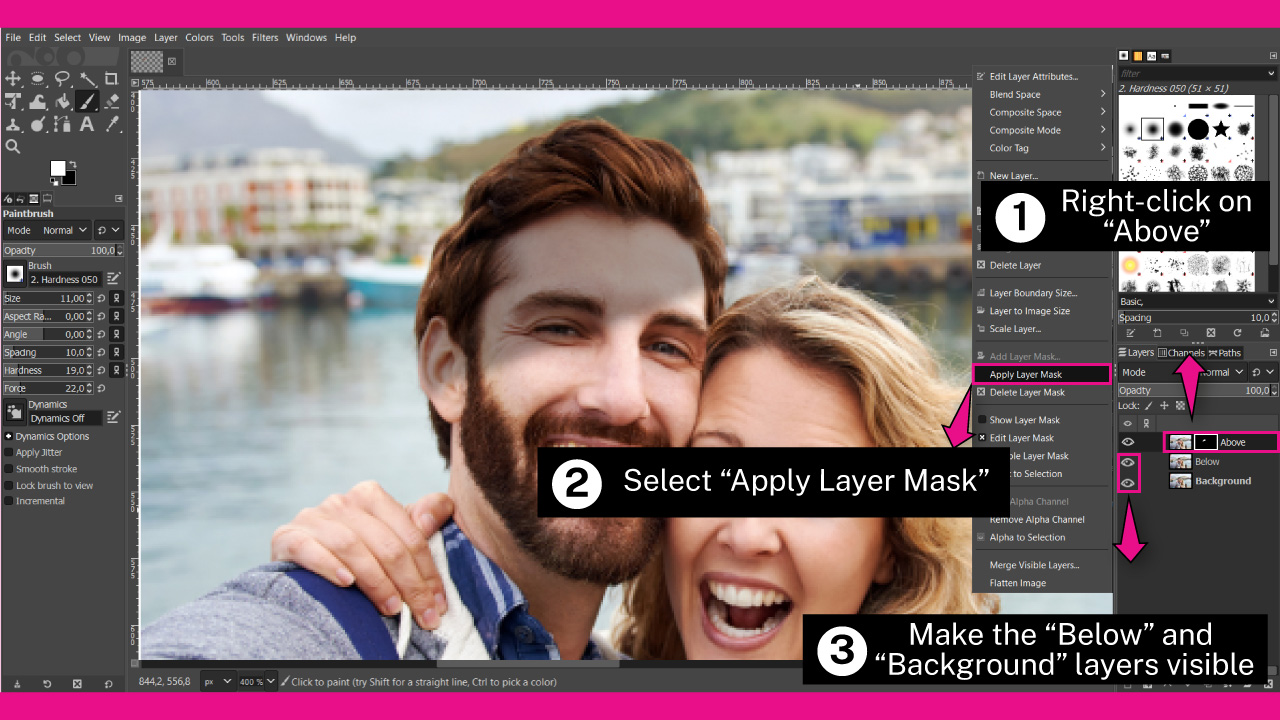
Go to the “Layers” panel and right-click on the “Above” masked layer.
On the unfolded menu select the “Apply Layer Mask” option.
Then make the “Below” and “Background” layers visible again by clicking on its “Eye” icons.
Step 6: Adjust Curves to Dodge
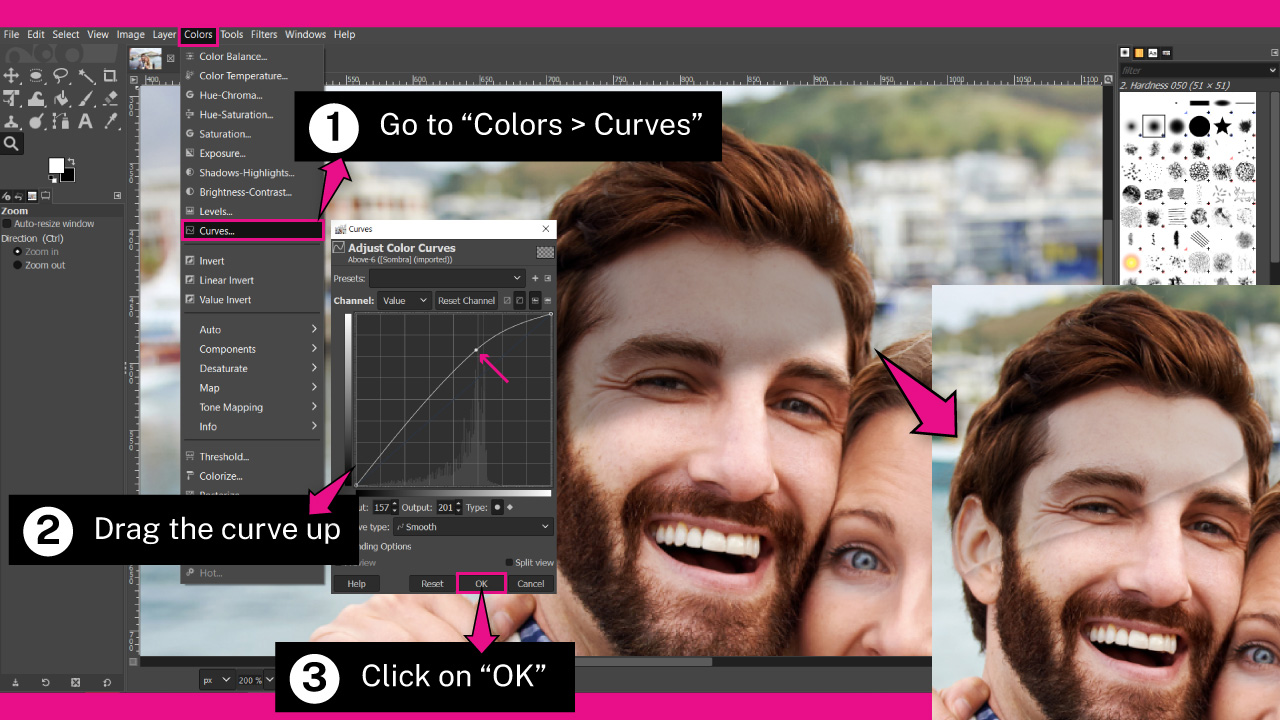
Go to “Colors > Curves” on the menu at the top of the screen.
On the “Curves” pop up window, hold and drag the center of the line to get a concave curve to dodge shadows.
Adjust the curve so that the shadow area has the same lighting as the rest of the face.
Once you are satisfied with the lighting, click on “OK” to save.
Step 7: Use Dodge Brush
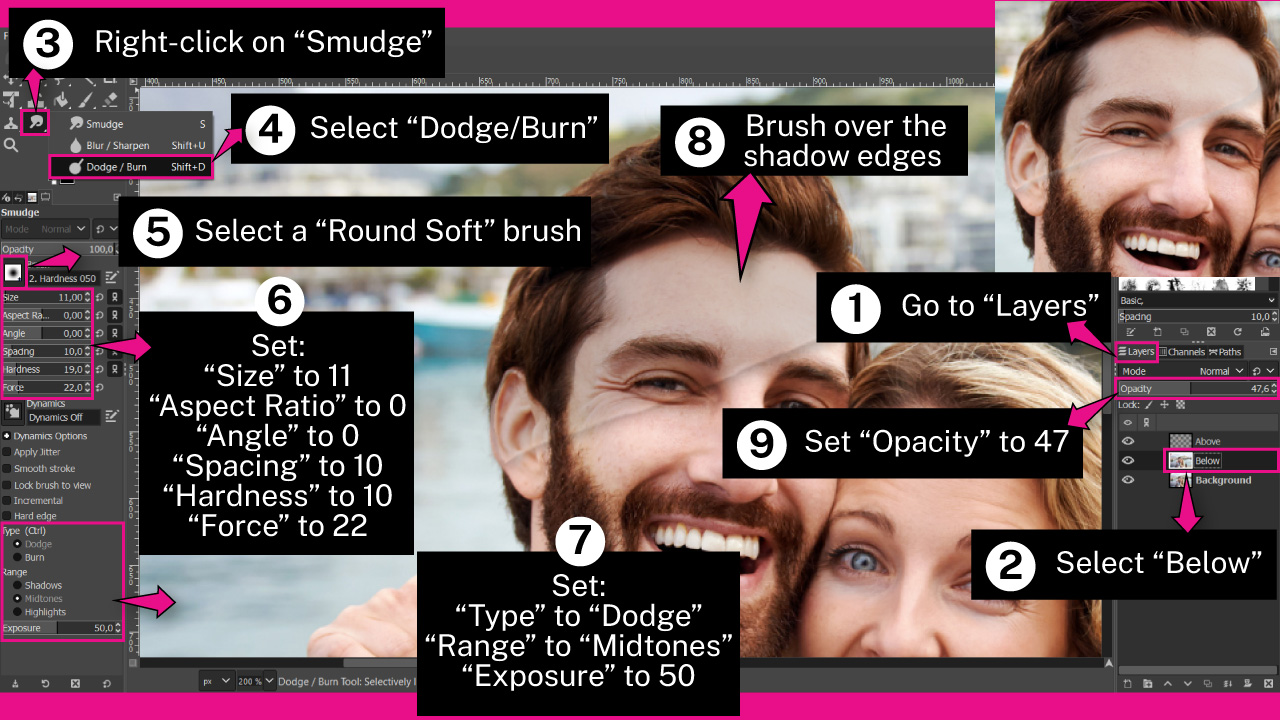
In this step, we will dodge the “Below” layer. The process is pretty similar to dodging and burning in Lightroom but in an easier and more basic way.
So, go to the “Layers” panel and select the “Below” layer to work here from now on.
Then, right-click on the “Smudge” (S) tool located on the left-side toolbar. Once the hidden tool menu unfolds, click on the “Dodge/Burn” (Shift + D) tool.
Alternatively, you can press the “Shift + D” command as a shortcut.
Under the toolbox, where the “Dodge/Burn” (Shift + D) tool is located, you can adjust its settings.
First, select a “Round Soft” brush. Next, set the “Opacity” to around 50%.
The brush settings should be the same as those we used for the “Paintbrush” (P) tool:
- “Size” to 11 or your desired value
- “Aspect Ratio” to 0
- “Angle” to 0
- “Spacing” to 10
- “Hardness” to 10
- “Force” to 22
Next, set:
- “Type” to “Dodge”
- “Range” to “Midtones”
- “Exposure” to 50
Finally, gently brush over the shadow edges to blend with the “Above” layer.
If the result is too harsh, go to the “Layers” panel and set the “Opacity” to around 50 or the value that suits your image better.
If you feel that the photo is getting blurred, after finishing this tutorial, you can fix out of focus photos in Lightroom.
Step 8: Merge the Layers
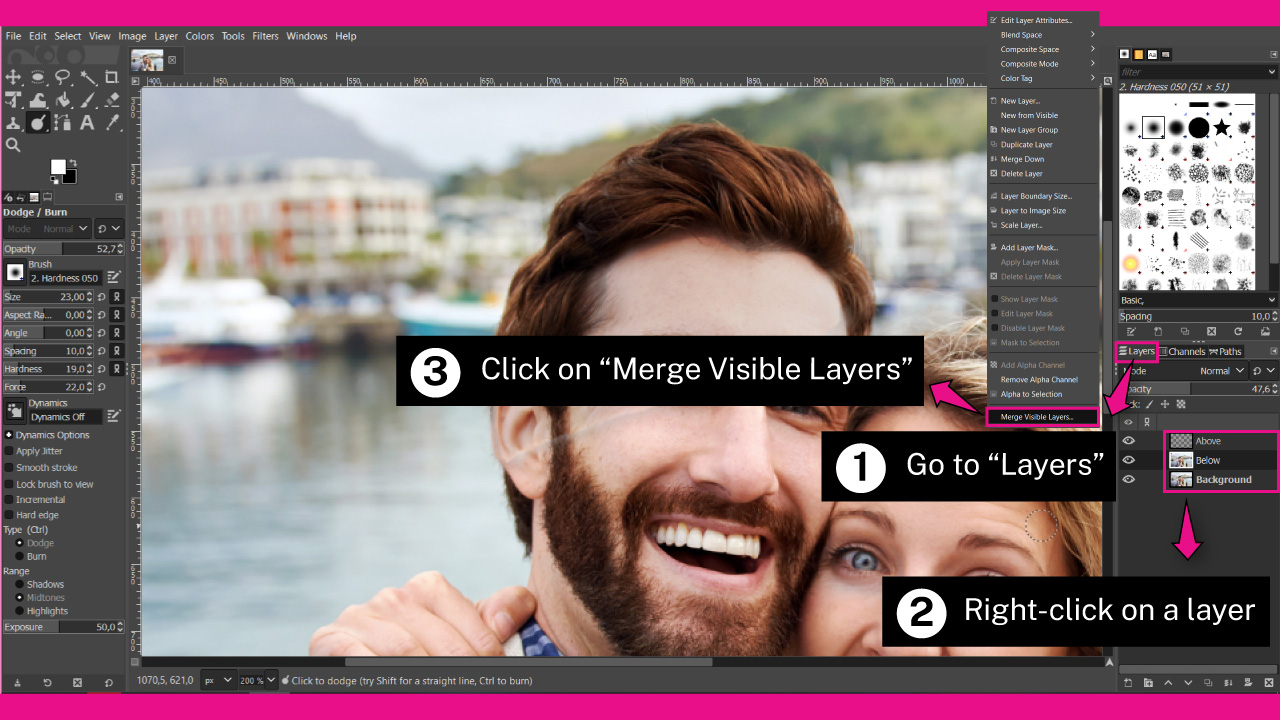
We are getting a good result, but there are still some details of the shadow outline remaining.
To fix this, go to the “Layers” panel and right-click on any layer to unfold the options menu.
On the unfolded menu select the “Merge Visible Layers” option.
Step 9: Smudge the Edges
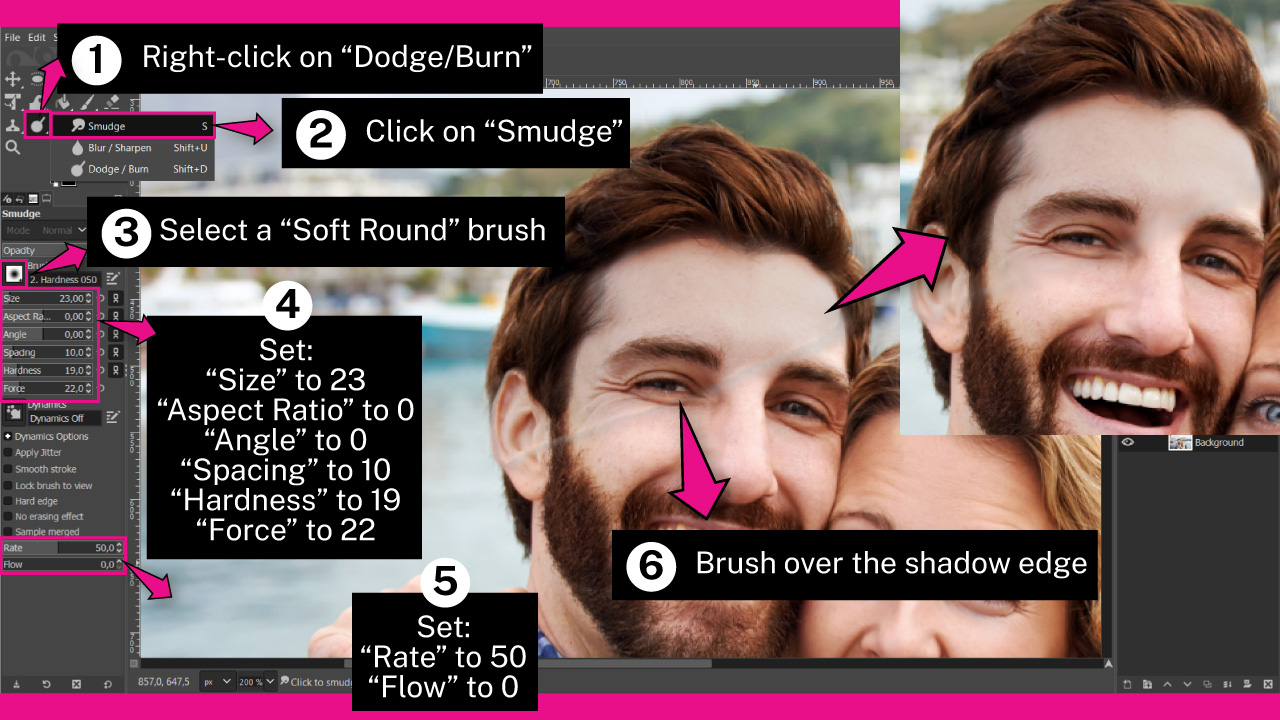
Right-click on the “Dodge/Burn” (Shift + D) panel and select the “Smudge” (S) tool from the unfolded tools. You can also press the “S” key from your keyboard to select it.
Under the toolbox, where the “Smudge” (S) tool is located, set:
- “Size” to 23 or your desired value
- “Aspect Ratio” to 0
- “Angle” to 0
- “Spacing” to 10
- “Hardness” to 19
- “Force” to 22
Next, set:
- “Rate” to 50
- “Flow” to 0
Finally, gently brush over the leftover shadows to blend them with the photo.
You can also use the “Blur” tool to blend the leftover shadows.
Step 10: Add Color
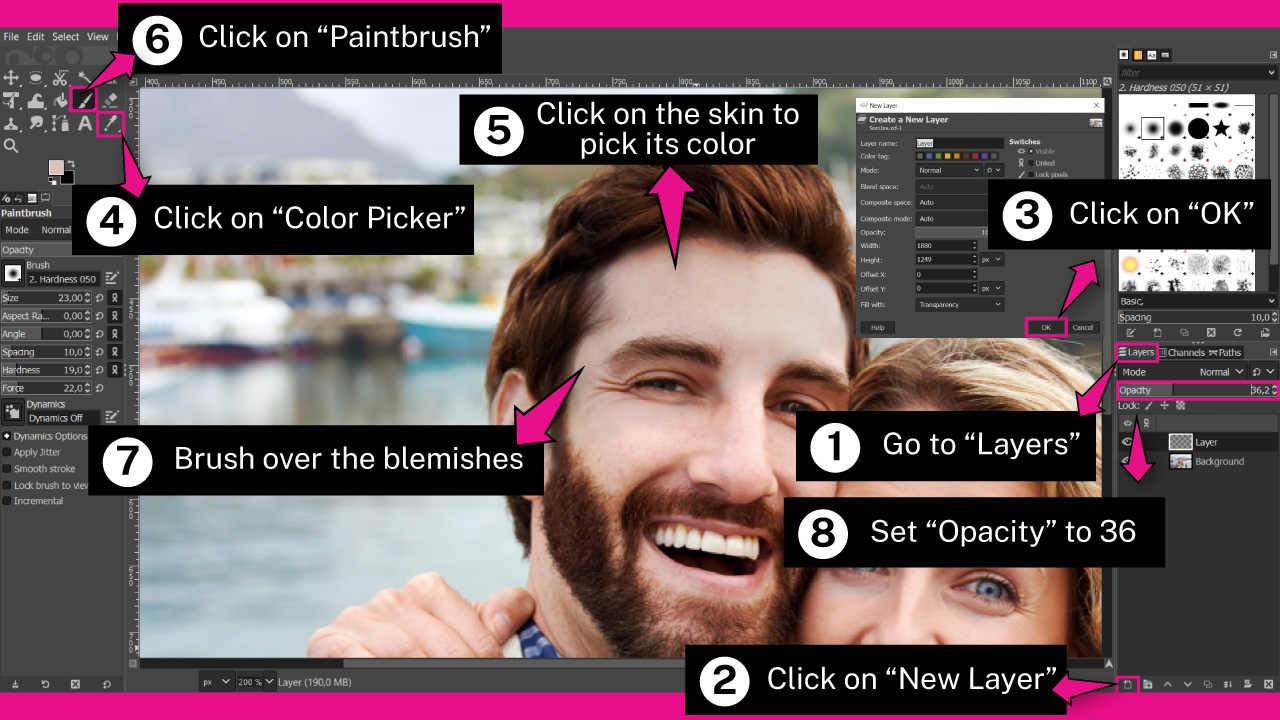
This step is optional. If you feel that there are still some strange areas on the face where the shadows were, you can hide them by adding color.
To add color, go to the “Layers” panel and click on the “Create New Layer” button at the bottom of the panel. On the “New Layer” pop-up window, leave the settings as default, and then click on “OK”.
Next, click on the “Color Picker” (O) tool, located on the left-side toolbar. Or you can press the “O” key from your keyboard to shortcut it.
Use the “Color Picker” to pick a similar color to the area you want to hide the blemishes.
I’ll pick the skin color nearest to the area I want to hide the blemishes.
Then select the “Paintbrush” (P) tool and gently brush over the areas you want to hide.
You may have to use the “Color Picker” (O) tool several times to pick different shades of color depending on the area you want to cover.
Once you have finished, return to the “Layers” panel and adjust the “Opacity” value around 35% to blend the brush strokes with the photo.
Feel free to run several tests until you get the value that works better for you.
The Result
This is the result of how to get rid of shadows in photos using GIMP.
Keep in mind that if you are going to use this photo as a client proof, you may want to add a watermark to the photo without using Photoshop, instead of sending them the final file.
How to Get Rid of Shadows in Photos
Getting rid of shadows can bedone using Photoshop or GIMP. In both software, select the shadow area, mask it, and adjust the Curves to dodge it. Blur the edges of the mask, and then use the Smudge or Blur tool to blend the shadow edges. Finally, add color strokes to the desaturated or blemished areas.
Frequently Asked Questions on “How to Get Rid of Shadows in Photos”
How to get rid of shadows in a photo for free on iPhone or Android?
Most of the shadows can be removed using “Snapseed”. To remove shadows, tap on “Tools” in the menu at the bottom of the screen. Then, tap on the “Healing” tool. Finally, brush over the areas where you want to remove the shadows.
How to get rid of shadows in a photo online?
Go to Fotor.com and click on “Edit a Photo”. Upload a photo, and then click on the “Adjust” panel on the left-side toolbar. In the “Smart Tools” section, click on the “Object Remover” option. Set the “Brush Size” and brush over the shadow. Finally, click on “Apply”.

I am a professional blogger and entrepreneur with a strong interest and passion in photo editing. On MindRelic, I happily share my expertise in the photo editing niche with all of you guys!
tadalafil or sildenafil
tadalafil or sildenafil