
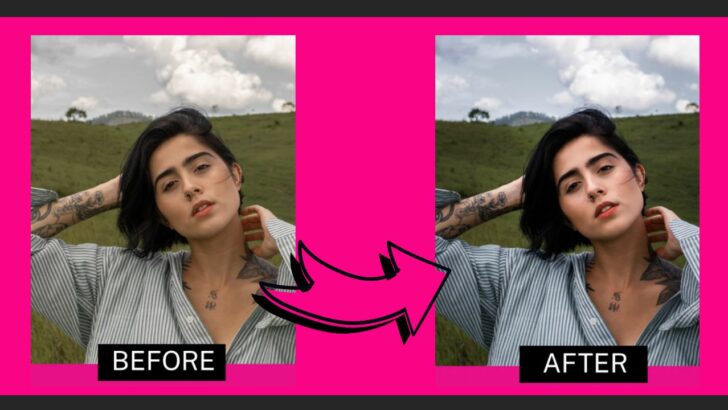
One of the most popular uses for Lightroom is editing portraits.
Achieving a well-done and well-edited portrait, can take it from being tasteless and lifeless, to dramatic and interesting.
This is the best way to catch viewers’ attention and focus.
If you’re interested in the best secrets of professional portrait editing in Lightroom, you are in the right place.
Let’s begin!
How to Edit Portraits in Lightroom
- Go to the “Develop” module
- Dodge the photo
- Balance to white
- Increase “Contrast”
- Adjust “Vibrance”, “Saturation” and “Whites” sliders
- Adjust “HSL/Color” settings
- Adjust “Sharpening” and “Noise Reduction” settings
- Crop the photo
- Add “Radial Filter” to darken and blur the background
- Softens skin
- Heal pimples
- Sharpen the hair, eyebrows, lashes and lips
- Contour the face by adding shadows
- Contour the face by adding highlights
- Whitens the teeth and eyes
- Highlight the irises
- Highlight the hair
Step 1: Go to the Develop Module
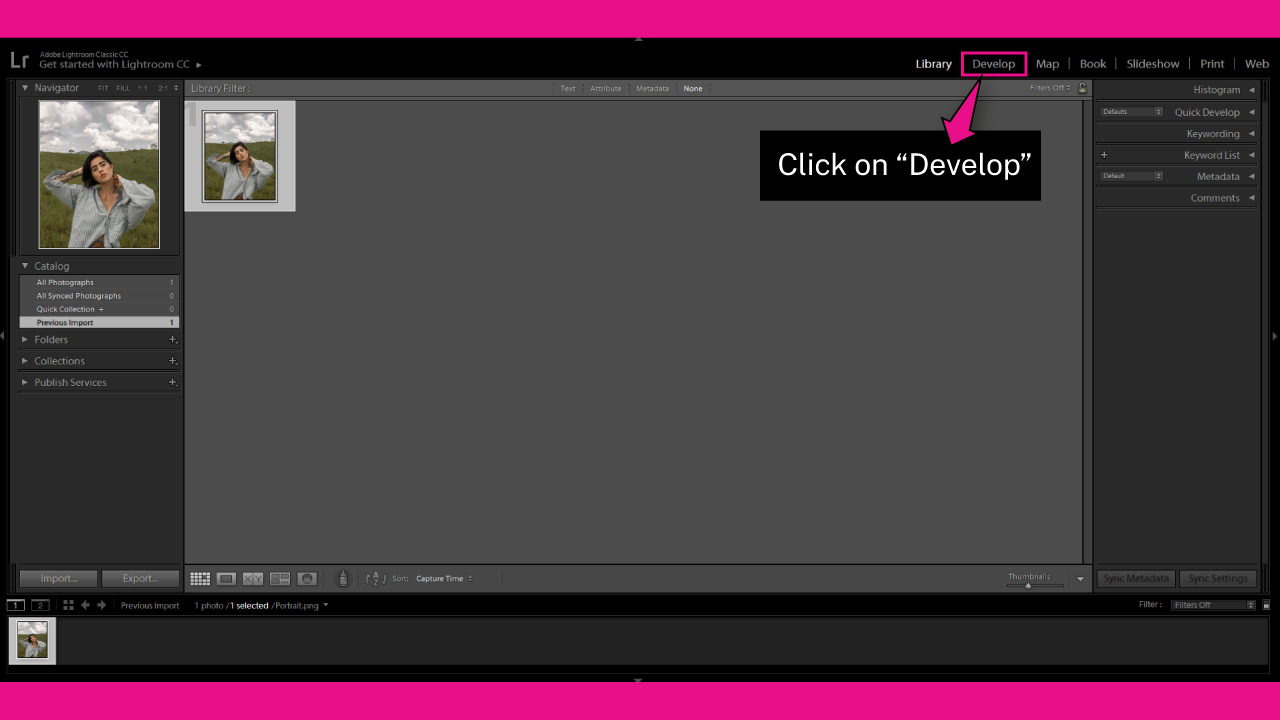
Once you’ve imported your image in Lightroom, go to the “Develop” module in the toolbar at the top of the screen.
If you can’t visualize it, click on the ▼ icon to unfold the hidden modules panel.
You can also access the “Develop” module by going to “Window > Develop” in the toolbar at the top of the screen.
Or by pressing the “Ctrl + Alt + 2” (Windows) or “Cmd + Option + 2” (Mac) command.
Step 2: Dodge the Photo
First, we’ll apply general effects to enhance the whole image, and then we’ll focus on specific areas.
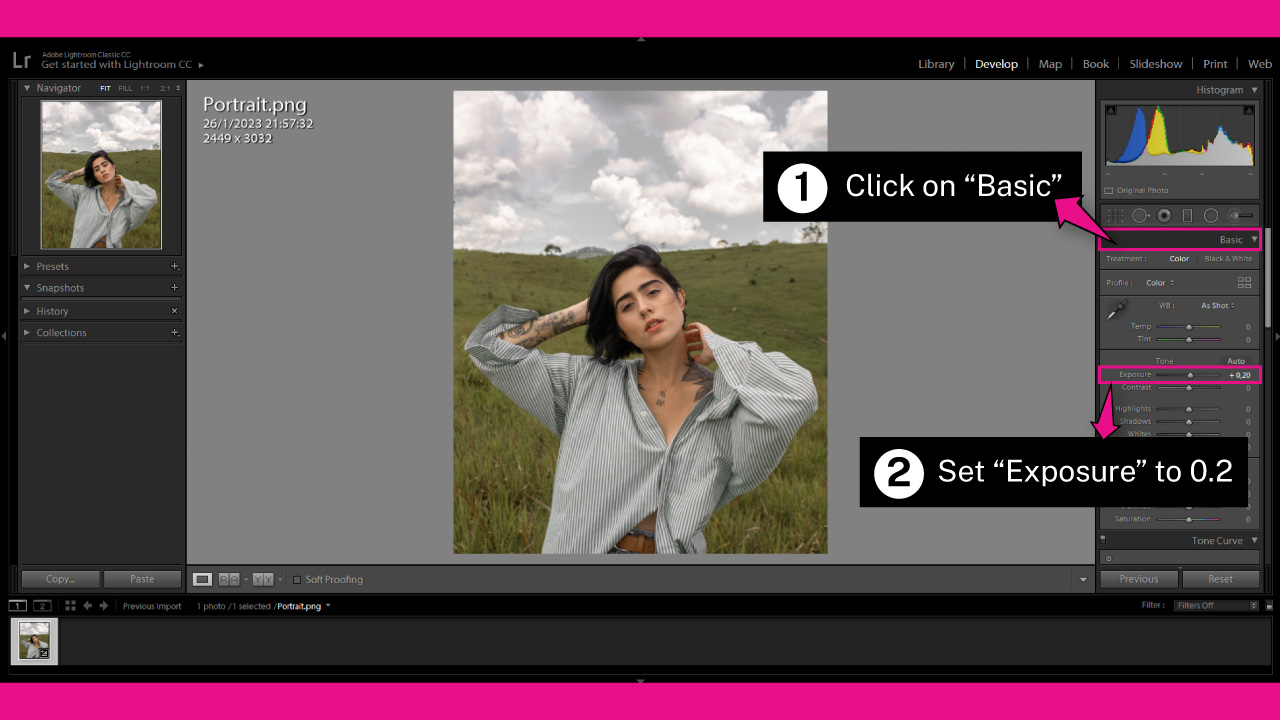
On the right side of the screen, you’ll find panels and tools you can use to edit your photo.
Keep in mind that the values we set may vary depending on the image you’re working on, so use this tutorial as a guide, but always make sure to run some tests on each field to get your desired result.
Click on the “Basic” panel, and set the “Exposure” slider to around 0.2 to add some brightness to your image.
The “Exposure” slider, also known as dodge and burn in Lightroom, controls the overall brightness of the photo.
Step 3: Balance to White
This image has a yellowish/greenish tint, so we need to balance the colors to white.
Most images have some kind of color mismatch, so before proceeding with the rest of the adjustments, it’s always a good idea to fix the color and balance it to white.
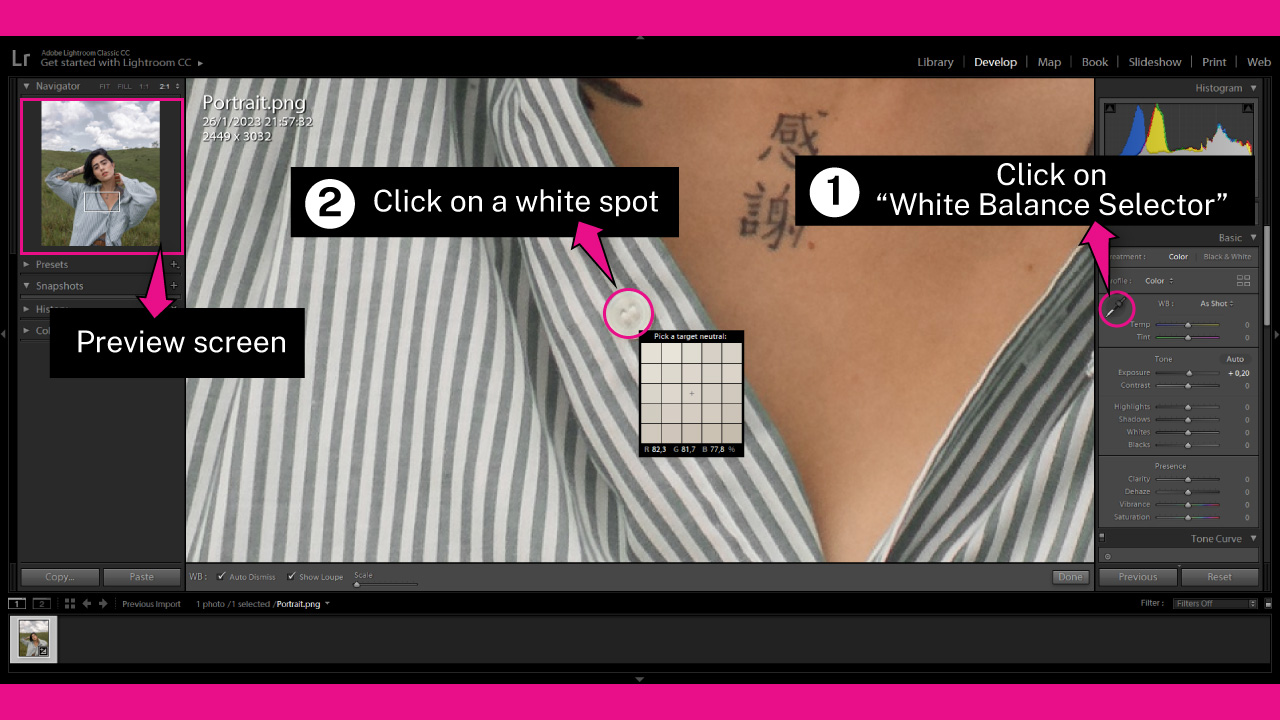
The best way to do this is by selecting the “White Balance Selector” (W) tool located on the “Basic” panel.
Next, locate a spot in the image that should be white or gray. Try to avoid the white of teeth or eyes because these colors are not pure white.
Teeth usually have a slightly yellowish pigmentation, while the white part of the eye tends to be bluish.
For this example, I’ll use the white of a shirt button, but you can use any other object or spot in your image that should be white or gray.
Once you’ve selected the “White Balance Selector” (W) tool, click on the white/gray spot to balance the colors. The image colors will automatically be balanced to white.
If you want to preview the result before clicking, you can check the possible outcome in the “Navigator” panel on the left-side toolbar.
Step 4: Add Contrast
To make the colors pop, we need to add some contrast.
We’ll add contrast using two different tools.
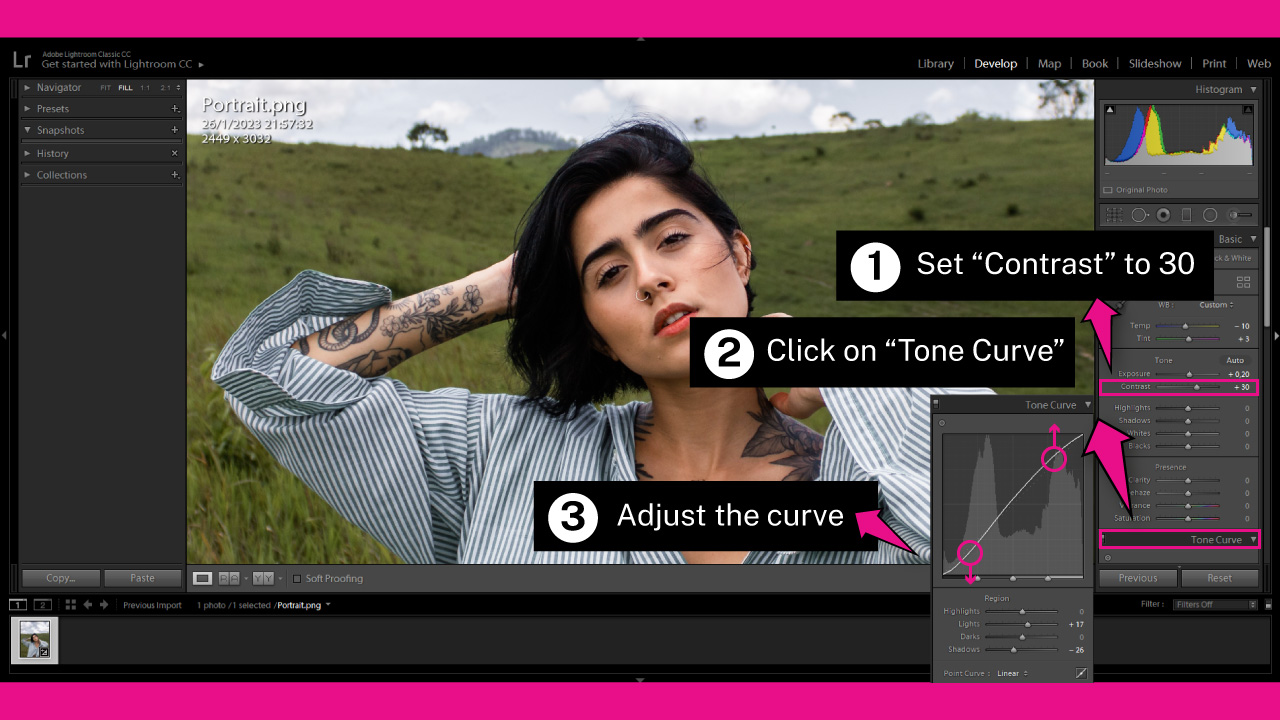
First, set the “Contrast” slider located on the “Basic” panel to 0.3 or your desired value.
Try not to go too far with the “Contrast” slider, it’s preferable to set it slightly below to the perfect amount.
Next, click on the “Tone Curve” panel, also located on the right-side toolbar.
On the “Tone Curve” panel, you’ll find a linear graph.
The x-axis (horizontal) represents the shadows on the left and highlights on the right. The y-axis (vertical) represents the amount of shadows/highlights.
The idea is to turn the linear curve into a subtle “S” shape. The “S” shape will make your shadows slightly darker and the highlights slightly brighter.
So, click and hold on the left side of the curve and drag it down slightly. Then click and hold on the right side of the curve and drag it up slightly.
The difference between adjusting the contrast using the “Contrast” slider and the “Tone Curve” panel is that with the latter, you have more control.
You can achieve different amounts of contrast for shadows, midtones, and highlights.
Step 5: Adjust Vibrance, Saturation and Whites
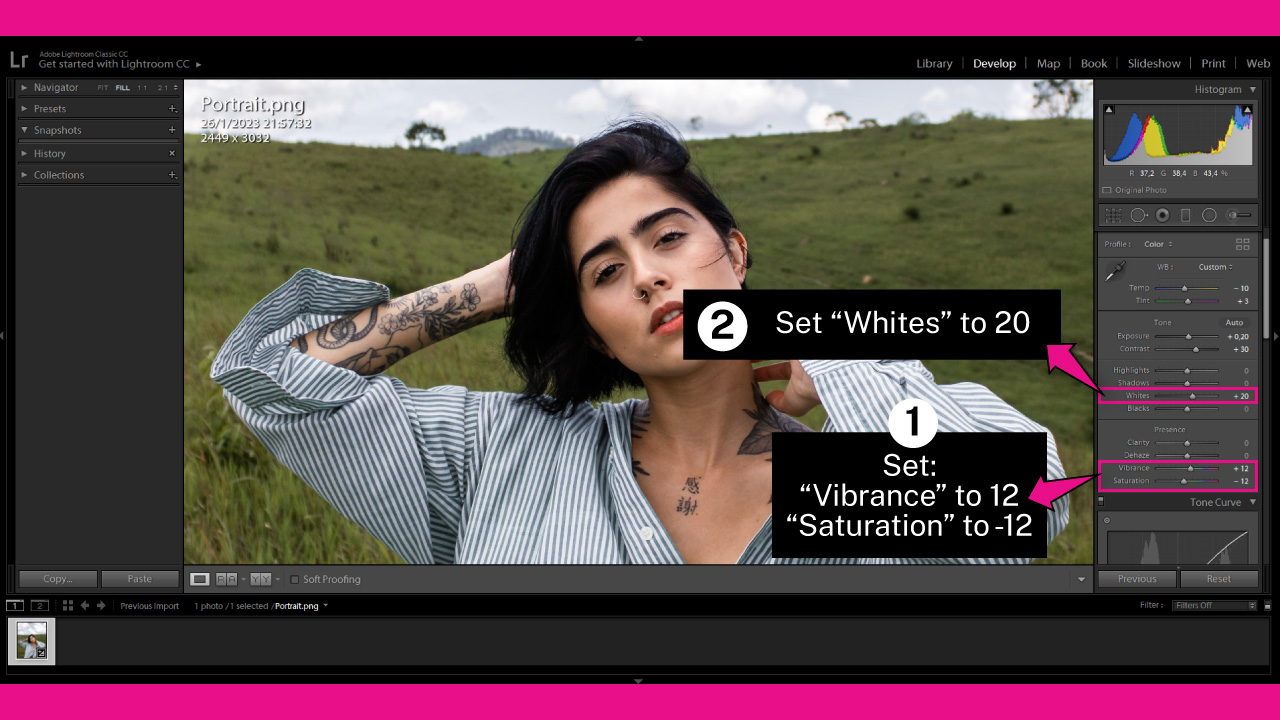
Next, we will adjust the “Vibrance,” “Saturation,” and “Whites” sliders, which can all be found on the “Basic” panel.
Set:
“Vibrance” to 12
“Saturation” to -12
“Whites” to 20
Note that the values may vary depending on your image.
Both “Vibrance” and “Saturation” adjust the intensity of colors, but “Vibrance” works in a more balanced way, increasing intensity on less saturated areas and avoiding over-saturation on already vibrant areas.
Increasing the “Whites” value adds brightness to white areas.
Use these values as a starting point and feel free to adjust them to suit your specific image.
Step 6: Adjust HSL/Color
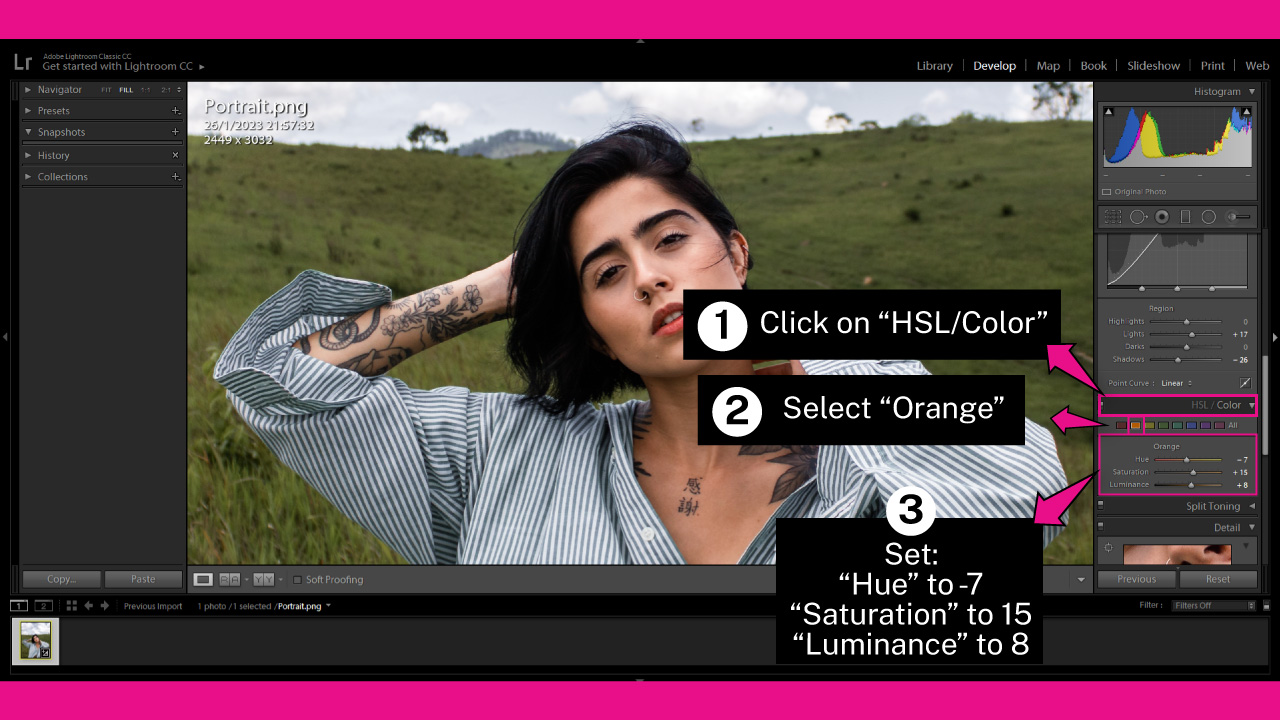
In this step, we will adjust the “HSL/Color” panel to add color to the skin. HSL stands for Hue, Saturation, and Luminance.
Click on the “HSL/Color” panel, located on the right side toolbar.
Next, select the “Orange” color box and set:
“Hue” to -7
“Saturation” to 15
“Luminance” to 8
Keep in mind that these values may vary slightly depending on your image.
Our goal is to add a slight orange tint to the skin. You can experiment with different values until you achieve your desired result.
Step 7: Adjust Sharpening and Noise Reduction
Since the photo I am working on was not taken in a close-up shot, the texture of the skin and clothes is not noticeable.
However, if your photo was taken in a close-up shot, this step will greatly enhance the texture of your image.
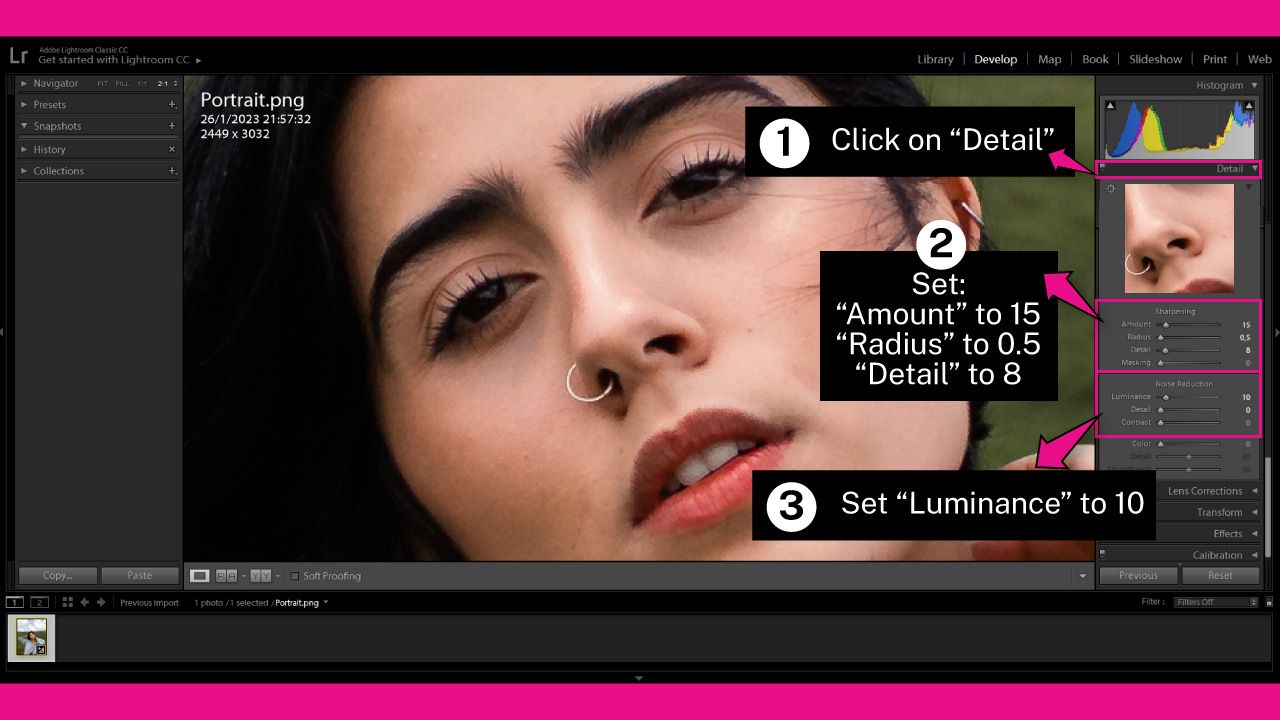
On the right side toolbar, scroll down and click on the “Detail” panel.
In the “Sharpening” section, set:
“Amount” to 15
“Radius” to 0.5
“Detail” to 8
In the “Noise Reduction” section, set:
“Luminance” to 10
Keep in mind that these values are tailored to my image, so you may need to adjust them slightly to suit your photo.
Step 8: Crop the Photo
It’s time to crop the photo.
Since we need a portrait, and not a generic photo, we have to focus on the subject’s face.
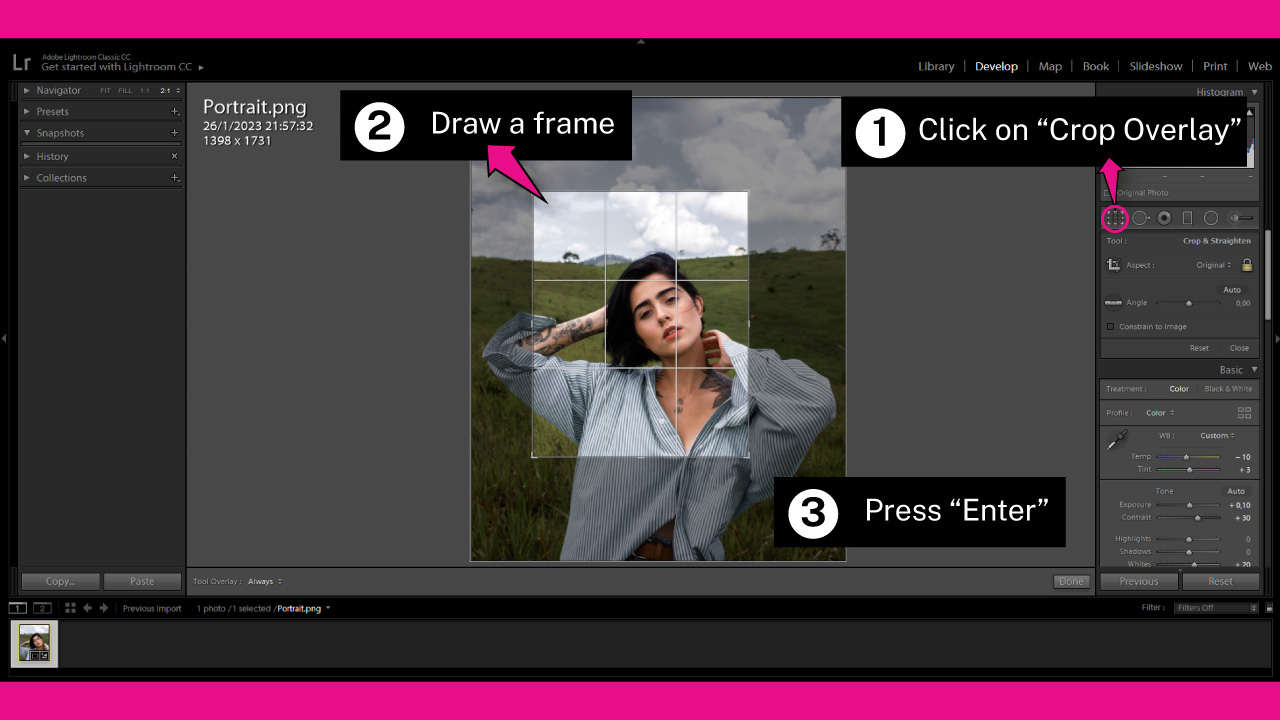
To crop in Lightroom, click on the “Crop Overlay” (R) tool located on the right side toolbar.
Once you are in the “Crop Overlay” (R) mode, draw a frame over the image.
If the frame isn’t in the exact place you want, you can drag it and relocate it.
If the frame hasn’t the exact size you want, you readjust by using the sides and corner handles of the frame.
Try to focus the frame to the face. Place the face on the middle of the frame or use the Rule of Thirds.
The Rule of Thirds is a composition guide that splits a scene into thirds and places the subject at an intersection.
When you’re satisfied with the size and placement of the frame, press the “Enter” key on your keyboard to confirm the crop.
Step 9: Add Radial Filter
To direct the viewer’s gaze to the subject’s face, we will darken and blur the radial area around the face.
Darkening and blurring the background in Lightroom, will help reduce possible background distractions.
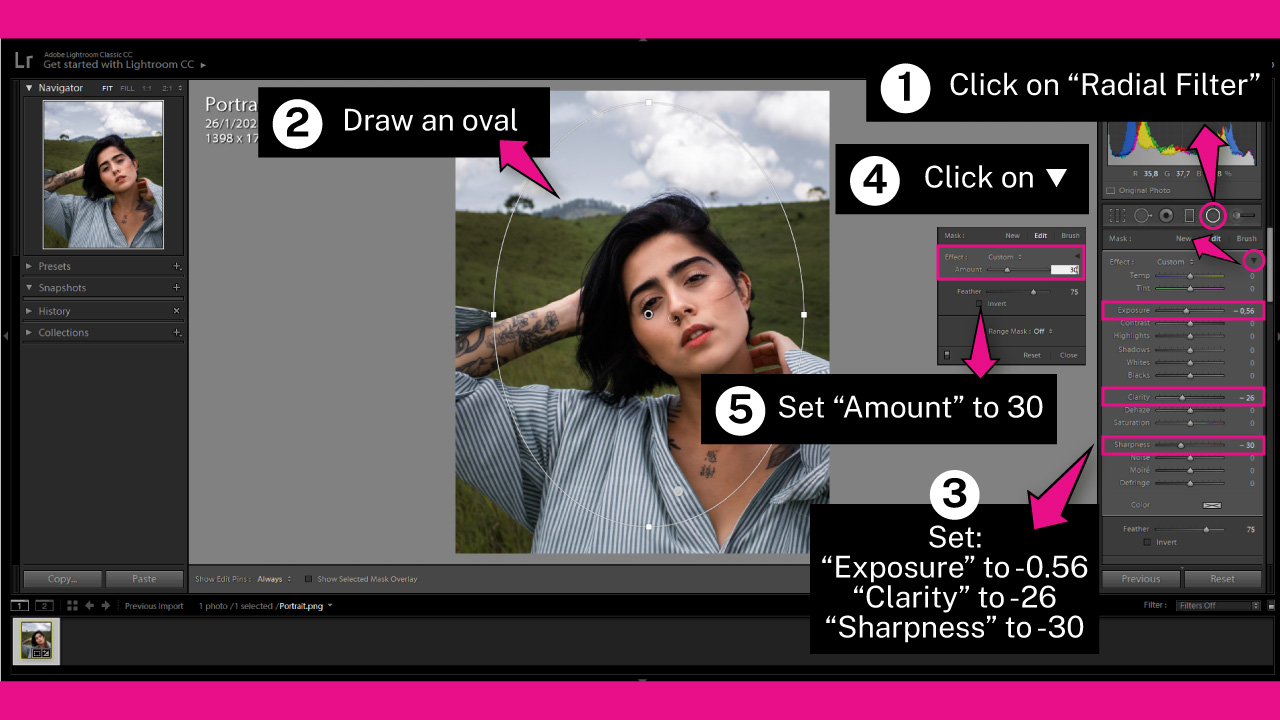
To achieve this, click on the “Radial Filter” (Shift + M) tool on the right side toolbar, or use the “Shift + M” shortcut.
Once you’re in “Radial Filter” (Shift + M) mode, draw an oval mostly centered around the face.
If you can’t get the desired shape in your first attempt, you can readjust the oval shape by using the handles on the oval.
Then, in the toolbar on the right side, set:
“Exposure” to -0.56
“Clarity” to -26
“Sharpness” to -30
The values may vary slightly on your image.
If you need to adjust the intensity of the effect, you can do so using the “Amount” controller.
To access the “Amount” controller, click on the “Radial Filter” ▼ icon to collapse the panel. Then you’ll have access to the “Amount” controller.
Adjust the “Amount” slider if needed. I’ll set it to 30.
Step 10: Softens the Skin
Skins used to have some imperfections. So it’s always a good idea to soften the skin in Lightroom.
To soften the skin, we’ll use brushes in Lightroom.
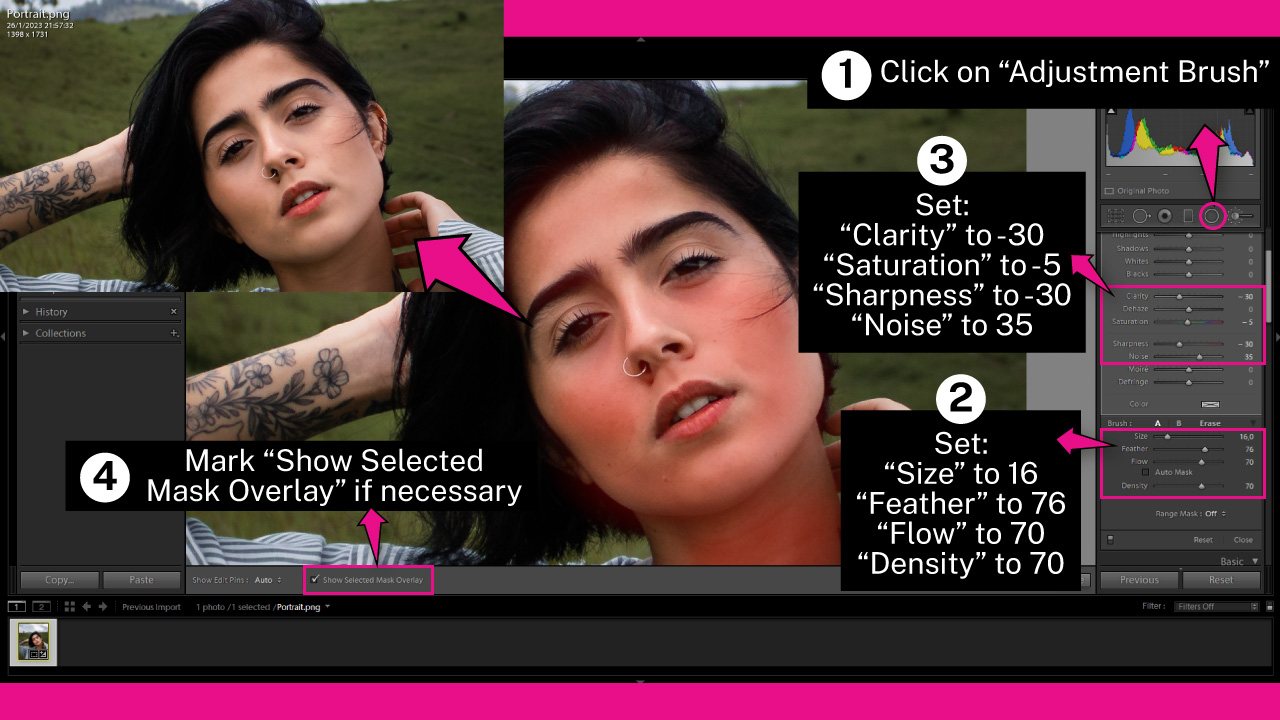
Click on the “Adjustment Brush” (K) tool located on the right side toolbar, or press the “K” key on your keyboard as a shortcut.
First, set the brush settings:
“Size” to 7 or your desired size
“Feather” around 76
“Flow” to 70
“Density” to 70
You can also adjust the brush size using the scroll wheel on your mouse.
Next, adjust the “Effects” settings:
“Clarity” to -30
“Saturation” to -5
“Sharpness” to -30
“Noise” to 35
Note that these values may vary slightly depending on your image. So you will have to play around with these settings a bit in order to get the best results.
Paint over the face, neck, and neckline, focusing on the most problematic areas, but avoid the mouth, eyes, eyebrows, lashes, tattoos, noseholes, etc.
If you want to see the area where you’re applying the brush, mark the “Show Selected Mask Overlay” checkbox at the bottom of the screen. To hide it, simply unmark it.
When you mark the “Show Selected Mask Overlay” checkbox, you’ll see the areas where the brush has been applied in red
Step 11: Heal Pimples

If you find pimples or other temporary imperfections on your subject’s skin, it’s reasonable to remove them.
However, be mindful not to remove birthmarks or other permanent marks, as these are traits that define the subject’s face and make it unique.
To remove pimples, we’ll use the healing brush tool in Lightroom, also known as the “Spot Removal” (Q) tool.
Click on the “Spot Removal” (Q) tool located on the right side toolbar. Then select the “Heal” mode and set:
“Size” to 45
“Feather” to 82
“Opacity” to 100
Note that these values may vary slightly based on your image.
Brush over the problematic areas to heal them. Once you click on a pimple, for example, it will be automatically filled with a texture.
This texture is a sample from a certain spot in your image, selected by Lightroom’s AI to cover the blemish.
However, you may often need to adjust the patch and source to achieve better results. Simply drag and place the patch and source spots if necessary.
Repeat this process until all imperfections are patched.
Step 12: Sharpen the Hair, Eyebrows, Lashes and Lips

The purpose of this step is to enhance the texture of the hair, eyebrows, lashes, and lips.
To do this, select the “Adjustment Brush” (K) tool in Lightroom.
Since we have already used this tool to soften the skin, we will create a new brush by clicking the “New” button.
Then double-click on “Effect” to reset the settings.
In the “Brush” panel, set “Size” to around 8 as a small brush will be required.
Then, in the “Effect” panel, set the following values, which may vary depending on your image:
“Contrast” to 15
“Highlights” to 20
“Shadows” to -10
“Clarity” to -20
“Dehaze” to 3
“Saturation” to 10
“Sharpness” to 10
“Noise” to 10
“Moiré” to -20Apply the brush to the hair, eyebrows, lashes, and lips.
If you need to remove a portion of the masked area, hold down the “Alt/Option” key while brushing over it or, switch to the “Erase” tool located next to “Brush” in the right-side toolbar.
Step 13: Contour the Face by Adding Shadows
In this and following steps, we’ll contour the face, neck, and neckline by exaggerating the shadows and highlights a bit.
To contour, we’ll use the “Adjustment Brush” (K) tool, as we did in the previous step.
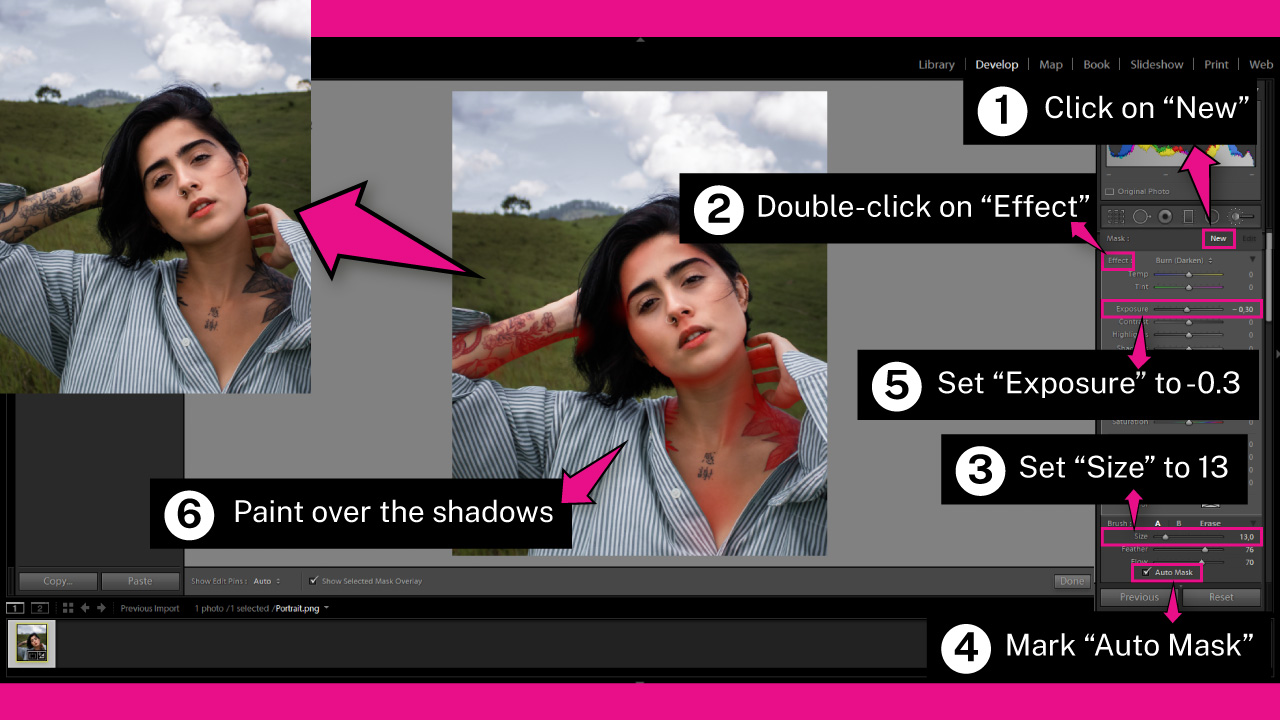
First, create a new brush by clicking the “New” button.
Then, double-click on the “Effect” title to reset the settings.
Next, we’ll create a brush for the shadows.
Go to the “Brush” panel and set the “Size” to around 13.
Then mark the “Auto Mask” checkbox.
The “Auto Mask” checkbox helps us to mask specific areas while ignoring others. This tool masks areas of similar colors to the first area you start brushing on.
Then, in the “Effect” settings, set the “Exposure” to around -0.3.
Finally, brush over the shadow areas, including the nose holes and black tattoos.
If you feel that you’ve added too much or too little effect, you can adjust the intensity by using the “Exposure” slider.
Step 14: Contour the Face by Adding Highlights
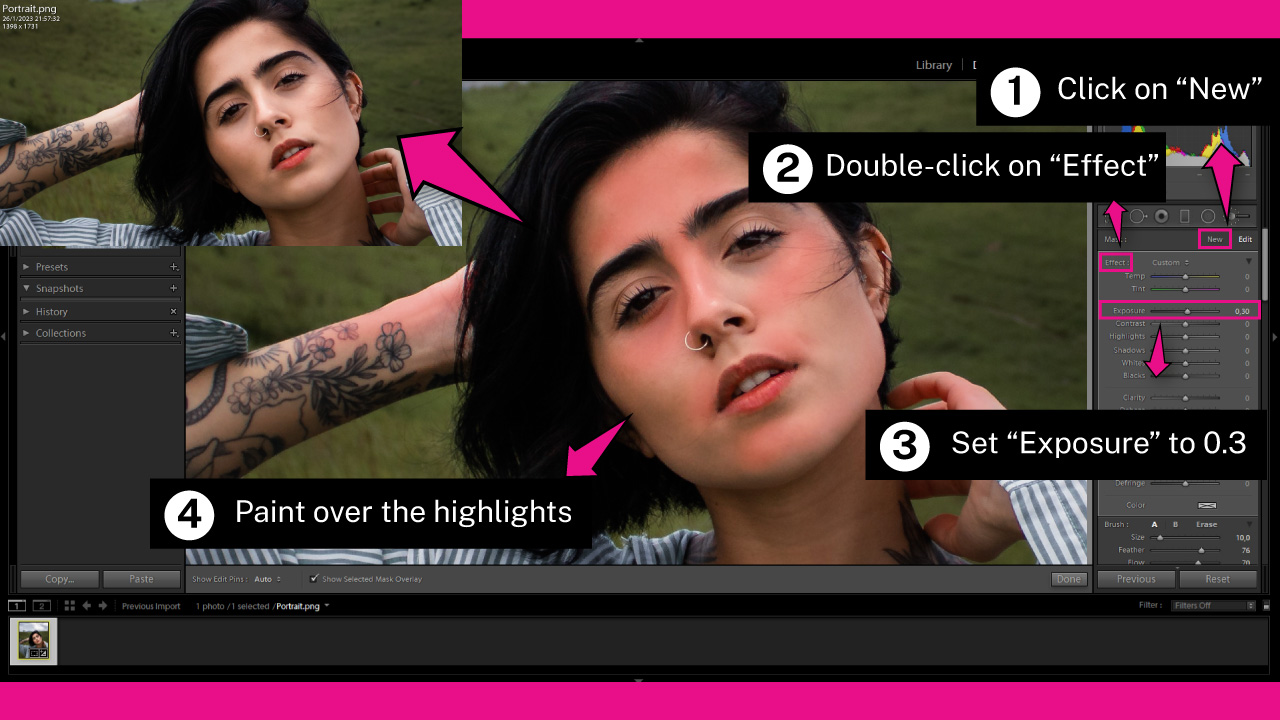 It’s time to add highlights.
First, create a new brush by clicking the “New” button. Then, double-click on the “Effect” title to reset the settings.
In the “Effect” settings, set the “Exposure” to around 0.3.
Then, brush over the bright areas of the face, including the forehead, nose dorsum, chin, top of the cheeks, highlighted areas of the neck and neckline.
If you feel that the effect is too harsh or too soft, you can adjust the intensity by using the “Exposure” slider.
Step 15: Whitens the Teeth and Eyes

While teeth typically have a yellowish natural shade, a little whitening can be appreciated if the subject has an intense shade. However, be mindful not to over-exaggerate the teeth whiteness, as this can appear unrealistic.
Similarly, the eye white part (sclera) tends to be bluish, but sometimes appears too dark in photos. Brightening it can make the eyes stand out, but again, excessive whitening can look unrealistic.
To whiten teeth in Lightroom, first select the “Adjustment Brush“ (K) tool.
Then create a new brush, clicking on the “New” button.
Next, double-click on the “Effect” title to restart the settings.
In the “Effects” panel, set:
“Temp” to 17
“Exposure” to 0.1
“Saturation” to -30
Note that these values may vary slightly depending on your image.
You can adjust the brush size as needed.
Then brush over the teeth.
These settings are intended to whiten teeth.
For whitening the eyes, set “Temp” to -17 instead.
However, if the visible eye white part is narrow, you can use the same brush you used for the teeth.
If the subject’s photo was taken in a close shot, or the eye white parts are more visible, you should use a different brush for each part.
Once you have brushed over the teeth and eyes, you can adjust the whitening effect’s intensity by adjusting the “Amount” controller.
To display this, click the “Effects” ▼ icon to collapse the panel, which will give you access to the “Amount” controller.
I’ll set it to 30, but you can adjust it to the value that works best for your photo.
Step 16: Highlight the Irises
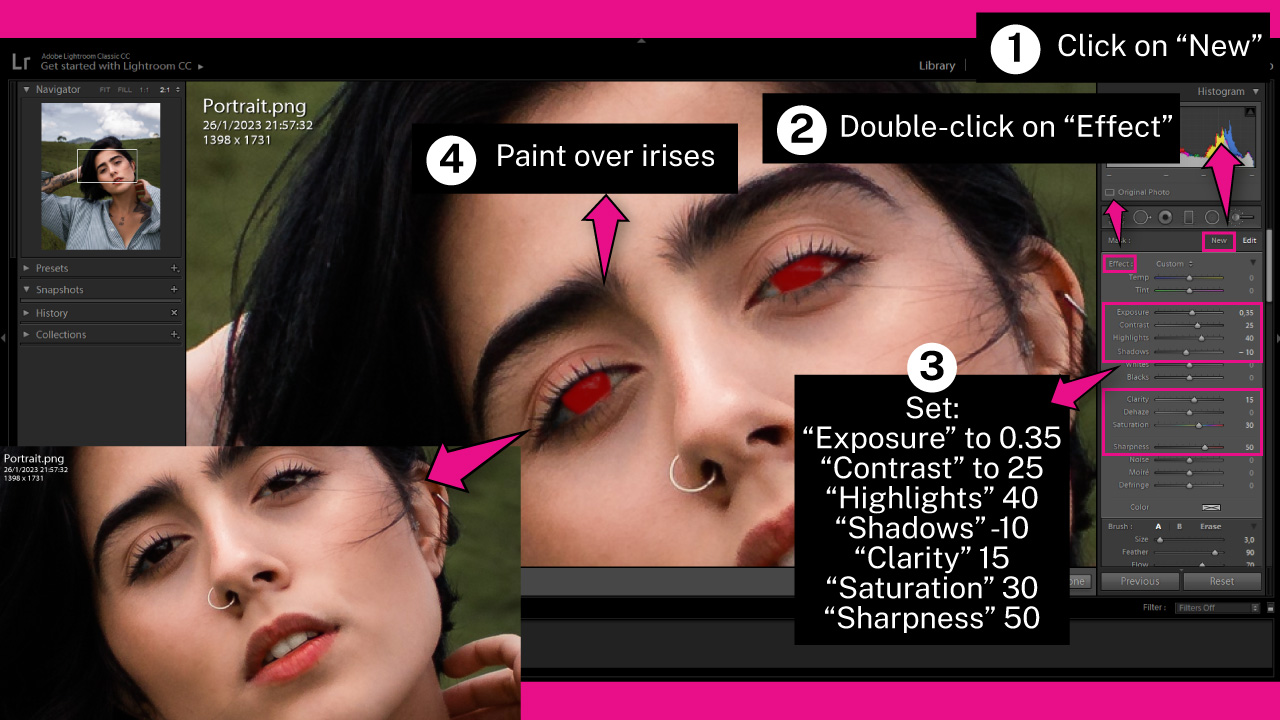
To make the eyes stand out, we’ll apply some effects to the irises.
To start, select the “Adjustment Brush” (K) tool and create a new brush by clicking the “New” button. Then, double-click the “Effect” title to reset the settings.
In the “Effects” panel, set the following:
“Exposure” to 0.35
“Contrast” to 25
“Highlights” to 40
“Shadows” to -10
“Clarity” to 15
“Saturation” to 30
“Sharpness” to 50
Note that these values may vary slightly depending on your image.
Brush over the irises. You can adjust the effect intensity using the “Amount” controller.
To display this, click the “Effects” ▼ icon to collapse the panel and access the “Amount” controller.
In my example, the subject photo wasn’t taken in a close shot, so the iris details are not noticeable and the applied effect is not as prominent.
However, if you are working with a higher resolution image, you will see a noticeable difference between the before and after.
Step 17: Lighten the Hair
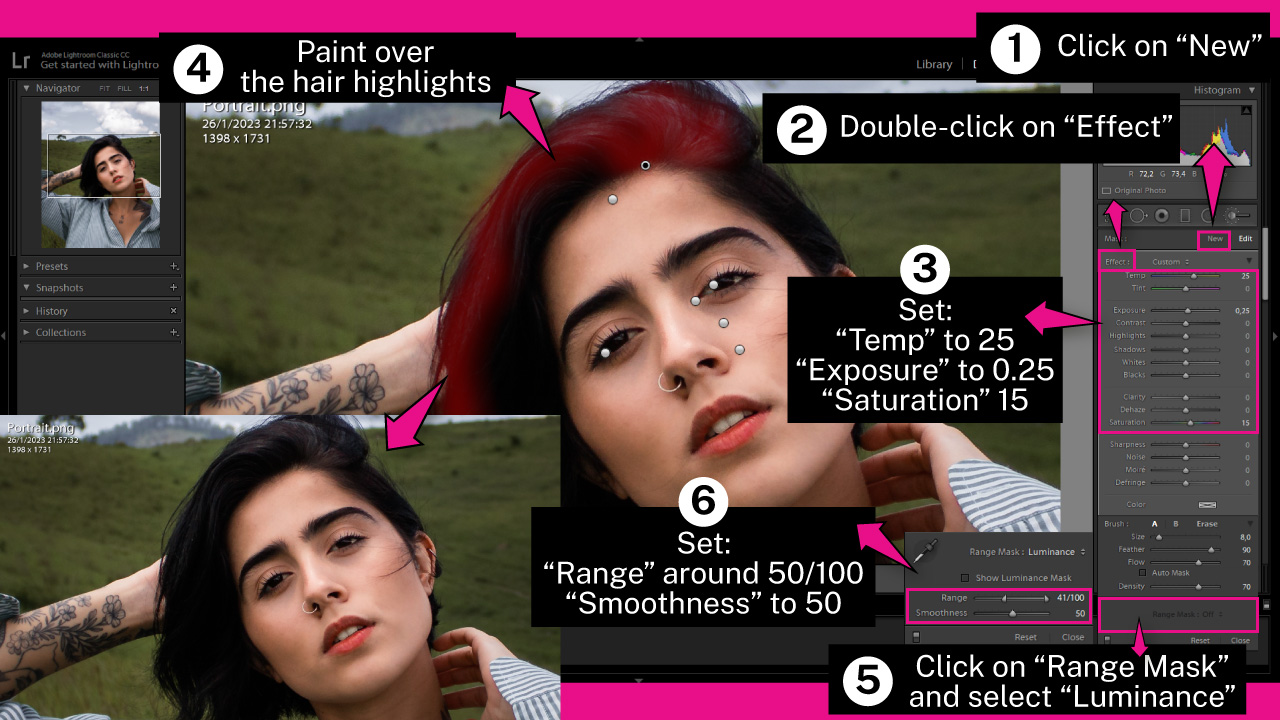
In this final step, we will increase the highlights in the hair.
To do this, make sure you have the “Adjustment Brush” (K) tool selected.
Then, click on the “New” button to create a new brush and double-click on the “Effect” title to reset the settings.
Set the following values:
“Temp” to 25
“Exposure” to 0.25
“Saturation” to 15
Note that the values may vary slightly depending on your image.
Next, brush over the brightest areas of the hair to enhance them.
To prevent loss of shadow intensity, it is important to avoid lightening the dark areas of the hair. To achieve this, we will use the “Range Mask” tool.
Click on the “Range Mask: Off” tool located under the “Brush” settings.
Then select “Luminance” from the popup menu and adjust the “Range” slider so that it goes from the middle to the right with a value around 50/100.
Finally, set the “Smoothness” to around 50.
With these settings, the effect will only be applied to the highlights and a limited range of midtones.
The Result
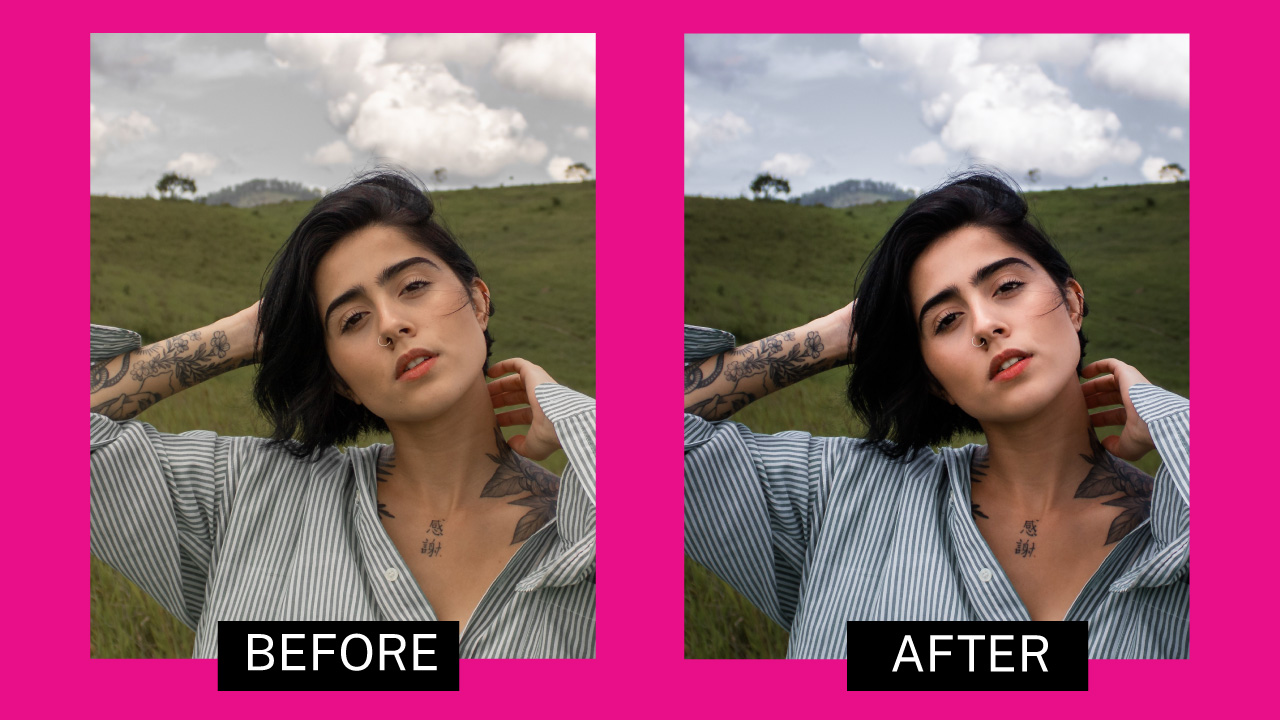
This is the result of how to edit portraits to make the colors pop and add dramatism.
Tip: Clean Up After Editing
After exporting multiple portrait versions from Lightroom — different crops, presets, or formats — your Mac can end up with dozens of identical photo files across Downloads, Desktop, and your export folder. I use DupScan to scan for duplicate photos by file content rather than filename, which catches copies even when they’ve been renamed during export.
Frequently Asked Questions on “How to Edit Portraits in Lightroom”
What are the main adjustments to make when editing a portrait in Lightroom?
Crop the image to focus on the face. Then balance the colors to white. Make the colors pop by adding contrast and vibrance. Use a radial filter to blur and darken the background. Soften the skin and heal any pimples. Contour the face by emphasizing the shadows and highlights.
What is the “Auto Mask” feature in Lightroom for?
This tool masks areas of similar colors to the first area you start brushing. For example, if you start brushing bright areas like white, it will ignore dark areas like black. However, if you get too close to dark areas, it will also mask them. So, use this tool with caution.
How do I add contrast using the “Tone Curve” graph in Lightroom?
Go to the “Develop” module and click on the “Tone Curve” panel. The goal is to turn the linear curve into a subtle “S” shape. To do this, click and hold on the left side of the curve and drag it down a bit. Then click and hold on the right side of the curve and drag it up a bit.

I am a professional blogger and entrepreneur with a strong interest and passion in photo editing. On MindRelic, I happily share my expertise in the photo editing niche with all of you guys!
elavil without a rx
elavil without a rx
cialis sample
cialis sample