Have you ever tried to edit the colors of your current logo?
Have you ever wanted to run some trials to check how a logo would look like in a different color combination?
Have you ever designed some merchandising for your brand, where you have to apply your logo on different surfaces with different colors, but you don’t know which combinations work better?
If any of these is your case, keep reading to find out how to sort out these obstacles using free online apps.
In this tutorial we’ll learn four easy ways to change the colors of a logo using Pixlr X, Canva, Pixlr E and Vecteezy.
For the first three methods we’ll be using images in bitmaps (PNG or JPG), and for the last one we’ll use vectors (SVG), so you can choose the method that suits your needs better.
On the first two methods you will be able to change all the colors at once, but on the last two methods (Pixlr E and Vecteezy) you will be able to select specific areas or spots of your logo to change their colors.
Let’s find out how all this works!
How to Change the Color of a Logo without Photoshop
You can either:
1. Go to Pixlr X, upload a logo in PNG or JPG, and modify the “Hue”.
2. Use Canva and apply DuoTone or ColorMix filters.
3. Go to Pixlr E, select an area and paint it with the Draw or Fill tools.
4. Go to “Vecteezy”, upload the logo in SVG, select an area and change the color.
How to Change the Colors of a Logo Using Pixlr X
Go to the Pixlr X website and upload your logo. Go to “Adjust & Filter > Color > Hue” on the left side toolbar. Set the “Hue” value. Save the image by clicking on the “Save” button.
Step 1: Go to the Pixlr Website
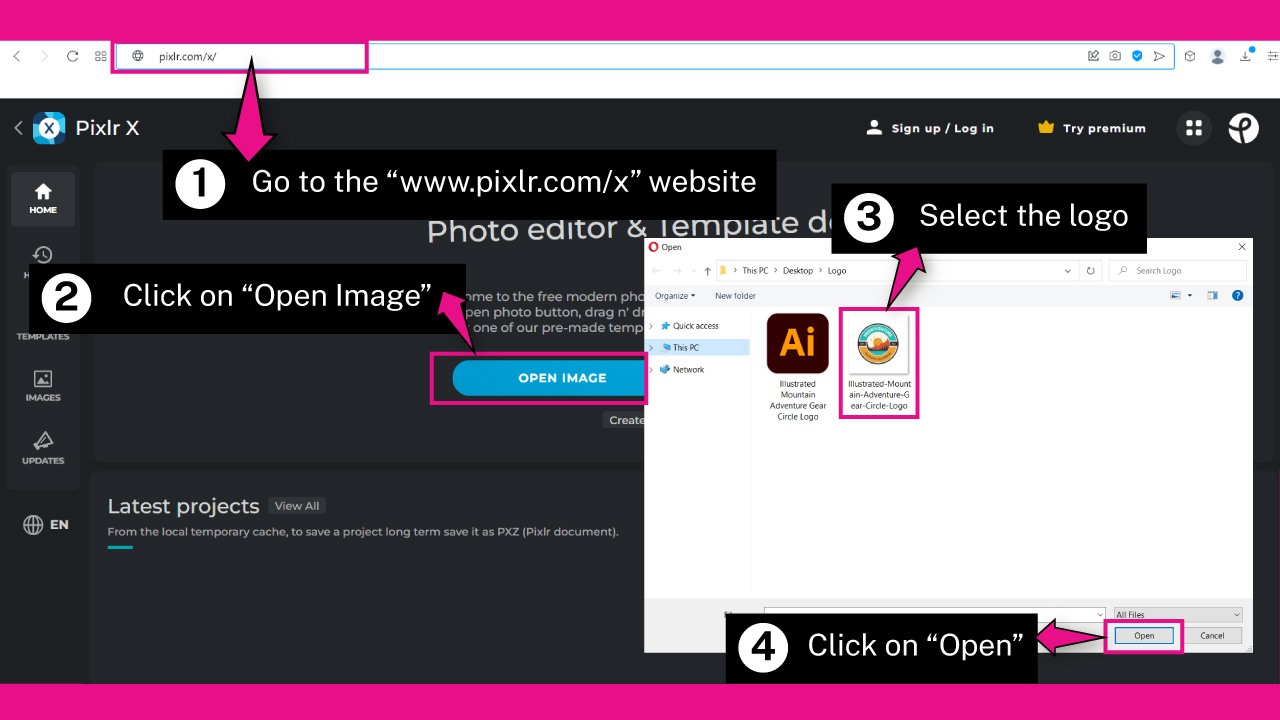
Open your browser and go to the pixlr.com/x website.
Click on the “Open Image” button.
Select the logo you want to change colors to, and click on the “Open” button.
Step 2: Change the Logo Color
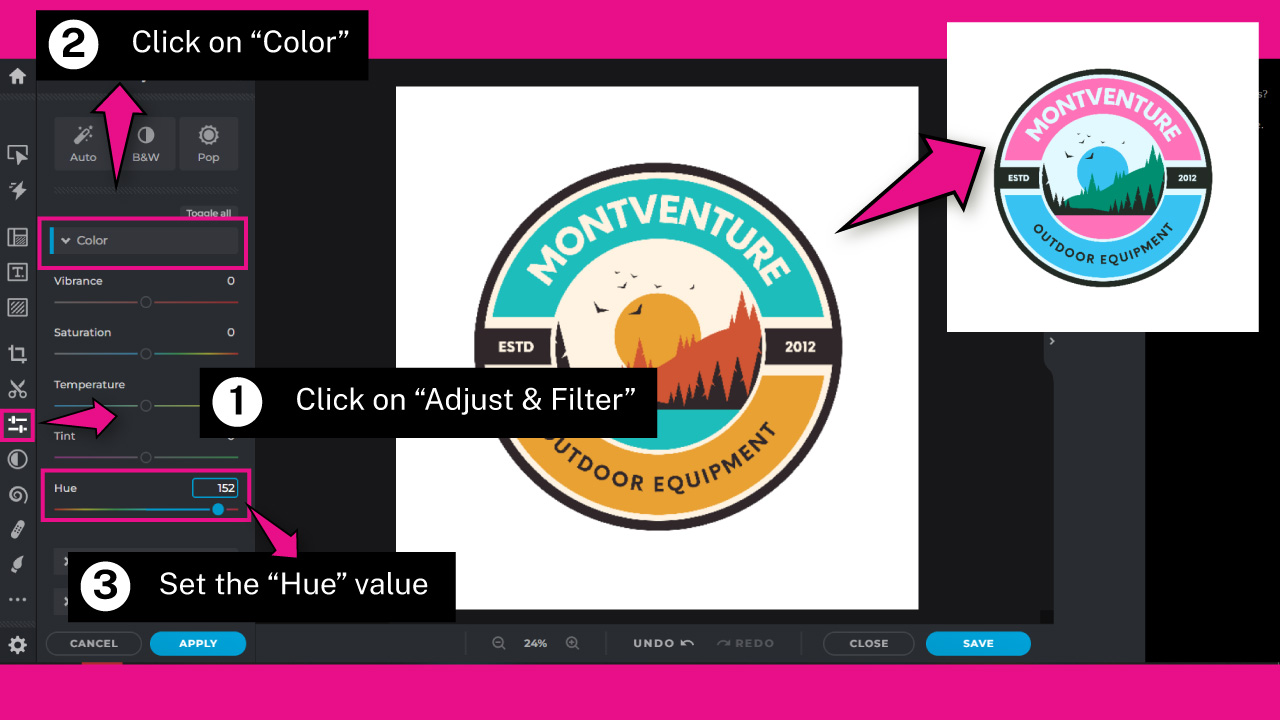
Once the image opens, click on the “Adjust & Filter” button on the left side toolbar.
On the unfolded panel, click on the “Color” menu to unfold adjustment options.
Then, set the “Hue” amount to your desired value to change the logo color.
I’ll set it to 152 for this example.
Step 3: Save the Logo Changes
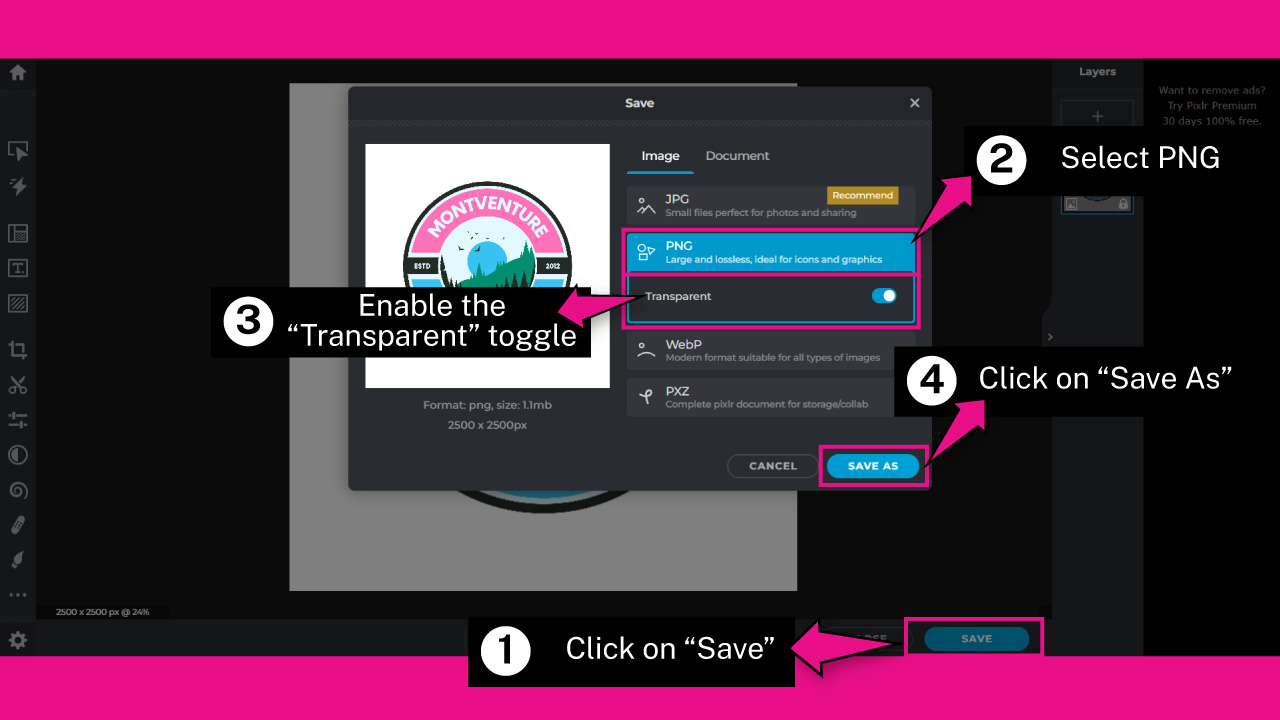
To save the logo, click on the “Save” button on the toolbar at the bottom of the screen.
Or press the “Ctrl + S” command on Windows, or “Cmd + S” on Mac to shortcut it.
Select the “PNG” option and make sure that the “Transparent” toggle is enabled.
Then, click on the “Save As” button.
On the pop up window, type your desired name, and click on the “Save” button.
You need to have an account to be able to download your edited logo. You can create an account for free. The process is very quick and simple.
“Sing Up” registering an email address, or “Log In” using your “Google”, “Facebook” or “Apple” account.
Once you’re logged in, you will be able to download the logo to your computer.
How to Change the Colors of a Logo Using Canva Free
Open up the Canva website, import a logo and click on “Use it in a Design”. Click on “Edit Image” and select between “DuoTone” or “ColorMix” filters. Select a preset to customize the colors. Save the image by going to “Share > Download > Download”.
Step 1: Go to the Canva Website

Open your browser and go to the canva.com website.
If you don’t have an account yet, you have to create a new one to be able to upload and edit your logo.
So, click on the “Sign Up For Free” button to create an account.
You can register using “Google”, “Facebook”, “Apple”, or an email account, among other options.
Step 2: Import the Logo
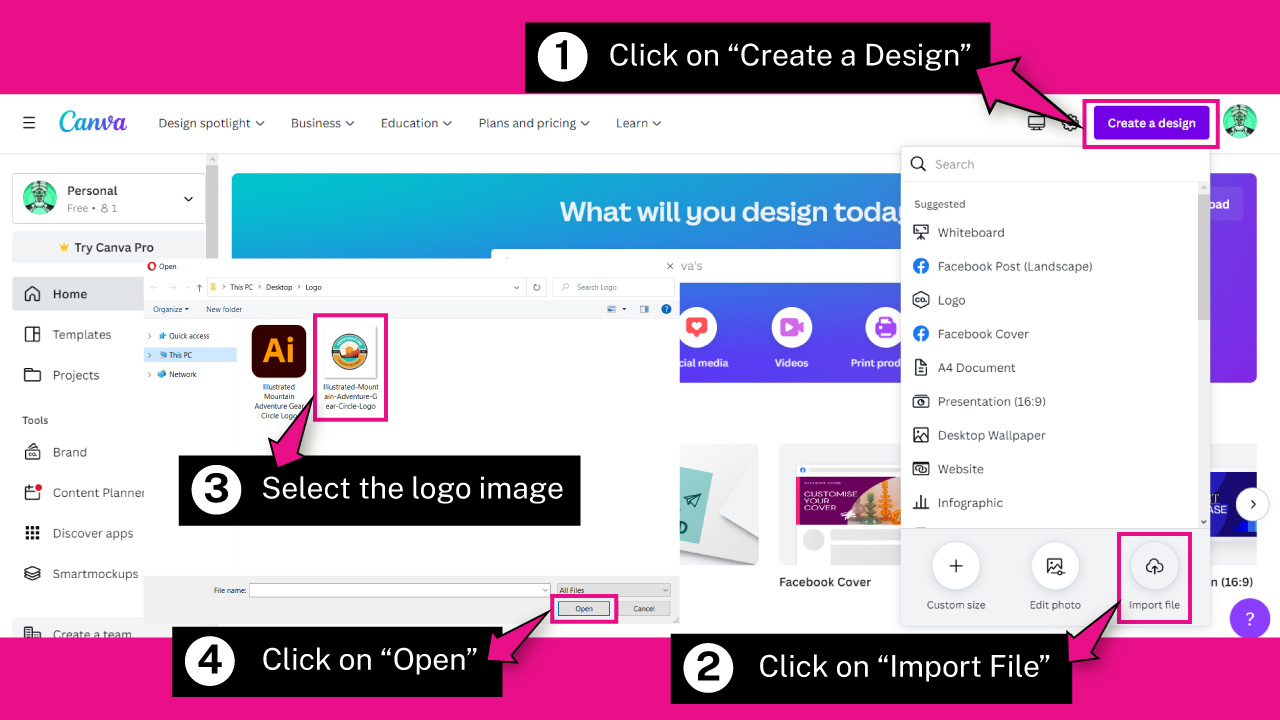
Click on the “Create a Design” button at the top right corner of the screen.
Once the menu unfolds, click on the “Import File” button located at the bottom of the menu.
On the local files window, browse in your directory and locate the logo you want to change colors to.
Select it, and then click on the “Open” button.
It’s recommended to upload a logo with a transparent background, so when you apply filters to change colors, they will only apply to the logo and not to the background as well.
If your logo doesn’t have a transparent background you can use the picwish.com app to remove the background for free.
Or you can remove the background from a picture in Canva if you have a premium account.
Step 3: Use the Logo in a Design
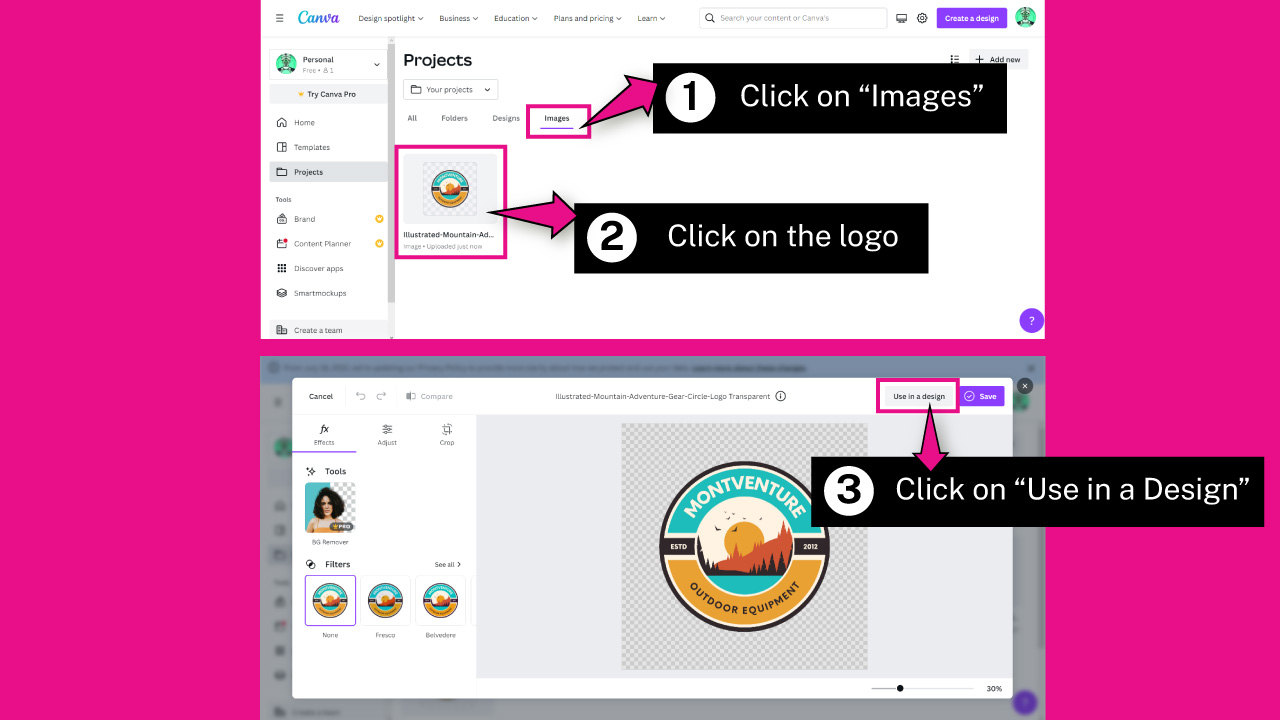
Once the logo uploads, click on the “Image” tab on your “Projects”.
Click on the uploaded image, and on the pop up window click on the “Use in a Design” button at the top right corner of the window.
Step 4: Use the DuoTone Filter to Change Colors
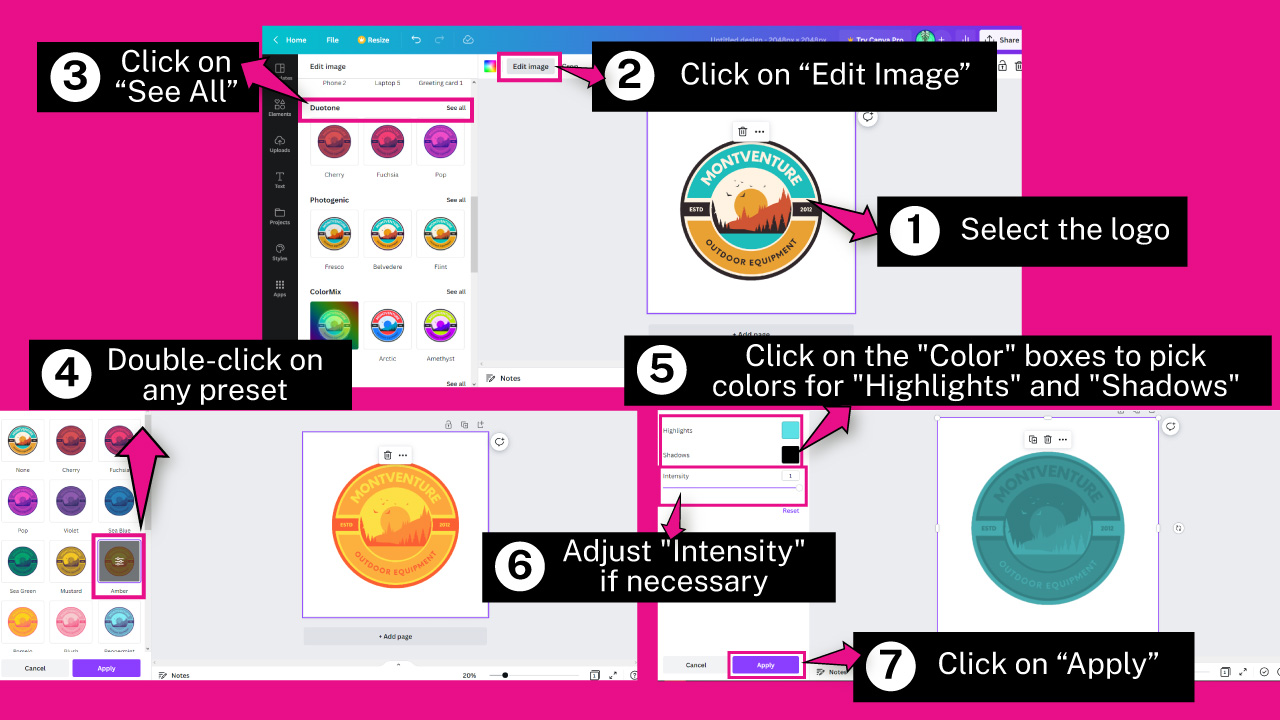
Click on the logo to select it.
You can change the color of the uploaded image in Canva using the “DuoTone” or “ColorMix” filters.
The first one will be explained in this step, and the “ColorMix” in the following one.
So, click on the “Edit Image” button on the toolbar at the top of the screen.
Next, on the left panel, scroll a bit down to find the “DuoTone” filters.
Click on “See All” to unfold all “DuoTone” presets.
Then click on your desired preset to apply it to your logo.
If you want to customize the colors, you can double-click on any preset (or click on a preset once again, if it’s already selected) to open “DuoTone” preset adjustments.
Then, click on “Highlights” and “Shadows” color boxes to pick their colors.
You can also modify the “Intensity” value by dragging the slider.
Its default value is 100%.
Once you’re happy with the edition, click on the “Apply” button.
Step 5: Use the ColorMix Filter to Change Colors
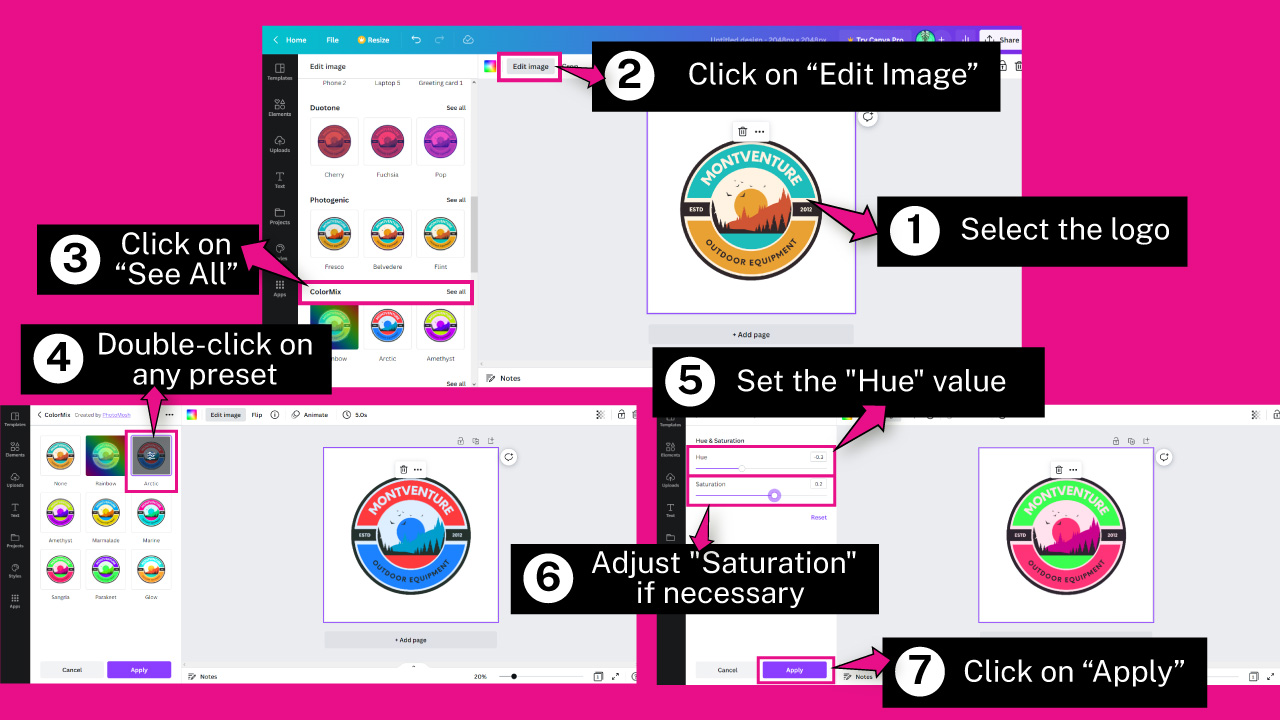
To apply the “ColorMix” filter, click on the “Edit Image” button on the toolbar at the top of the screen.
Next, on the left panel, scroll down a bit to find “ColorMix” filter presets.
Click on “See All” to unfold all “ColorMix” presets.
Then click on your desired preset to apply it to your logo.
If you want to customize the colors, you can double-click on any preset (or click on a preset once again, if it’s already selected) to open “ColorMix” preset adjustments.
Then set the “Hue” value to adjust colors. I’ll set it to -0.3 for this example.
Next, adjust the “Saturation” value if necessary. Its default value is 0.3. I’ll set it to 0.2.
Once you’re happy with the edition, click on the “Apply” button.
Step 6: Download the Edited Logo
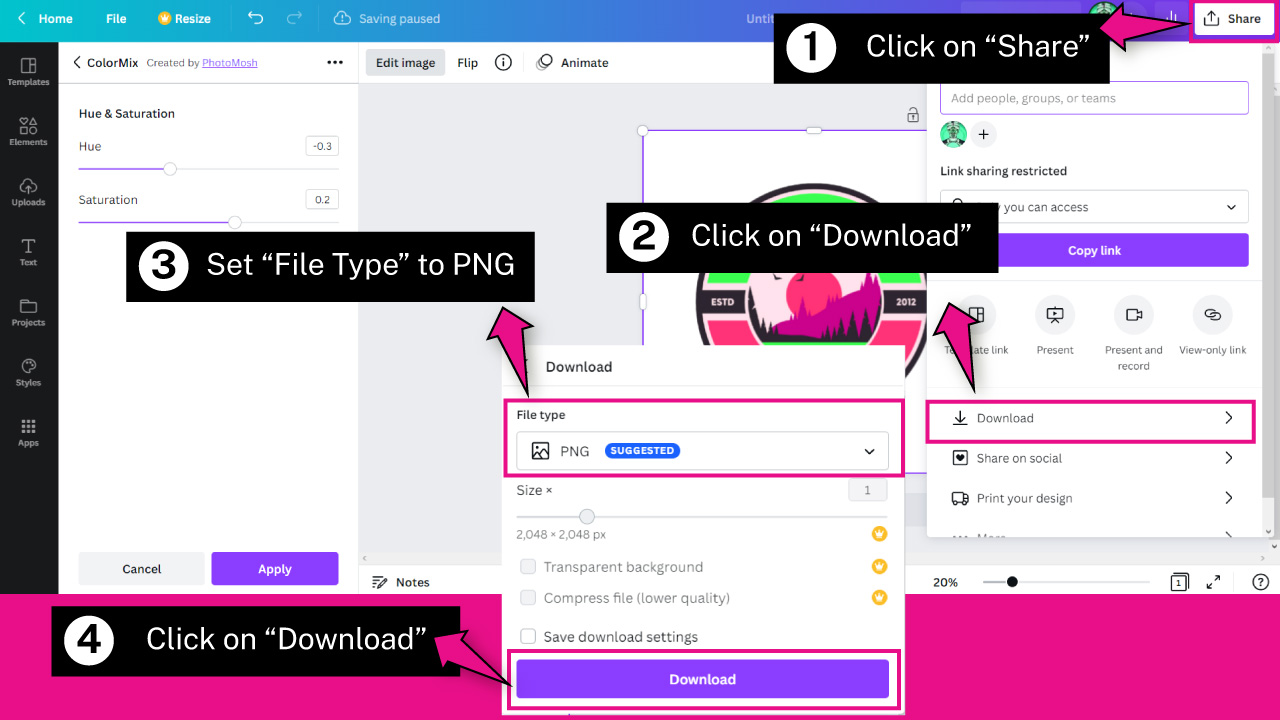
To save Canva images on your computer, click on the “Share” button located at the to right corner.
On the unfolded menu, click on the “Download” collapsible menu.
Then, select “PNG” in the “File Type” field.
Finally, click on the purple “Download” button to download the edited logo to your computer.
How to Change the Colors of a Logo Using Pixlr E
Go to the Pixlr E website and upload a logo. Use the “Wand Select” (W) tool to select a logo area. Pick a color and use either the “Draw” (B), or the “Fill” (F) tool to paint the selected areas. Save the image by going to “File > Save” (Ctrl/Cmd + S).
Step 1: Go to the Pixlr Website
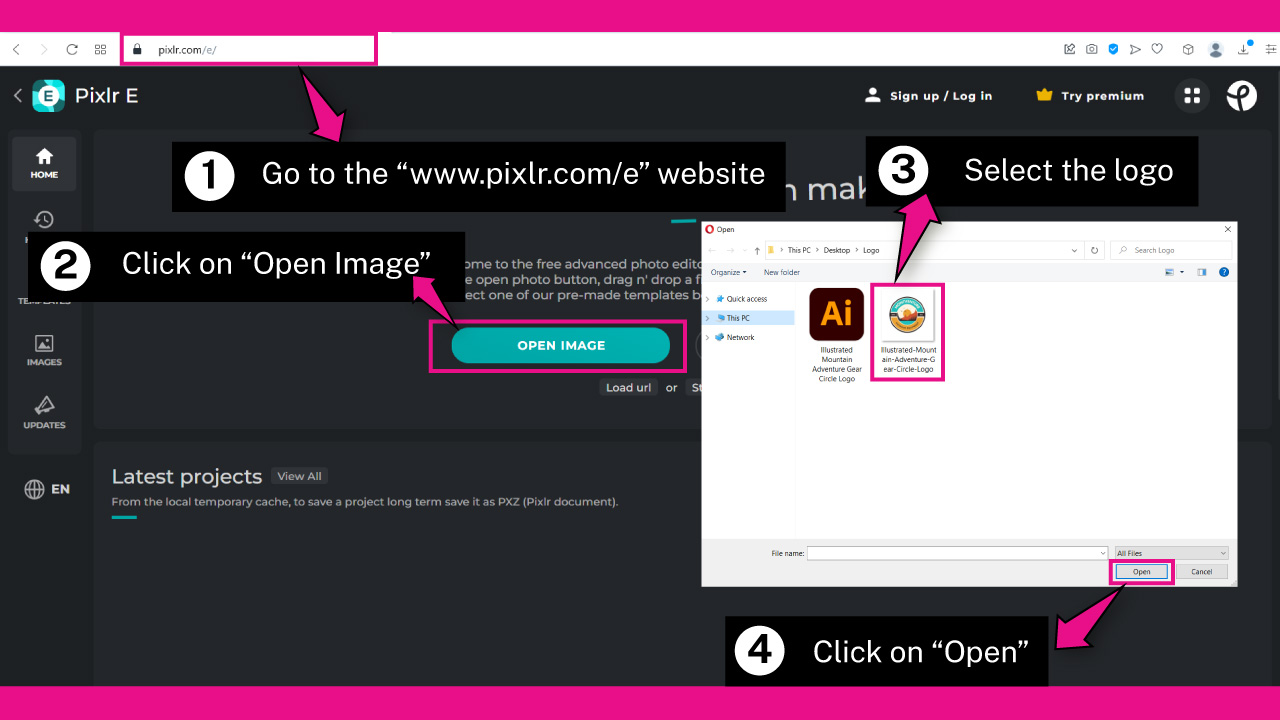
Open your browser and go to the pixlr.com/e website.
Click on the “Open Image” button.
Select the logo you want to change colors to, and click on the “Open” button.
Step 2: Select a Logo Area

Once the image opens, click on the “Wand Select” (W) tool located on the left side toolbar.
You can adjust the “Wand Select” (W) tool settings on the toolbar at the top of the screen.
I’ll set the “Tolerance” value to 32, and “Feather” to 10. These values may vary depending on your logo.
Next, make sure that the “Anti-Alias” and “Contiguous” toggles are enabled, while the “Sample All Layers” is disabled.
Now you can click over any logo area you want to change colors to.
If you want to change several areas at the same time, hold the “Shift” key and click on specific color spots.
Step 3: Pick a Color
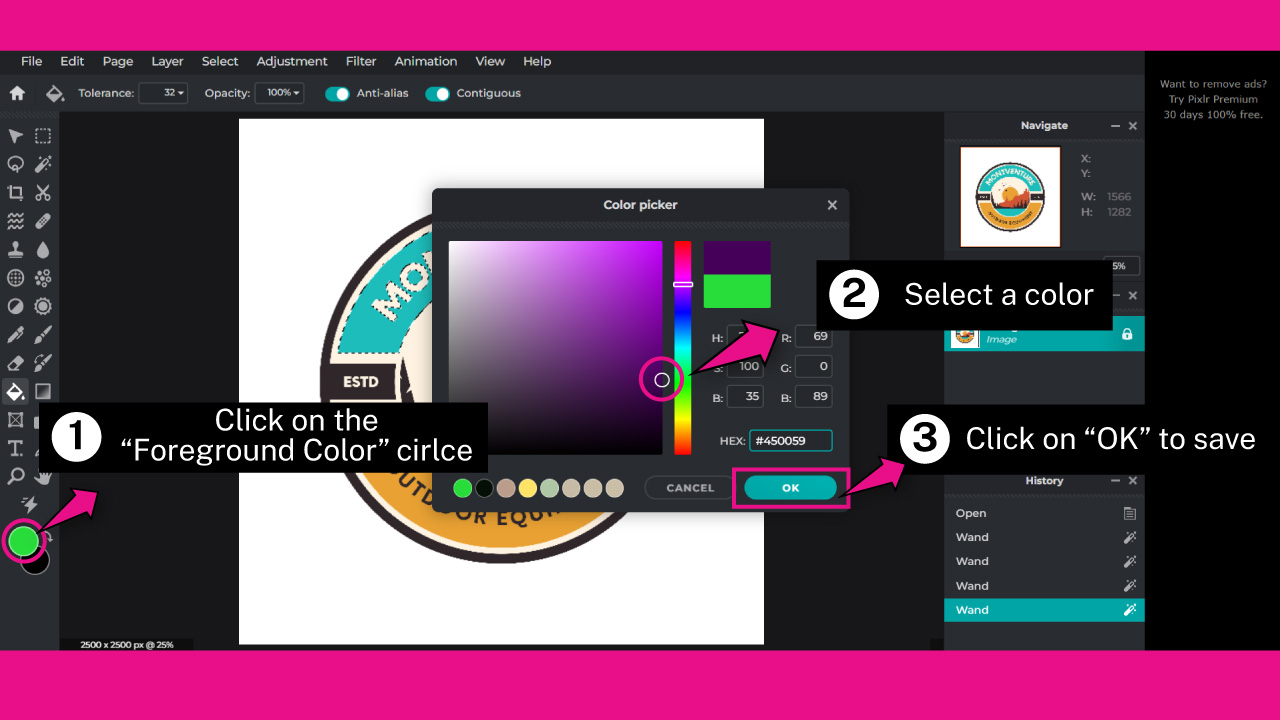
Now it’s time to pick a color.
To pick a color, click on the “Foreground Color” circle on the left side toolbar.
Once the “Color Picker” window opens, pick your desired color, or enter the hex color code.
Then click on “OK” to save changes.
Step 4: Change the Selected Logo Areas
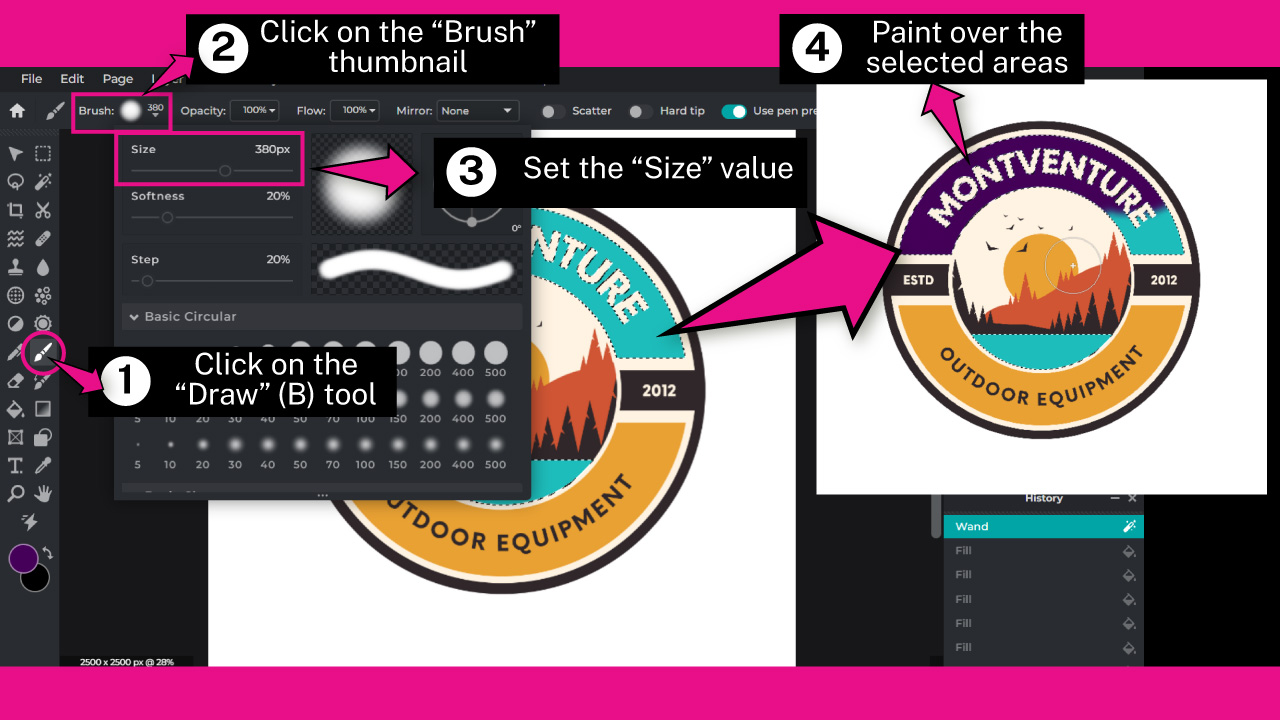
The next step can be done by using two different tools: “Draw” (B) tool, or “Fill” (F) tool, both located on the left side toolbar.
We usually recommend using the “Draw” (B) tool, since it’s easier to get smoother results with this tool. But you can use the “Fill” (F) tool as well. It’s up to you.
If you’re using the “Draw” (B) tool, click on the “Brush” thumbnail located on the toolbar at the top of the screen.
On the unfolded window, set the “Size” value. I’ll set it to 380 px for this example.
Finally, use the “Draw” (B) tool to paint over the areas you want to change colors to.
If you’re using the “Fill” (F) tool instead, set the “Tolerance” value around 60 on the toolbar at the top of the screen.
This value may vary depending on the resolution of your logo.
Then, make sure that the “Anti-Alias” and “Contiguous” toggles are enabled.
Finally, click over the areas you want to fill with your selected color.
Step 5: Save the Logo Changes
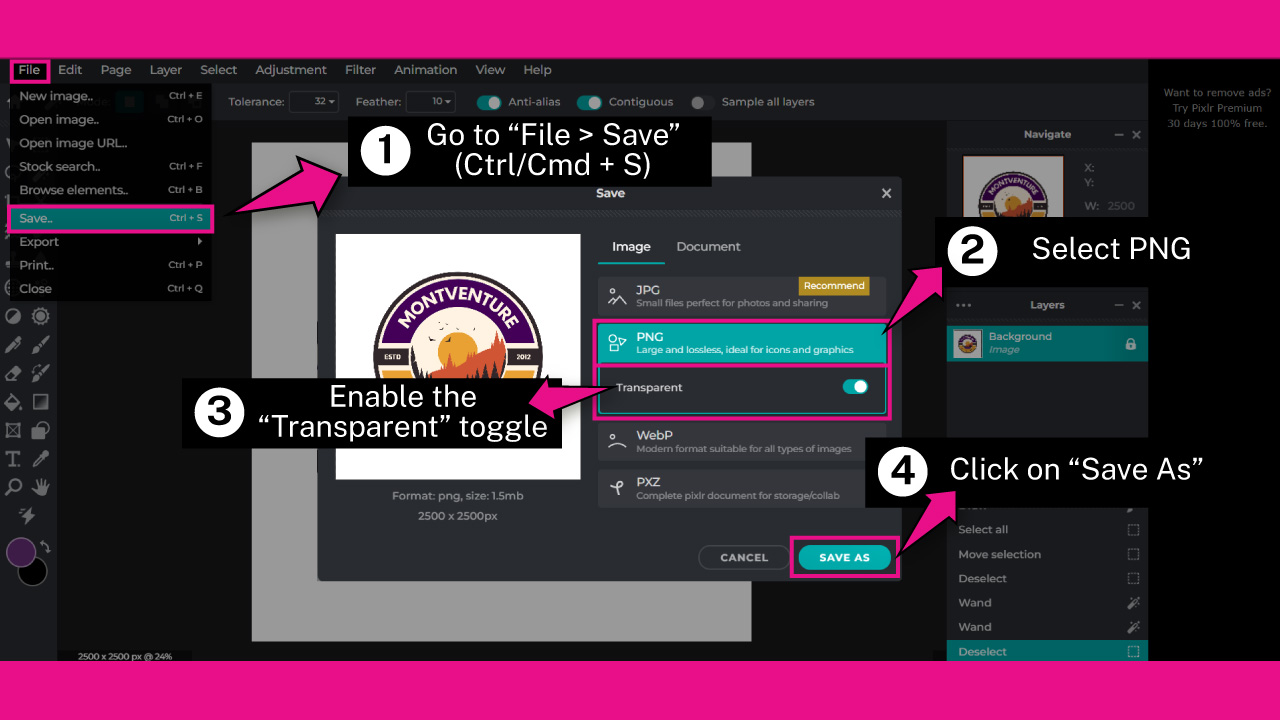
To save your image, go to “File > Save” on the menu at the top of the screen.
Or press the “Ctrl + S” command on Windows, or “Cmd + S” on Mac to shortcut it.
Select the “PNG” option, and make sure that the “Transparent” toggle is enabled.
Then, click on the “Save As” button.
On the pop up window, type your desired name, and click on the “Save” button.
You need to have an account to be able to download your edited logo. You can create an account for free. The process is very quick and simple.
“Sing Up” registering an email address, or “Log In” using your “Google”, “Facebook” or “Apple” account.
Once you’re logged in, you will be able to download the image to your computer.
How to Change the Color of a Logo in SVG Using Vecteezy
Go to the Vecteezy website and click on “Start Designing”. Go to “File > Clear” to remove the random design. Go to “File > Import SVG” to import your logo. Ungroup the logo, select a shape and pick a color. Click on “Download” to save the logo.
Step 1: Go to Vecteezy Website

Open your browser and go to the vecteezy.com/editor website.
Click on the “Start Designing” button.
Step 2: Clear the Canvas

By default the canvas will open with a random design.
To remove this random design, go to “File > Clear” on the menu at the top of the screen.
Or press the “Ctrl + O” (Windows) or “Cmd + O” (Mac) commands.
Step 3: Import a Vector (SVG)
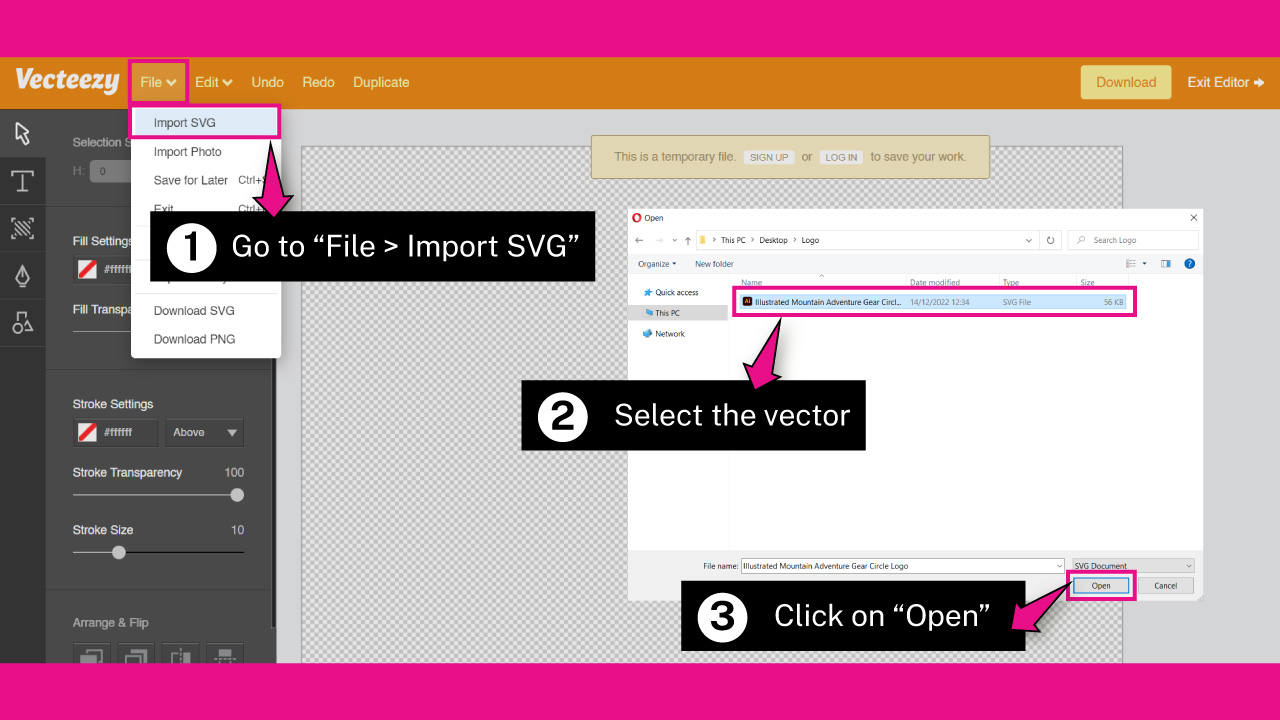
To import your SVG extension logo, go to “File > Import SVG” on the menu at the top of the screen.
On the local files window, browse in your directory and locate your SVG file.
Select it, and then click on the “Open” button.
Once you’ve done this, the logo will be imported to your canva.
Step 4: Ungroup Logo
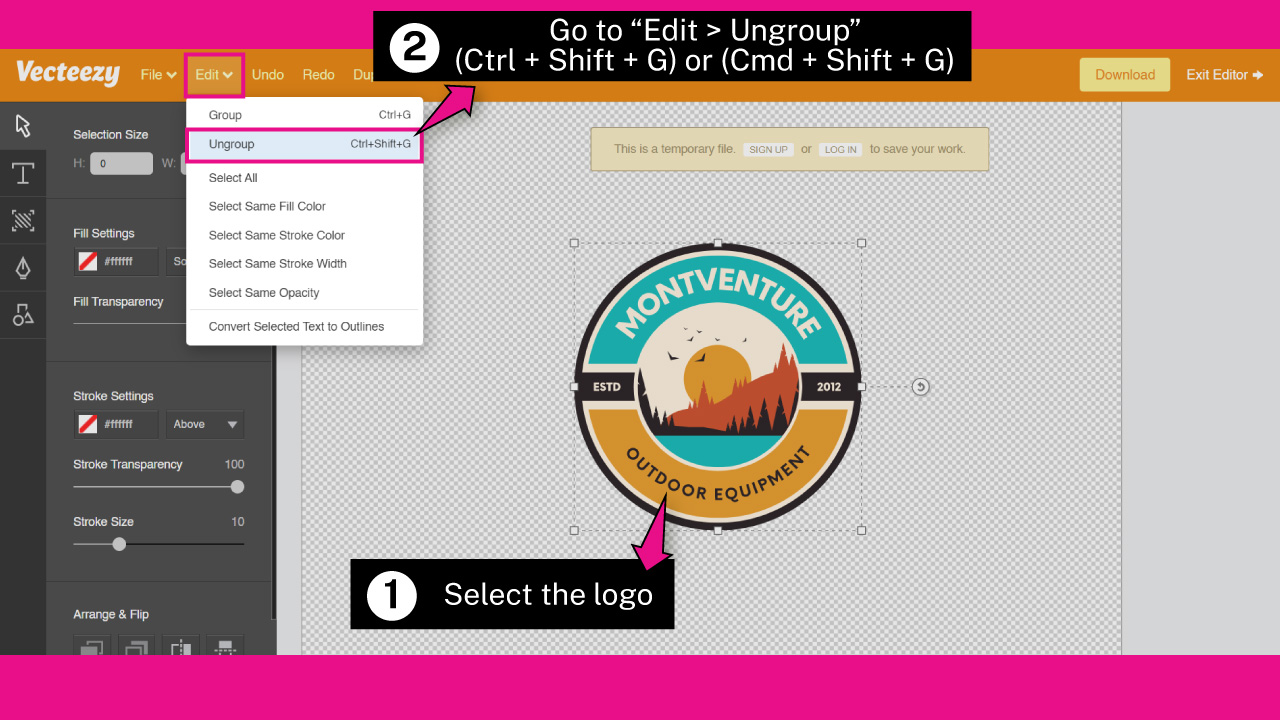
If your logo is grouped and you can’t select a specific shape, you have to ungroup it first.
To ungroup a logo, first select it. Then, go to “Edit > Ungroup” (“Ctrl + Shift + G” on Windows or “Cmd + Shift + G” on Mac) on the menu at the top of the screen.
Repeat this process as many times as you need to ungroup groups within groups.
Step 5: Change Shape Color

Select the shape you want to change color to.
If you want to select several shapes at the same time, hold the “Shift” key as you click on the different shapes you want to select.
Then, go to “File Settings” and click on the “Color” box located on the left side toolbar.
On the “Color Picker” pop up window, pick your desired color, or enter the hex color code.
First, select a color from the color wheel, and then use the slider to make it lighter or darker.
Step 6: Save the Image
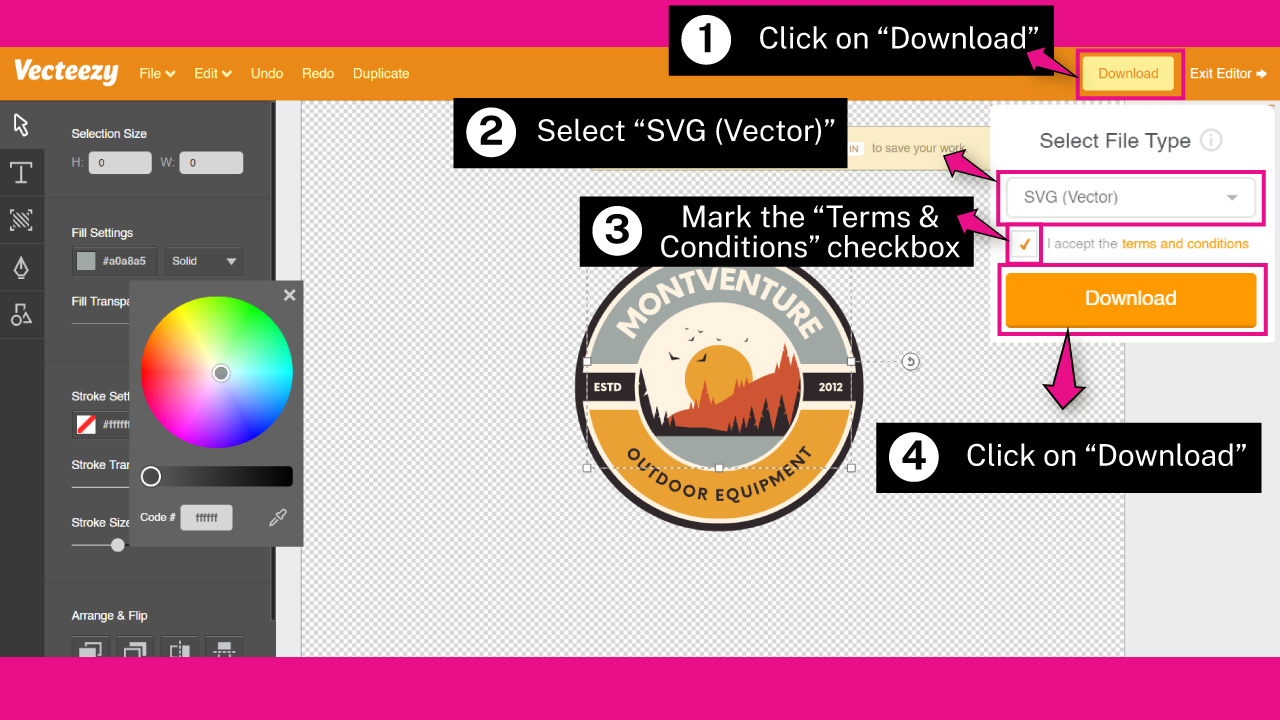
To save your edited logo, click on the “Download” button on the toolbar at the top of the screen.
Once the “Download” settings window unfolds, select a file type extension between SVG, PNG or JPG.
Select SVG if you want to save your file in a vector. Otherwise, select PNG or JPG to save it as an image.
Next, mark the “Terms and Conditions” checkbox.
Finally, click on the “Download” button to save the file in your computer.
Frequently Asked Questions on “How to Change the Color of a Logo without Photoshop”
How to ungroup vector shapes in Vecteezy?
First, select the vector. Then, go to “Edit > Ungroup” (“Ctrl + Shift + G” on Windows, or “Cmd + Shift + G” on Mac) on the menu at the top of the screen. Repeat this process as many times as you need.
How to customize the colors of DuoTone and ColorMix filters in Canva?
To customize, double-click on the presets thumbnail to open the settings panel. In the “DuoTone” filter you can modify “Highlight” and “Shadow” colors. While in the “ColorMix” filter you can modify “Hue” and “Saturation”.
How can I get better results when changing colors of a specific area of a logo in Pixlr E?
It’s recommended to import and work with high resolution images. When you select a logo area, set the “Feather” value around 10. Then, when it comes to changing colors, use the “Draw” (B) tool instead of the “Fill” (F) tool.


