

When you work with hundreds or even thousands of images, there comes a point where finding a specific image becomes challenging.
To avoid these frustrating situations, it’s important to work as neatly as possible.
There are several ways to organize photos in Lightroom, and there is no better way than others.
It completely depends on your preferences and the method that works best for you.
You can choose the one that suits you best, or use a combination of them.
In this article, we will review five methods for keeping your photos organized.
Keep reading to discover what these methods are and how to use them.
Finally, we’ll learn how to use the search engine to quickly locate photos that have been previously categorized.
How to Organize Photos in Lightroom
There are 5 ways to organize photos in Lightroom: By folders, collections, keywords, location or labels. In any case, to organize photos in Lightromm, you’ll first need to to open up Lightroom’s “Library”module by clicking on “Library” in the top right corner of the screen.
First things first: Go to the “Library Module”
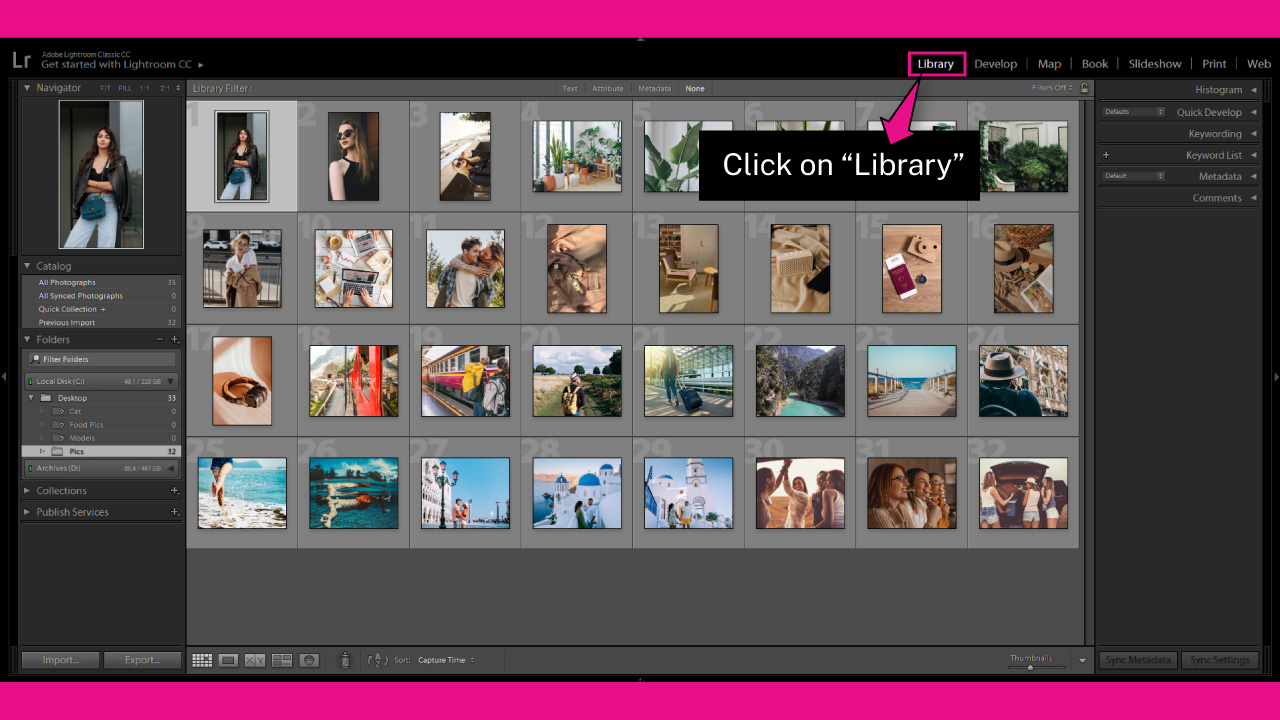
To organize photos in Lightroom, navigate to the “Library” module in the toolbar at the top of the screen.
If you cannot see it, click on the ▼ icon to expand the hidden modules panel.
You can also access the “Library” module by going to “Window > Library” in the toolbar at the top of the screen, or by pressing the “Ctrl + Alt + 1” (Windows) or “Cmd + Option + 1” (Mac) command.
From here, you now have several options to organize photos in Lightroom. We will go through these one by one.
1. Organize Phots in Lightroom by Folders
The first method for organizing photos is using folders.
When you import images into Lightroom, the location is tracked. However, if you move a photo to another folder using the hard drive folders, Lightroom will lose track of the image.
The best way to organize photos by folders is to use Lightroom folders. This way, Lightroom will keep track of the photos and you can also create, move, or delete folders directly on the hard drive.
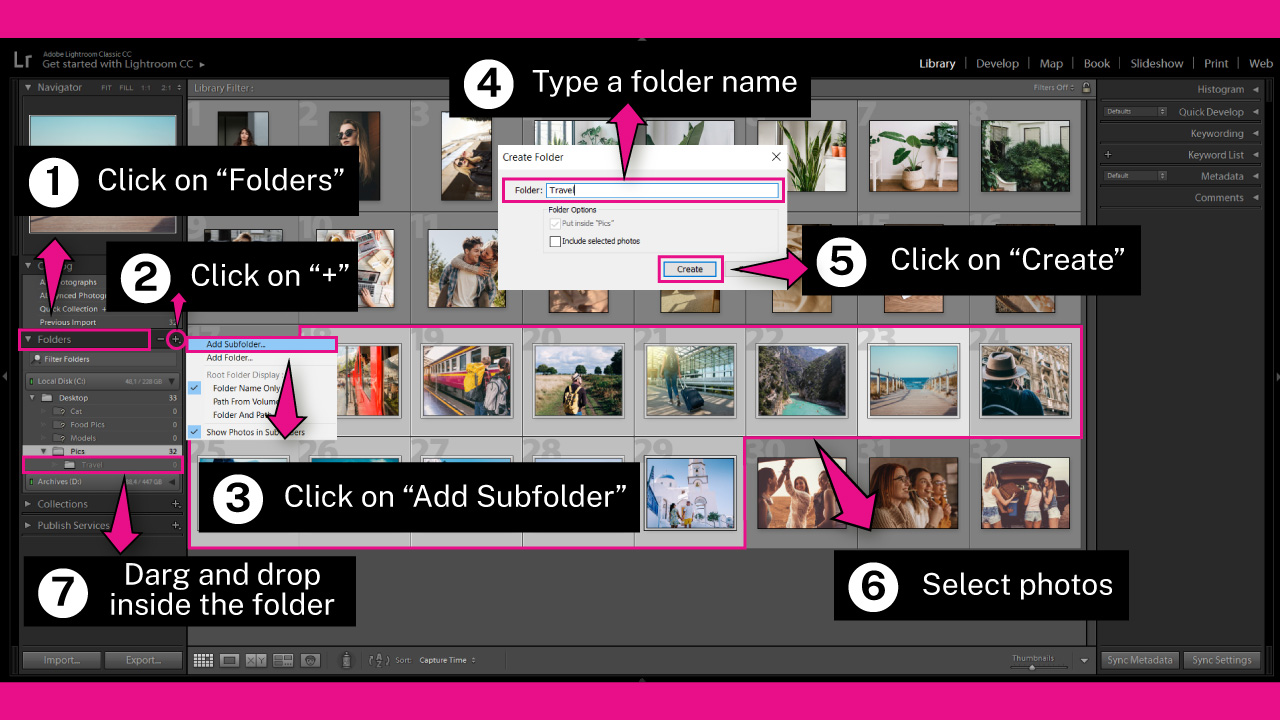
To organize photos by folders, click on the “Folders” menu on the left side toolbar.
When the menu expands, locate the folder where you want to place the images. Then, click on the “+” button next to the “Folders” title and select the “Add Subfolder” option.
A “Create Folder” window will appear. Enter a subfolder name in the “Folder” field and click “Create.” For example, you could enter “Travel.”
Now, you have a new folder in Lightroom and on the hard drive. To organize, select the photos and drag and drop them into the new folder.
If a message pops up asking to confirm moving the files on the hard drive, check the “Don’t show again” box and click “Move.”
To select all images, press “Ctrl + A” (Windows) or “Cmd + A” (Mac).
To select specific images, hold the “Ctrl” (Windows) or “Cmd” (Mac) key and click on the desired images.
To select images in bulk, hold the “Shift” key, click the first image, and then the last image.
Repeat this process as many times as necessary to organize your photos by folders.
2. Organize Photos by collections in Lightroom
Organizing photos by collections in Lightroom is different from organizing by folders. A single image can be included in multiple collections without duplicating the file on the hard drive.
Collections work like playlists on Spotify.
Additionally, editing a photo in a collection will result in the same edit being reflected across all collections it is included in.
This means you no longer need to have multiple versions of the same image or update collections individually.
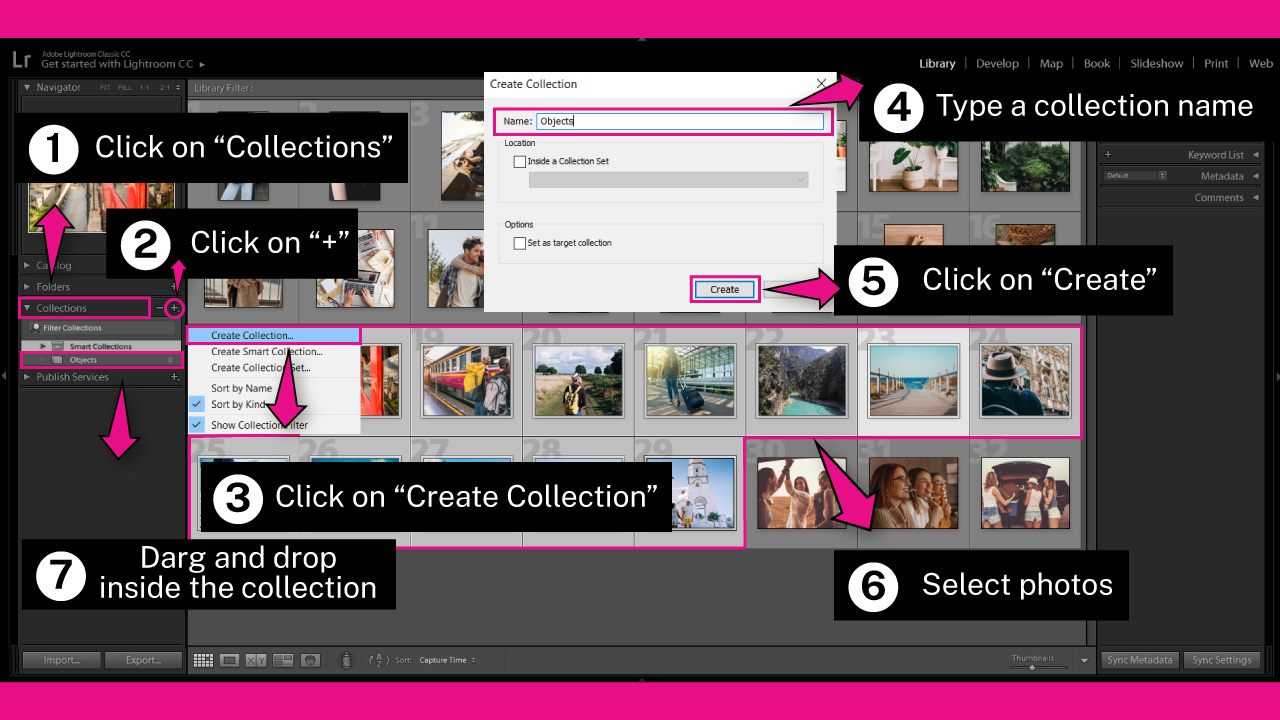
To view collections, click on the “Collections” menu on the left side toolbar. A list of collections will be displayed.
If you haven’t created any collections, the only available one will be “Smart Collection”. This includes automatically generated collections such as “Five Stars”, “Past Month”, and “Recently Modified”.
To create a new collection, click on the “+” icon next to the “Collections” title and select “Create Collection” from the drop-down menu.
The “Create Collection” window will popup. Enter a name in the “Name” field and click “Create”.
Finally, select the images you want to add to the collection and drag and drop them into the collection.
3. Organize Photos by Keywords in Lightroom
Another way to organize photos is by assigning keywords to describe the picture.
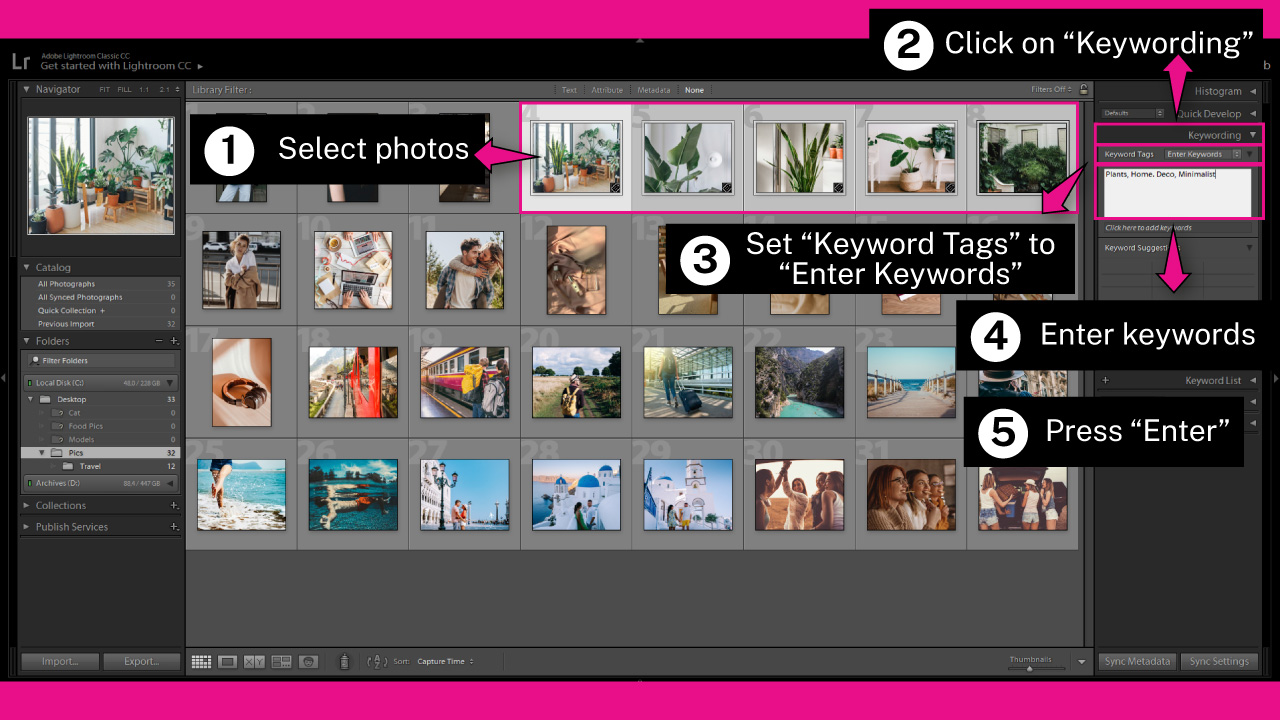
To do this, first select the photo or photos you want to categorize with keywords.
Next, click on the “Keywording” option on the right side toolbar.
In the “Keywords Tag” field, make sure the “Enter Keywords” option is selected.
Then, enter descriptive keywords for the selected images. For example, “Home, Decor, Minimalist, Plants”.
Keywords should be separated by commas. Capitalization doesn’t matter, but consistency is important.
Finally, press the “Enter” key to save the keywords.
Repeat this process as needed to add keywords to all your images.
4. Organize Photos by Location Information in Lightroom
If you’re planning to organize photos taken at multiple locations, consider organizing by location.
The location info is included in metadata when you export from Lightroom.
Contrary to popular belief, you do not need a GPS integrated camera to have location metadata; you can enter the information later using Lightroom or other similar apps.
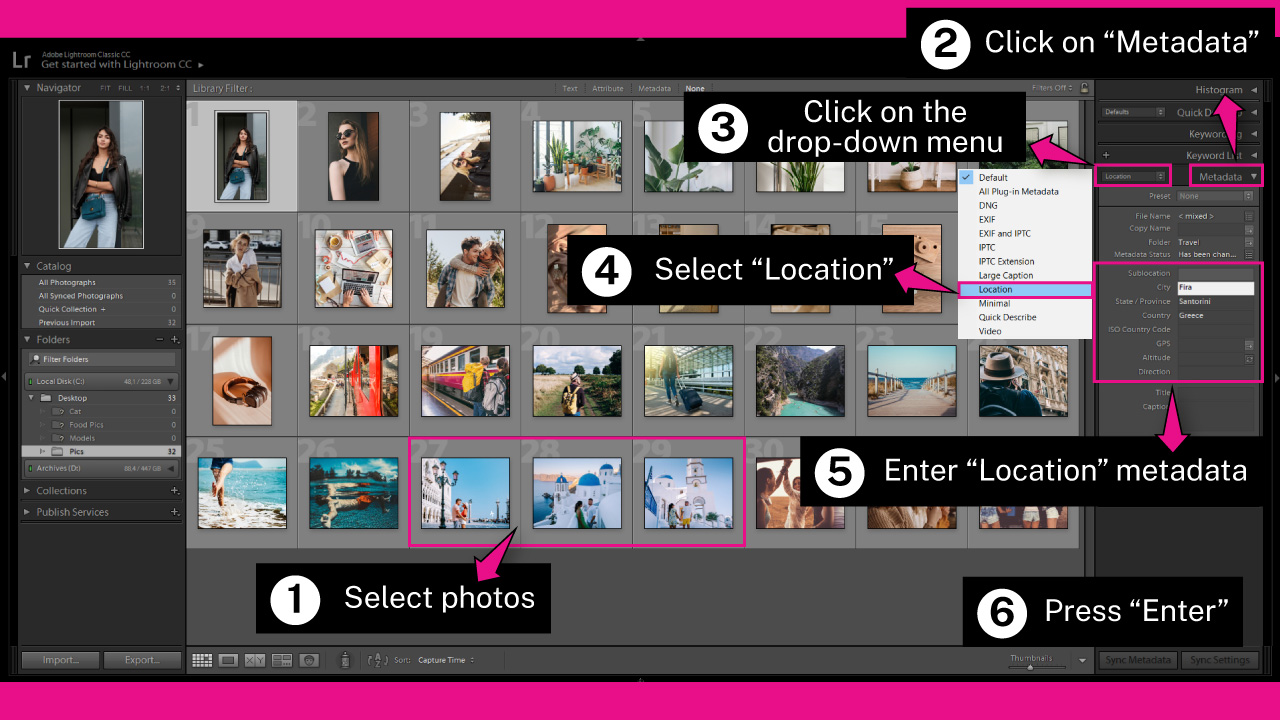
To add location information, first select the pictures taken in a certain location.
Next, click on the “Metadata” option on the right side toolbar. From there, click on the drop-down menu and select the “Location” option.
Then, fill out some or all of the location-related fields, such as: “Country”, “State/Province”, “City”, “Sublocation”, “ISO Country Code”, “GPS” coordinates, “Altitude”, “Direction”, and others.
I’ll select a few images from Greece, so I’ll fill out the “Country”, “State/Province”, and “City” fields for instance.
Finally, press the “Enter” key to save the location information.
5. Organize Photos by Labels in Lightroom (Flags, Stars and Colors)
Organizing photos by labels or attributes is probably the most handy way.
There are three types of labels available: “Flag”, “Color” and “Rating”.
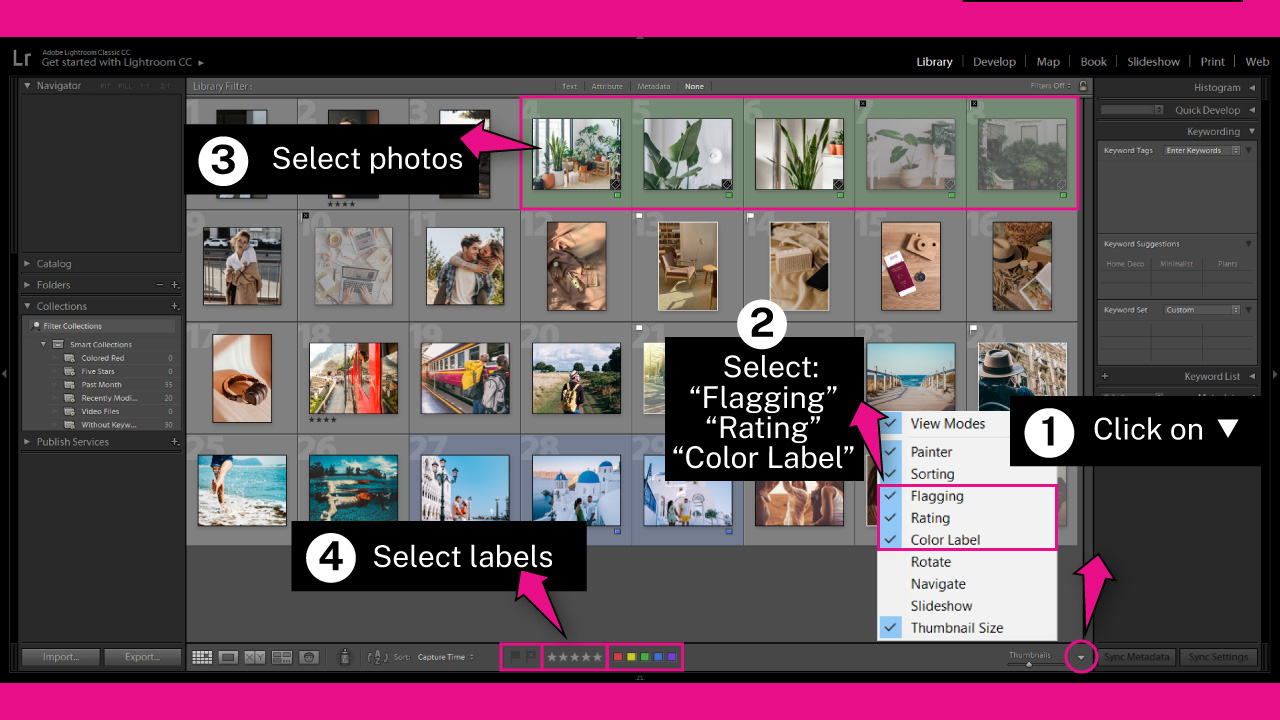
To enable the labeling tools, click on the ▼ icon, located in the toolbar at the right bottom of the screen.
On the popup menu, mark the “Flagging”, “Rating” and “Color Label” options.
Once you do this, the label tools will display in the toolbar at the bottom of the screen.
If the toolbar isn’t visible, hit the “T” key from your computer to display it.
The “Flag” labels organize photos between good and bad photos.
Good photos are also known as Pick (P) and are represented by a “White Flag”.
Bad photos are also known as Reject (X) and are represented by a “Black Flag”.
To label photos between “Black Flag” and “White Flag”, first select the photos you want to label with a certain flag.
Then hit the “P” key to label it as “White Flag”, or hit the “X” key to label it as “Black Flag”.
You can also do this, by clicking on the “White Flag” and “Black Flags” located in the toolbar at the bottom of the screen.
The “Color” labels organize photos between “Red” (8), “Yellow” (7), “Green” (8), “Blue” (9) and Purple.
To label photos by colors, first select the photo or photos you want to label.
Then press:
“6” key to label as “Red”
“7” key to label as “Yellow”
“8” key to label as Green”
“9” key to label as “Blue”
You can also do this by clicking on the color boxes displayed in the toolbar at the bottom of the screen.
The “Purple” doesn’t have a shortcut assigned, however if you want to label a photo to “Purple” you just need to click on the “Purple” color box.
As we mentioned before, this tool is located in the toolbar at the bottom of the screen.
The “Rating” labels organize photos between 0 to 5 stars.
To label photos by stars, first select the photo or photos you want to label.
Then press:
“0” key to label as 0 Stars
“1” key to label as 1 Stars
“2” key to label as 2 Stars
“3” key to label as 3 Stars
“4” key to label as 4 Stars
“5” key to label as 5 Stars
You can also do this by clicking on the stars icons displayed in the toolbar at the bottom of the screen.
Search Organized Photos in Lightroom
The five techniques described above are equally searchable.
The photos that are organized using the methods of “Folders”, “Collection”, “Keywords”, and “Location” can be searched by clicking on the “Text” button in the toolbar located at the top of the screen
Once the “Text Search” engine toolbar appears, type a word that describes the photo you want to search in the “Search” field.
You can enter any word used to organize the photos, such as folder or collection names, keywords, locations, filenames, or captions.
To filter the displayed results, click on the drop-down menu, which is set to “Any Searchable Field” by default, and select a filter option such as “Filenames,” “Keywords,” or “Metadata.”
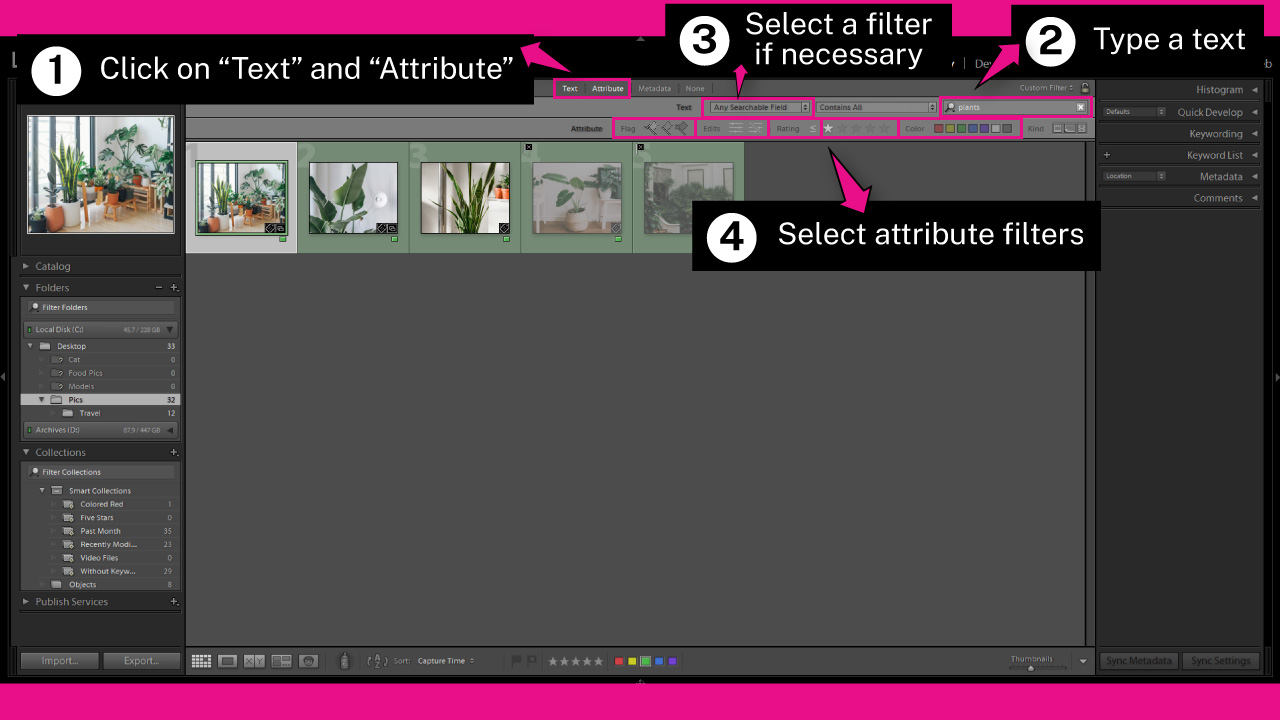
To search by labels, click on the “Attribute” button, also located in the toolbar at the top of the screen.
On the unfolded toolbar, select the combination of labels you want to search.
Note that you can combine flags, colors, ratings, and text in your search.
Frequently Asked Questions on “How to Organize Photos in Lightroom”
How to use colors to label photos in Lightroom?
Go to the “Library” module and click on the down-arrow icon, located in the toolbar at the bottom of the screen. On the popup window, click on “Color Label”. Then select the photos you want to label, and click on the color boxes displayed on the bottom toolbar.
What are the shortcuts to label photos using color in Lightroom?
Press the “6” key to label as “Red”, press “7” to label as “Yellow”, press “8” to label as “Green” and press “9” to label as “Blue”.
How to use stars to label photos in Lightroom?
Go to the “Library” module and click on the down-arrow icon, located in the toolbar at the bottom of the screen. On the popup window, click on “Rating”. Then select the photos you want to label, and click on the stars icons displayed on the bottom toolbar.
What are the shortcuts to label photos using stars in Lightroom?
Press the “0” key to label as “0 Stars”, “1” to label as “1 Star”, “2” to label as “2 Stars”, “3” to label as “3 Stars”, “4” to label as “4 Stars” and “5” to label as “5 Stars”
How to use flags to label photos in Lightroom?
Go to the “Library” module and click on the down-arrow icon, located in the toolbar at the bottom of the screen. On the popup window, click on “Flags”. Then select the photos you want to label, and click on the “Black Flag” or “White Flag” icons displayed on the bottom toolbar.
What are the shortcuts to label photos using flags in Lightroom?
Press the “P” key to label as “White Flag” or press “X” key to label as “Black Flag”.

I am a professional blogger and entrepreneur with a strong interest and passion in photo editing. On MindRelic, I happily share my expertise in the photo editing niche with all of you guys!