

Professional photographers understand the critical role of lighting in capturing stunning images.
They are well-aware of the importance of light and how it affects the mood and atmosphere of a photo.
This is why they often follow the golden rule of photography and aim to shoot during sunrise or sunset, avoiding harsh noon light.
The soft, warm light at dawn and dusk creates a magical atmosphere in photos, and helps to produce captivating and beautiful images.
However, it’s not always possible to capture images with the desired lighting conditions, especially if the photographer is dealing with limited time or resources.
This is where photo editing skills come into play.
If you are looking to transform your photo into a sunny and bright image, complete with sun flares and rays, you are on the right path.
Follow these next 4 steps and add some magical sun flares to your images.
How to Add Sun Flares in Lightroom
Go to the Develop module and adjust Basic settings to get a sunny day atmosphere. Select the Radial Filter tool and adjust its settings to create a sun flare effect. Draw a circle around the area where you want to add the sun flare. Duplicate the circle, stretch to create long sun rays. Repeat.
Step 1: Go to the Develop Module
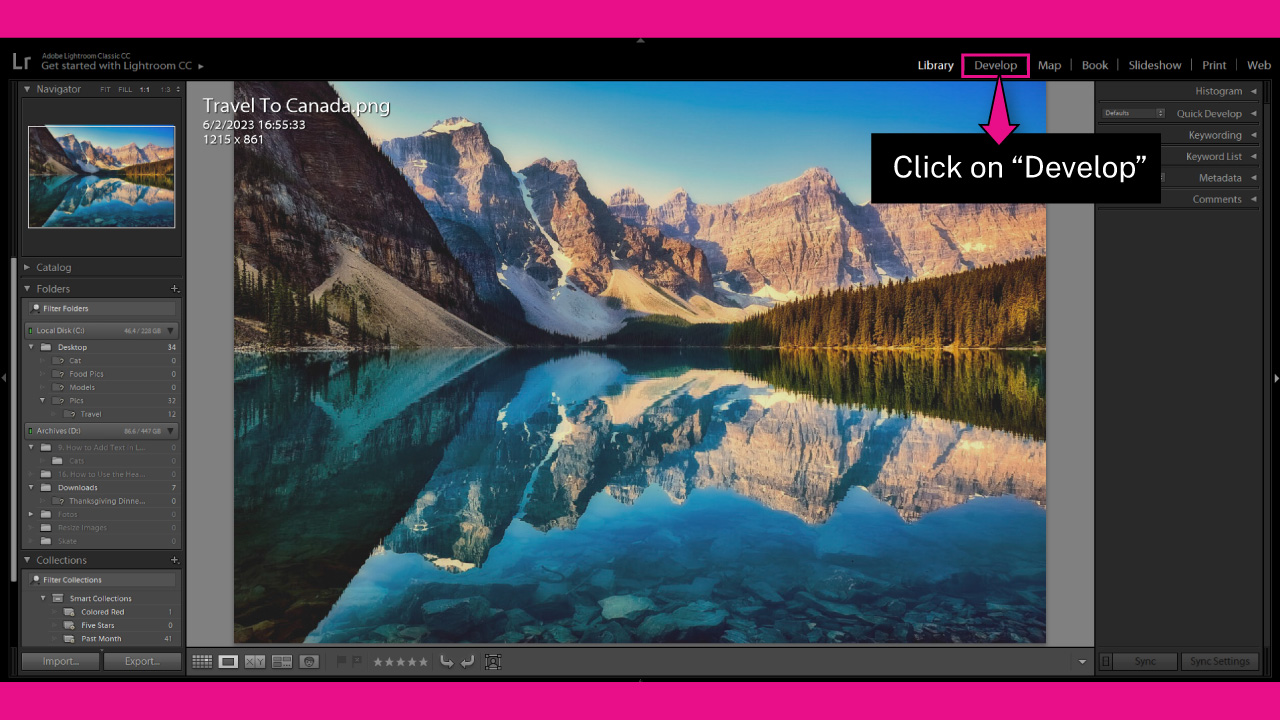
Once you have imported your photo, navigate to the “Develop” module in the toolbar at the top of the screen. If you cannot see it, click on the ▼ icon to expand the hidden modules panel.
You can also access the “Develop” module by going to “Window > Develop” in the toolbar at the top of the screen.
Or by pressing the “Ctrl + Alt + 2” (Windows) or “Cmd + Option + 2” (Mac) command.
Step 2: Adjust Basic Settings
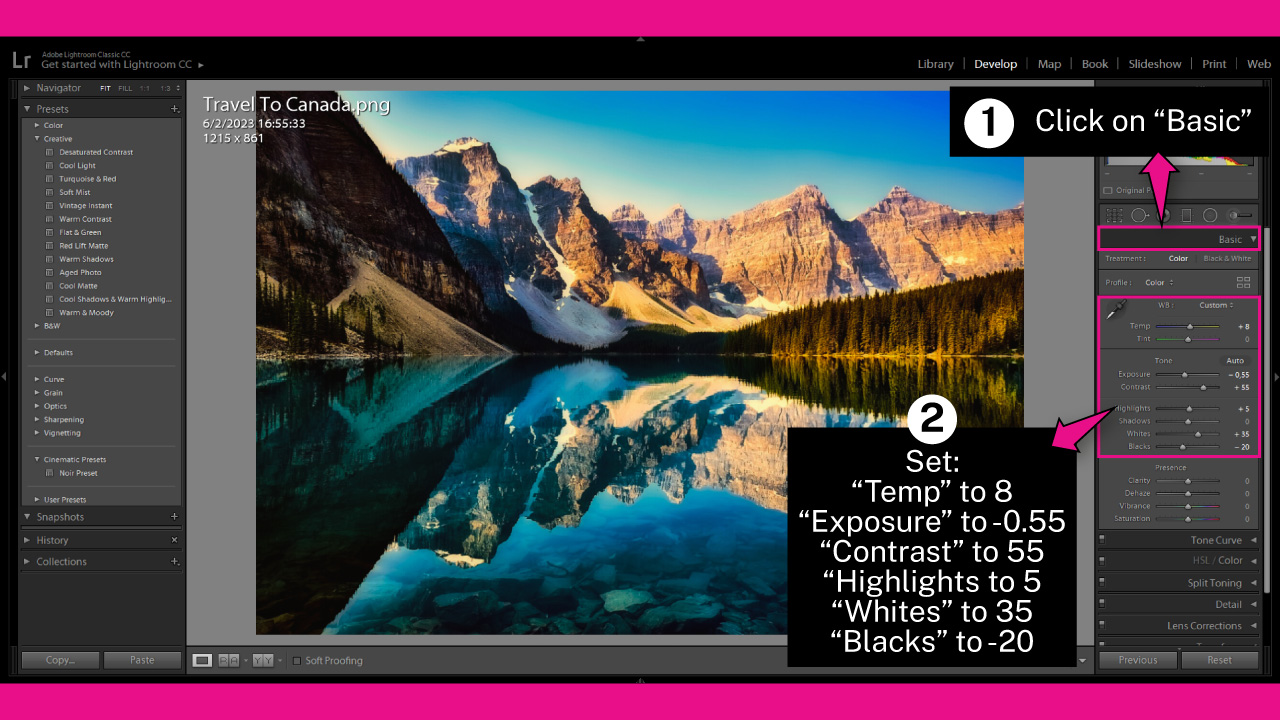
In this step, we aim to create the illusion of a sun-kissed landscape to get a warm and radiant hue scenario. This way, the sun flares will look more natural and better suit the landscape.
Click on the “Basic” menu located on the right-side toolbar to expand its settings.
Then, set:
“Temp” to 8
“Exposure” to -0.55
“Contrast” to 55
“Highlights” to 5
“Whites” to 35
“Blacks” to -20
These values may vary slightly in your photo, so feel free to run several tests until you achieve your desired result.
We’re setting the “Temp” slightly to warm and reducing the “Exposure” slider to get a burnt effect.
The warm temp will make the sun flares better suit the photo, while the “Exposure” set to burn will make the sun flares pop from the bright areas of the photo.
We are also increasing the “Contrast,” “Highlights,” and “Whites” values while reducing the “Blacks” to increase the contrast in the photo.
Step 3: Add Sun Flares
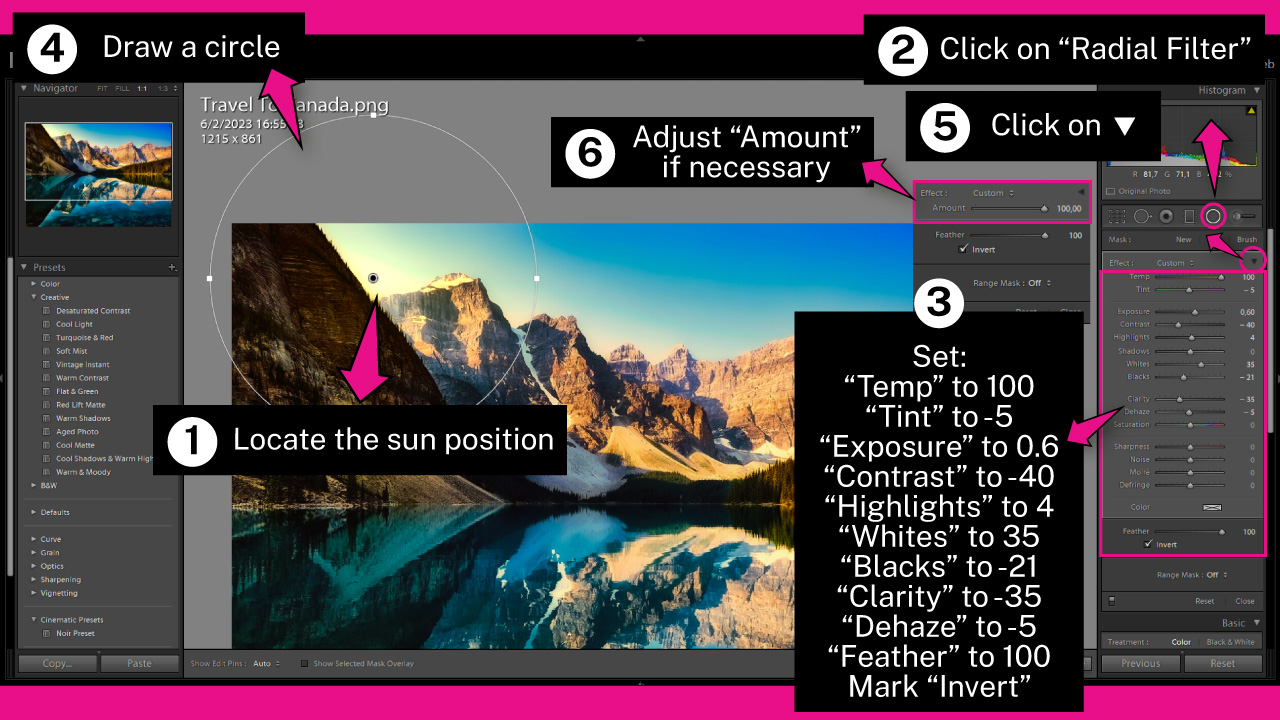
Focus on your photo and locate the sun’s position.
This step is important because placing the sun flare in the wrong spot will make the photo look weird.
If the sun is visible, it’s easy to locate.
If it’s not visible but there are sun remnants, you can still locate it.
If there are no sun remnants, look at the cast shadows.
Once you’ve located where to add the sun flare, click on the “Radial Filter” located on the right-side toolbar.
Or you can use the “Shift + M” command as a shortcut.
Then, set the following adjustments on the right-side panel:
“Temp” to 100
“Tint” to -5
“Exposure” to 0.6
“Contrast” to -40
“Highlights” to 4
“Whites” to 35
“Blacks” to -21
“Clarity” to -35
“Dehaze” to -5
“Feather” to 100
Please note that the above settings are obviously not “set in stone” but they do work well in our case.
Every picture will need different settings, though. So you want to play around with these settings until you find the settings that work for you and your picture!
Mark the “Invert” checkbox.
After adjusting the settings, draw a circle over the spot where the sun flares should appear.
If the circle isn’t perfect in the first try, you can modify its size and shape using the handles.
You can also relocate the circle by dragging it.
If you need to readjust the sun flare intensity, click on the “Effect” ▼ icon to collapse the panel to access the “Amount” controller.
Adjust the “Amount” slider as necessary. I’ll set mine to 100.
Step 4: Add Sun Rays
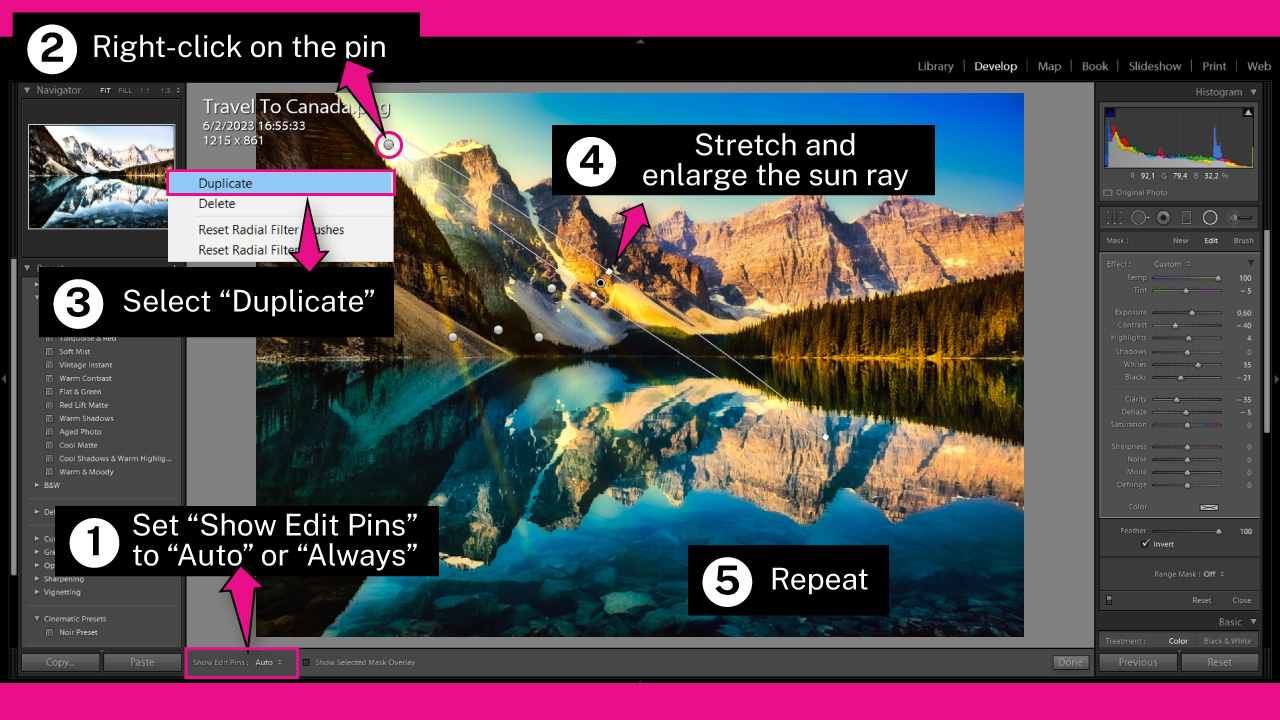
If you want to take your sun flares to another level, you can also add some sun rays.
To add sun rays, first ensure that the “Show Edit Pins” feature located in the bottom toolbar is set to “Auto” or “Always”.
Once the pins are enabled, you will see a pin over the image. This is the pin of the sun flare radial filter that we added in the previous step.
Right-click on the pin to open the options menu, and select “Duplicate”.
Now, we have duplicated the sun flares.
Select the duplicated sun flare and use its handles to stretch it into a sun ray.
Keep using the handles to enlarge it and create a long sun ray. Then, rotate the sun ray to a suitable angle for the photo.
Repeat this step several times, varying the angle and thickness of the rays to achieve a natural sun rays effect.
The Result

This is the result of transforming the photo into a sunny and bright image, complete with added sun flares and sun rays in Lightroom.
Frequently Asked Questions on “How to Add Sun Flares in Lightroom”
Can I add sun flares to any landscape in Lightroom?
Technically, yes, but not all landscapes are suitable for sun flares to look natural. Avoid landscapes that are too cloudy or photos where the sun should not be visible at all.
How do I save a sun flare preset in Lightroom?
Once you have adjusted the settings to achieve the desired sun flare effect, go to the left side toolbar. Click on the “+” icon next to the “Preset” menu. On the expanded menu, select “Create Preset”. In the pop-up window, enter a name, select a “Group” to save it in, and click on “Create”.
How do I apply a sun flare preset to a photo in Lightroom?
Go to the “Develop” module. On the left side toolbar, click on the “Preset” menu to expand the preset list. Click on the group where you saved the sun flare effect to expand it. Click on the previously saved sun flare preset, and it will be applied to your current photo.

I am a professional blogger and entrepreneur with a strong interest and passion in photo editing. On MindRelic, I happily share my expertise in the photo editing niche with all of you guys!