
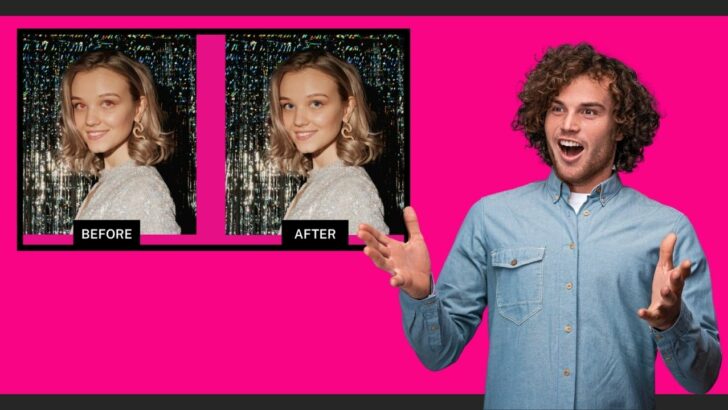
In some photos, people appear with red eyes, and you may wonder why this happens.
The phenomenon is called the red-eye effect, and it occurs when you take a picture with flash in dark environments.
You probably already know that pupils dilate to be able to see in the dark by capturing as much light as possible.
When a picture is taken in the dark with flash, the light passes into the eye through the pupil and reflects off the fundus at the back of the eyeball. Yeah, that’s creepy!
In summary, that’s the reason for the red eyes in photos.
Luckily, this phenomenon happens less frequently nowadays since we use more sophisticated cameras, including mobile cameras, which are able to take good pictures in some dark environments, even without flash.
However, sometimes it’s almost impossible to avoid flash, and red eyes still appear in some photos.
If you want to get rid of red eyes in a photo and don’t know where to start, it’s your lucky day.There are several ways to fix this problem, and we’ll review the best ways in this article.
Keep reading to find out how to do it with the device you have in hand.
How to Get Rid of Red Eyes in Photos Using Photoshop
Right-click on the “Spot Healing Brush” (J) tool on the left-side toolbar. From the unfolded menu, select the “Red Eye” tool. Finally, click on the red spots to get rid of them.
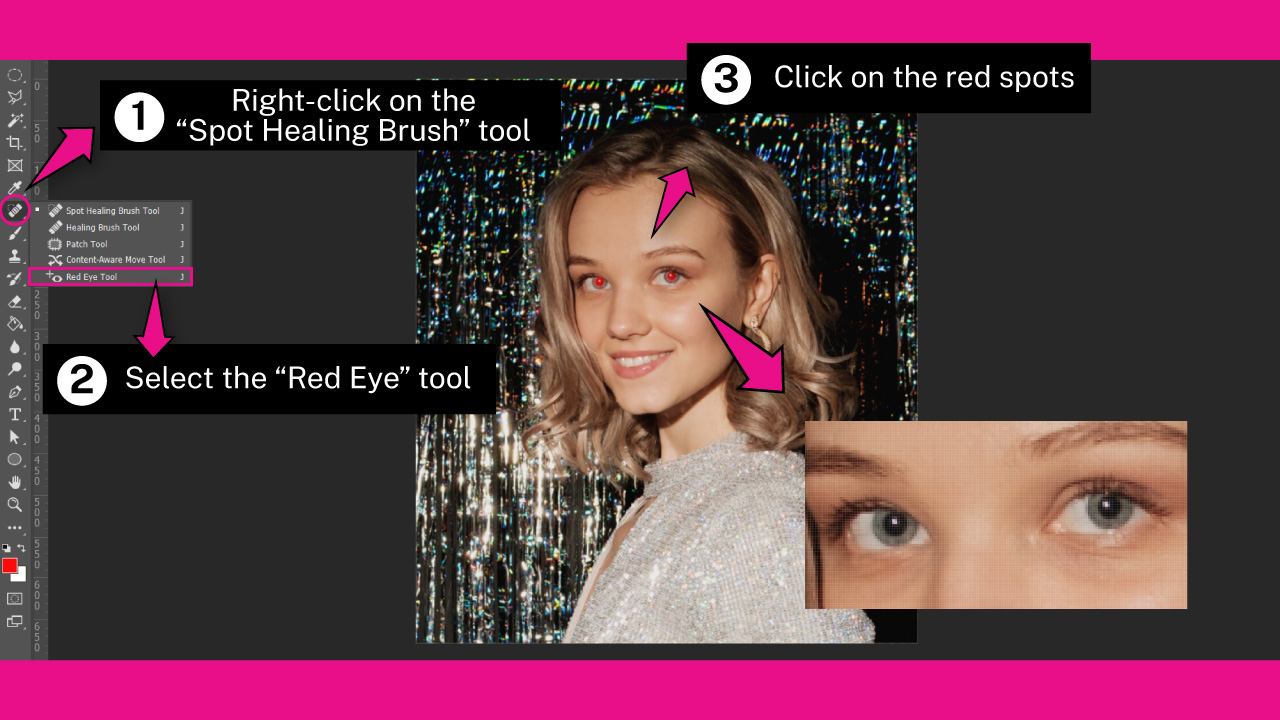
Luckily, Photoshop has a specific tool to fix red eyes in photos. The tool’s name is “Red Eye,” and it’s hidden in the “Spot Healing Brush” tool menu.
As most people know, Adobe includes healing brushes in their photo editing software, like the Healing Brush Tool in Lightroom. These tools work incredibly well and help us fix images in seconds, as it does with this example.
To select the “Red Eye” tool, right-click on the “Spot Healing Brush” (J) tool located on the left-side toolbar. Once the hidden tools menu collapses, select the “Red Eye” (J) tool.
Then, click on a red eye to fix it instantly.
The Result
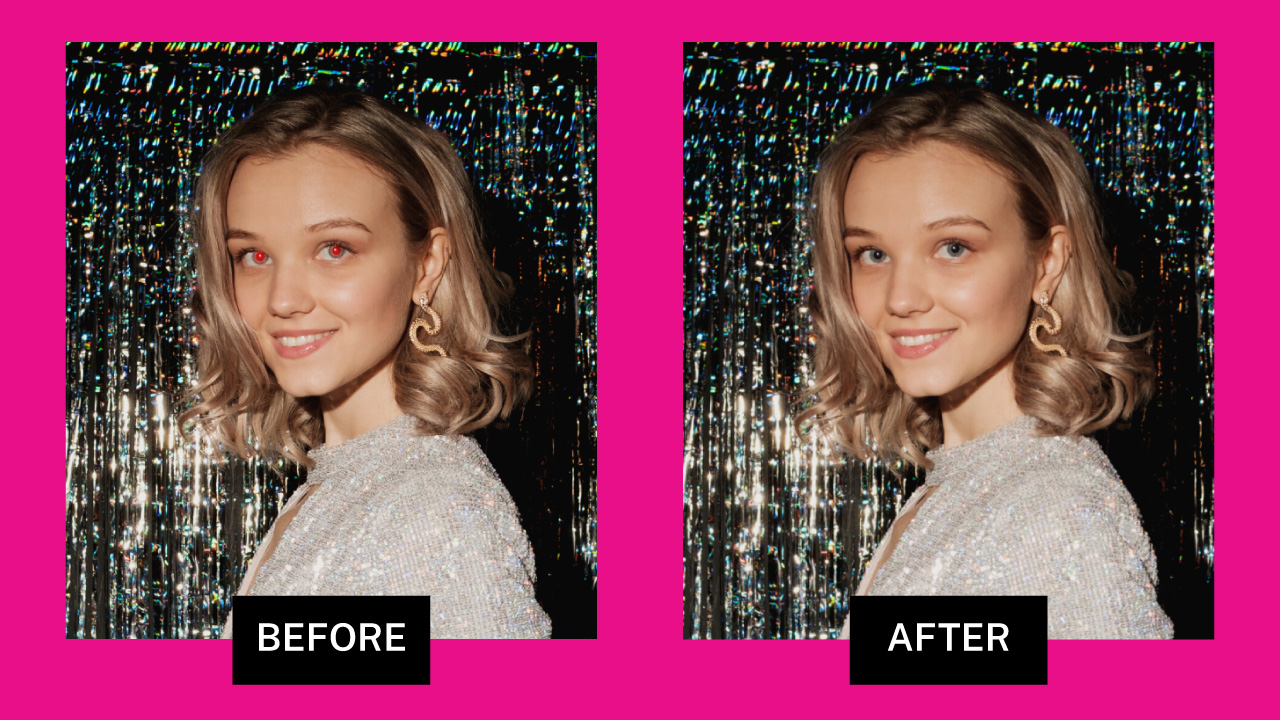
This is the result after applying the “Red Eye” tool in Photoshop to get rid of red eyes.
How to Get Rid of Red Eyes in Photos Using Canva
Select the image and click on the “Edit Image” button on the toolbar at the top of the screen. Then click on the “Face Retouch” feature located on the left-side toolbar. Finally, select the “Red Eye” tool and click on “Apply” to save the changes.
Step 1: Select the “Face Retouch” Tool
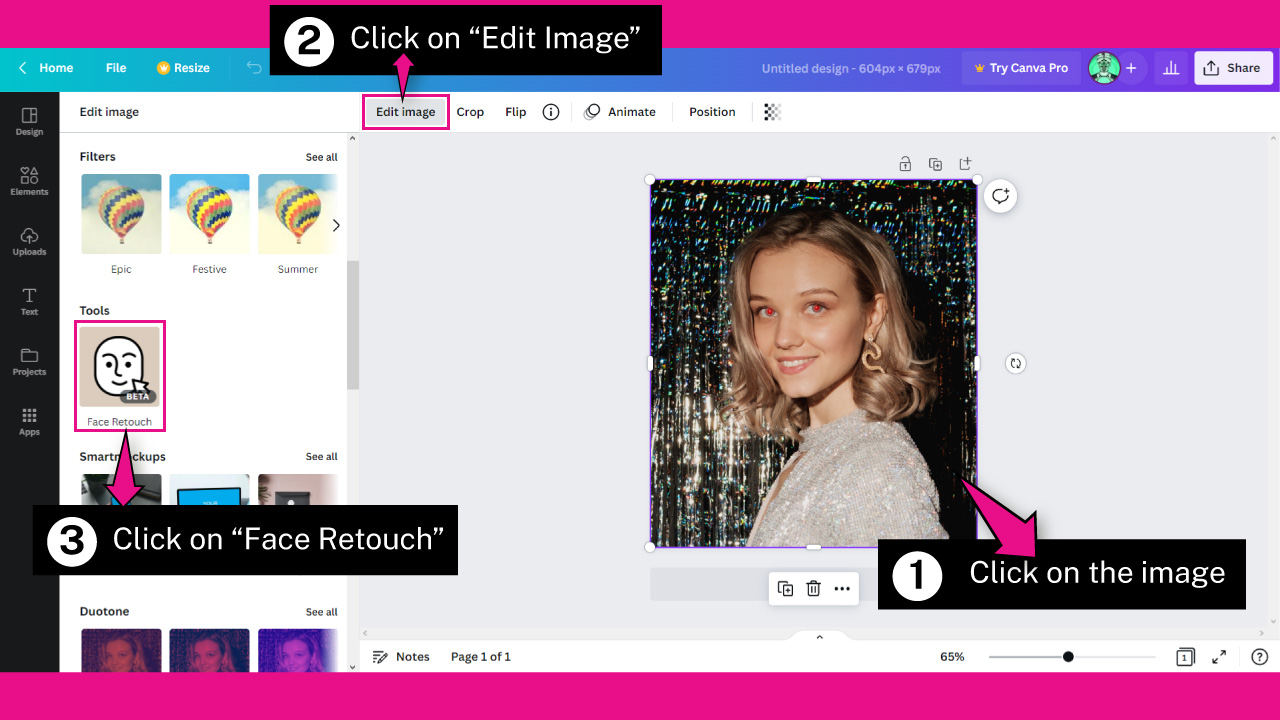
Once you have uploaded your image and are in “Design” mode, click on the image to select it.
Then, click on the “Edit Image” button on the toolbar at the top of the screen.
Next, scroll down the left-side toolbar to find the “Face Retouch” feature. If you haven’t used this tool before, you will find it in the “You May Also Like” tool group.
Step 2: Get Rid of Red Eyes
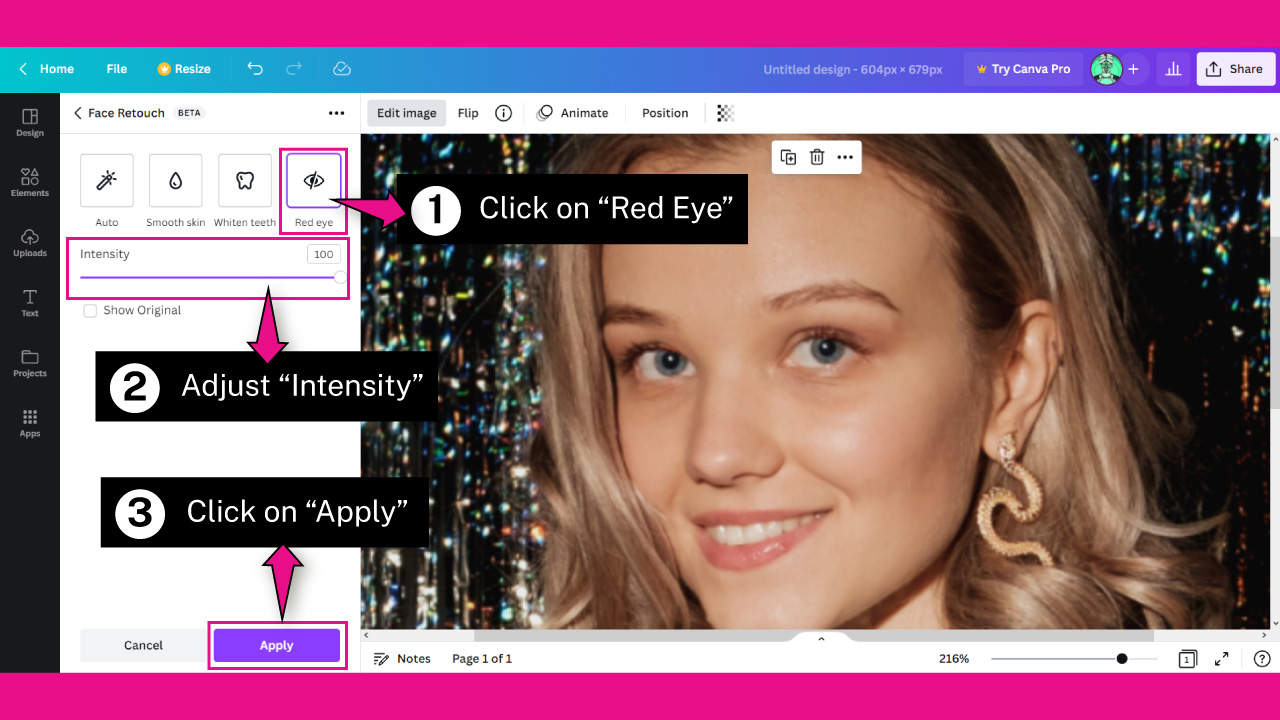
In the “Face Retouch” tool, click on the “Red Eye” button to instantly correct red eyes.
You can control the filter’s “Intensity” by dragging the slider or entering your desired value.
Once you are satisfied with the result, click on the “Apply” button at the bottom of the toolbar.
Step 3: Download Photo
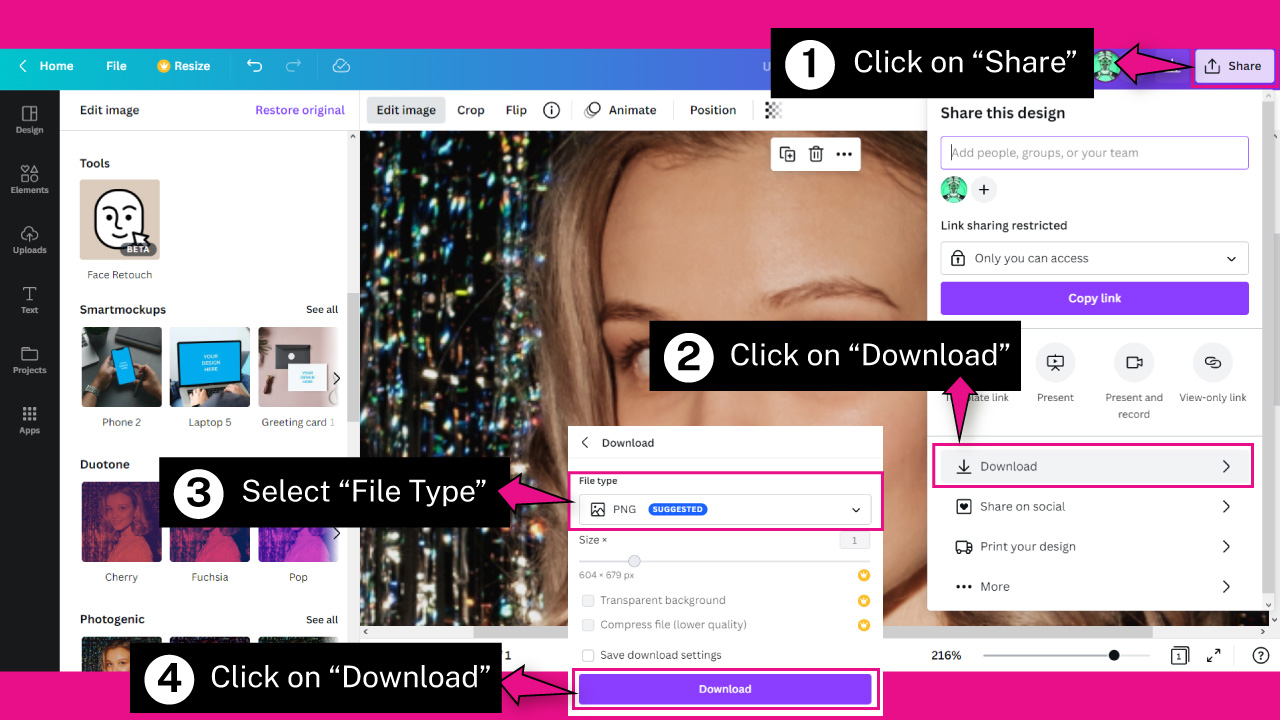
To export your fixed image, click on the “Share” button located at the upper-left corner of the screen.
On the collapsed panel, click on the “Download” button.
Under the “Type File” options, select your desired file extension:
Select JPG if you are going to share the photo on social media.
Select PNG if you are looking to preserve the image quality.
Select PDF if you are looking to export in the best possible quality.
Once you have selected the file type, click on the “Download” button to start the download instantly.
If you have selected the PDF option and are wondering whether you will be able to convert PDF to PNG or JPG later, the answer is yes.
You can easily convert PDF to an image using online converters like PDF2PNG or PDF2JPG. The first website converts PDF to PNG, and the second one converts PDF to JPG
The Result
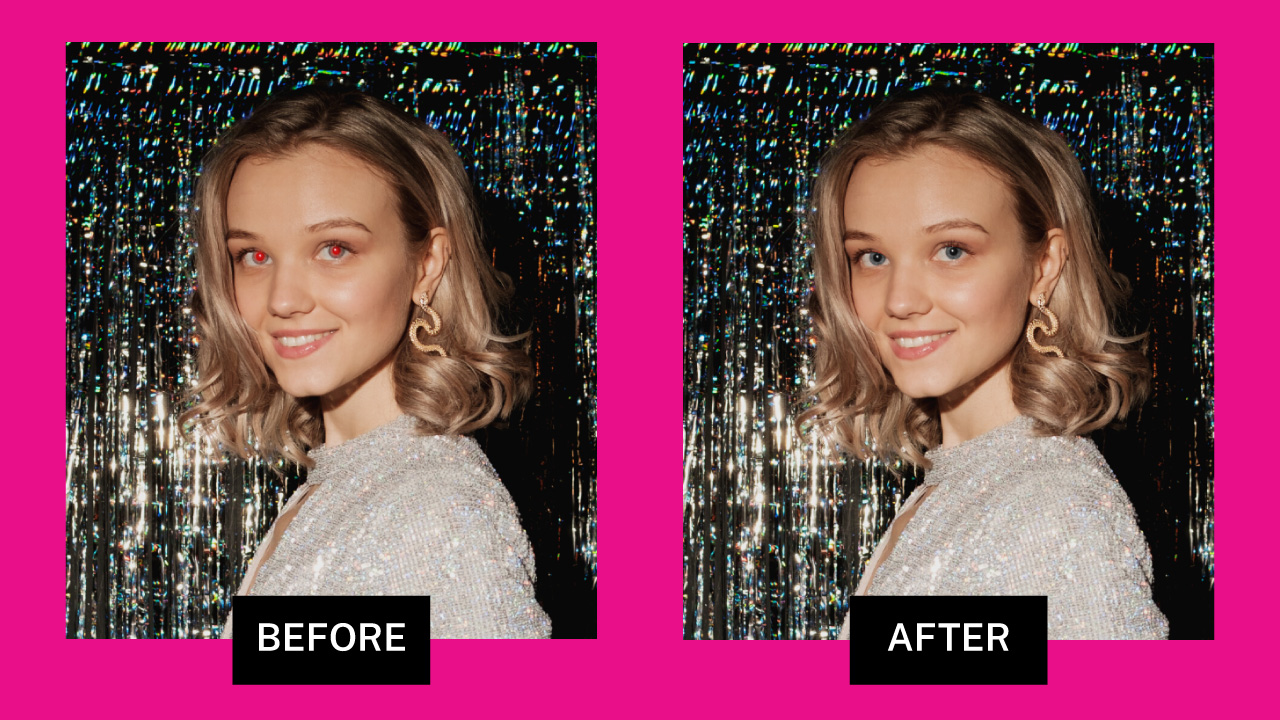
This is the result of “How to Get Rid of Red Eyes in Photos Using Canva.”
If you want to make the eyes pop after downloading the photo, you can try brightening eyes in Lightroom.
How to Get Rid of Red Eyes in Photos on iPhone and Android Using Snapseed
Tap on Brush and set Saturation to -5. Brush over the red spots. Set Dodge & Burn to -5 and brush over the pupils. Save. Tap on Tune Image and adjust the Warmth. Save. Tap on Edit Stacks, followed by Edit Views, Tune Image, and Mask. Adjust the Tune Image value and brush over the irises.
Step 1: Open the Photo in Snapseed
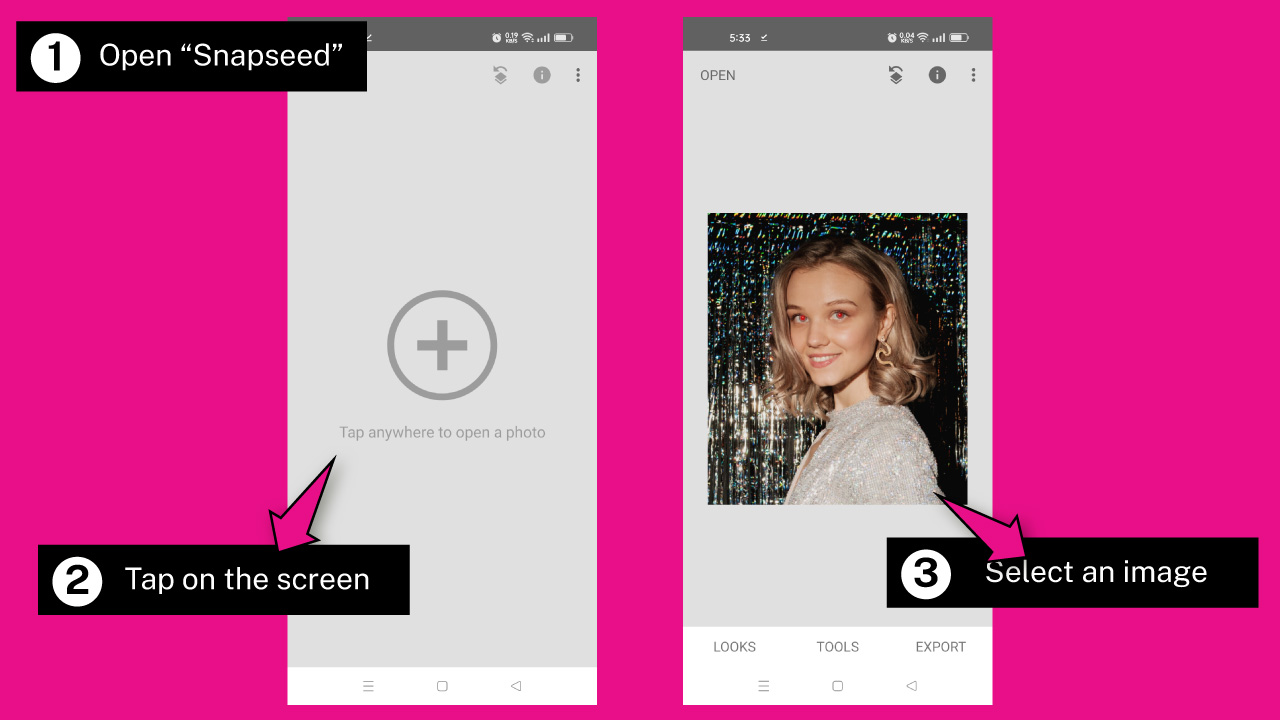
If you want to get rid of red eyes on your phone, you can use “Snapseed”.
However, if you’re using an iPhone, you can also do it using the “Photos” app with no need to install anything else.
Just enter the “Photos” app and tap “Edit” on the top-right corner of the screen. Tap on the “Red Eye” tool and then on the “Tap on Each Eye” button. Finally, tap on each eye to fix them.
If you’re using an Android phone or an iPhone but you want to try a different app, go to the Apple Store or Google Play and download Snapseed for free.
After installing it, open the app and grant permission to access your files.
Then on the “+” screen, tap the screen to open the photo you want to work on.
Step 2: Desaturate Red Spots
Unfortunately, Snapseed doesn’t have a specific tool to fix red eyes in photos, so we have to do it manually.
The first thing we have to do is turn off the red color by reducing the saturation value. Then we’ll decrease the exposure (also known as burn) on the pupil to restore the blackness intensity. Finally, we’ll increase the irises’ color to restore the possible loss of color when desaturating.
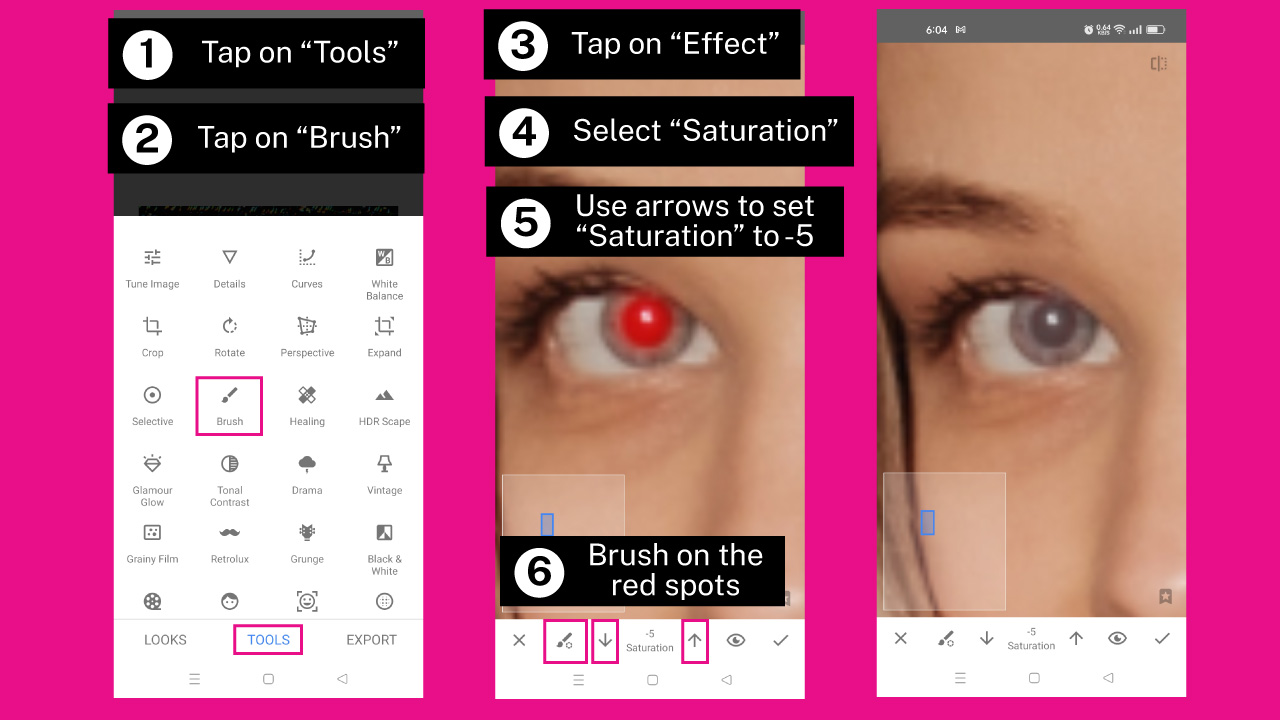
Tap on “Tool” on the toolbar at the bottom of the screen. Once the tools panel collapses, select the “Brush” tool.
Then tap on the “Effect” icon on the toolbar at the bottom of the screen and select the “Saturation” brush.
Tap on the “Increase” and “Decrease” arrows on the toolbar at the bottom of the screen to adjust the brush intensity. Set the “Saturation” brush to -5.
Pinch with two fingers to zoom in to the eyes and brush over the red spots to reduce saturation and turn off the red color intensity.
Tap on the “Eye” icon to enable it if you want to see the area where you’re applying the brush.
This tool works similarly to when you use brushes in Lightroom.
If you want to remove an area of the applied brush, use the “Increase” or “Decrease” arrows and set the amount to “0” or “Erase”. Then brush over the areas you want to remove.
As a result of desaturating the eye’s red spot the eye pupils will turn to a shade of gray.
Step 3: Burn Pupils
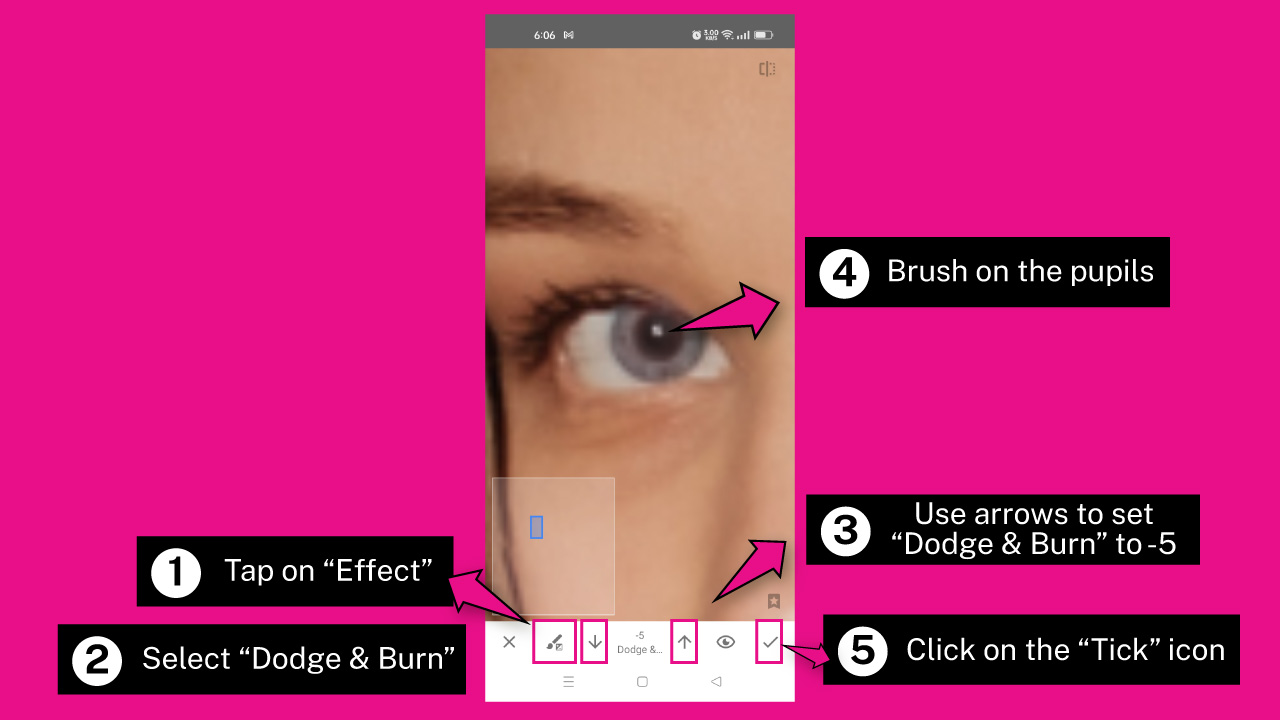
To recover the blackness of the pupils, tap on the “Effect” icon once again and select the “Dodge & Burn” tool.
Then use the “Increase” and “Decrease” arrows to adjust the brush intensity and set the “Dodge & Burn” brush to -5.
Once you have set the brush intensity, brush over the pupils and slightly over the irises if they have been dodged during the desaturation process.
Once you have finished, tap on the “Tick” icon to confirm the changes.
Step 4: Add a Color Filter
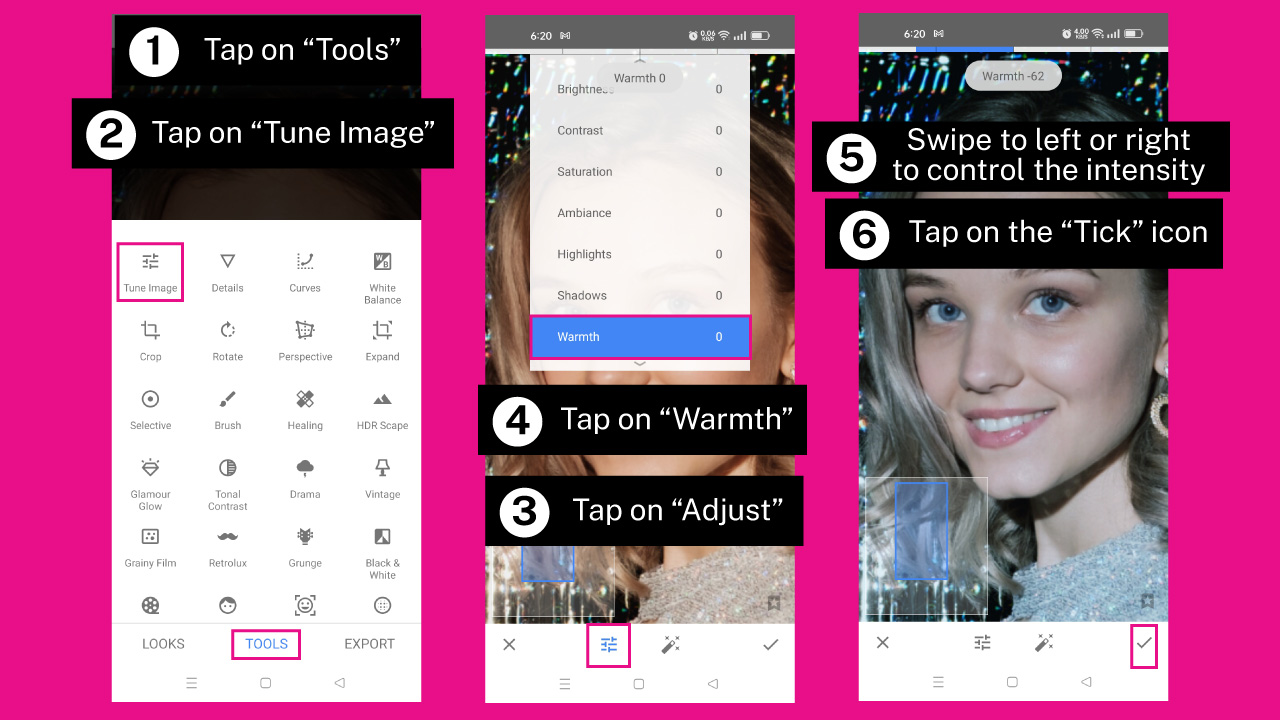
After getting rid of the red spots in the eyes, the irises may appear desaturated. If this is the case in your image, you need to restore the color of the irises.
To do this, tap on “Tools” and select the “Tune Image” tool from the collapsed panel.
Once you are in the “Tune Image” tool mode, tap on the “Adjust” icon and select the “Warmth” filter.
Swipe left or right anywhere on the screen to control the “Warmth” filter. Swipe it to the left to get a bluish filter or to the right to get a reddish filter.Swipe it to the side that better suits the color of the irises, taking into account the applied filter amount.
Once you finish, tap on the “Tick” icon to confirm the changes.
Step 5: Apply a Mask Filter
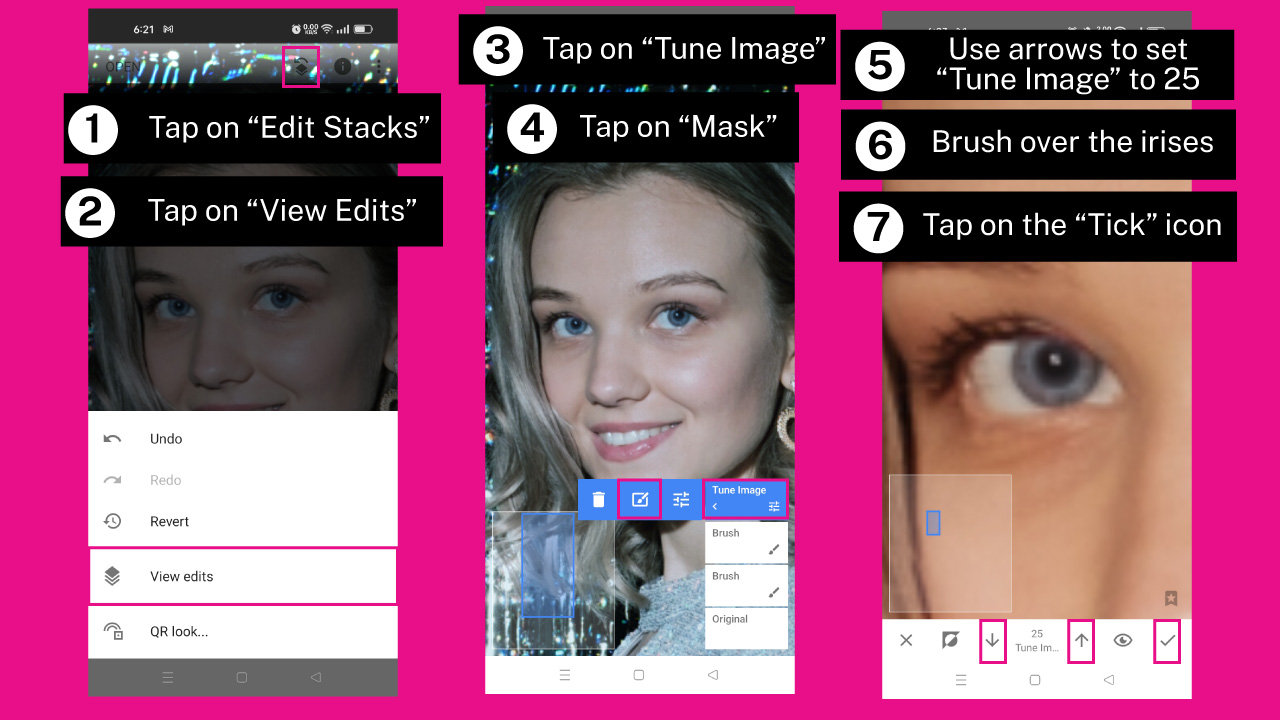
Tap on the “Edit Stacks” button located at the top of the screen. Once the menu unfolds, tap on the “View Edits” option.
Next, tap on the “Tune Image” edit and on the unfolded options, tap on the “Mask” icon.
In the “Mask” mode, use the “Increase” and “Decrease” arrows to set the “Tune Image” filter to 25 or your desired value. This value controls the intensity of the applied filter.
Then, brush over the irises to mask them, so the filter will be applied to the irises only instead of the whole image.
Tap on the “Eye” icon to enable it if you want to see the area where you are applying the brush.
Once you have finished, tap on the “Tick” icon.
Step 6: Save Image

When you have finished editing the photo, tap on “Export” and on the unfolded menu select “Save” to save it in your phone.
The Result

This is the result of how to get rid of red eyes in photos using Snapseed on iPhone and Android.
If you feel that something is still missing to get a great photo after exporting the image, you can try enhancing the image by making eyes pop in Lightroom.
Frequently Asked Questions on “How to Get Rid of Red Eyes in Photos”
How to get rid of red eyes in photos on an iPhone without installing any app?
Open the “Photos” app and tap on “Edit” in the top-right corner of the screen. Select the “Red Eye” tool, then tap on the “Tap on Each Eye” button. Finally, tap on each eye to fix them.
How to remove applied brushes in Snapseed?
Use the “Increase” or “Decrease” arrows at the bottom of the screen to set the amount to “0” or “Erase”. Then, brush over the areas where you want to remove the applied brush.
How to mask an applied brush in Snapseed?
On the main screen, tap on the “Edit Stacks” button located at the top of the screen. Next, tap on the “View Edits” option, followed by the effect or brush you want to mask. Select the “Mask” option, then set the amount of the effect. Finally, brush over the areas where you want the effect to be shown.

I am a professional blogger and entrepreneur with a strong interest and passion in photo editing. On MindRelic, I happily share my expertise in the photo editing niche with all of you guys!