
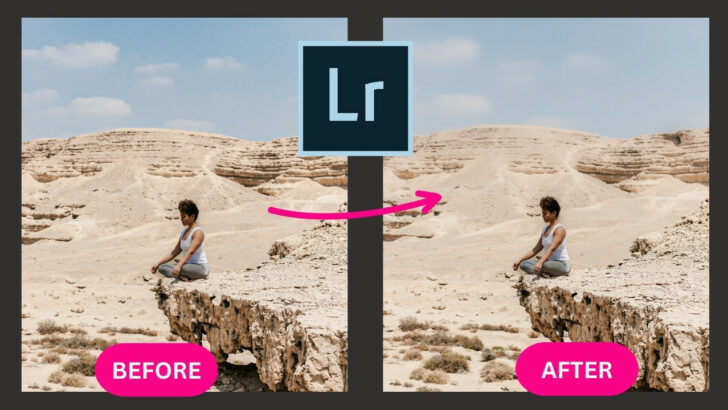
A blurry background is not only visually appealing but also an effective way to hide background distractions and keep the focus on the main subject in an image.
Although a blurry background is best achieved in camera by adjusting your camera settings, some cameras or phones may not be able to achieve this.
The good news is that even if we have not achieved a blurry background in camera, we are able to utilize the Lightroom Mobile app to edit our image and achiev the desired look.
In this tutorial, you will learn how to easily blur the background of any image using nothing but Lightroom Mobile.
How to blur the background of an image on Lightroom Mobile
To blur the background in Lightroom Mobile utilize the “Masking” tool to select the subject, and invert the mask to select everything excluding the subject. Decrease the “Clarity”, “Texture” and “Dehaze” sliders. Next, utilize the brush tool and erase the mask from any areas you do not want blurry.
For in-depth complicated edits, it is recommended to use Lightroom Desktop.
However, Lightroom Mobile is extremely effective and has a majority of the same tools as Lightroom Desktop.
Lightroom Mobile is convenient for quick edits that produce great results.
This tutorial will teach you how to blur the background of an image directly on your phone in the Lightroom Mobile App.
Step 1: Import an image
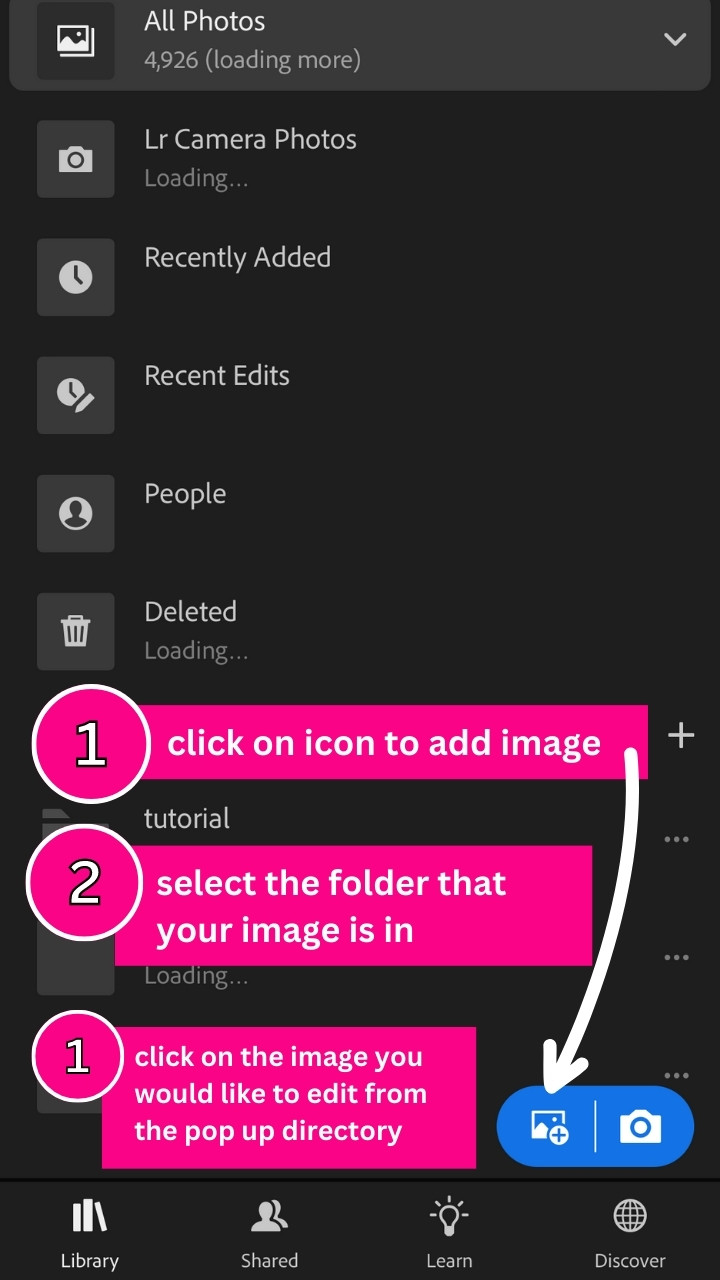
The first step is to import the image we would like to edit onto the Lightroom Mobile app.
To do this, start by clicking on the icon in the bottom left corner with a picture and a plus sign.
A menu will pop up with different folders on your phone.
Select the folder that your image is stored in.
Next, click on the image you would like to edit from the pop-up directory.
We can now begin with the editing process.
Step 2: Click on the “Masking” tab and utilize the “Select Subject” tool to automatically select the subject
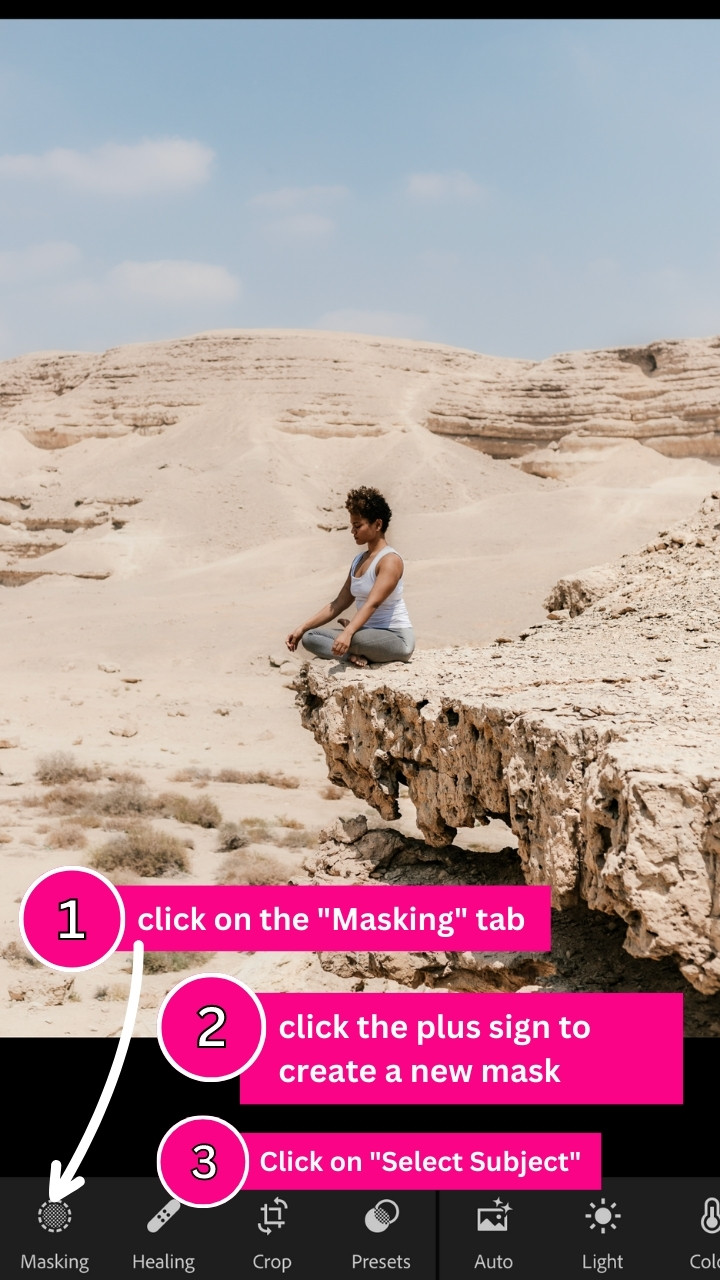
Begin by clicking on the “Masking” tab on the bottom panel.
Next click on the icon with the plus sign on the right-hand side panel to create a new mask.
A pop-up menu will appear.
Click on “Select Subject”.
Lightroom will automatically find and select the main subject of the image.
This tool is highly accurate, especially in images with one subject or where the subject is easy to identify.
In the same menu, you will notice other masking options such as “Select Sky”.
These can all be used in the same manner for different purposes.
The reason why we chose to utilize the “Select Subject” option is that we want to make changes to the whole image excluding the subject.
If we only wanted to blur the sky we would have utilized the “Select Sky” option.
Step 3: Invert the mask to select everything excluding the subject
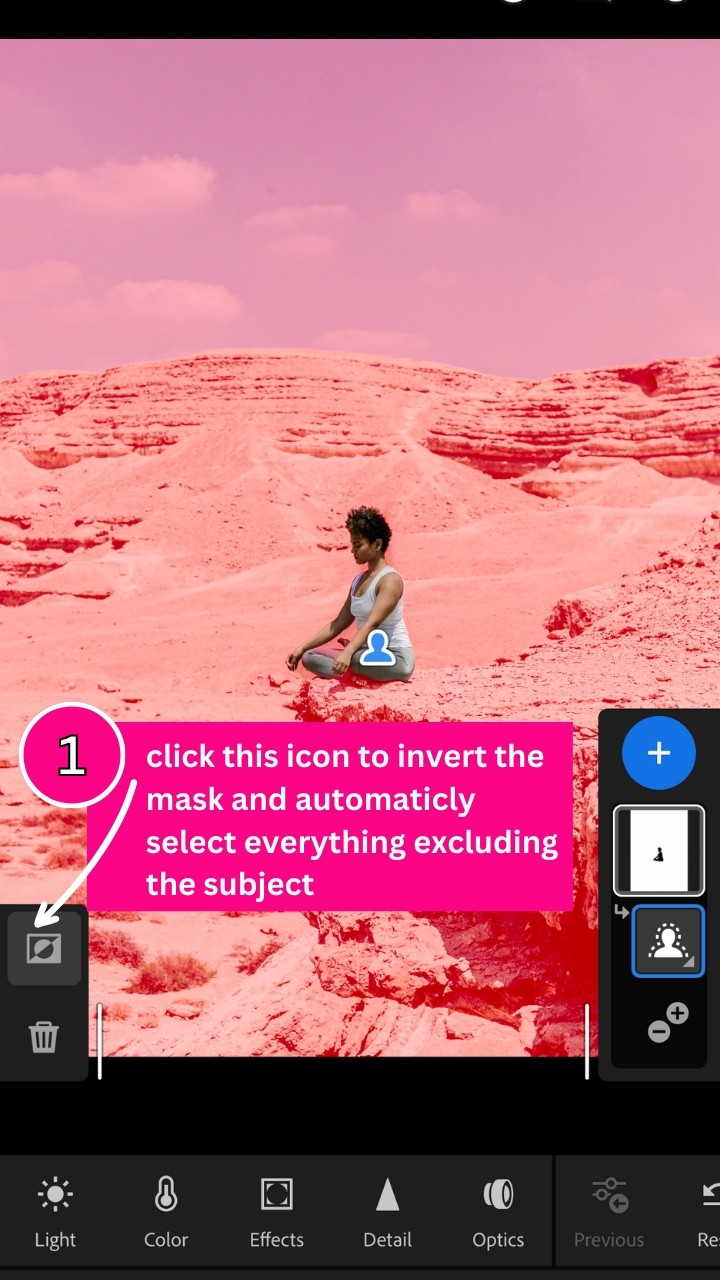
Now that we have selected the subject in our image, we need to invert the mask because we want to make changes to the background of the image, not the subject.
Inverting the mask will automatically select the entire image except for the subject.
This is an extremely quick and helpful way for us to highlight the background of an image.
To do this, click the icon on the left side panel above the trash icon.
At first, the icon may be confusing but you will soon come to recognize this as the symbol for inverting the mask.
Once you have clicked the invert mask button, you will notice that the mask is now over the whole image excluding the subject.
We are now able to make changes to the background of our image without affecting our subject.
Step 4: Select the “Effects” panel and decrease the “Texture”, “Clarity” and “Dehaze” sliders
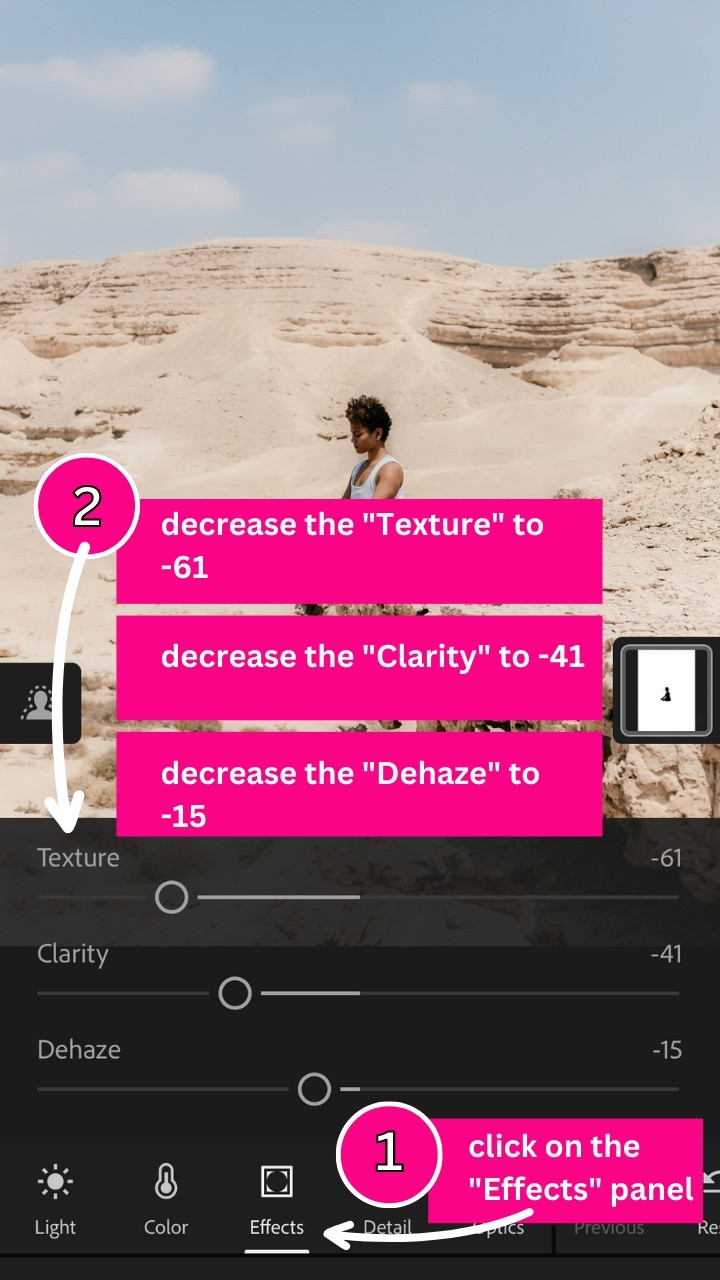
To begin editing and making changes to our background we need to start by selecting the “Effects” panel.
A menu of different settings will open.
For this tutorial, we will be focusing on the “Texture”, “Clarity” and “Dehaze” settings.
Our aim is to blur the background of our image which is why we need to remove the texture and clarity from the background.
Therefore, we will decrease the “Texture” slider to -61 and the “Clarity” slider to – 41.
The “Dehaze” setting works by reducing the haze in an image.
For this tutorial we want our image to be blurry and therefore want a bit of haze.
We will therefore decrease the “Dehaze” slider to -15.
You will now be able to see that everything in our image has become blurred, except for our subject.
We have achieved our blurry background in just a few steps.
You can press and hold on the screen to see the before and release your hold to see the after.
This will allow you to see the changes you have made and help you decide if you would like to add more blur.
If you would like to have the background more blurry, simply decrease the “Texture”, “Clarity” and “Dehaze” sliders further.
Remember to not go overboard as your image can quickly become overedited.
Step 5: Click on the “Mask” panel and select “Subtract from Mask 1”
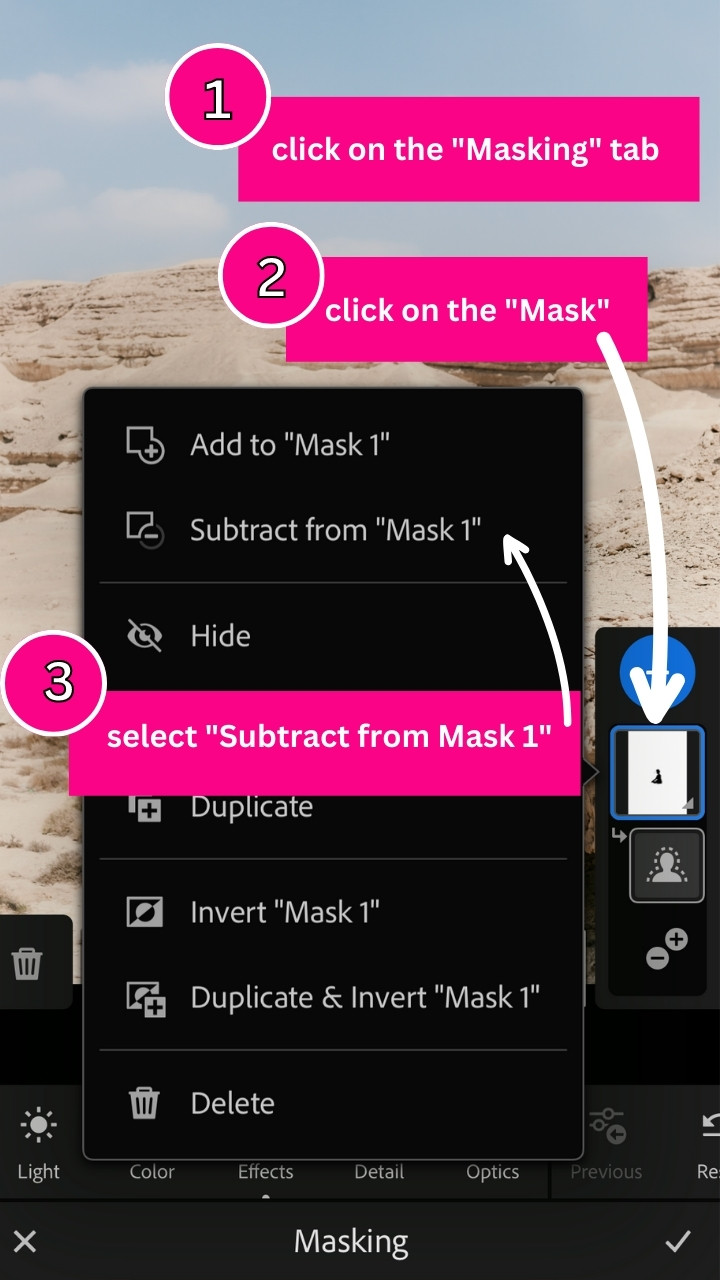
Now that we have blurred everything except our subject, it is important for us to analyze our image to figure out if there are any areas besides the subject that we do not want to be blurry.
In order for the edit to look more realistic we can make sure that we do not blur anything in line with our subject.
We can therefore remove the blur from the rock that our subject is sitting on and the ground in the foreground of our image.
To do this, click on the “Masking” tab, then click on the Mask.
Lastly, select “Subtract from Mask 1”.
Step 6: Select the “Brush” tool and brush over any areas you do not want blurry
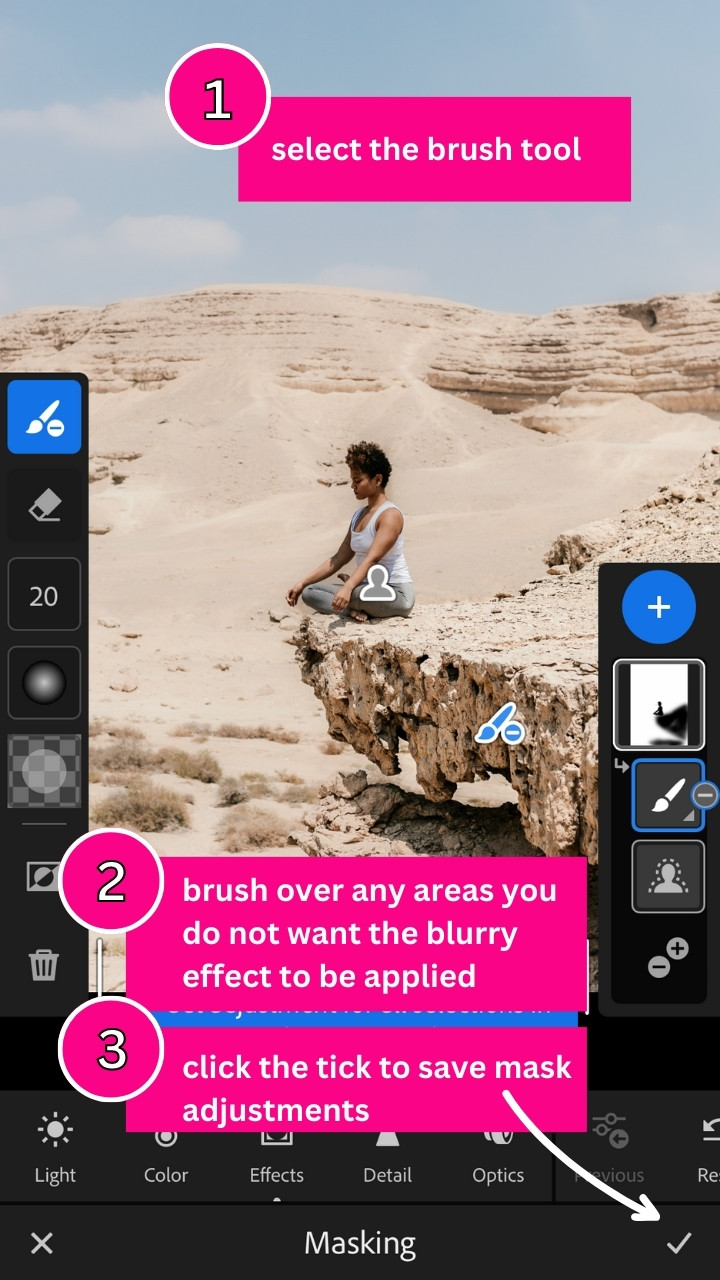
After you select “Subtract from Mask 1” a menu will pop up with different tools that you can utilize.
Click on the “Brush” tool.
Once the brush tool is selected, we can brush over the areas we do not want blurry.
Brush over the rock that the subject is sitting on and the ground in the foreground of the image.
When you are happy with your masking and your overall image, click the tick on the bottom right corner to save your mask settings.
Step 7: Export your image
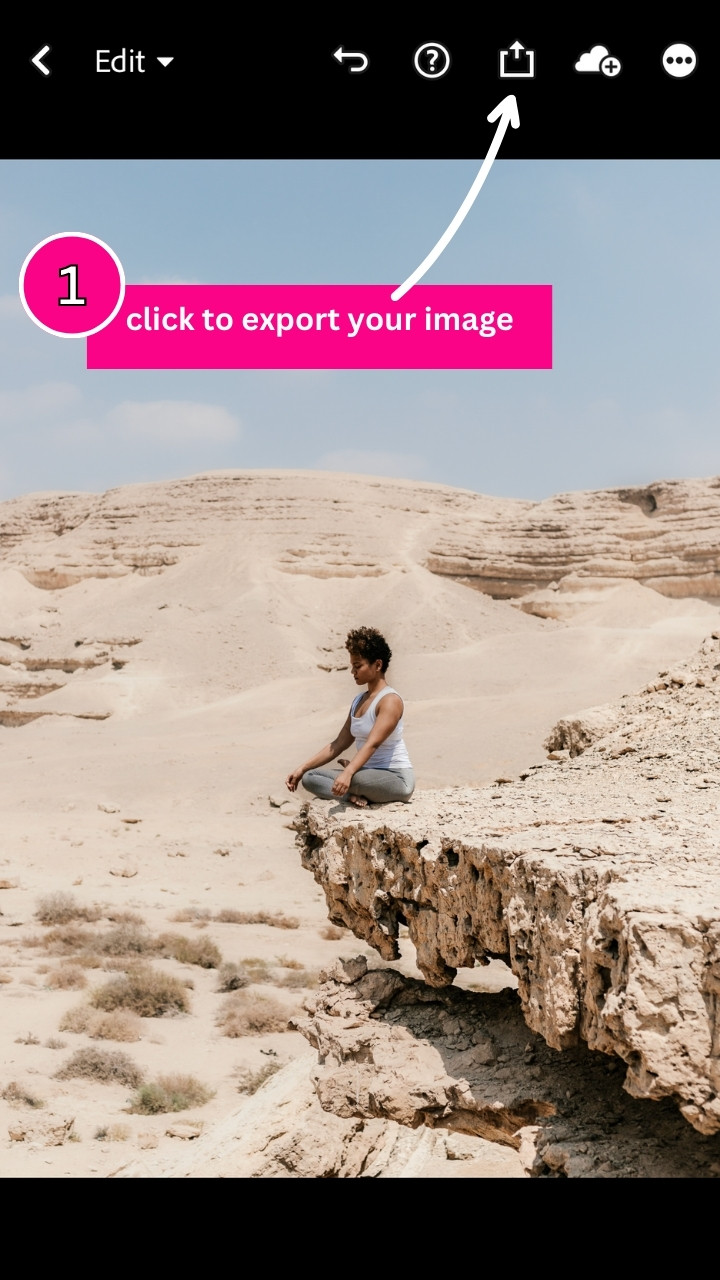
You have now successfully blurred the background of your image and can now export it to your phone.
To export, click on the icon with the square and arrow and choose where you would like to export your image too.
The Result
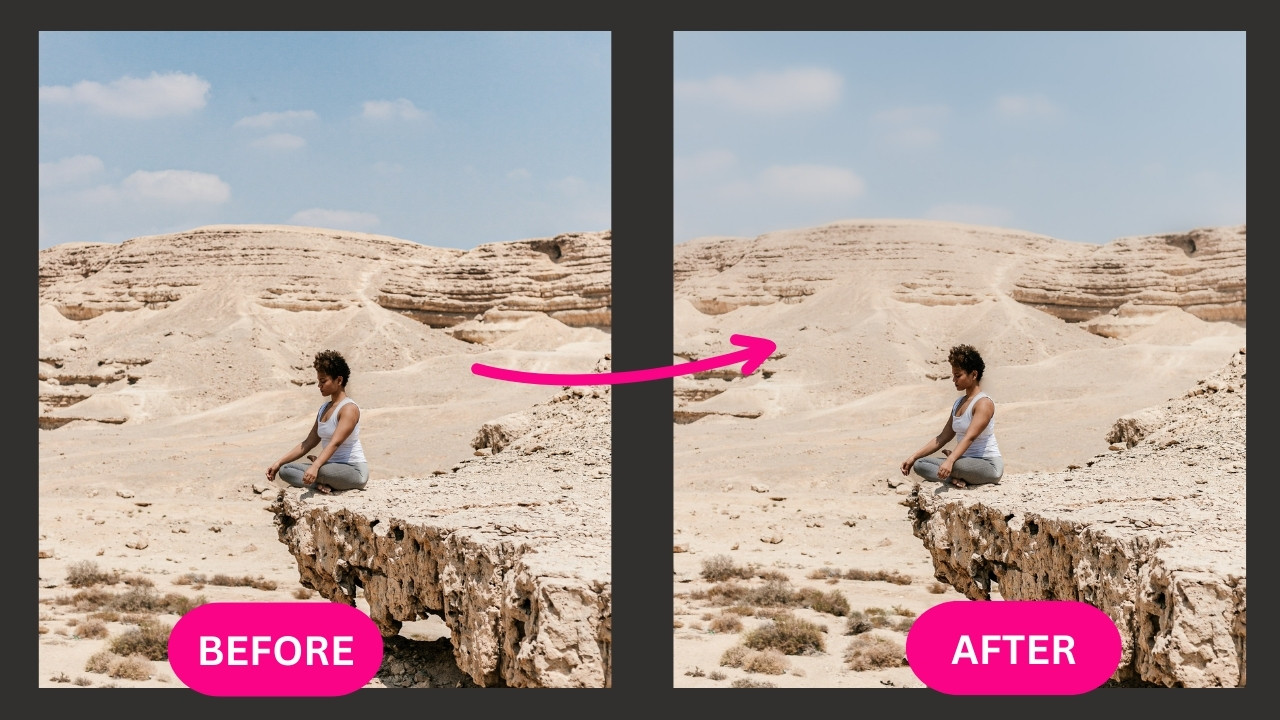
Here is the final result of blurring the background.
You can now take the steps that you have learned in this tutorial and successfully blur the background of any image. We went with a very subtle blur in this case. Using the very same method but changing the parameters a bit, you can obviously achieve a much heavier blur of your background if desired!
Frequently asked questions on “How to blur the background of an image in Lightroom Mobile”
Is Lightroom Mobile free to use?
Lightroom mobile is free to install on both Apple and Android, however, not all of the features are available on the free version. You will need to purchase an Adobe subscription to gain access to all of the features.

I am a professional blogger and entrepreneur with a strong interest and passion in photo editing. On MindRelic, I happily share my expertise in the photo editing niche with all of you guys!