
Adding a person into a photograph, either just for fun, or because we need to, may seem like a very challenging task. And it doesn’t really matter why we do it, but how to get it done.
Since most of us have watched tutorials of skillful and experienced designers and editors getting the job done by employing complicated techniques and some fancy premium software, it may appear to be an impossible thing to achieve for some.
But what most people ignore is that you don’t even need to be close to these top designers’ level to accomplish this task.
In this article we will learn how to add someone into a picture step by step, and by using two 100% free different types of software.
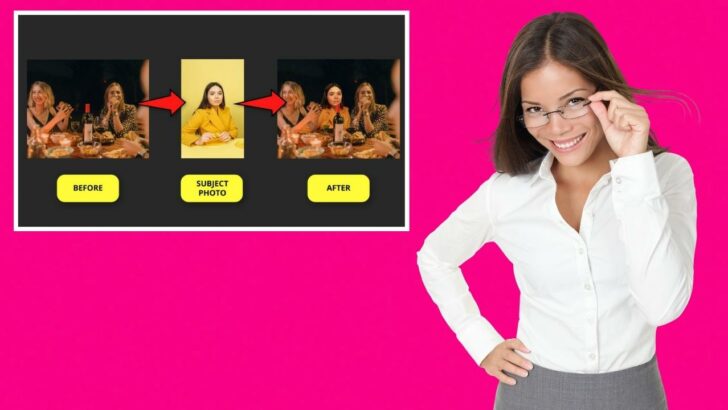
I will be adding a woman into a picture of a night birthday party for this example.
Since I’ll be combining a studio lighting photo with a night lighting vintage style photo, we’ll have to sort several obstacles by adding some filters and applying some tools to make both match.
With guidance and the proper tools, you will be on the right track.
Outstanding and groundbreaking Krita and Pixlr will be our allies in this mission.
Stay with me to find out how to get this done.
But, before we go into more details, let me give you a general summary on what the main steps are when you want to add someone into a picture without Photoshop.
How to add someone into a picture without Photoshop
Import the subject image. Select its background and remove it. Import the background image and place the subject image. Apply a selection mask to fit the subject between the front objects and the background. Add a series of filters to the subject to match the background.
How to Add Someone into a Picture using Pixlr
Go to the Pixlr website and import the subject image. Select its background and remove it. Import the background image and place the subject image. Apply a selection mask to fit the subject between the front objects and the background. Add a series of filters to the subject to match the background.
Step 1: Go to the Pixlr Website
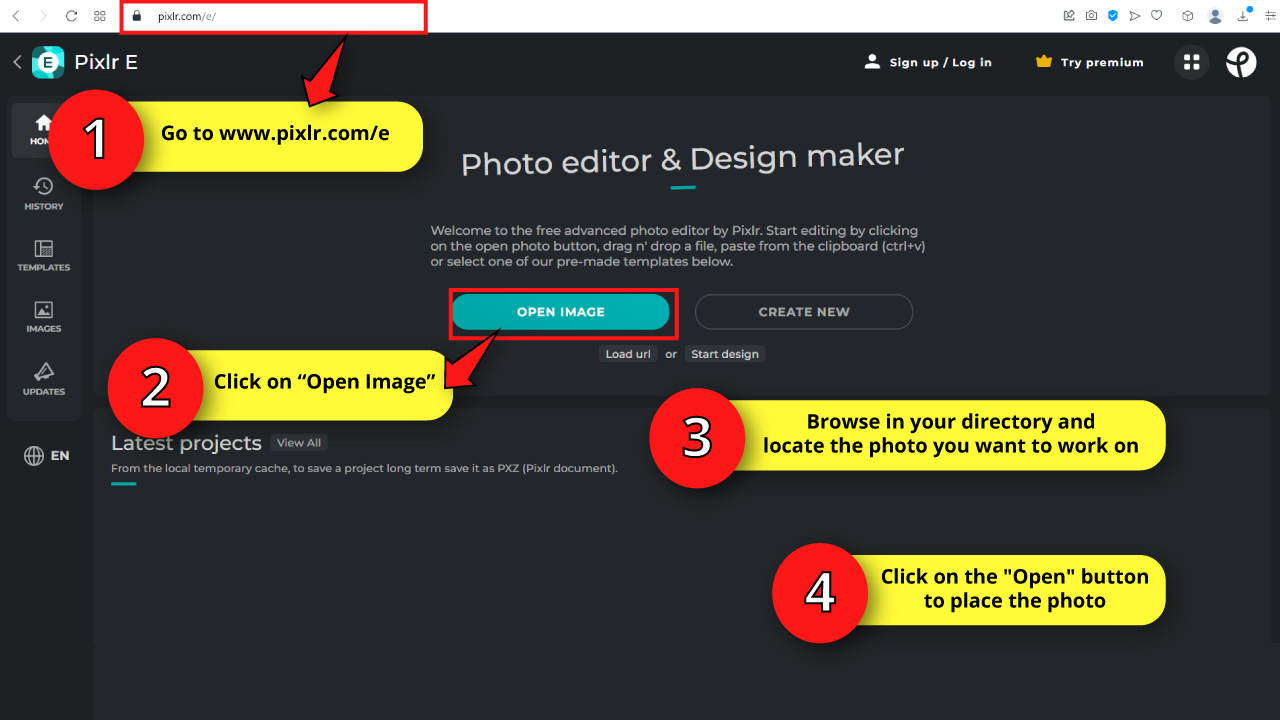
Pixlr is an online photo edition software. This means it isn’t necessary to download or install anything to use it.
Just go to the Pixlr website and click on the “Open Image” button.
On the pop up window, browse in your directory and locate the subject photo you want to work on.
Select the image and then click on the “Open” button.
Step 2: Select the Background
We need to remove the background. For this, you can select the girl or the background. It’s entirely up to you. But since the background has a flatter texture, it will be easier to select. So I’ll go with the background.
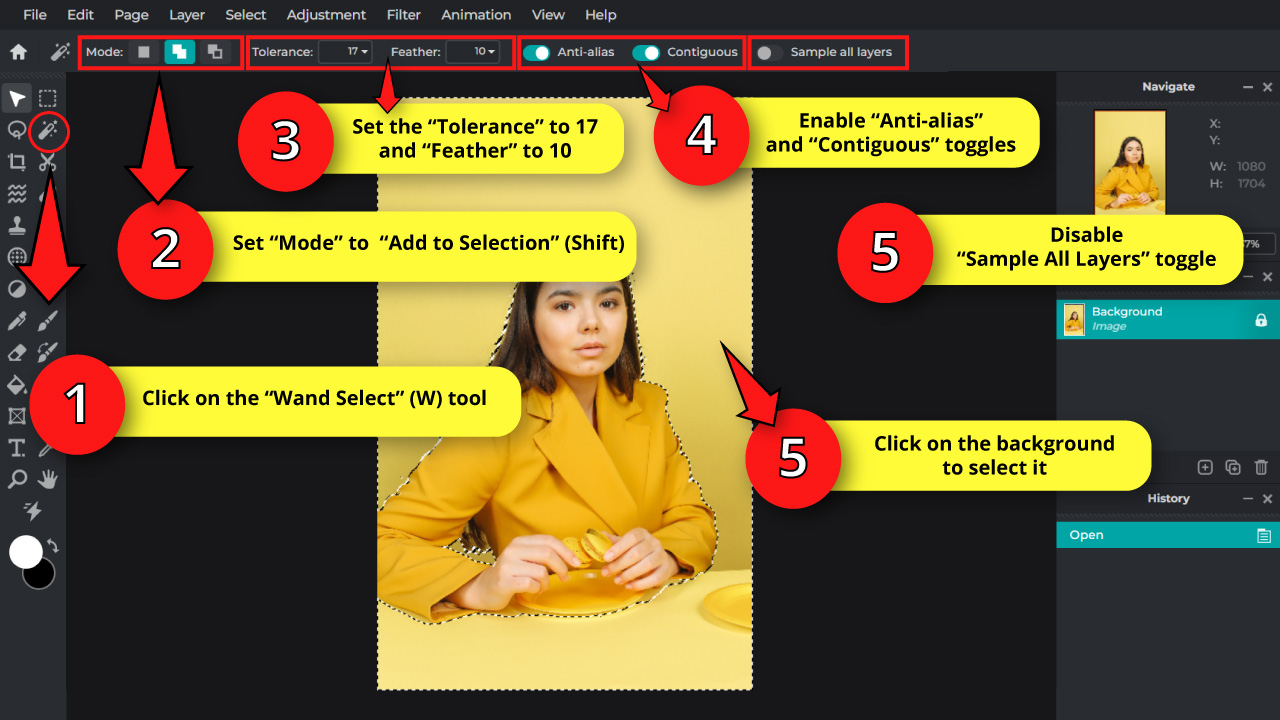
To select the background, click on the “Wand Select” (W) tool located on the left side toolbar.
The “Wand Select” (W) tool has some adjustable parameters available on the top side toolbar.
Select “Add to Selection” in the “Mode” field, or hold the “Shift” key from your keyboard, so every time you click on the image you’ll add a new area to your current selection.
If you want to remove any selected area, click on “Remove From Selection”, or hold the “Ctrl” key from your keyboard as you click on that specific area.
Set the “Tolerance” value. I’ll set mine to 17. The higher the value, the wider the color range of your selection will be.
Set the “Feather” value around 10 px. The higher the value, the softer the edges of your selection will be.
Make sure to have the “Anti-alias” and the “Contiguous” toggles enabled, and the “Sample all Layers” toggle disabled.
So click on the background to make a rough selection. Click several times on different background spots until you have selected the whole background.
Don’t worry if your selection isn’t smooth enough. We’ll take care of this in the two following steps.
Step 3: Convert the Selection into a Mask
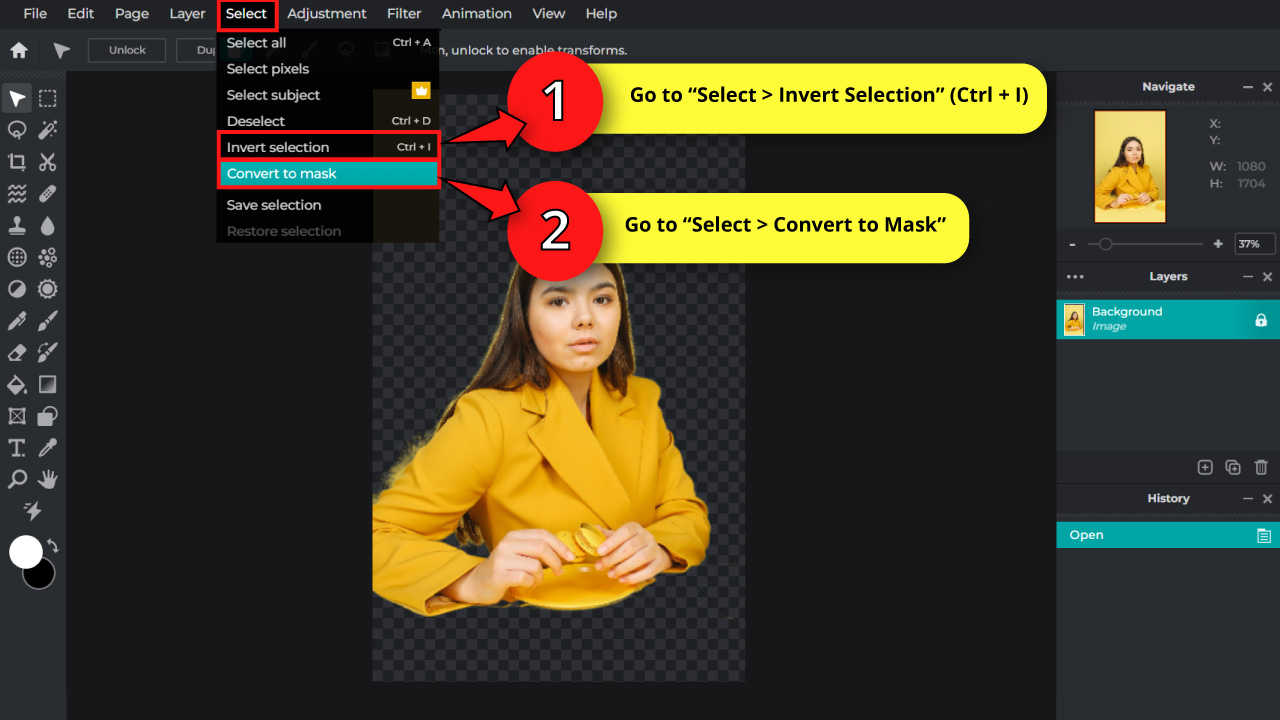
If you have selected the background in the previous step, go to “Select > Invert Selection” on the menu at the top of the screen, or press the “Ctrl + I” command to invert the selection, thus selecting the background.
If you have selected the subject, skip the invert selection part.
Go to “Select > Convert to Mask”, also on the menu at the top of the screen, so now our selection is converted into a mask.
Step 4: Fix the Edges
Once you’re done with this, the “Cutout / Mask” (K) tool will be automatically enabled.
You can also select this tool by clicking on the scissors icon, located on the left side toolbar.
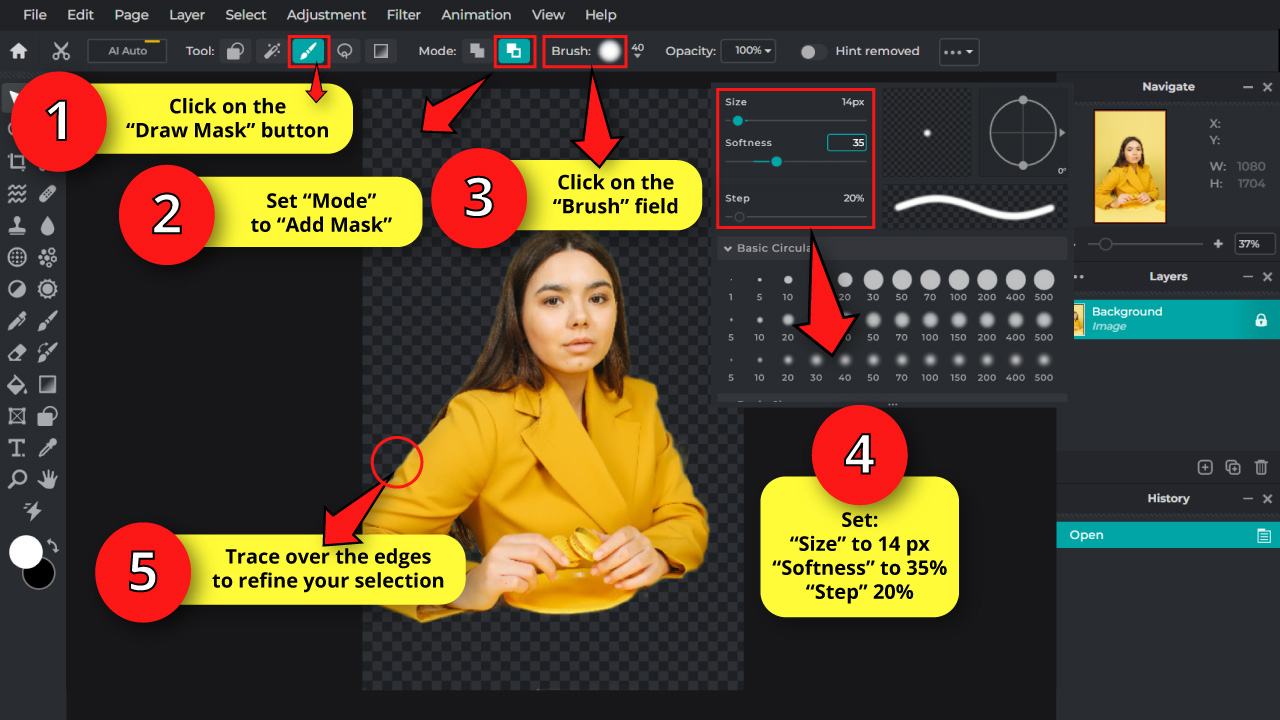
Click on the “Draw Mask” button located on the toolbar at the top of the screen.
Set the “Mode” to “Add Mask” if you want to add more areas to your current selection, or click on the “Remove From Mask” button if you want to remove areas from your selection.
Then, click on the “Brush” field to set the “Size” value to around 14 px.
Set the “Softness” value around 35%, and make sure that the “Step” value is set to 20%.
Trace over the edges to refine your selection.
Step 5: Apply Mask, Unlock Layer and Copy the Image
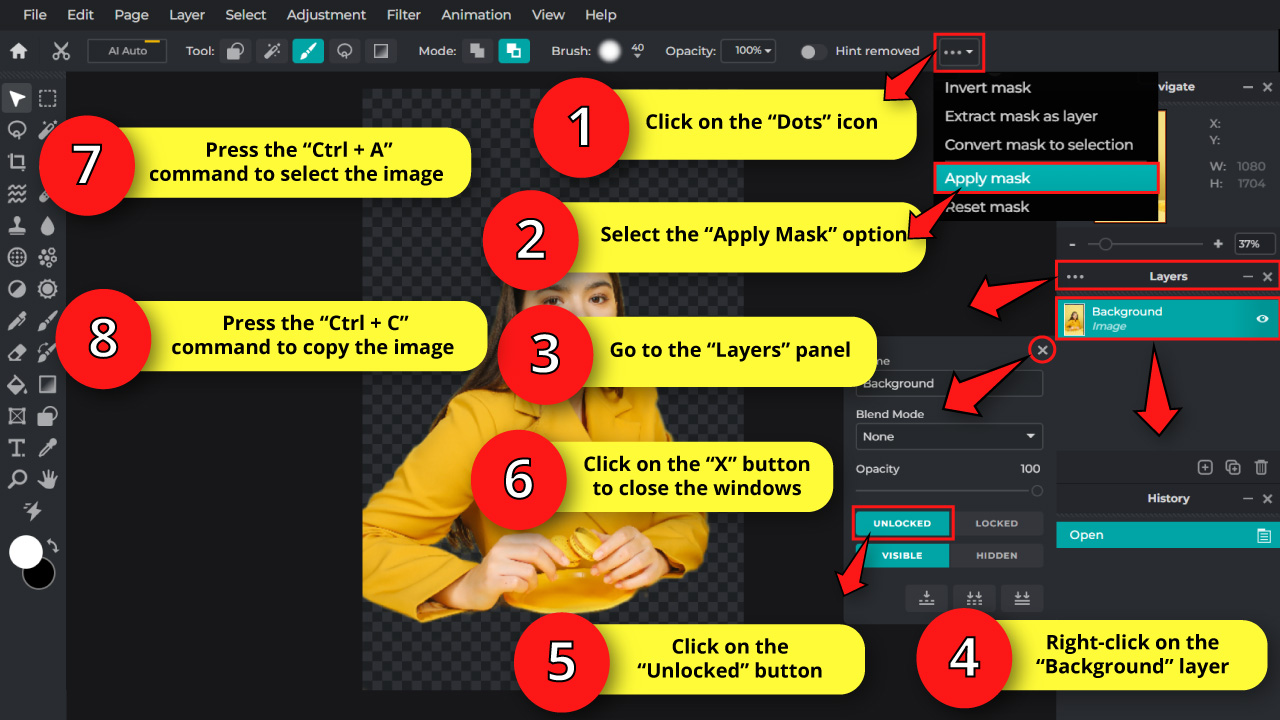
Once you’re done, click on the “…” three dots icon on the toolbar at the top of the screen, and select the “Apply Mask” option.
Go to the “Layers” panel on the right side toolbar.
Right-click on the “Background” layer and click on the “Unlocked” button.
Next, click on the “X” button on the top right side to close the pop window.
And then press the “Ctrl + A” and the “Ctrl + C” commands to select and copy the whole image.
Step 6: Import a New Image
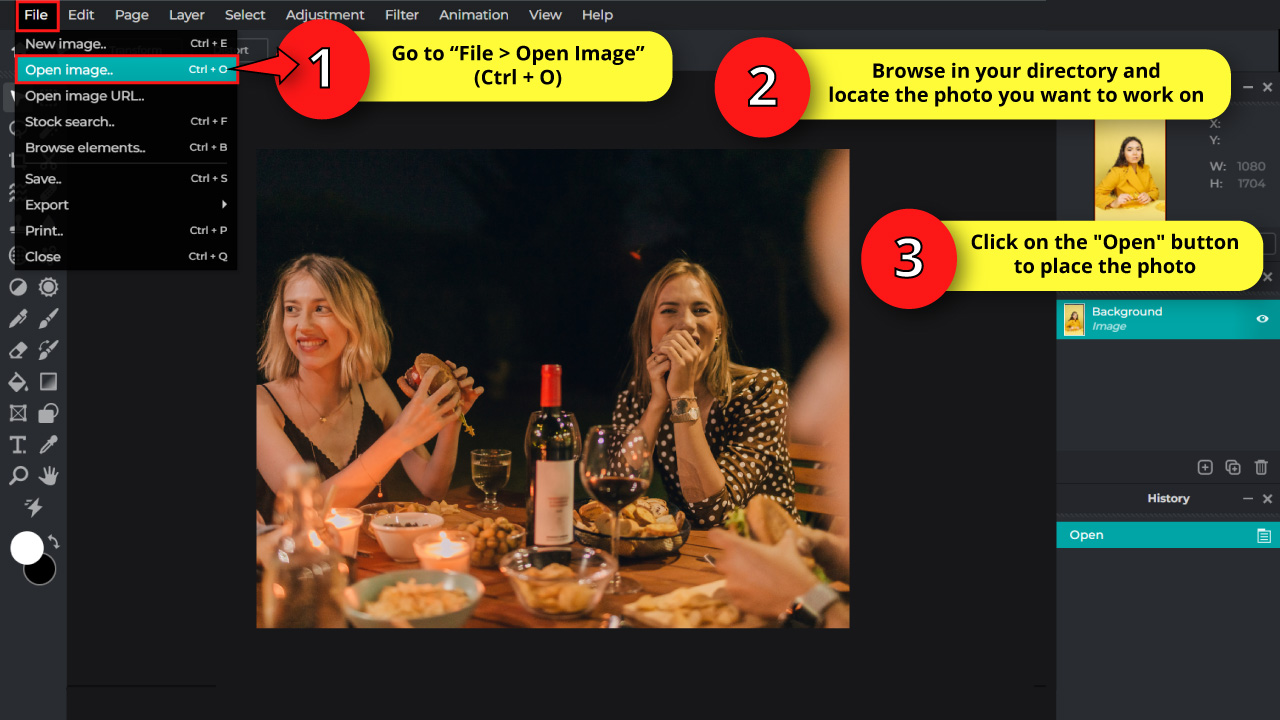
Go to “File > Open Image” on the menu at the top of the screen, or press the “Ctrl + O” command to shortcut it.
On the pop up window, browse in your directory and locate the background photo you want to work on.
Select the image, and then click on the “Open” button.
Step 7: Paste, Resize and Place the Subject Photo on the Background
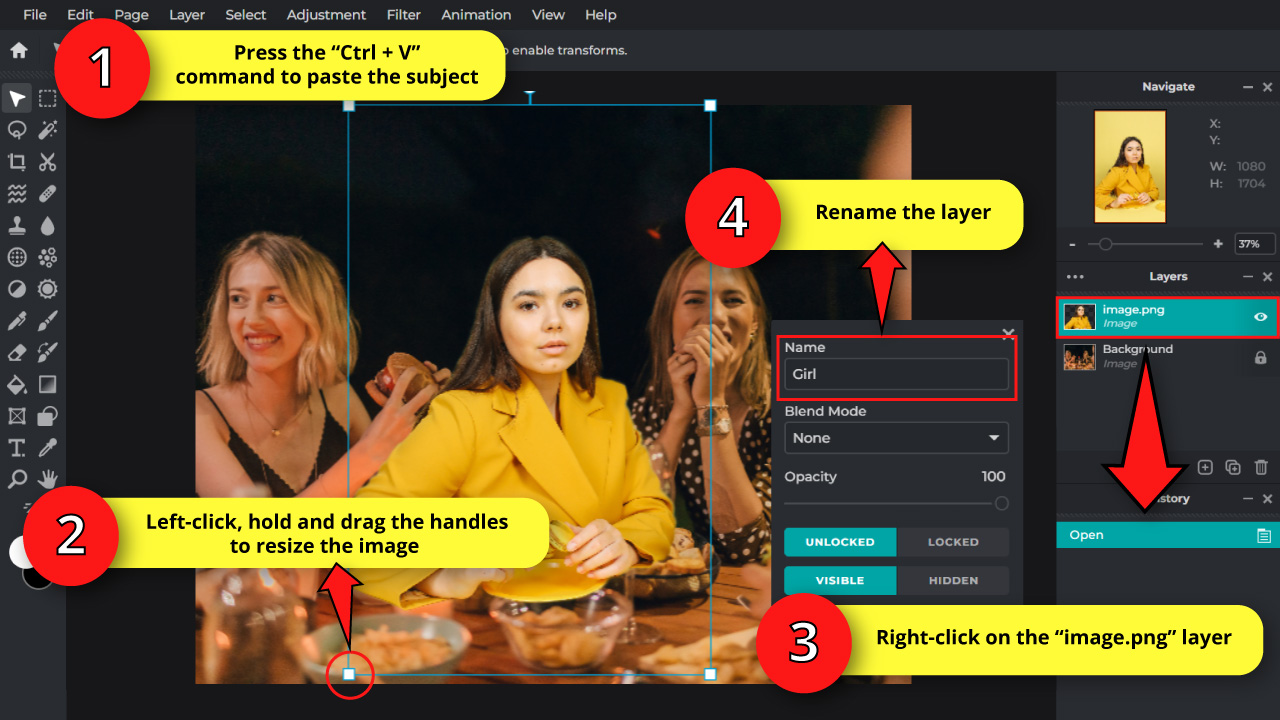
Once you have successfully imported the background image, press the “Ctrl + V” command to paste the subject image in front.
Then, resize the subject image by holding left-click and dragging the handles of the bounding box to match the picture.
To find the right size, use the other people’s face size as a reference.
Our subject and the other people’s face size should be similar.
Next, put the subject image in place.
Then, go to the “Layers” panel and right-click on the layer which name is “image.png”.
On the pop up window, rename the layer on the “Name” field. I’ll rename it as “Girl” for this example.
Step 8: Select the Background
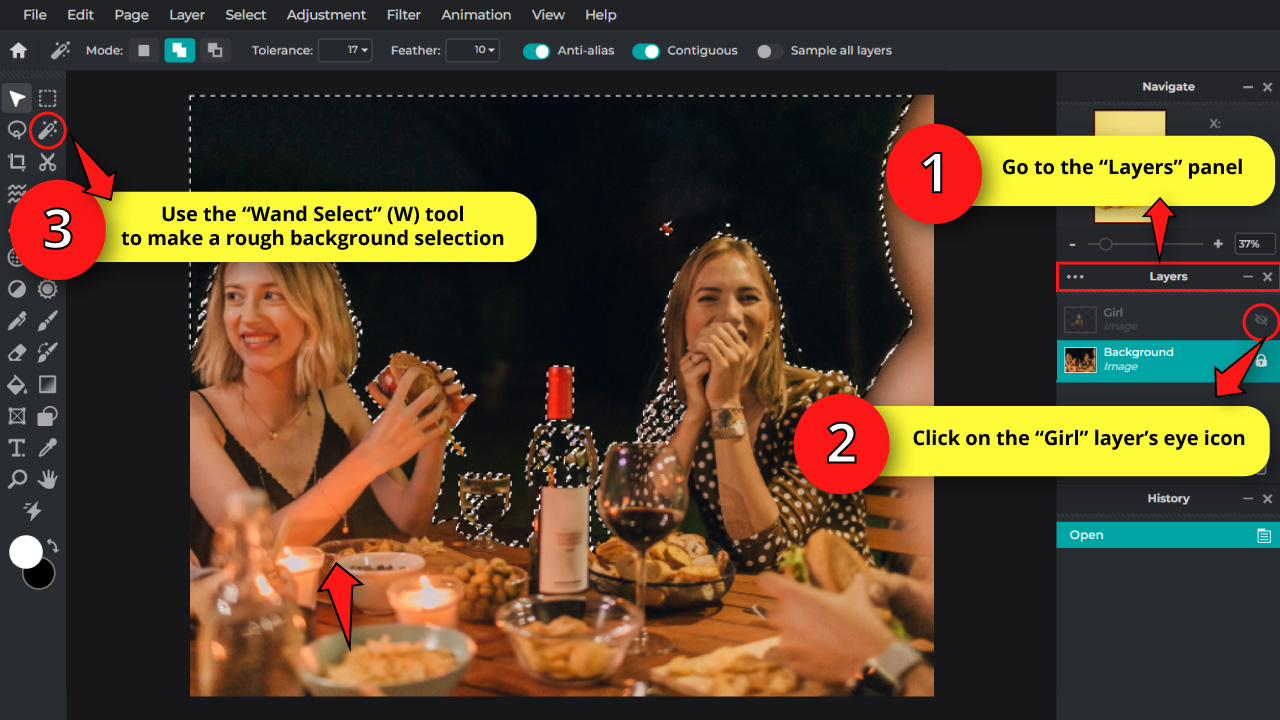
On the “Layers” panel, click on the “Girl” layer’s eye icon to hide the layer.
Then, select the “Background” layer to work here from now on.
Next, click on the “Wand Select” (W) tool and set this tool adjustments on the top side toolbar.
Use the same basic concepts we learned on “Step 2” to adjust the “Wand Select” (W) tool.
Use this tool to make a rough background selection.
Step 9: Convert Selection to Mask
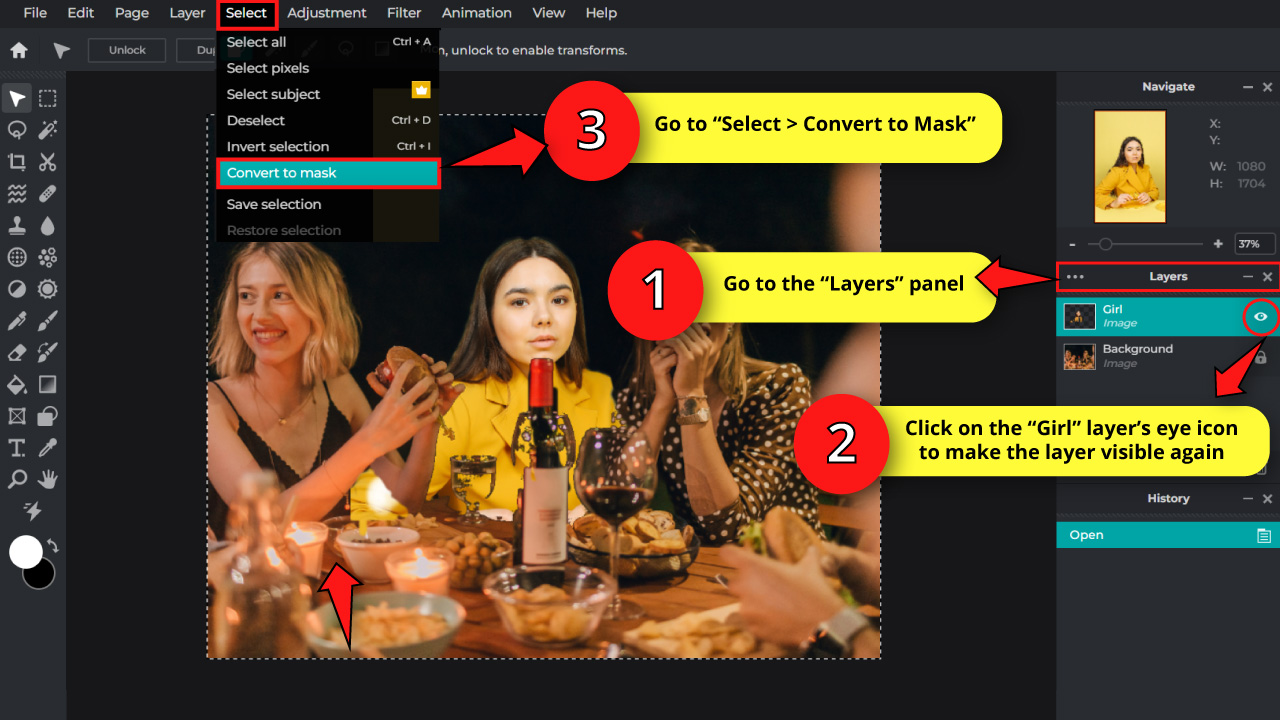
Go back to the “Layers” panel, and click on the “Girl” layer’s eye icon to make this layer visible again.
Then go to “Select > Convert to Mask” on the menu at the top of the screen.
Now our selection will be converted into a mask.
Step 10: Refine Edges and Apply the Mask
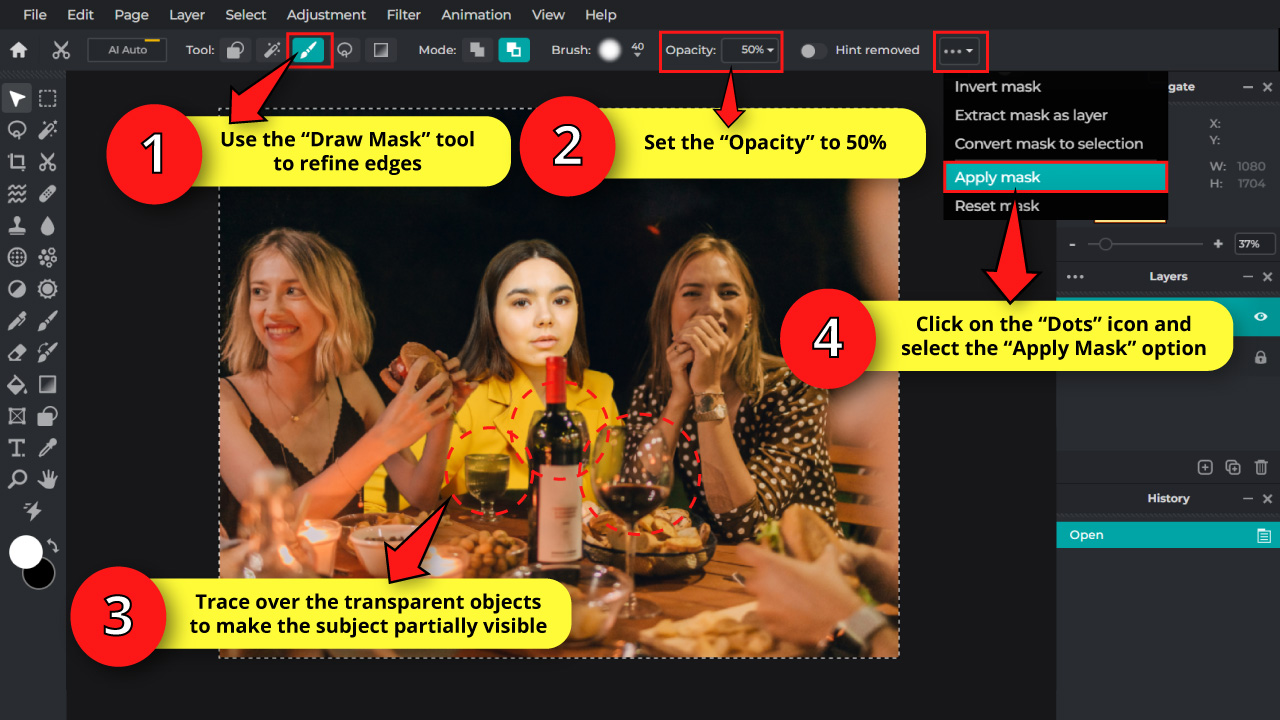
Refine your selection edges applying the same concepts we learned on “Step 3”.
To make the edition more realistic, we have to take care of the transparent objects like glasses.
You have to make the subject partially visible behind these transparent objects.
To sort this obstacle, set the brush “Opacity” around 50% on the toolbar at the top of the screen. Then, trace over the glass objects and make our subject a tad bit visible.
Once you’re happy with the result, click on the “…” three dots icon on the toolbar at the top of the screen, and select the “Apply Mask” option.
Step 11: Add a New Layer

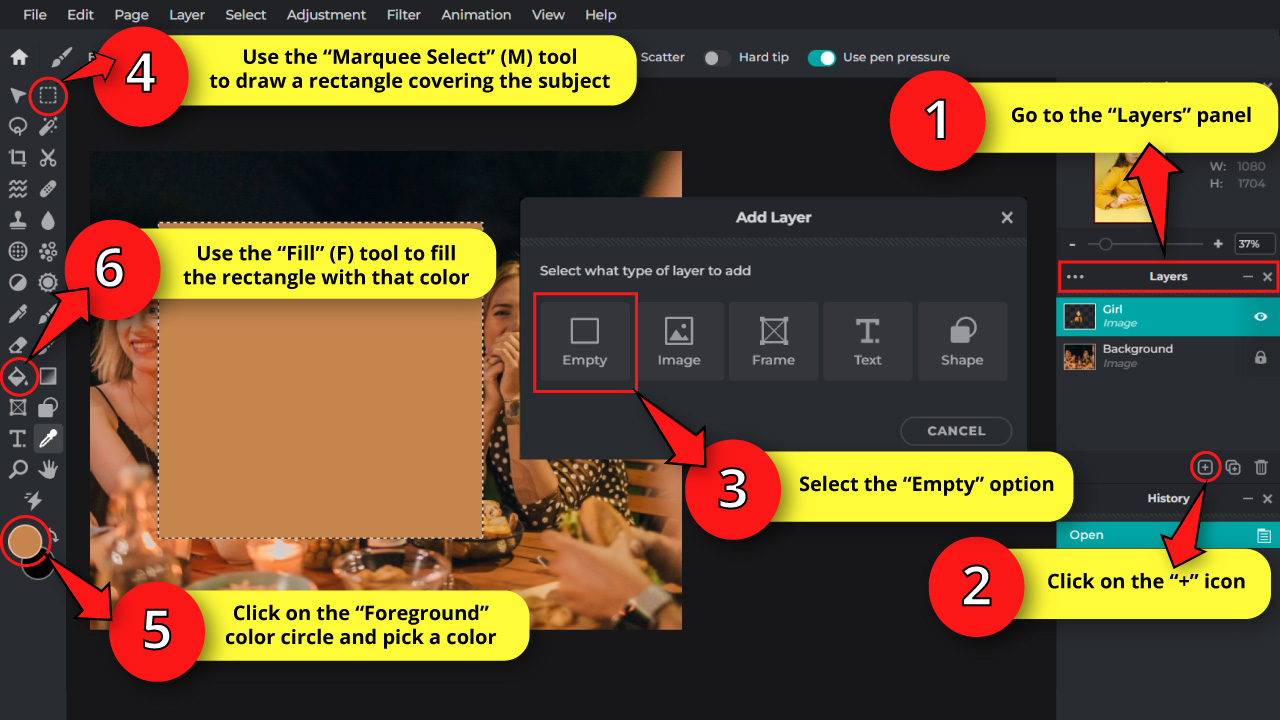
Go to the “Layers” panel and click on the “+” icon at the bottom of the panel.
Once the options window pops up, click on the “Empty” button to add a brand new layer.
Step 12: Fill the Gaps
Sometimes, even if we found a good image to use for the edition, it could happen that you’ll get some gaps, like what happened with the elbow of the girl in this example. As you may have noticed, the image is cropped and the girl’s elbow is missing, so we need to fix it.
This procedure will only work if the missing area is relatively small. Otherwise, you will probably have to find a more suitable image.
To add the missing elbow, we’ll simply draw it.
In order to get this done, click on the “Picker” (I) tool, and then click on the closest area to pick its color.
That’d be the yellow shade of the jacket for my image.
Then, click on the “Draw” (B) tool. Next, click on the “Brush” adjustment field on the toolbar at the top of the screen.
Adjust the brush “Size” value to 8 px or needed. Then, set the “Softness” value to 6% or similar, and then make sure that the “Step” value is set to 20%.
Next, draw the missing elbow shape.
Once you are done, click on the “Foreground” color circle on the left side toolbar, and pick a darker shade of the selected color.
Adjust the brush “Size” to a lower value to be able to draw the details. For my image, these would be the jacket wrinkles.
I’ll set my brush size to 3 px.
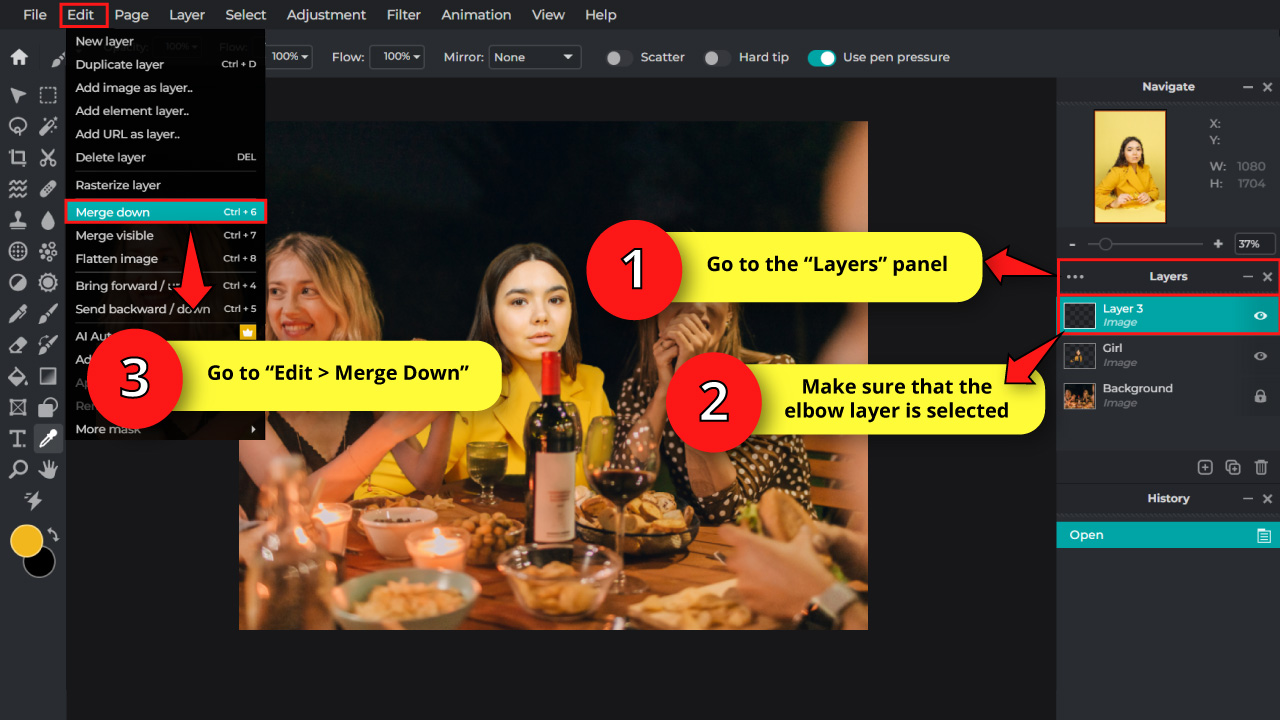
Step 13: Merge the Layers
Go to the “Layers” panel and make sure the elbow layer is selected.
Then, go to “Edit > Merge Down” on the menu at the top of the screen, or press the “Ctrl + 6” command to shortcut it.
“Layer 3” and “Girl” layers have now been merged into the “Girl” layer.
Step 14: Make a Fill Color Rectangle
Now it’s time to add a series of filters to our subject to make the appearance of the photo similar to the background.
For this, go to the “Layers” panel and click on the “+” icon at the bottom of the panel.
Once the options window pops up, click on the “Empty” button to add a brand new layer.
Then, click on the “Marquee Select” (M) tool on the left side toolbar.
Use this tool to make a rectangle covering your subject.
Next, click on the “Foreground” color circle and pick your desired color. This color will vary according to your image. For my example, I’m picking a dark desaturated orange color. Next, select the “Fill” (F) tool located on the left side toolbar, and click on the rectangle to fill it with your desired color.
Step 15: Crop the Rectangle
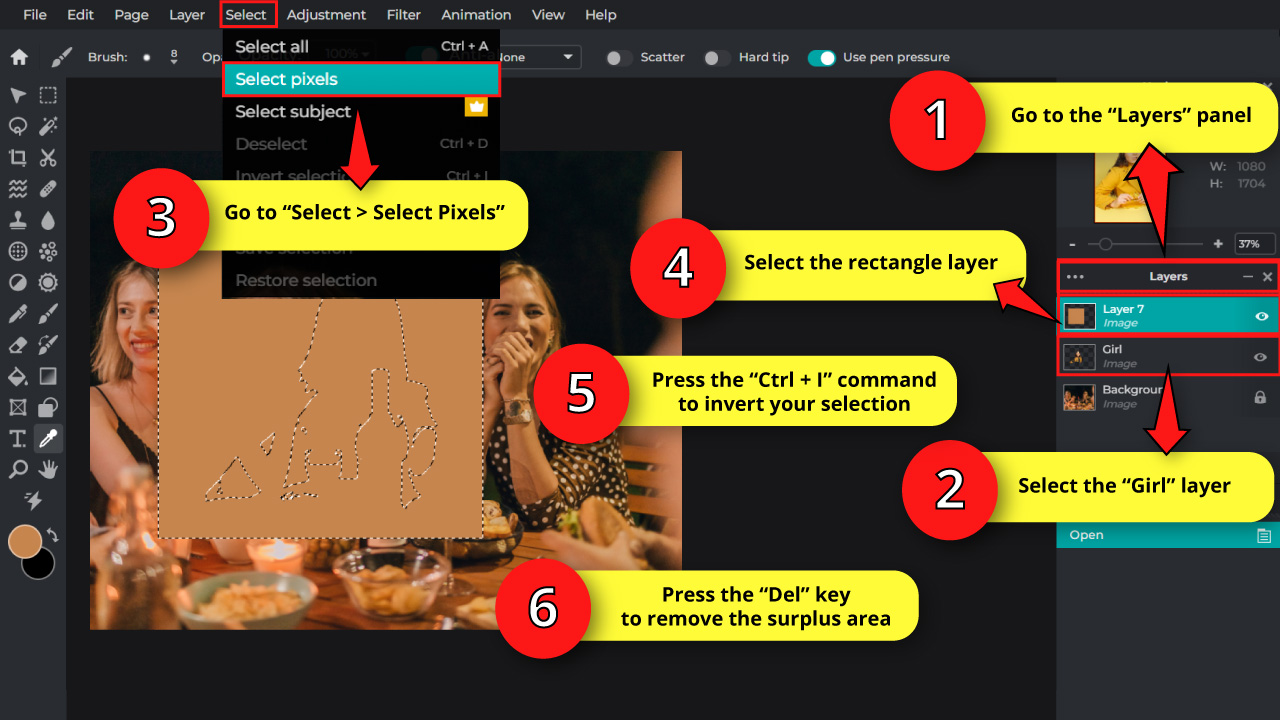
Go to the “Layers” panel and click on the “Girl” layer.
Then, go to “Select > Select Pixels” on the menu at the top of the screen, so now we have the girl’s shape selected.
Now, go to the “Layers” panel once again, and select the rectangle layer.
Press the “Ctrl + I” command, or go to “Select > Invert Selection” on the menu at the top of the screen, so you invert your selection.
Finally, press the “Del” key to crop the rectangle with the subject’s silhouette shape.
Step 16: Add Blend Mode
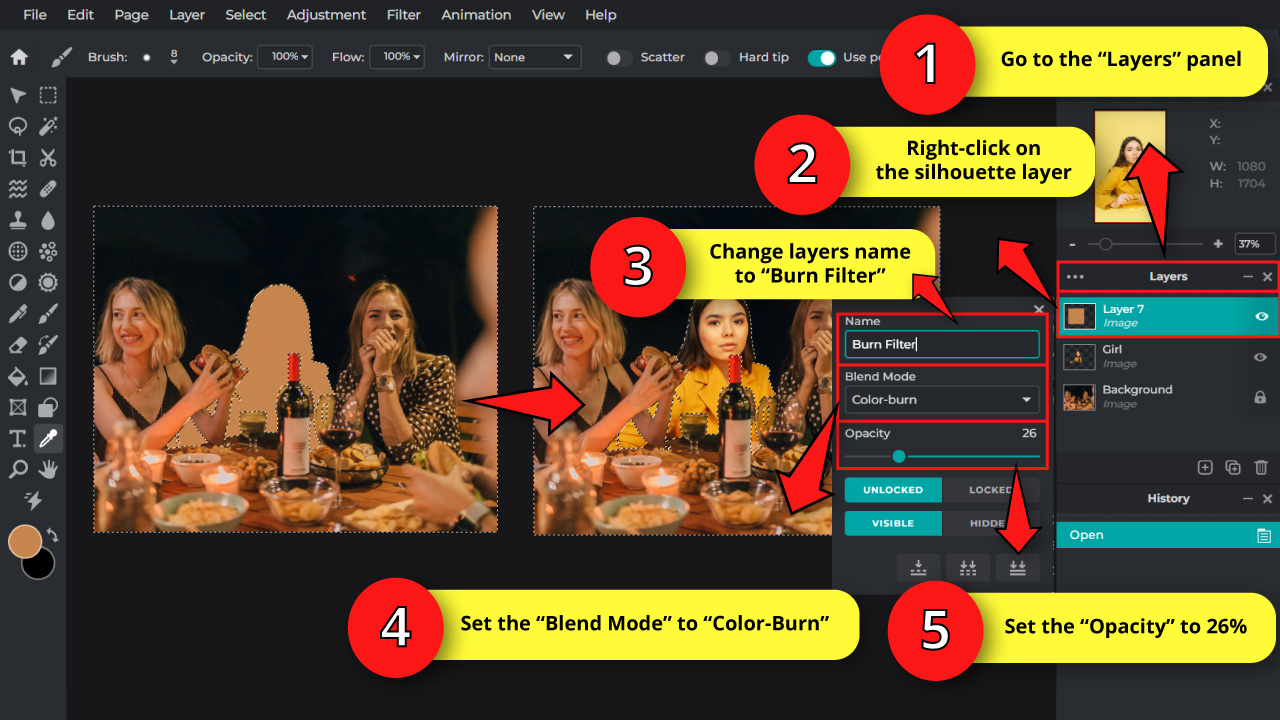
Go to the “Layers” panel and right-click on the colored silhouette layer. Name the layer to “Burn Filter”.
Set the “Blend Mode” to “Color-Burn”, and reduce the “Opacity” around 26%.
Step 17: Add Gaussian Blur
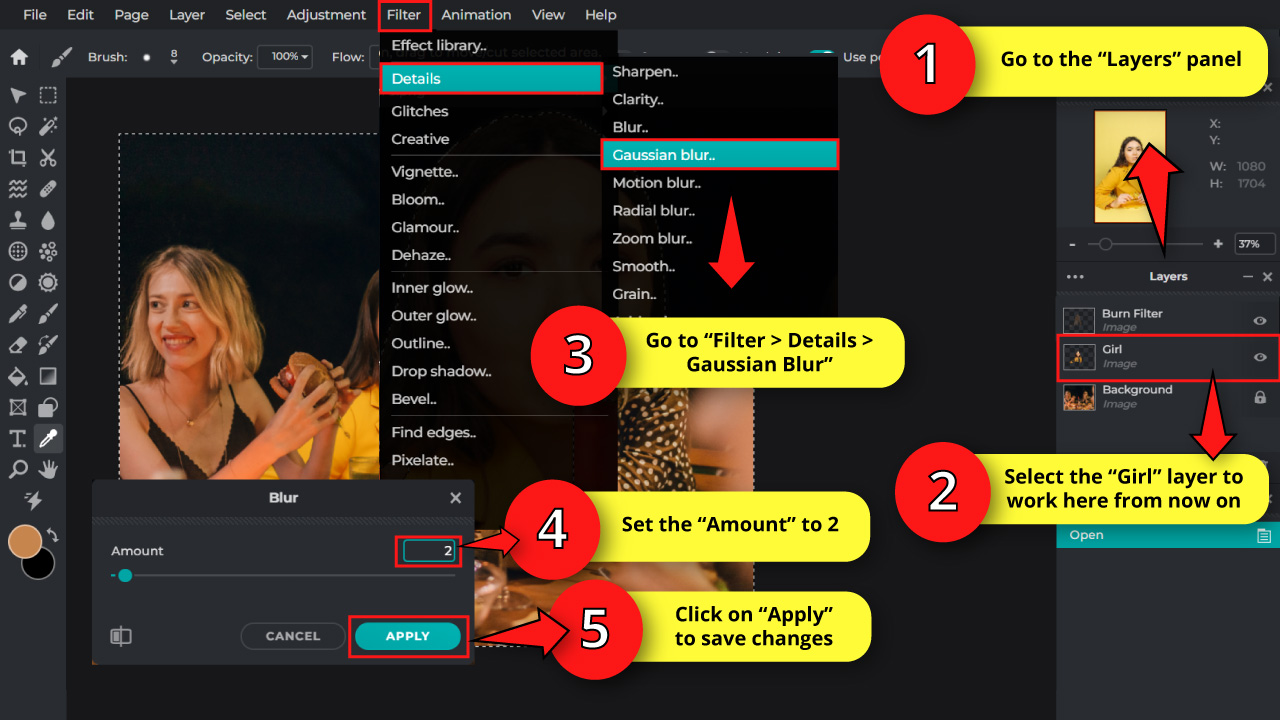
Since the resolution of the photos we are working with is quite different (the subject one is clearly higher, while the dinner table one is lower) we need to match them.
Something we can do to decrease the subject’s image quality is applying the “Gaussian Blur” filter.
Go to the “Layer” panel and click on the “Girl” layer to work here from now on.
Then go to “Filter > Details > Gaussian Blur” on the menu at the top of the screen.
On the “Gaussian Blur” options window, set the “Amount” to 2 px.
Then click on the “Apply” button to save changes.
Step 18: Adjust Hue and Saturation
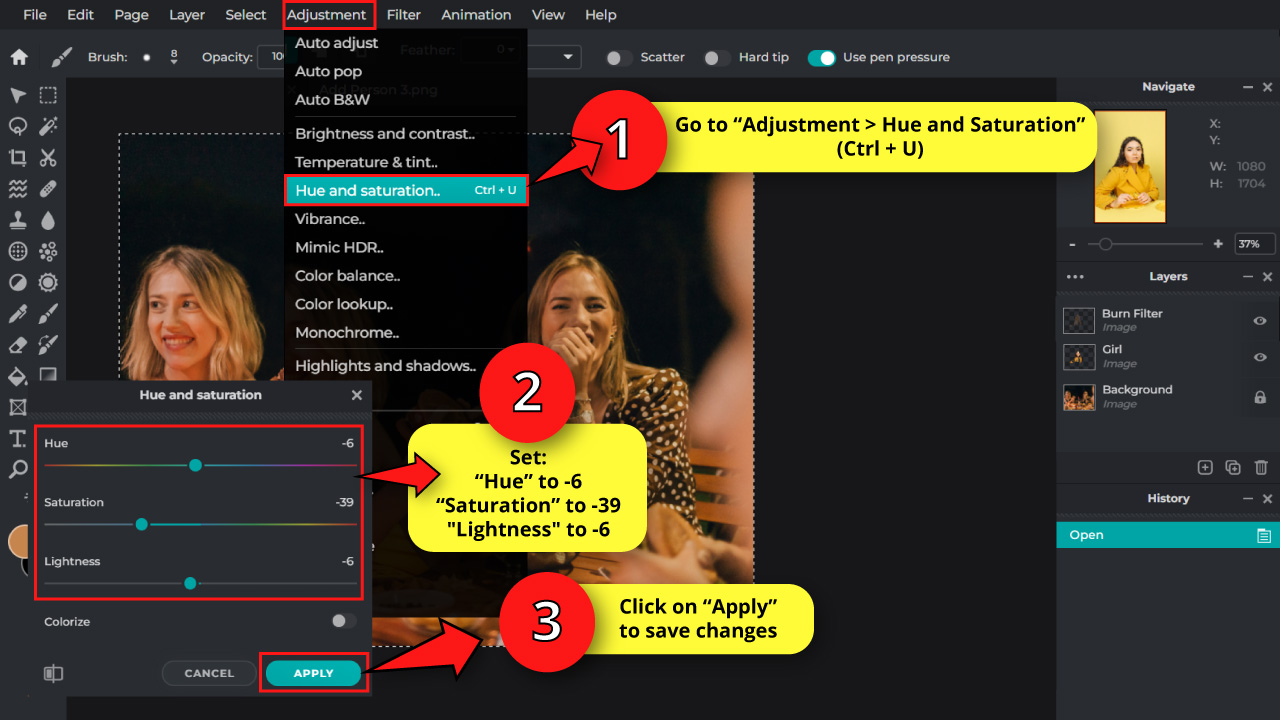
First, make sure to have the “Girl” layer selected.
Then go to “Adjustment > Hue and Saturation” on the menu at the top of the screen. Or press the “Ctrl + U” command to shortcut it.
On the “Hue and Saturation” options window, set “Hue” to -6, “Saturation” to -39 and “Lightness” to -6.
These values may vary according to your image.
Once you’re happy with your adjustment settings, click on the “Apply” button to save changes.
Step 19: Adjust Color Balance
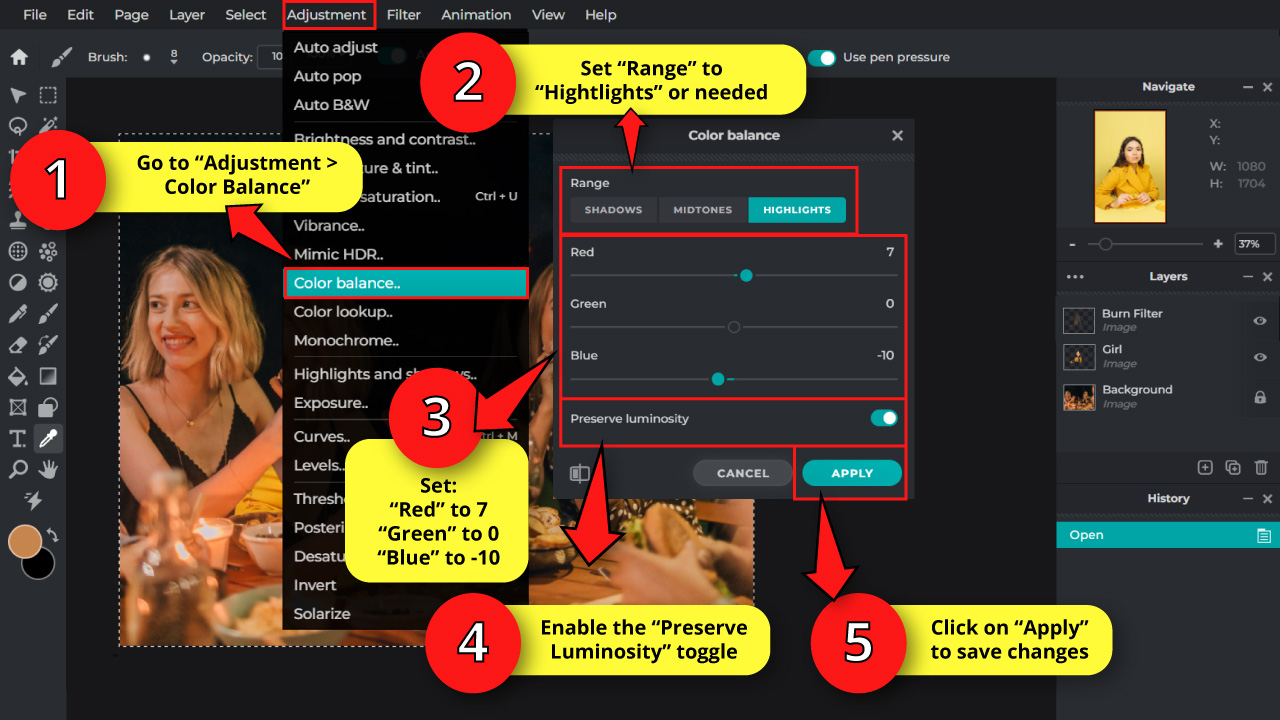
Make sure that the “Girl” layer is still selected.
Go to “Adjustment > Color Balance” on the menu at the top of the screen.
On the “Color Balance” options window, select a “Range” between “Shadows”, “Midtones” and “Highlights”.
I selected “Highlights” since my image is highlight predominant.
Next, set “Red” to 7, leave “Green” set to 0 as by default, and set “Blue” to -10.
These values may vary according to your image.
Make sure that the “Preserve Luminosity” toggle is enabled.
Once you’re happy with your edition, click on the “Apply” button to save changes.
Step 20: Add Highlights
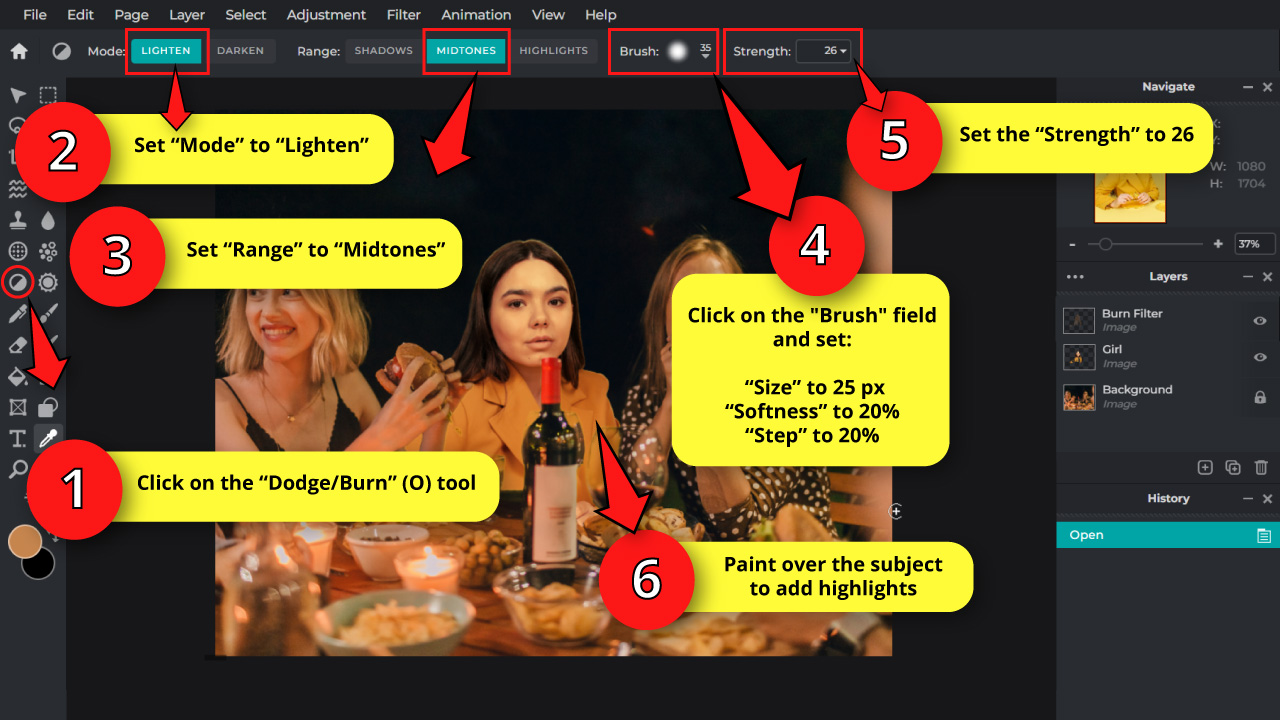
Select the “Dodge/Burn” (O) tool, located on the left side toolbar.
On the toolbar at the top of the screen, you will find some adjustments you can set.
Set “Mode” to “Lighten”, and “Range” to “Midtone”.
The “Range” adjustment may vary according to your image. I’m selecting “Midtone” because it is the range that fits my subject photo better.
Keep in mind that the “Range” adjustment also varies according to the edition software you’re using.
Now click on the “Brush” field and set the “Size” to somewhere around 25 px.
Set both “Softness” and “Step” fields to 20%.
Next, set the “Strength” value to 26.
Use the “Dodge/Burn” (O) tool to paint the spots where you think that the light should reach the subject if she was actually there.
If you have doubts, use the highlights on other people as reference.
I’ll add some highlights to the forehead, cheeks, chin and hair.
Step 21: Add Shadows
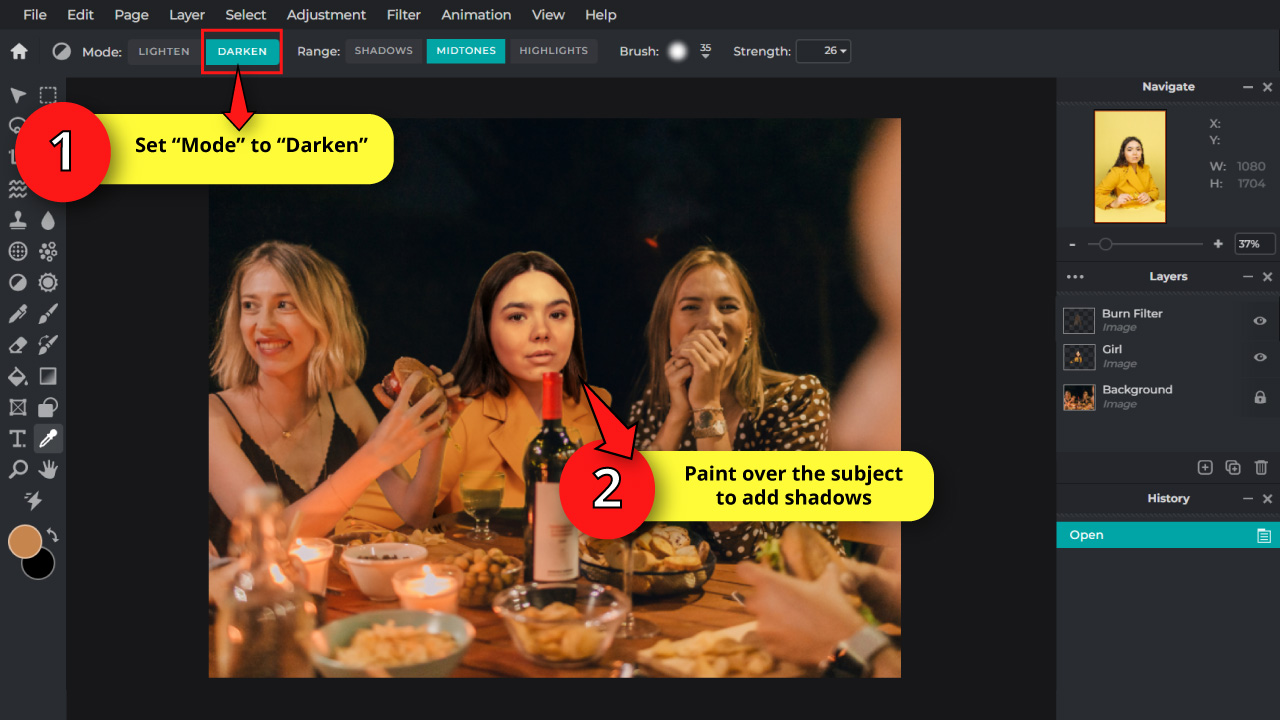
Now it’s time to add some shadows.
To add shadows, set the “Mode” to “Darken”.
Then paint over the subject to add shadows, making emphasis on the lower areas, or the opposite area of highlights.
Step 22: Remove the Halo Around the Subject
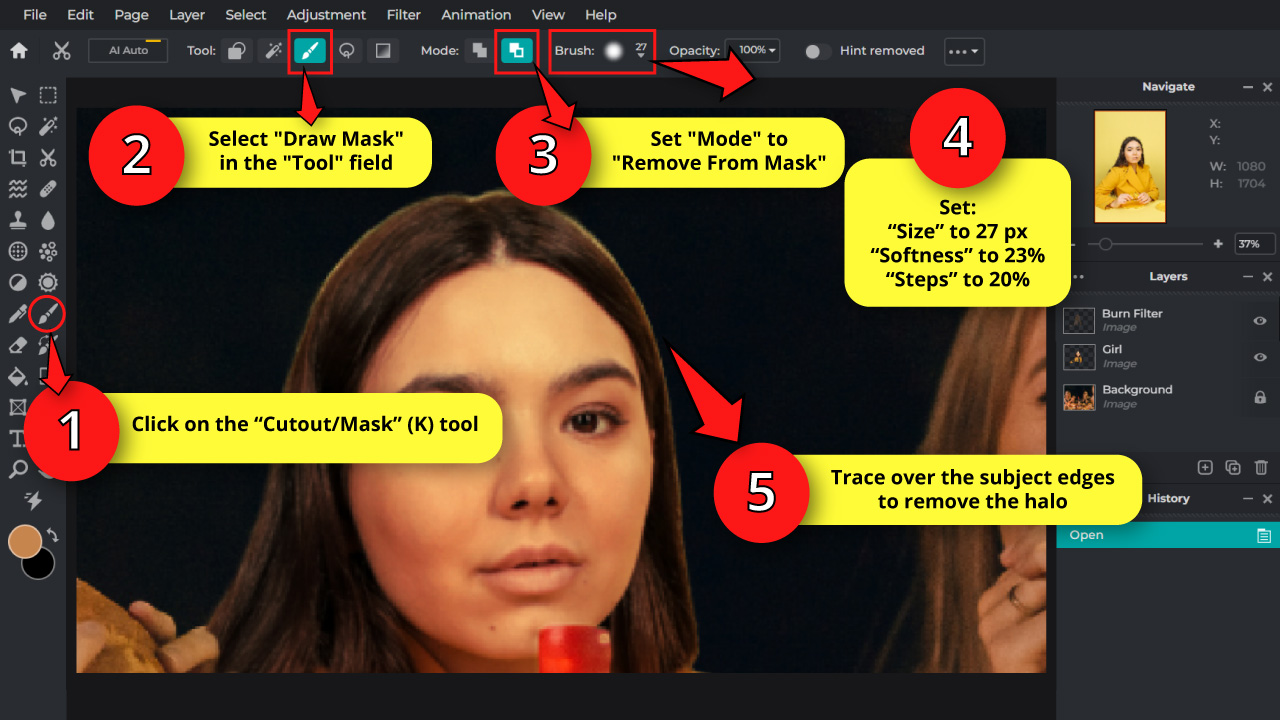
Sometimes after adding some filters, a light halo could appear around the subject.
To fix this problem we’ll use the “Cutout/Mask” (K) tool, located on the left side toolbar.
Select the “Cut/Mask” (K) tool and make some adjustments on the toolbar at the top of the screen.
Select “Draw Mask” in the “Tool” field, and in the “Mode” field select “Remove From Mask”.
Click on the “Brush” field button to adjust its settings. I’ll set “Size” to 27 px, “Softness” to 23%, and “Step” to 20% as by default.
Finally, use this tool to remove the halo around the subject.
Step 23: Add Grain Filter
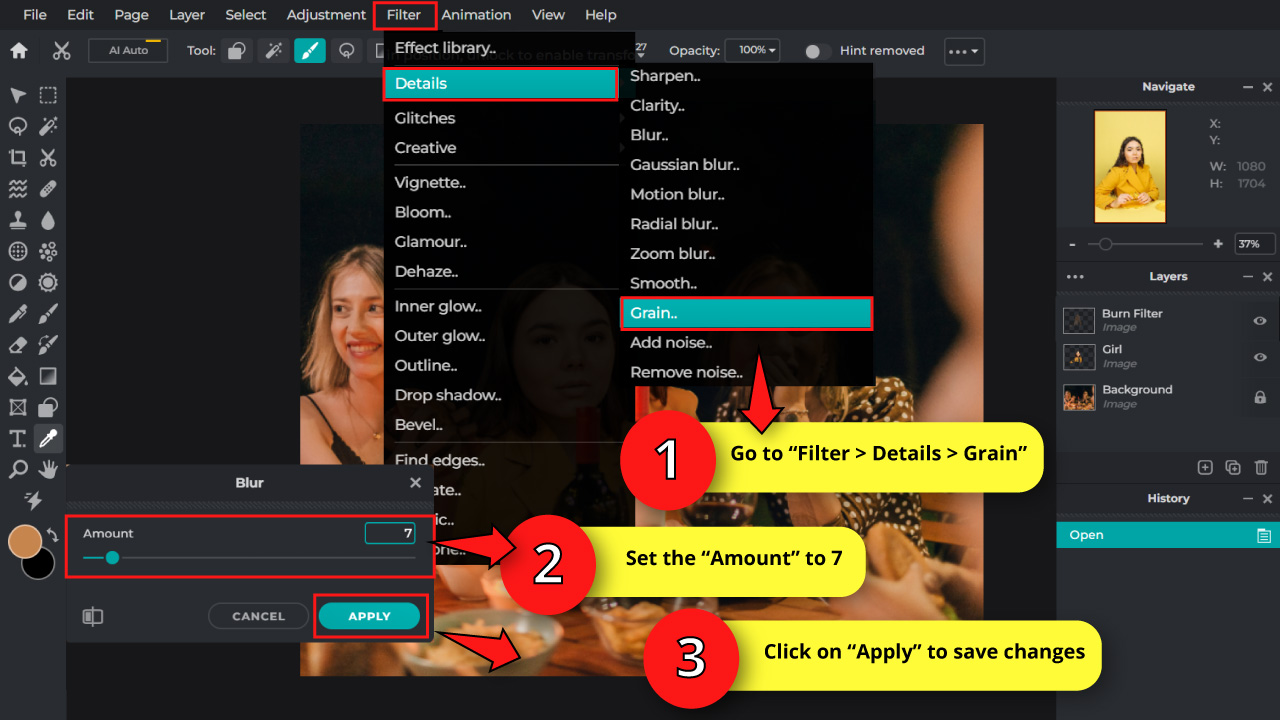
The last effect we’ll add is the “Grain” filter.
The background image has a dotted filter. To blend our subject image better in the background we’ll have to apply this filter.
Go to “Filter > Details > Grain” on the menu at the top of the screen.
On the “Grain” options window, set the “Amount” to 7 and then click on the “Apply” button to save changes.
Step 24: Save the Image
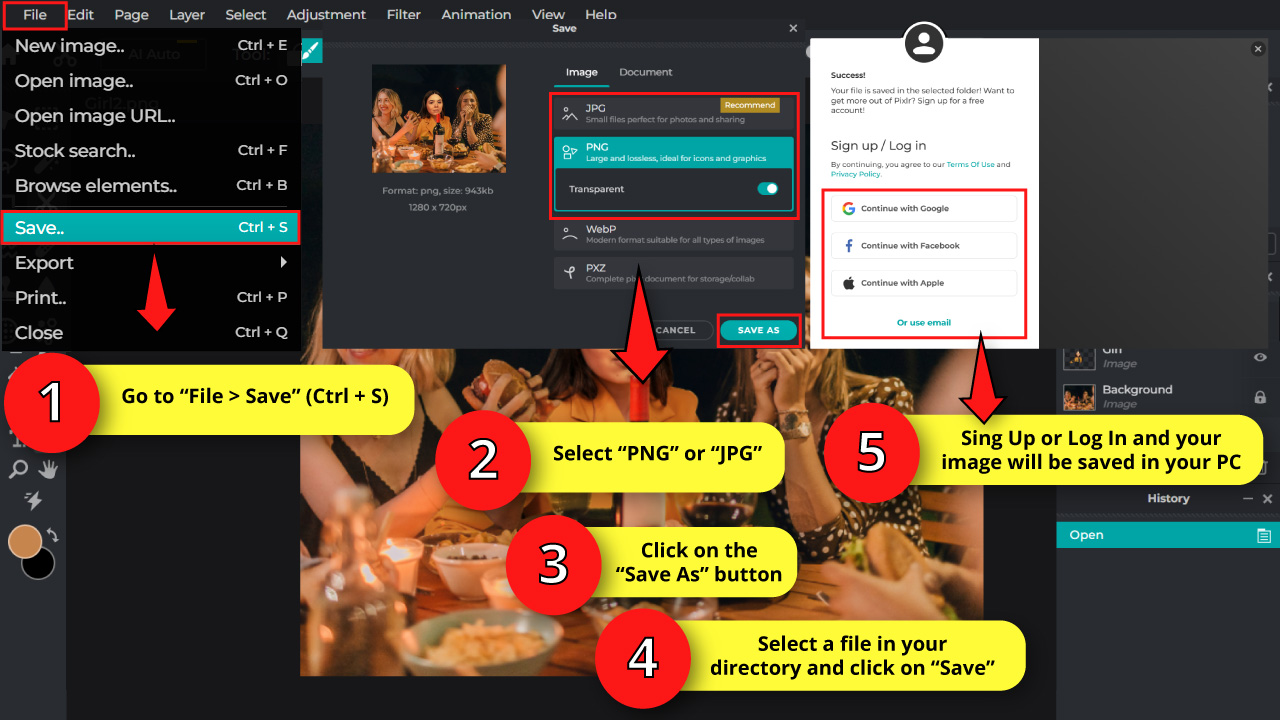
Once you’re done, you need to save and download your image.
To save your edited image, go to “File > Save” on the menu at the top of the screen.
Or press the “Ctrl + S” command to shortcut it.
On the “Save” options window, select the “JPG” or the “PNG” option.
You’ll have to necessarily select the “PNG” option if your image has transparencies.
Next, click on the “Save As” button to save the image.
You need to have an account to be able to download your edited image. You can create an account for free. The process is very quick and simple.
“Sing Up” registering an email address, or “Log In” using your “Google”, “Facebook” or “Apple” account.
Once you’re logged in, you will be able to download the image to your computer.
The Result

Here is the result of how to add someone into a picture using Pixlr in this case, and solving issues that may happen like filling some gaps, or dealing with different lightings, resolutions or hue tints.
How to Add Someone into a Picture using Krita
Download and install Krita. Import the subject image. Select its background and remove it. Import the background image and place the subject image. Apply a selection mask to fit the subject between the front objects and the background. Add a series of filters to the subject to match the background.
Step 1: Download and Install Krita
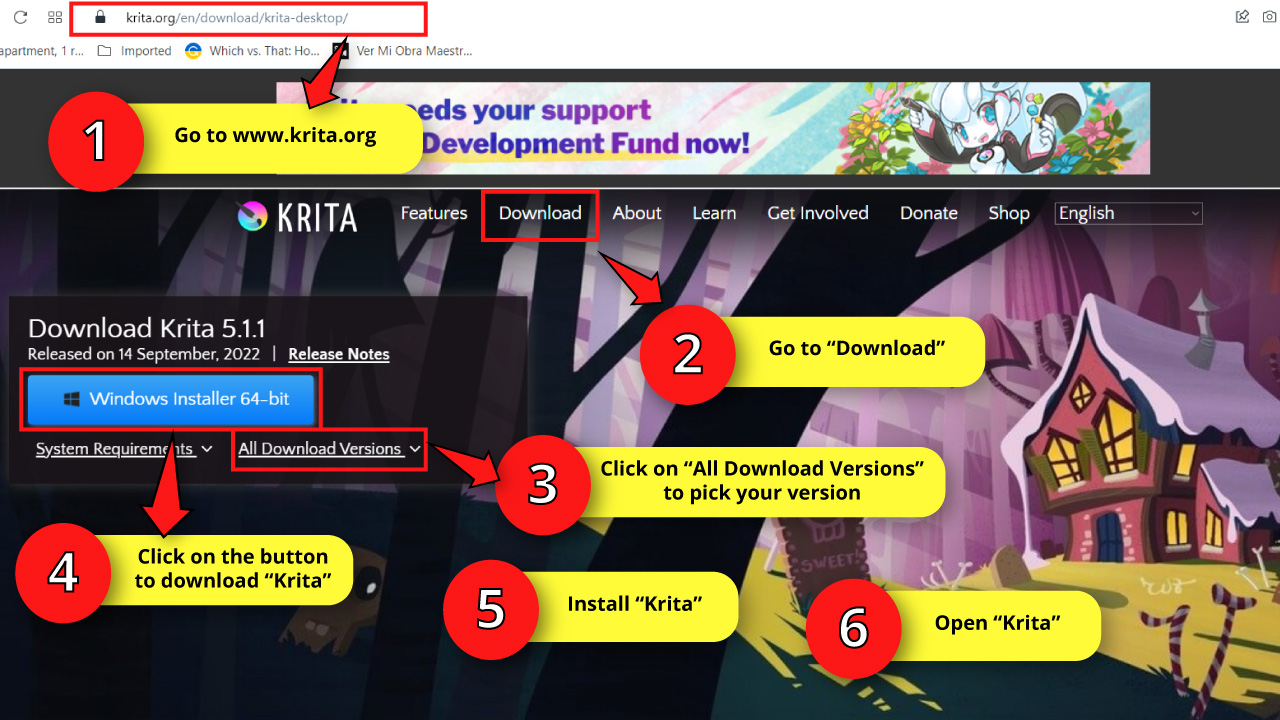
We need to first install the software we will be working with. We’ll use Krita, which is an open-source raster graphic editor available for Windows, macOS and Linux.
Download Krita for free from their official website. Then, install and open the software.
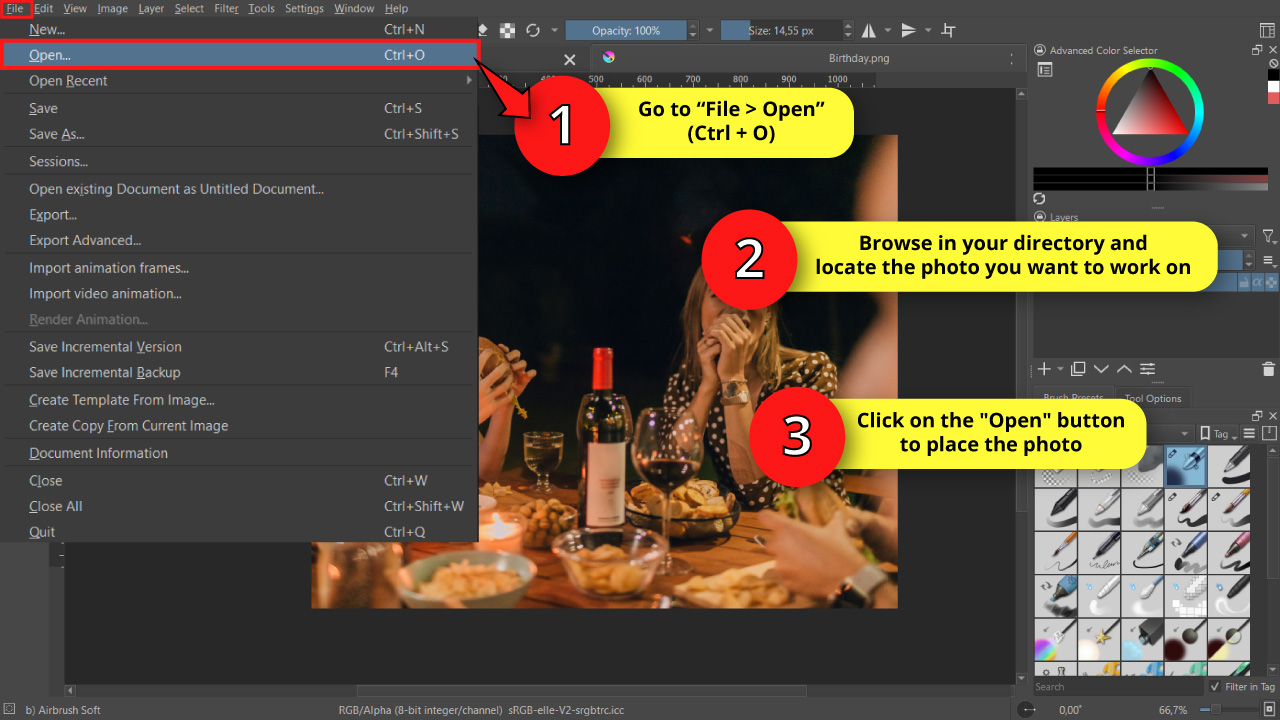
Step 2: Import an Image
Now we need to import a photograph of the person we’ll add to a different picture.
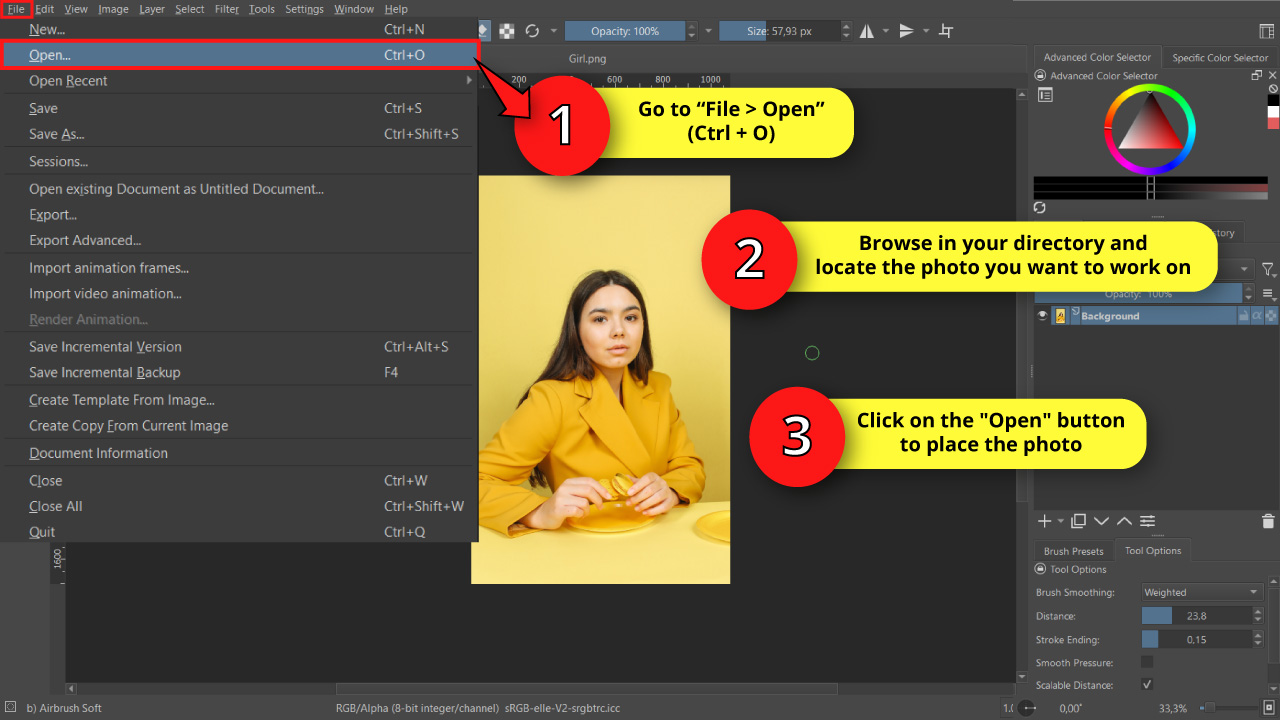
To import an image, go to “File > Open” on the menu at the top of the screen.
Or you can press the “Ctrl + O” command to shortcut it.
On the pop up window, browse in your directory and locate the photo you want to work on.
Select the image, and then click on the “Open” button.
Step 3: Enable the Dockers
If this is the first time you are using Krita, your software settings will most likely be set by default.
Hence, we’ll have to enable some dockers (panels) we’ll be using throughout the article.
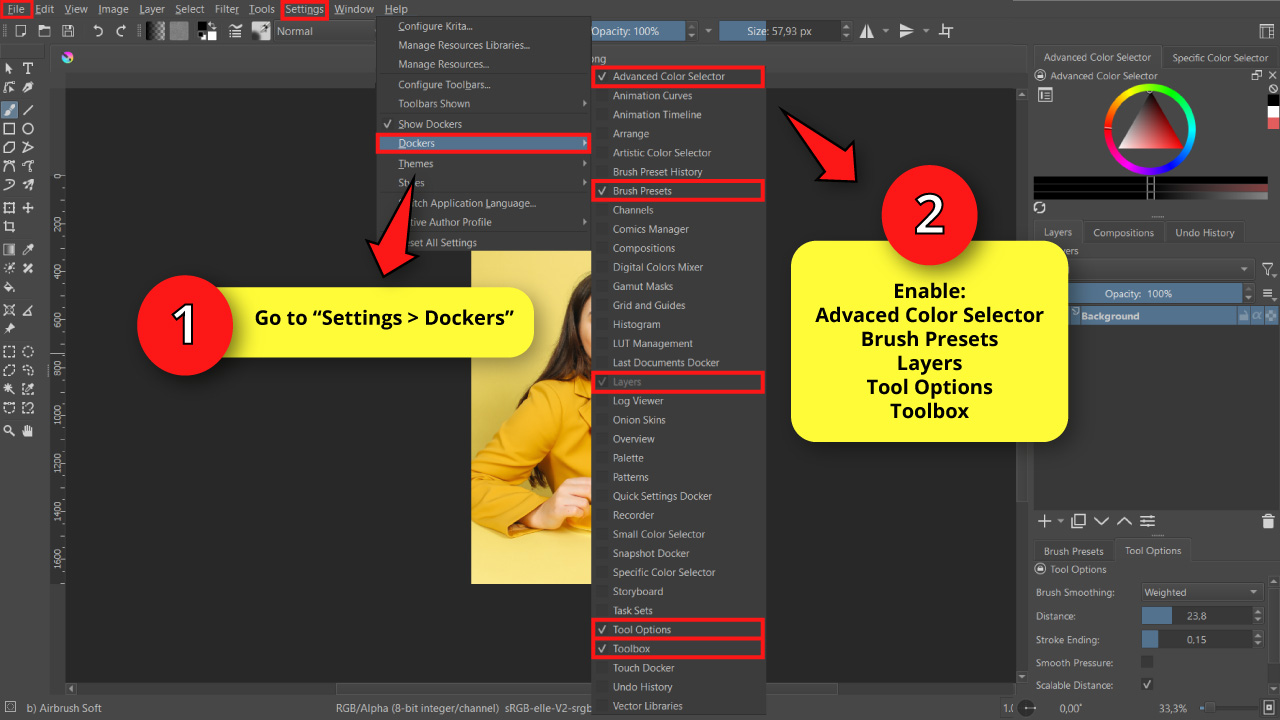
To enable dockers, go to “Settings > Dockers”on the menu at the top of the screen and make sure to mark the following checkboxes by clicking on them:
Advanced Color Selector
Brush Presets
Layers
Tool Options
Toolbox
The dockers are usually located on the right side of the screen, and they can be moved and grouped any way you want. I normally customize my workspace in this specific way.
This means that if you can’t find a docker in the exact same place as mine, just look around on the right side toolbar and you’ll find it, as long as it’s been enabled first.
Step 4: Select the Background
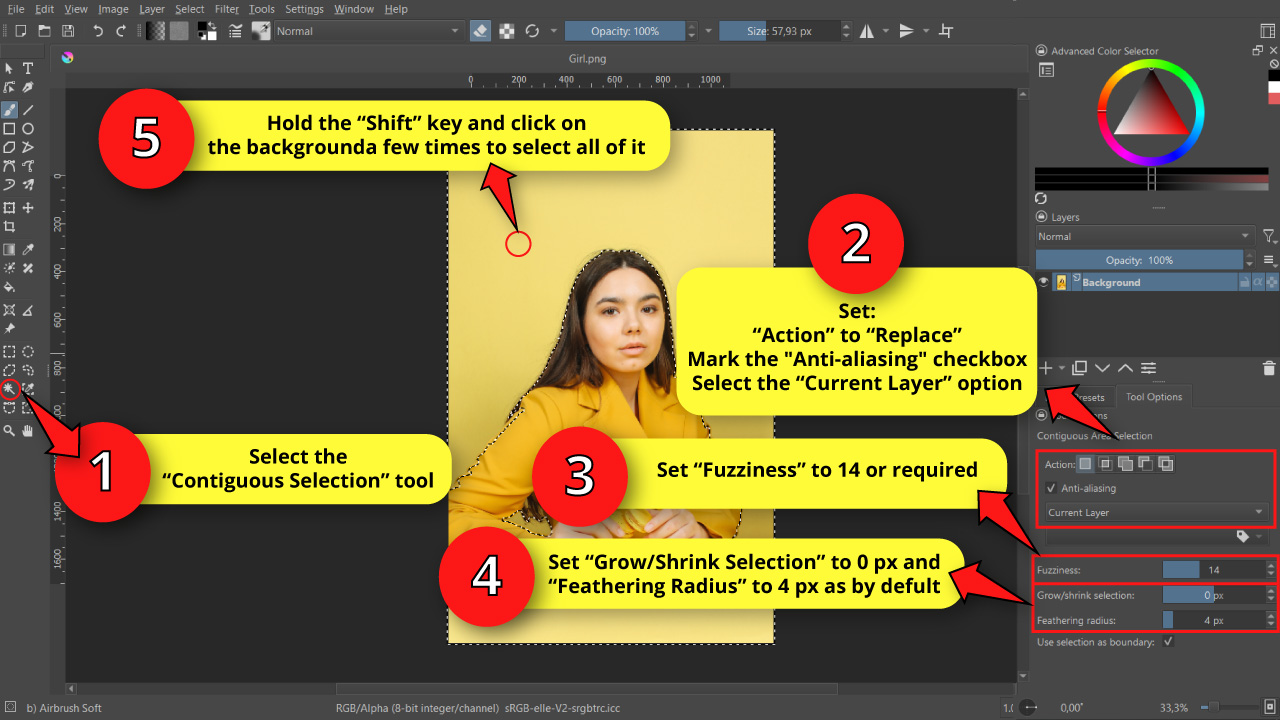
Click on the “Contiguous Selection” tool located on the left side toolbar.
Then go to the “Tool Options” docker on the right side toolbar.
On the “Tool Options” docker, make sure to select “Replace” in the “Action” field, mark the “Anti-aliasing” checkbox, and select the “Current Layer” option.
Then you have the “Fuzziness” value that modifies the threshold of the selected area, similar to the “Tolerance” value on “Magic Wand” tool in Photoshop or Illustrator.
The higher the value, the more pixels of similar shades of a color will be selected. The lower the value, the more restricted the selection will be.
This is the only value you should modify to improve your selection range.
Regarding the “Grow / Shrink Selection” and “Feathering Radius”” values, leave them as by default.
If you need to grow, shrink or feather your selection, you can always do it later.
Finally, the “Use Selection as Boundary” checkbox is indistinct for this edition.
Now that you know how to set the available selection values, use the “Contiguous Selection” tool to make a rough selection of the background.
You can select the subject or the background. It’s entirely up to you. But since the background has a flatter texture, it will be easier to select. So I’ll go with the background.
Click on the background to select it. If your selection area isn’t clear enough, you can improve your selection by holding the “Shift” key as you click on the same spot multiple times.
For the same reason, you will also have to hold the “Shift” key while you click on a different spot to add a new area to your current selection.
Step 5: Change Display Mode to Mask
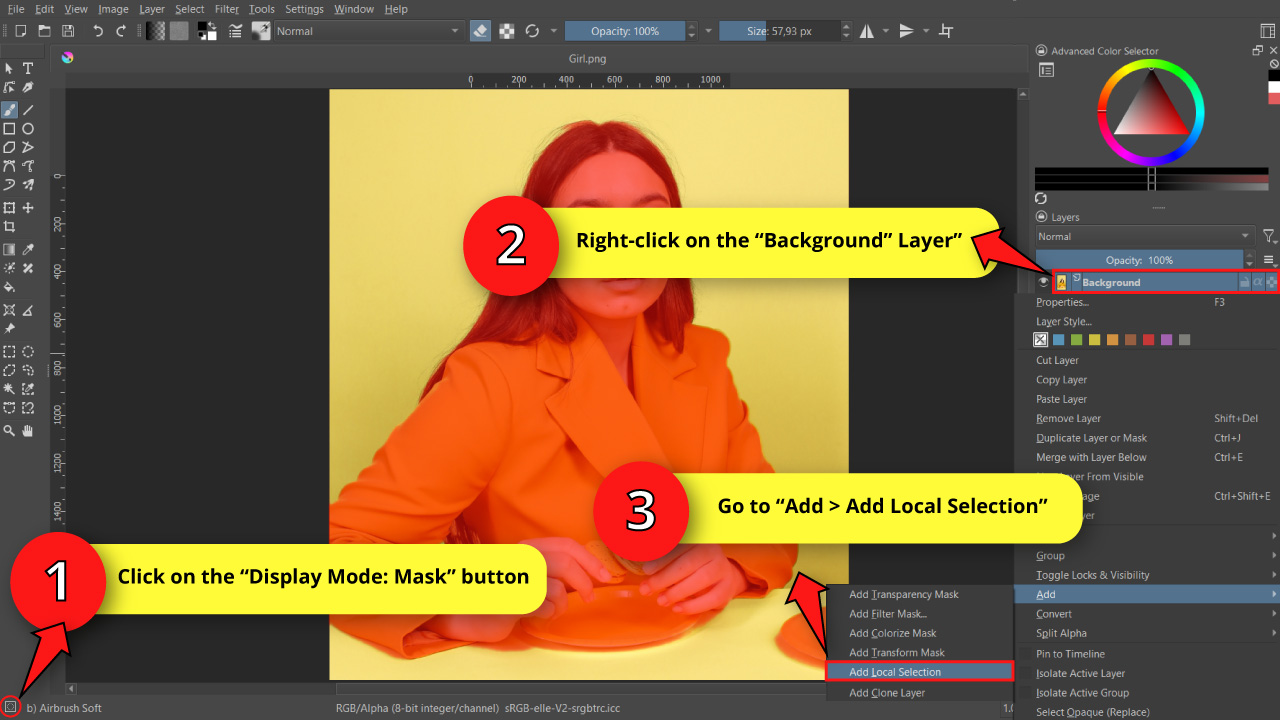
Click on the “Display Mode: Mask” button located at the very bottom left corner of the screen.
This display mode will allow us to visualize our selection better.
The red areas are the ones that are not selected.
Next, go to the “Layers” docker on the right side toolbar, and right-click on the “Background” layer to unfold its options menu.
Go to “Add > Add Local Selection”.
Now we can use paint tools to improve our selection, making it more precise.
Step 6: Invert Selection
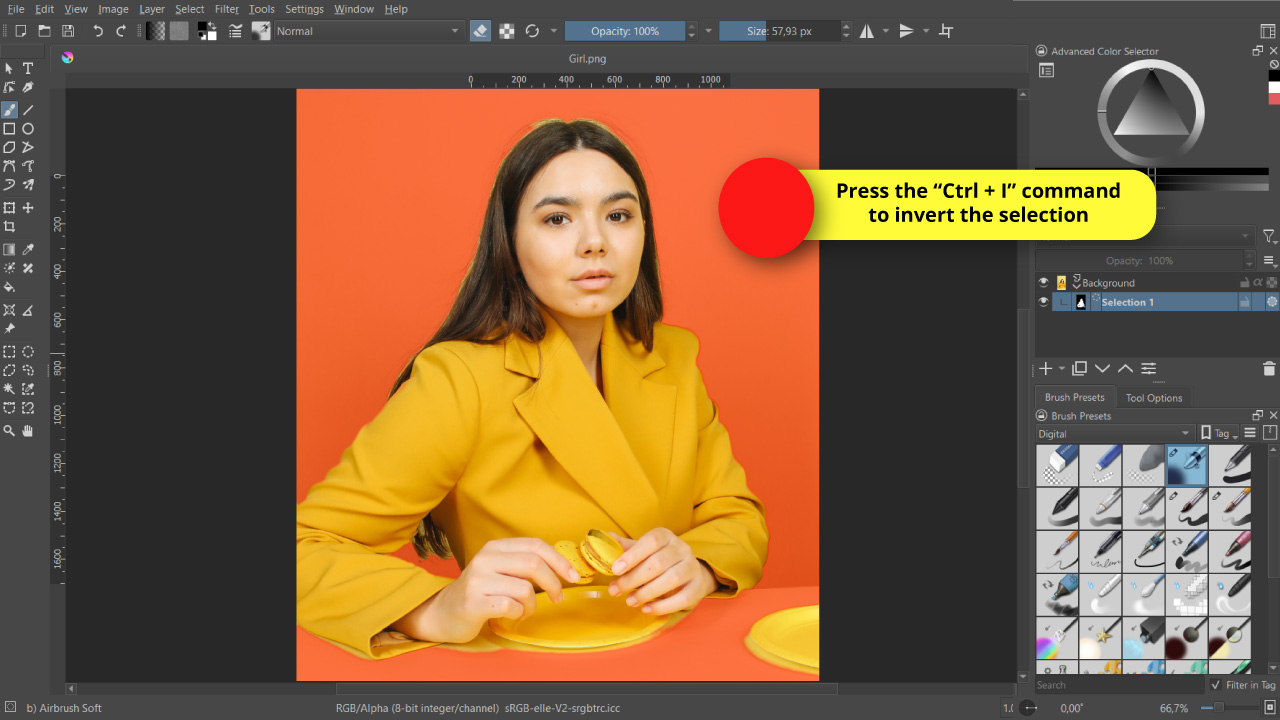
If you decided to select your subject instead of the background on “Step 4”, just skip to the next step. Otherwise, continue reading.
In order to be able to visualize the selection edges better, we’ll need to invert the selection so we’re selecting the subject and not the background.
To invert your selection, press the “Ctrl + I” command, or go to “Select > Invert Selection” on the menu at the top of the screen.
Step 7: Use the Freehand Brush Tool to Refine your Selection

Select the “Freehand Brush” (B) tool located on the left side toolbar.
Then, open the “Brush Presets” docker on the right side toolbar.
On the top side field select the “Digital” brush presets. Now find and select the “b) Airbrush Soft” brush, or some other soft brush you prefer.
If you have a graphic tablet, it’s time to put it to work. If you don’t have one and you need to use the mouse, it’ll probably take you a little bit more time, but you can also get it done for sure.
If you are using the mouse, it’s recommended to decrease the “Opacity” located on the top side toolbar, to a value around 40%, so you can simulate the pressure of a graphic tablet pen.
The next thing you need to set are the “Foreground” and “Background” colors.
Click on the “Set Foreground and Background Colors to Black and White” button located just below the “Foreground” color box on the top side toolbar.
When working on a selection mask, your colors are limited to a grayscale.
This means that when you use a black brush, you are removing a selection area. Logically, when you use a white brush, you are adding a selection area.
If you use grays, you will be adding or removing selections with certain transparency, depending on the intensity of the grays.
Taking all this into consideration, use the “Freehand Brush” (B) tool to refine the selection edges.
Always remember that the red areas are the non-selected spots.
If you want to quickly toggle your brush between black and white, just press the “X” key from your keyboard to toggle between them.
To resize your brush, go to the “Size” field on the toolbar at the top of the screen, and left-click, hold and drag from side to side.
Step 8: Remove the Background and Convert to a Flat Image
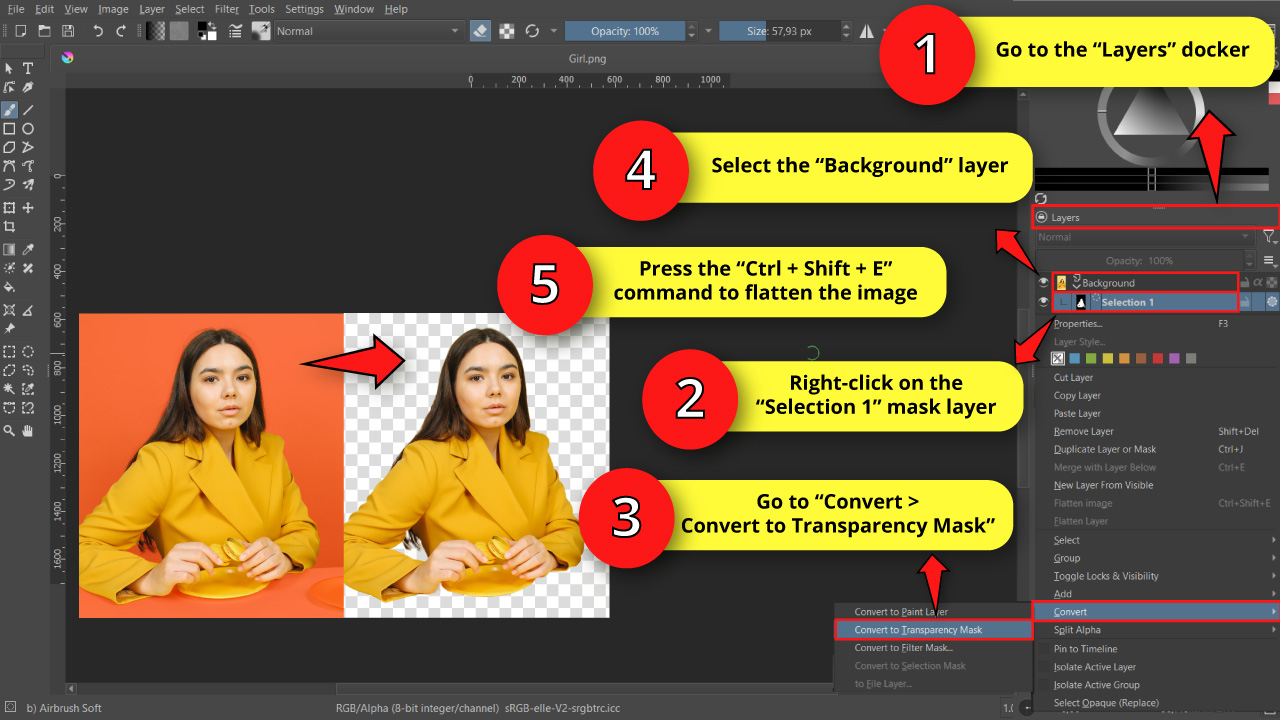
Go to the “Layers” docker, and right-click on the “Selection 1” mask layer to unfold its options menu.
Go to “Convert > Convert to Transparency Mask” on the menu to mask the selection, thus getting a transparent background.
Next, right-click on the “Background” layer to unfold its options menu once again.
This time select the “Flatten Image” (Ctrl + Shift + E) option, so the masked layers merge.
Now our picture is ready to be pasted in the birthday party photo.
Step 9: Import Another Photo
It’s time to import the picture where we’ll be adding the subject into.
Go to “File > Open” on the menu at the top of the screen.
Or you can also press the “Ctrl + O” command to shortcut it.
On the pop up window, browse in your directory and locate the photo you want to work on.
Select the image, and then click on the “Open” button.
Step 10: Place the Subject into the Picture
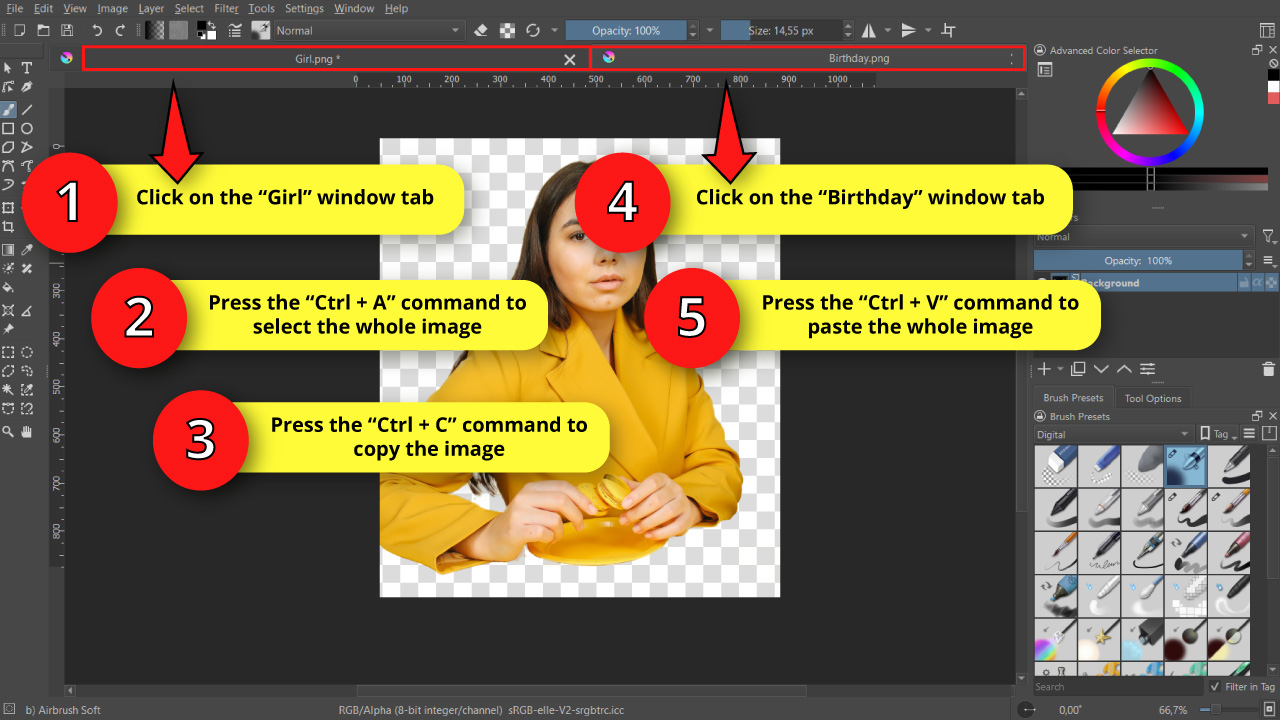
Click on the “Girl” window tab right below the top side toolbar to go back to the subject image.
Once you are in the “Girl” window, press the “Ctrl + A” command to select the whole photo.
You can also get it done by going to “Selection > Select All” on the menu at the top of the screen.
Now press the “Ctrl + C” command to copy the picture.
Next, click on the “Birthday” window tab to return to the birthday party photo, and press the “Ctrl + V” command to paste the “Girl” picture.
Step 11: Resize the Subject Picture
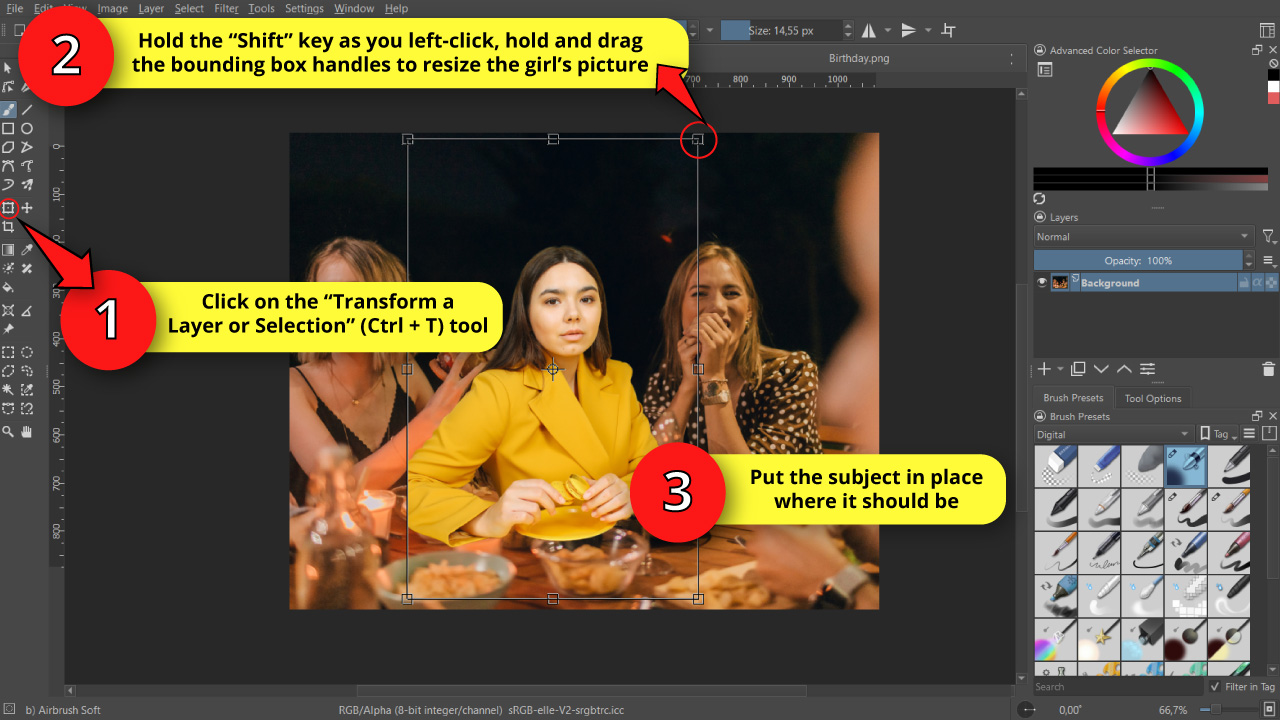
Click on the “Transform a Layer or Selection” (Ctrl + T) tool located on the left side toolbar, or press the “Ctrl + T” command to shortcut it.
Then, hold the “Shift” key as you left-click, hold and drag over the bounding box handles to resize the image.
When resizing, it’s a good idea to compare the size of the heads of our subject and other people in the picture as a reference.
If in the photo you are adding your subject into there is nobody else, you will have to use some other object as a reference for resizing. Be creative and try to observe the whole picture cautiously.
However, in case you happen to make a resizing mistake, it will most likely not be as noticeable as if there were other people in it. Just make sure you take your time to get the desired effect.
Once you’ve resized the picture, carefully put it into the right place. Make any resizing changes if necessary by repeating the previous process.
Step 12: Select the Background

Go to the “Layers” docker and hide the “Girl” layer by clicking on its “Eye” icon.
Then, click on the “Background” layer to work here from now on.
Now, use the “Contiguous Selection” tool to select the background. Hold the “Shift” key as you click on the same spot as many times as you need until you select the whole background.
Step 13: Mask Selection
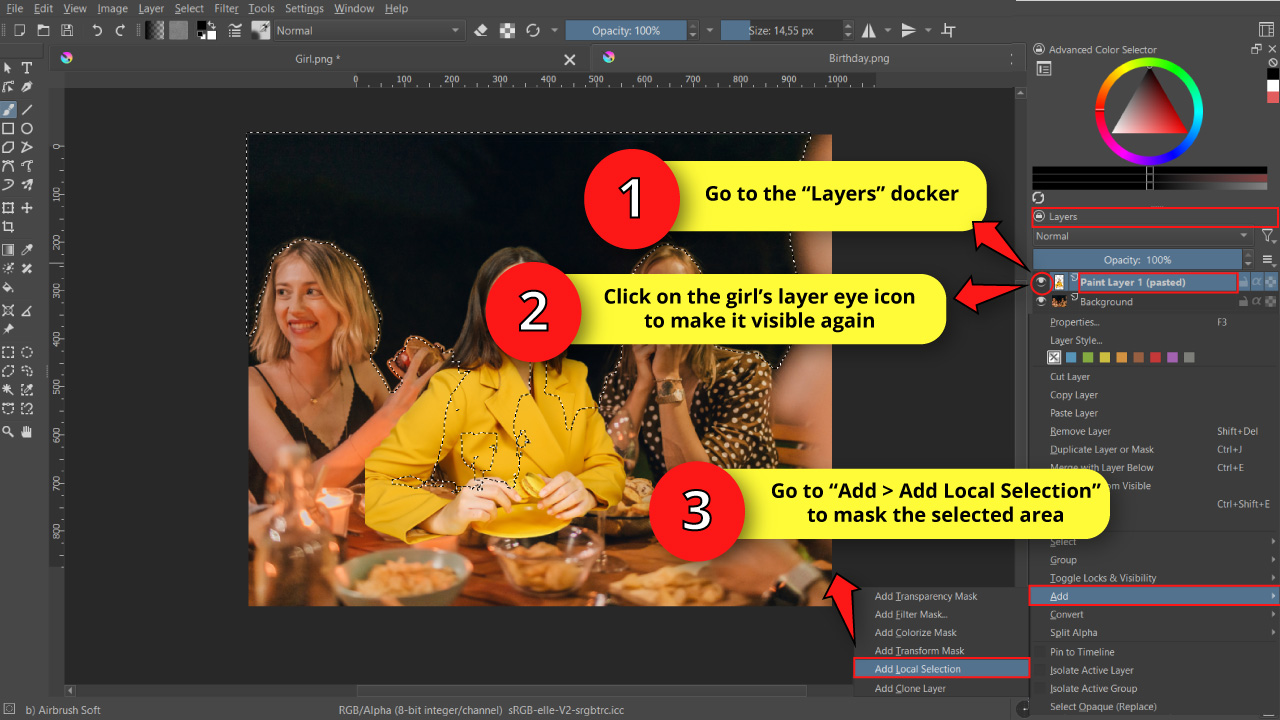
Go to the “Layers” docker and click on the subject’s layer eye icon to make it visible again. Then right-click on it.
On the unfolded menu, go to “Add > Add Local Selection” to mask the selected area.
Step 14: Make the Layer Transparent and Refine Edges
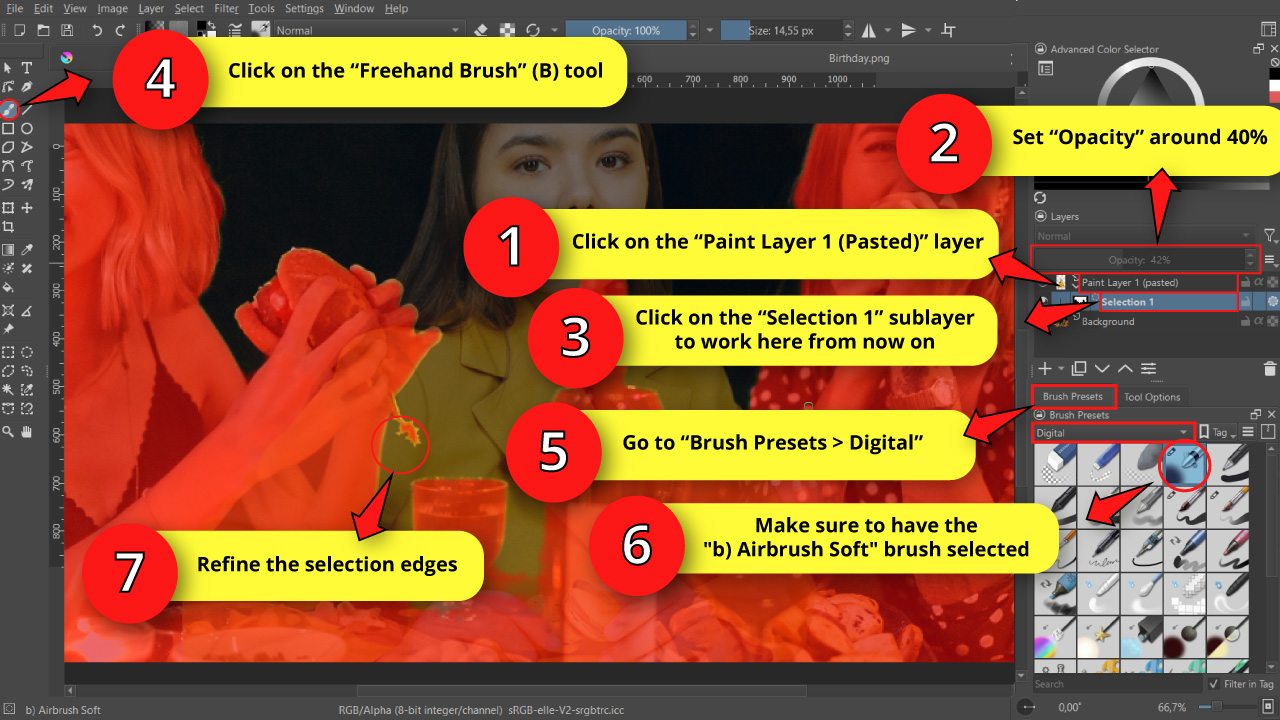
Click on the subject layer again to make sure it’s selected, and then set the “Opacity” to a value around 40%, so you can visualize the selection better and refine the edges.
Next, click on the “Selection 1” sublayer to work here from now on.
Click on the “Freehand Brush” (B) tool.
Then make sure the “b) Airbrush Soft” on the “Brush Presets” docker on the “Digital” category is still selected.
Now refine the selection edges as you did on “Step 7”.
It doesn’t need to be perfect, we’ll improve our selection on the next step.
Step 15: Convert the Subject Layer into a Transparency Mask
Now we need to get rid of the area that is not selected. That’d be the intersection between our subject and the front objects.
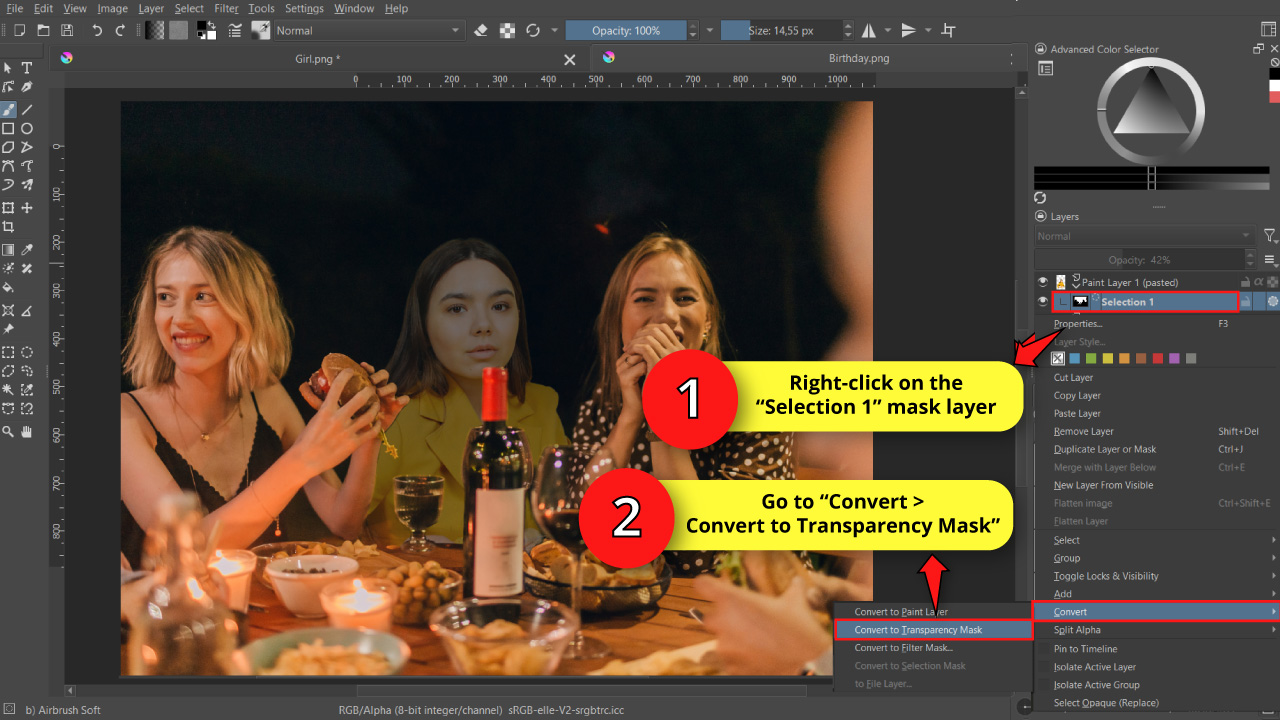
To get this done, right-click on the “Selection 1” mask layer, and go to “Convert > Convert to Transparency Mask” on the unfolded menu.
Once you’ve done this, the non-selected area will be converted into a transparency mask.
Step 16: Edit the Selection Mask for Complex Objects
Now it’s time to focus on complex objects like those that have transparency. The glass of wine, for example.
In these cases we need to make our subject partially visible behind the glass.
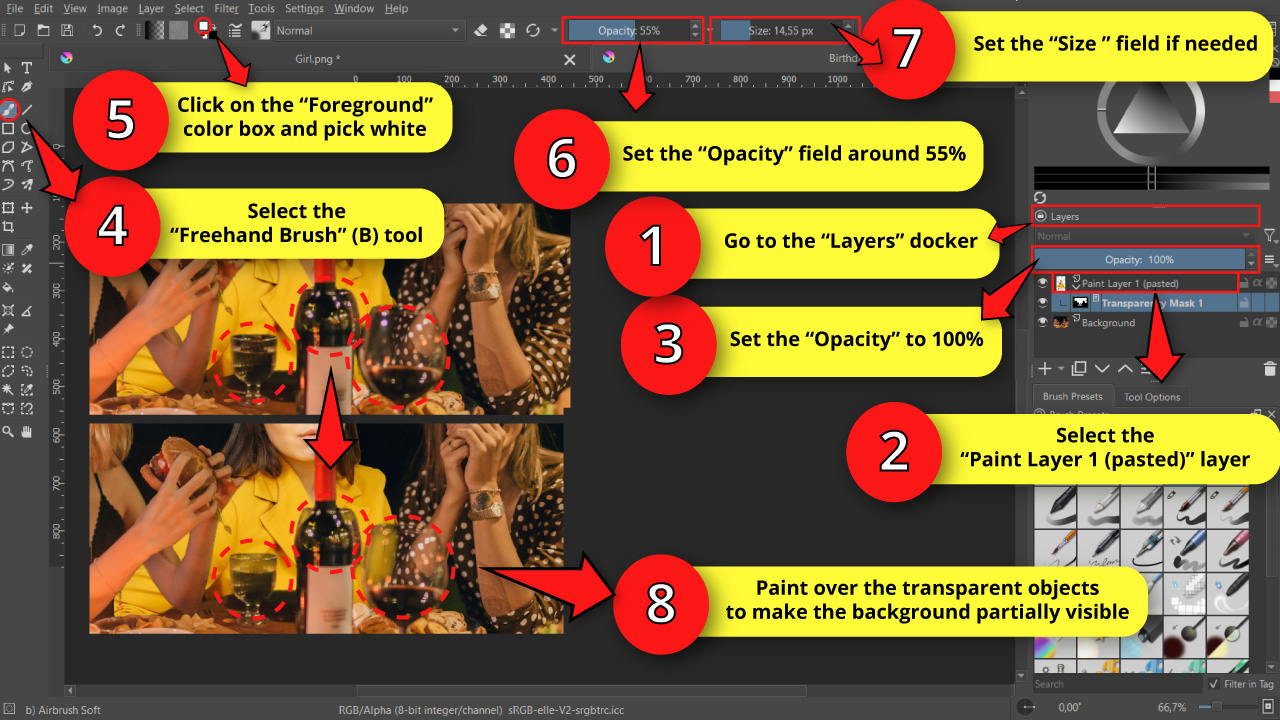
To reach this effect, first go to the “Layers” docker, select the “Paint Layer 1 (Pasted)” layer, and then set the “Opacity” to 100% again.
Now select the “Freehand Brush” (B) tool, and make sure you have a soft brush selected, like the “b) Airbrush Soft” brush, and then pick white color from the “Foreground” color box.
Next, decrease the brush “Opacity” value around 50%. You can find the “Opacity” field for the brush on the toolbar at the top of the screen.
Then, paint over the glass and other transparent objects little by little, until you make your subject partially visible.
Use the “Size” field whenever you need to adjust the brush size according to the areas you’re working on.
Use this technique as well to refine the selection in smaller areas, like it could be the space between the glass and the bottle.
Step 17: Fill the Gaps
Sometimes, even if we found a good image to use for the edition, it could happen that you’ll get some gaps, like what happened with the elbow of the girl in this example. As you may have noticed, the image is cropped and the girl’s elbow is missing, so we need to fix it.
This procedure will only work if the missing area is relatively small. Otherwise, you will probably have to find a more suitable image.
To add the missing elbow, we’ll simply draw it.
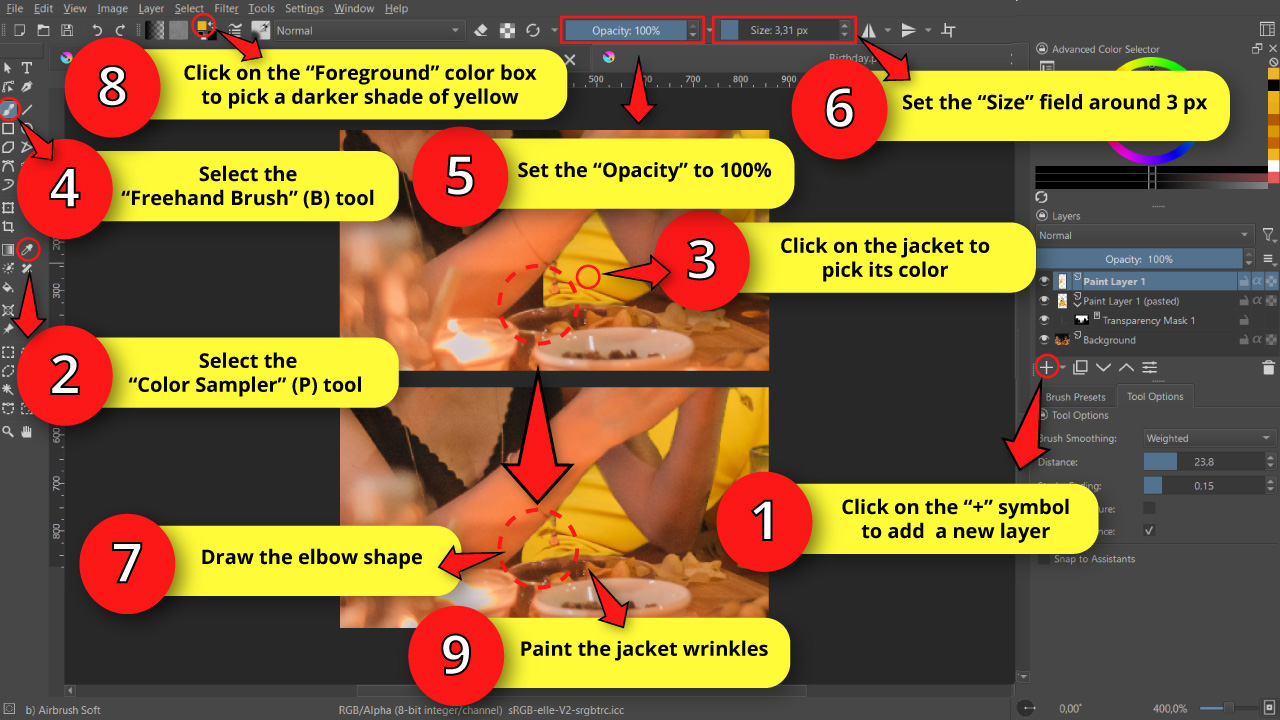
For this, first go to the “Layers” docker and click on the “+” icon to add a new layer.
Then, select the “Color Sampler” (P) tool located on the left side toolbar, and click on the nearest color of the area you will have to fill. This would be yellow for my image.
Now select the “Freehand Brush” (B) tool, and set the “Opacity” field to 100%.
Next, set the “Size” field to a low number, like 3 px.
Imagine the missing area and then paint it using a base color.
Next, pick a darker shade of your base color by clicking on the “Foreground” color box, and then set the “Size” to an even lower number.
Finish this step by adding the little details, like the jacket wrinkles in my image.
Step 18: Flatten and Merge the Layers
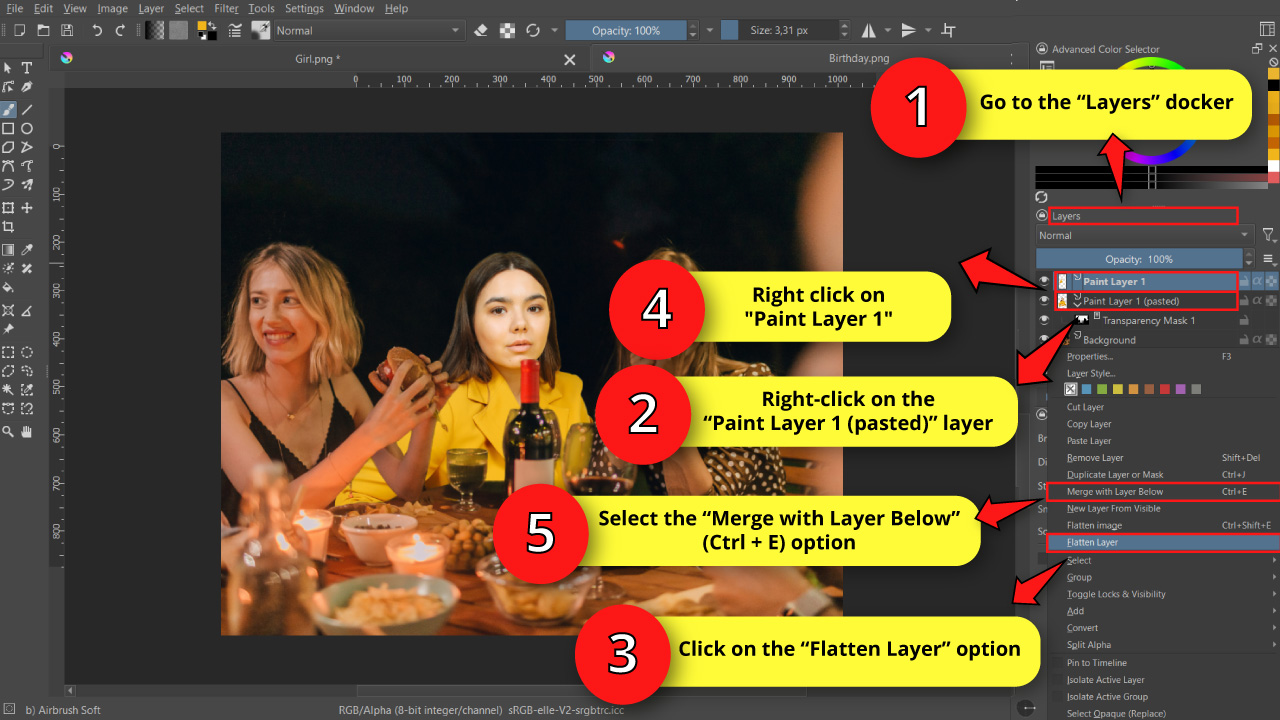
Go to the “Layers” docker and right-click on the subject layer, called “Paint Layer 1 (Pasted)”. Once the menu unfolds, select the “Flatten Layer” option.
Next, right click on the “Paint Layer 1” layer, and select the “Merge with Layers Below” option from the unfolded menu. Or press the “Ctrl + E” command to shortcut it.
Once you’ve done this, both our subject layers will be merged into one.
Step 19: Add a Fill Color Layer
We already have our subject placed, resized and masked, we refined its edges, but the image still looks unnatural.
Since our subject photo has been taken in a different place, with different lighting and different filters, both photos still won’t match.
If from the beginning you made the effort to search and select two images that match these fields, you will save some time skipping some, or maybe all next steps.
The first difference that calls our attention is the color tint between both images.
While the party image has a warm orange vintage filter, our subject tint tends to be way more neutral.
To make our subject blend better in the party photo, we’ll have to fix this.
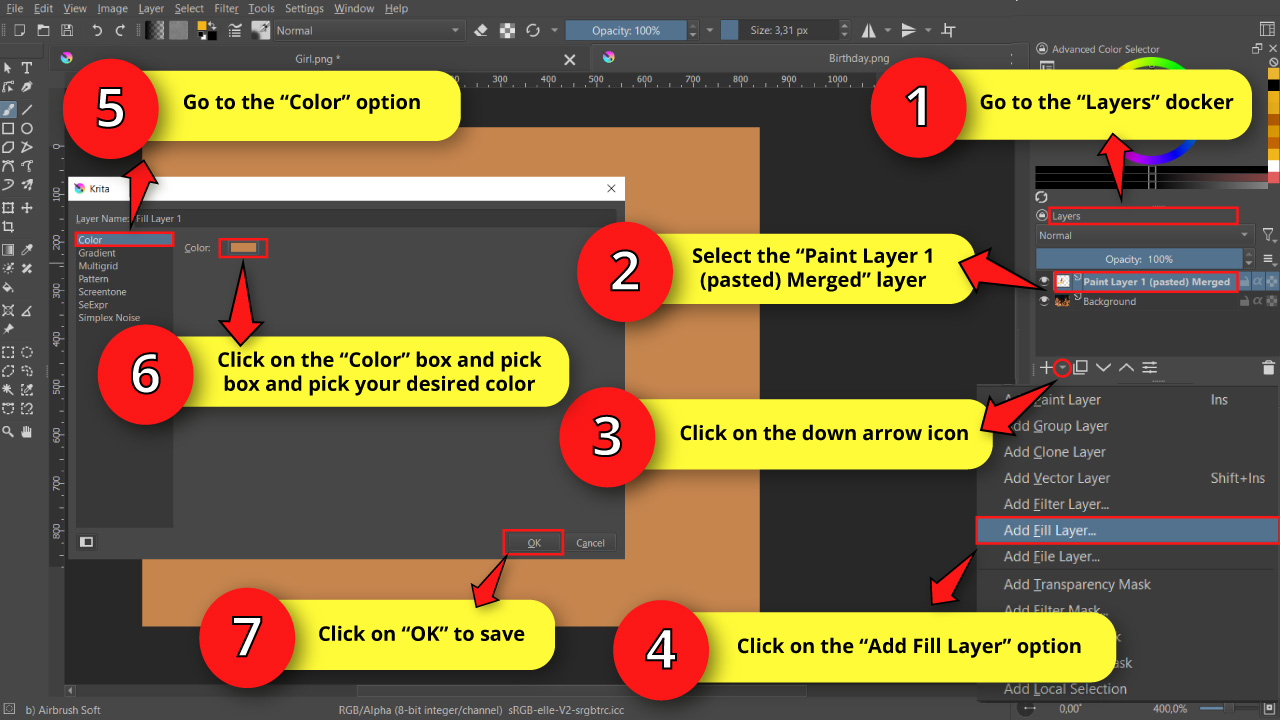
First go to the “Layers” docker, and make sure to have the subject layer now called “Layer 1 (Pasted) Merged” selected.
Then click on the ”▼” icon, next to the “+” icon on the “Layers” docker. On the unfolded menu, select the “Add Fill Layer” option.
Once you’ve done this, a window will pop up. Make sure you are on the “Color” tab on the left side menu. Then click on the “Color” box and pick your desired color. This color will vary according to your image. For my example, I’m picking a dark desaturated orange color.
Then click on “OK” to save
After doing this, all the canva will be filled with your selected color.
Step 20: Apply the Fill Layer Exclusively to the Subject
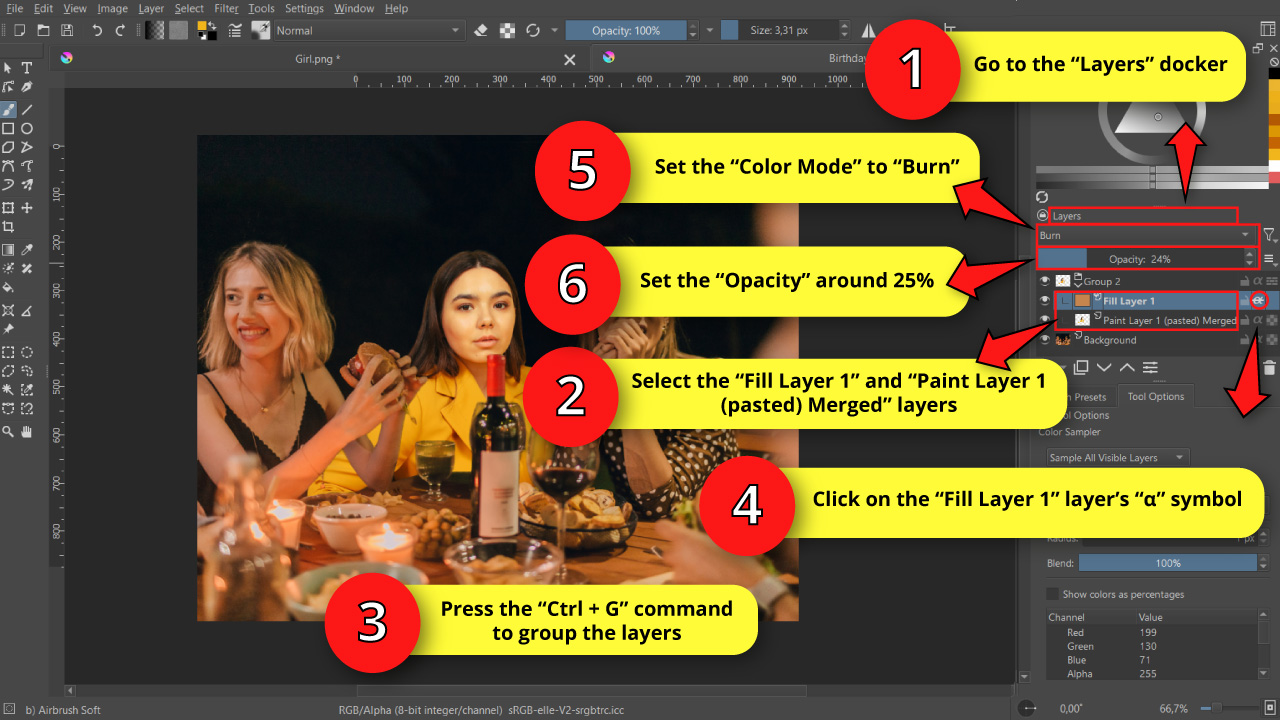
To apply the fill color strictly to our subject, select both the “Fill Layer 1 (pasted) Merged” and the “Fill Layer 1” layers, by holding the “Shift” key as you click on each one of them.
Then, right-click on any of them, and select “Group > Quick Group” on the unfolded menu. Or press the “Ctrl + G” command to shortcut it.
Now click on the “Fill Layer 1” layer’s “α” symbol until it shows strikethrough.
Once you’ve done this, the fill color will be visible only over the subject.
Next, set the “Blend Mode” to “Burn”, and decrease the “Opacity” field to a value around 25%.
Step 21: Add Gaussian Blur
Since the resolution of the photos we are working with is quite different (the subject one is clearly higher, while the dinner table one is lower) we need to match them.
Something we can do to decrease the subject’s image quality is applying the “Gaussian Blur” filter.
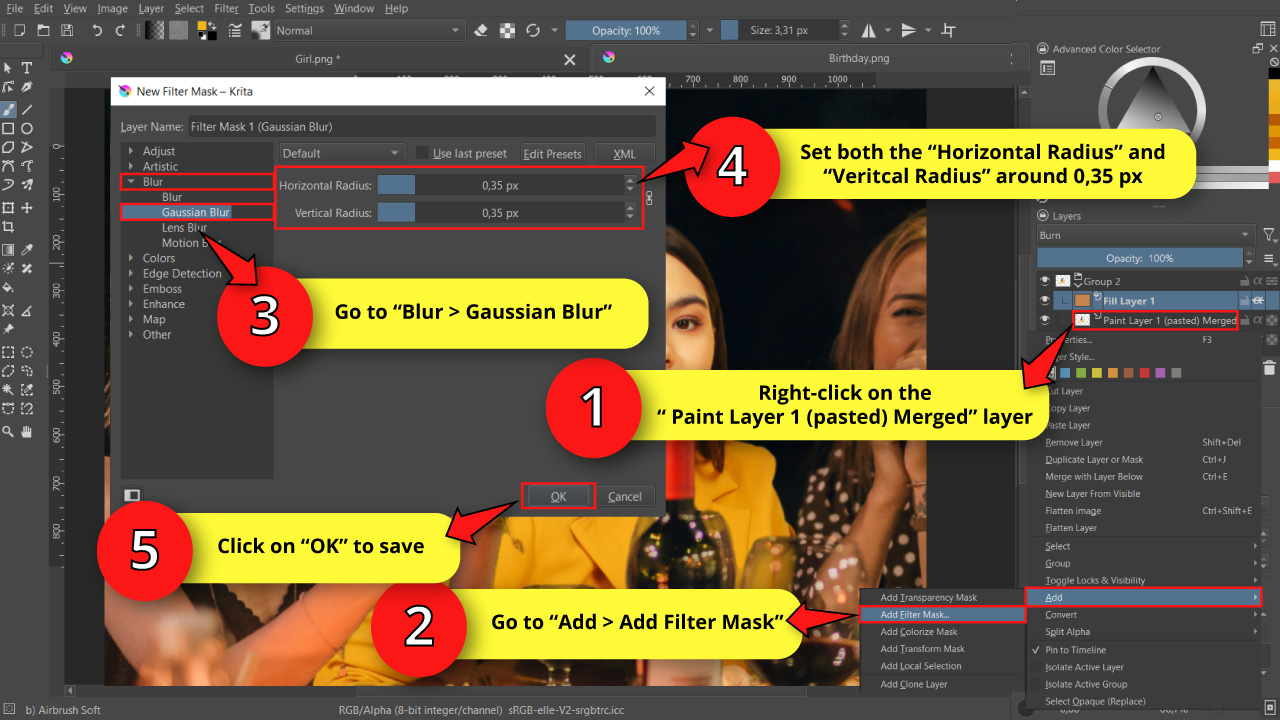
Go to the “Layers” docker and select the “Paint Layer 1 (pasted) Merged” layer.
Right-click on that layer to unfold its options menu.
Go to “Add > Add Filter Mask”.
On the pop up window, select “Blur > Gaussian Blur” from the left side menu.
Finally, set both “Horizontal Radius” and “Vertical Radius” around 0,35 px.
Then click “OK” to save.
This value may vary according to your image.
If the image of the background is the one with the higher resolution, you will have to apply the “Gaussian Blur” filter to that image.
To apply the “Gaussian Blur” filter on the background image, you have to click on the “Background” layer, so the filter applies right above the “Background” layer. Then, add the “Gaussian Blur” filter as we did in this step.
Step 22: Adjust the Hue, Saturation and Light Values
Now it’s time to take care of Hue, Saturation and Light, also known as “HSV/HSL” adjustments.
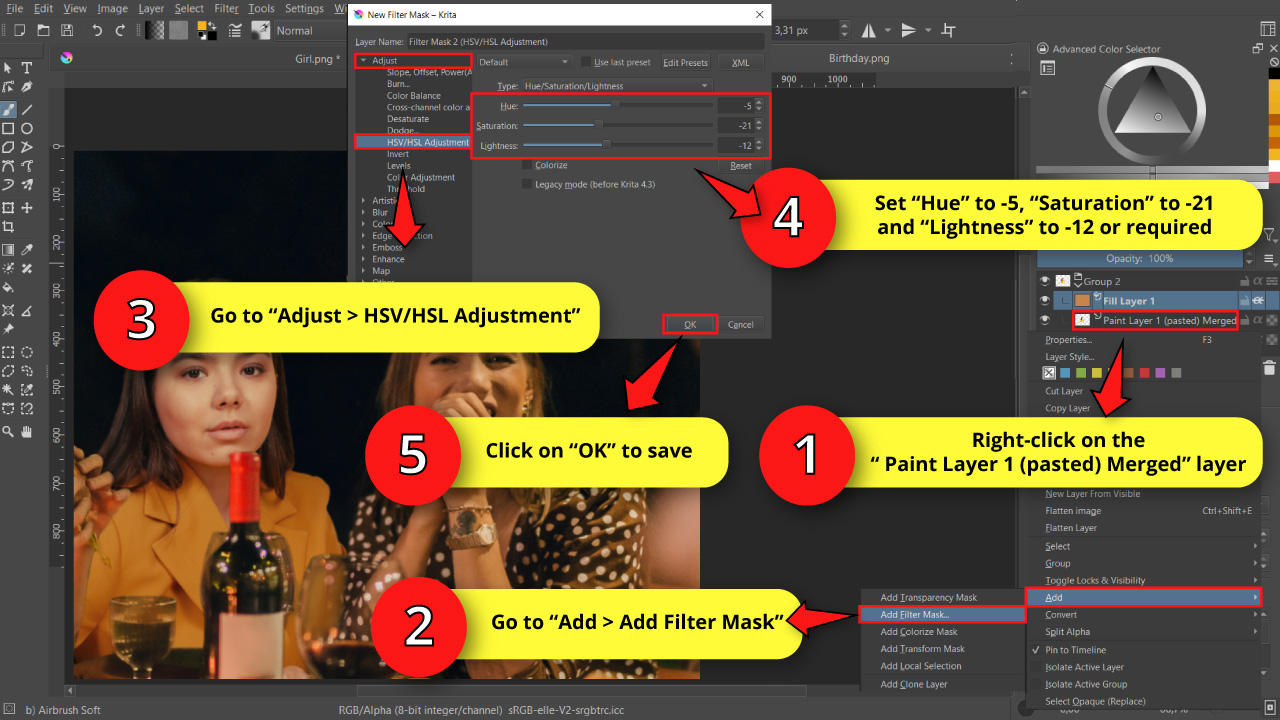
On the “Layers” docker, select the “Paint Layer 1 (pasted) Merged” layer.
Then, right-click on that layer to unfold its options menu.
Next, go to “Add > Add Filter Mask”.
On the pop up window, select “Adjust > HSV/HSL Adjustment” from the left side menu.
Now set the “Hue”, “Saturation” and “Light” values to fit your image’s ambience and appearance the better.
I need to make my subject color more yellowish, so I’m setting the “Hue” value to -5.
Since my subject photo colors are too bright, and the lightness is too high, I’m setting “Saturation” to -21 and “Lightness” to -12.
Then click “OK” to save.
Step 23: Add a Burn Filter
Since the party photo was taken during night time, and our subject photo was taken in a studio, we need to make the latter one darker.
For this we’ll use the “Burn” filter.
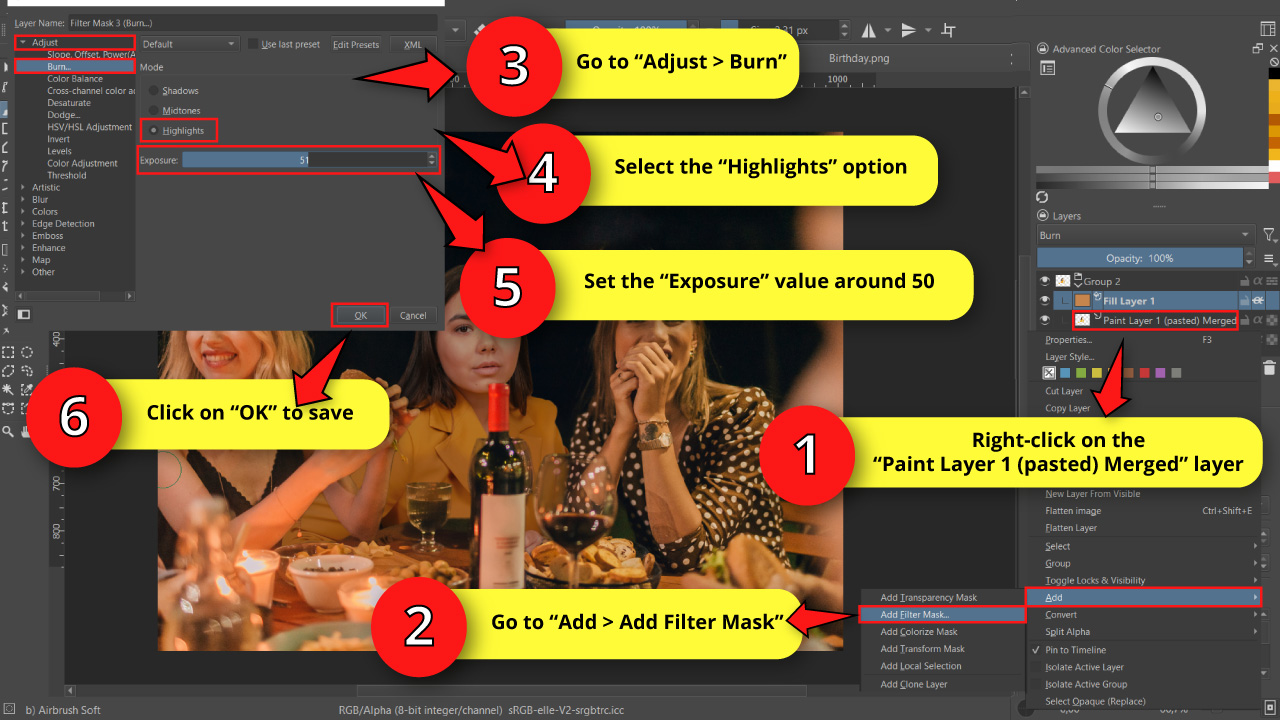
On the “Layers” docker, select the “Paint Layer 1 (pasted) Merged” layer.
Right-click on that layer to unfold its options menu.
Then, go to “Add > Add Filter Mask”.
On the pop up window, select “Adjust > Burn” from the left side menu.
The photo of the subject has too much light, so on the “Mode” adjustment field, I’ll select “Highlights”.
However, it’s probably worth trying different modes and comparing results.
Next, set the “Exposure” value around 50.
Finally, click on “OK” to save.
Step 24: Add a Color Balance Filter
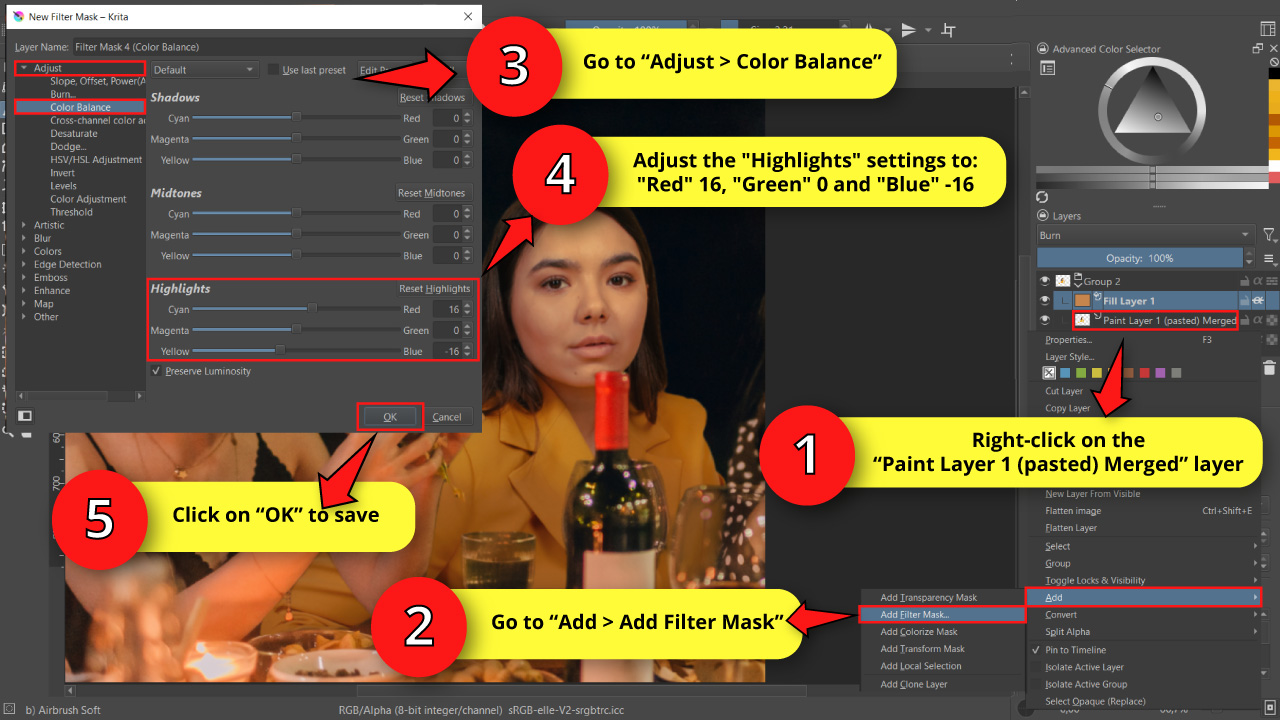
We’re getting closer to blend our subject into the party photo.
But the tint color still looks off, so we definitely need to adjust the balance filter.
On the “Layers” docker, select the “Paint Layer 1 (pasted) Merged” layer.
Then right-click on that layer to unfold its options menu.
Next, go to “Add > Add Filter Mask”.
Now, on the pop up window select “Adjust > Color Balance” from the left side menu.
Since the girl photo is mostly composed of highlights, I’ve just added some yellows and reds in the “Highlights” mode. I set “Red” to 16, “Green” 0 as default and “Blue” to -16.
Make sure to have the “Preserve Luminosity” checkbox marked for better results.
Then click on “OK” to save.
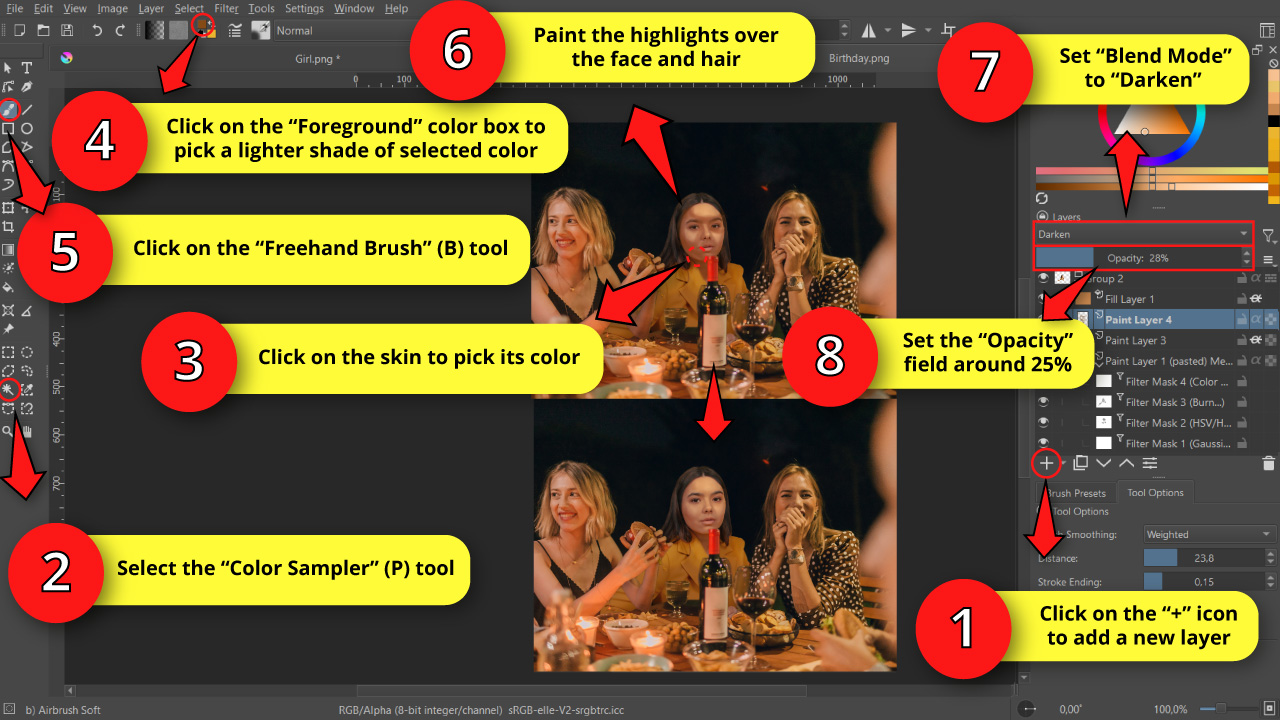
Step 25: Add Highlights
As you may have noticed, we still need to get to the point where it looks as if the light was reaching the subject in a way that it seems she was actually there for real.
To add highlights, go to the “Layers” docker and press the “+” icon located at the bottom of the docker to add a new layer.
Then select the “Color Sampler” (P) tool, and click anywhere on the skin to pick that color.
Next, click on the “Foreground” color box to select a lighter shade of that color.
Now click on the “Freehand Brush” (B) tool, and make sure to have a soft brush like the “b) Airbrush Soft” selected.
You can change the brush presets on the “Brush Presets” docker located on the right side toolbar.
Use this brush to paint the spots where you think that the light might be reaching the subject if she was there.
If you have trouble, use the highlights that other people, or even objects have on their surfaces as reference.
Change the brush size whenever you need to.
I’m adding highlights to the forehead, cheeks, chin and hair.
Once you’re done, go to the “Layers” docker again and set “Blend Mode” to “Luminosity”, and the “Opacity” value around 25%.
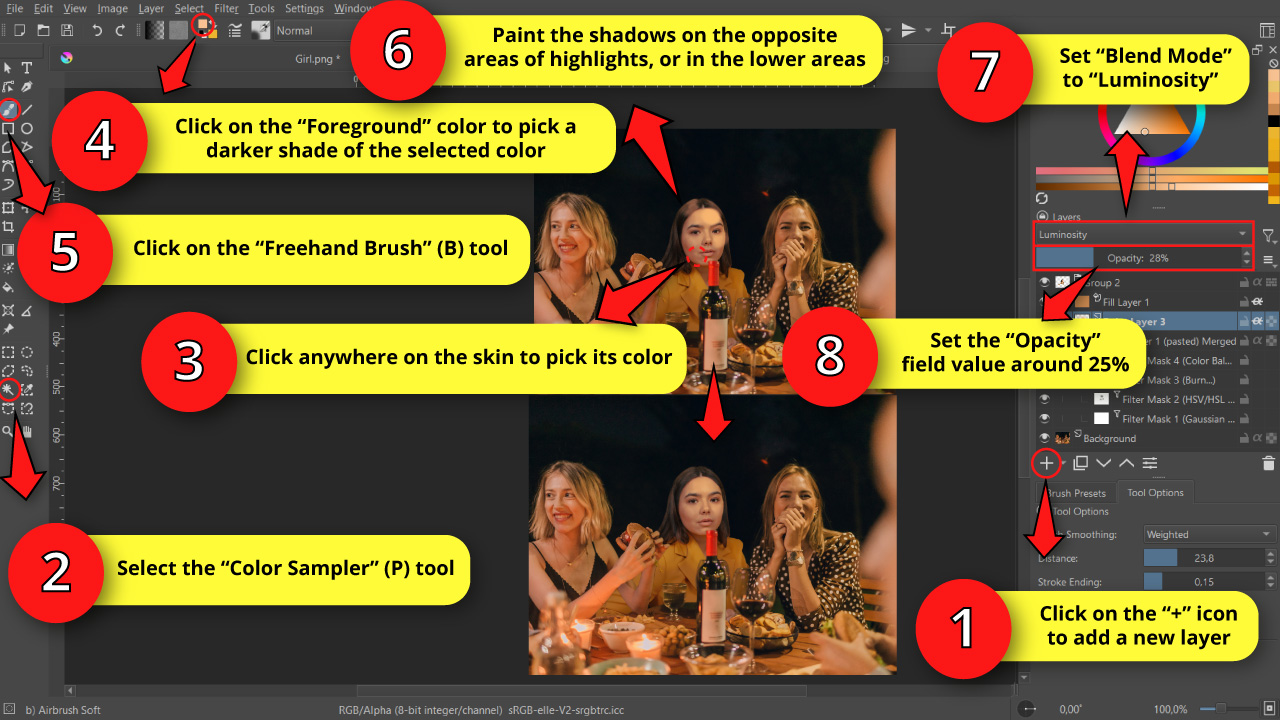
Step 26: Add Shadows
We already have the highlights, but we need to add some shadows to contrast with the lights.
To add shadows, repeat the previous step, adding a new layer, picking the color of the skin with the “Color Sampler” (P) tool, and then changing the color now to a darker shade of it.
Then use the “Freehand brush” (B) tool to paint the shadow areas. For shadows make emphasis in the lower areas, or on the opposite areas of highlights.
Once you’re done, go to the “Layers” docker again and set “Blend Mode” to “Darken”, and the “Opacity” value around 25%.
Step 27: Add a Grain Filter
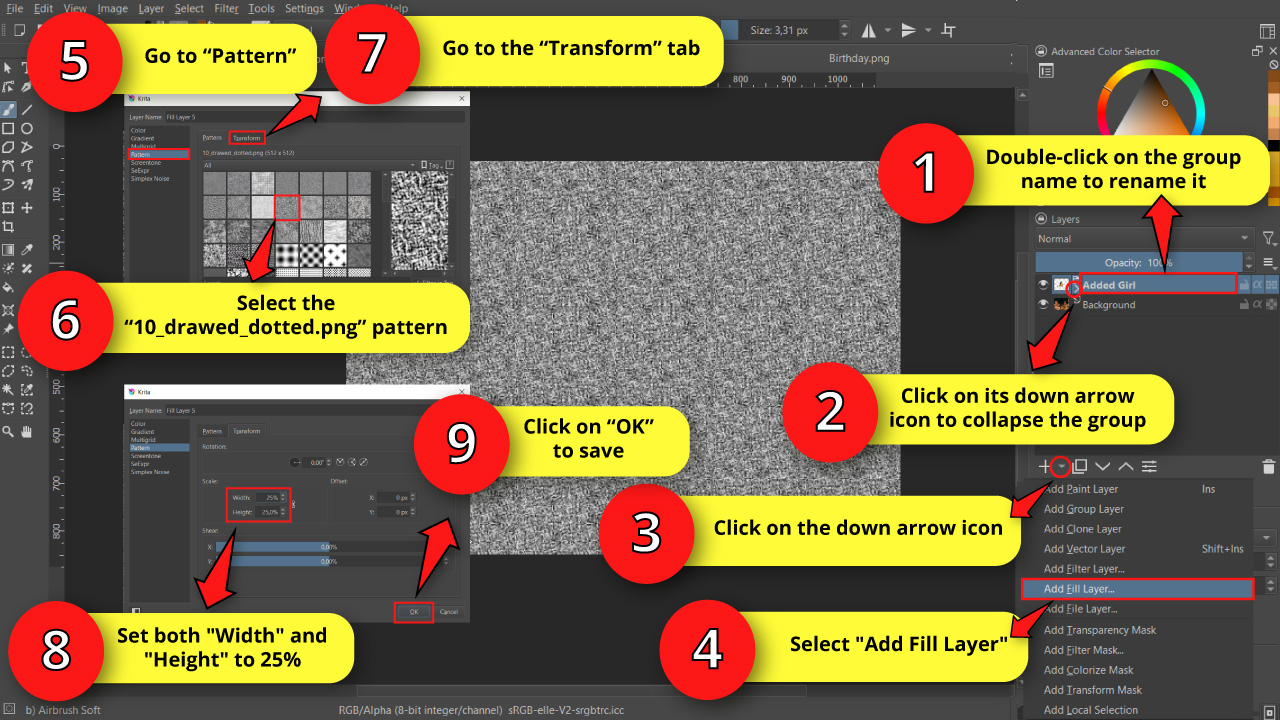
Finally, I’ll add a grain filter to our subject, since the background image also has this kind of filter.
In order to add a grain filter and apply it exclusively to our subject, we need to do the following.
I’ll first change the group name. To change a layer or group name, go to the “Layers” docker and double-click on the name. Next, type your new name in.
I’ll rename the group name as “Added Girl”. Once you’ve done this, collapse the group by clicking on the ”▼” icon next to the group name.
Now, click on the ”▼” icon next to the “+” icon. On the unfolded menu, select the “Add Fill Layer” option.
On the pop up window, go to the “Pattern” option located on the left side toolbar, and then select the “10_drawed_dotted.png” pattern.
Next, go to the “Transform” tab and set both “Width” and “Height” to 25%, since we are adding a very fine pattern.
Then press on “OK” to save.
Step 28: Set Grain Filter Color Mode and Transparency
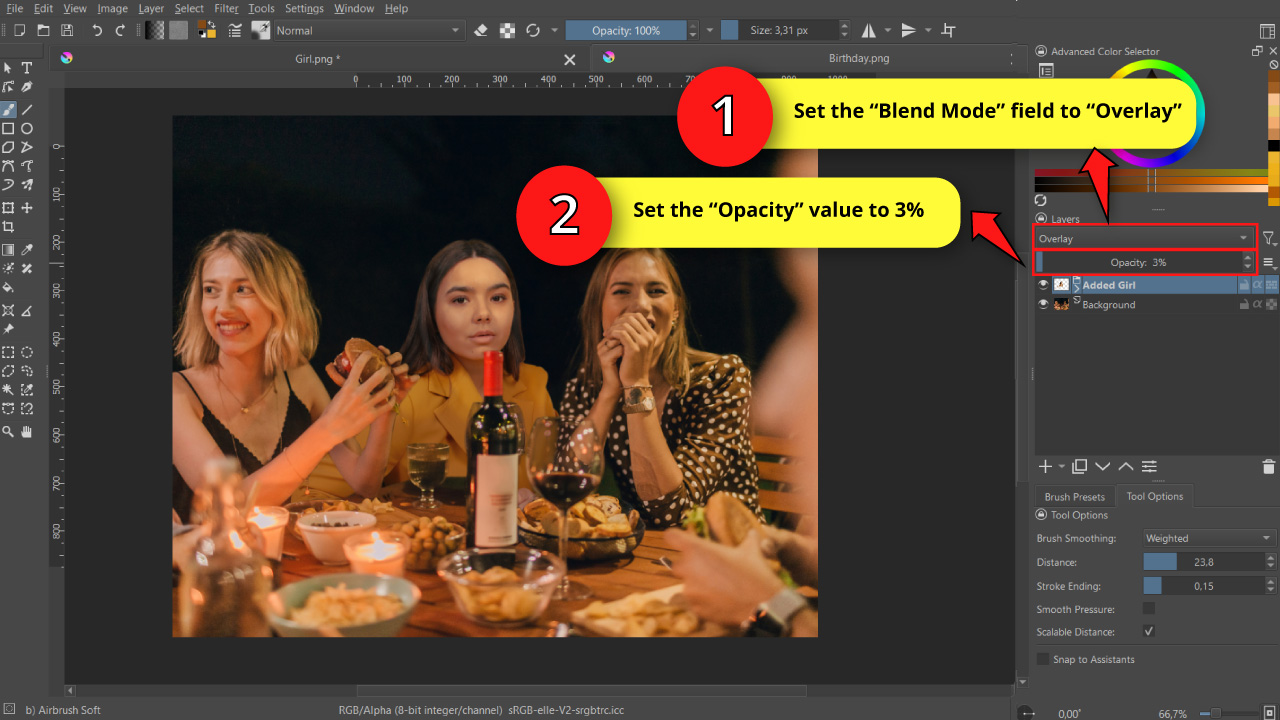
Go to the “Layers” docker and set the “Blend Mode” to “Overlay”, and the “Opacity” field value around 3%.
The Result
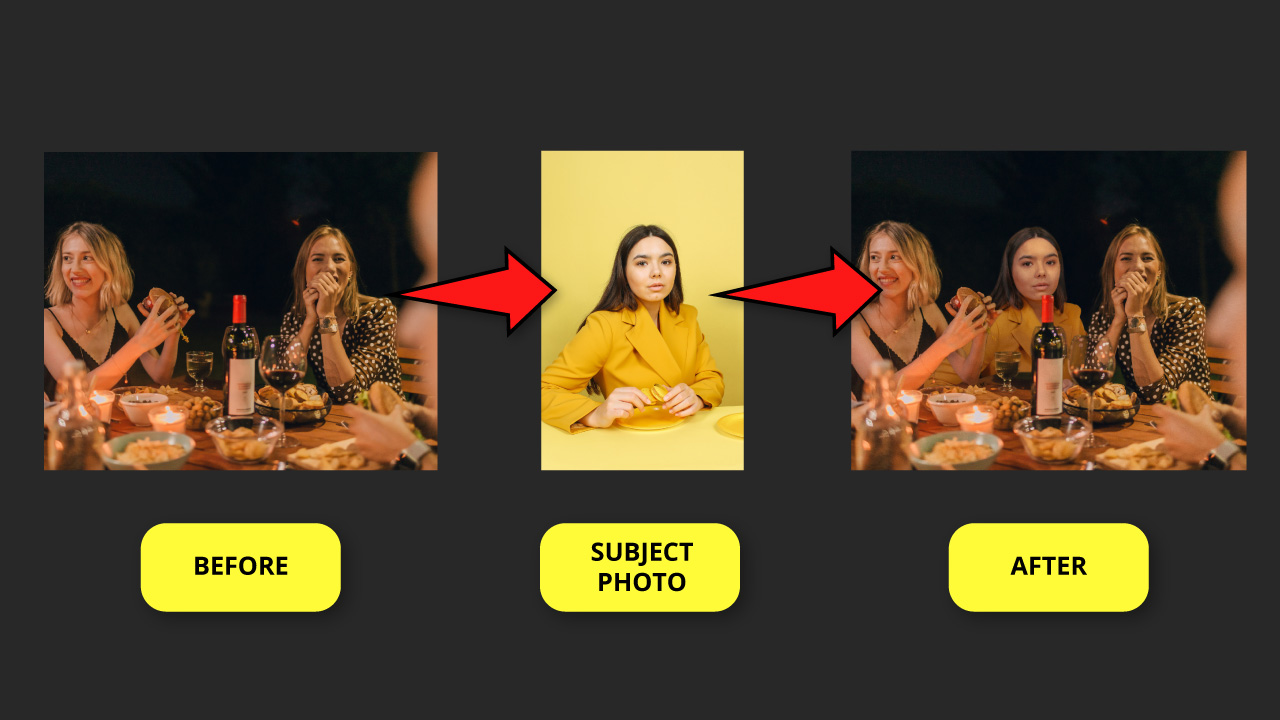
Here is the result of how to add someone into a picture using Krita in this case, and solving issues that may happen like filling some gaps, or dealing with different lightings, resolutions or hue tints.
Frequently Asked Questions on “How to Add Someone into a Picture without Photoshop”
What are the requirements for the images to be combined successfully?
To get a realistic result and hopefully save some time (and skip some steps) make sure to select images with similar lighting, resolution, hue tint, and always avoid cropped spots.
Is Pixlr 100% online and free?
Pixlr is 100% online, and the great majority of its tools are available for free. However, there are some extra tools you can have access to by getting a Premium Account.
What’s the difference between Pixlr X and Pixlr E?
Pixlr X version was designed for novice users. Tools and features work in a more intuitive and simpler way, oriented to preset adjustments and little to no customization. On the other hand, Pixlr E counts with a wider variety of tools and features, and it’s a more customizable version in general.
Is Krita a 100% free software?
Krita is a 100% free and open-source professional raster graphics editor. The software runs on Windows, macOS, Linux, Android, and ChromeOS. In order to use it, you simply need to download and install it on your device.
What free software should I use to add a person to an image and get the best result?
It’s highly recommended to use Krita since it’s a very complete and flexible software, totally capable of professional photo editing.
What free software should I use to add a person to an image if I have no experience whatsoever in photo editing?
Pixlr is probably a very suitable option since it’s been designed for novice users, but still counts with a wide enough variety of tools and functions.

I am a professional blogger and entrepreneur with a strong interest and passion in photo editing. On MindRelic, I happily share my expertise in the photo editing niche with all of you guys!
itstitle
excerptsa