
Have you ever wanted to brighten eyes in Lightroom but didn’t know where to start? Well, in this tutorial, you’ll discover how to do it in three simple steps.
This includes adjusting the intensity of the brightening effect. You can brighten just a little bit to make the eyes pop slightly, or you can go as far as you desire.
However, keep in mind that over-brightening eyes can make the results look unrealistic. Unless you’re trying to achieve a specific effect, you should be careful with the amount applied.
Keep reading to find out how to brighten eyes in the simplest and most effective way possible.
How to Brighten Eyes in Lightroom
Go to the Develop module and select the Radial Filter tool. Draw a circle over the iris and set the Custom menu to Iris Enhance. Mark Invert. Next, select the Adjustment Brush tool and adjust the Exposure, Highlights, Shadows, Clarity and Saturation sliders. Brush over the iris.
Step 1: Go to the Develop Module
 Once you’ve imported your image in Lightroom, go to the “Develop” module in the toolbar at the top of the screen.
If you can’t visualize it, click on the ▼ icon to unfold the hidden modules panel.
You can also access the “Develop” module by going to “Window > Develop” in the toolbar at the top of the screen.
Or by pressing the “Ctrl + Alt + 2” (Windows) or “Cmd + Option + 2” (Mac) command.
Step 2: Enhance Irises
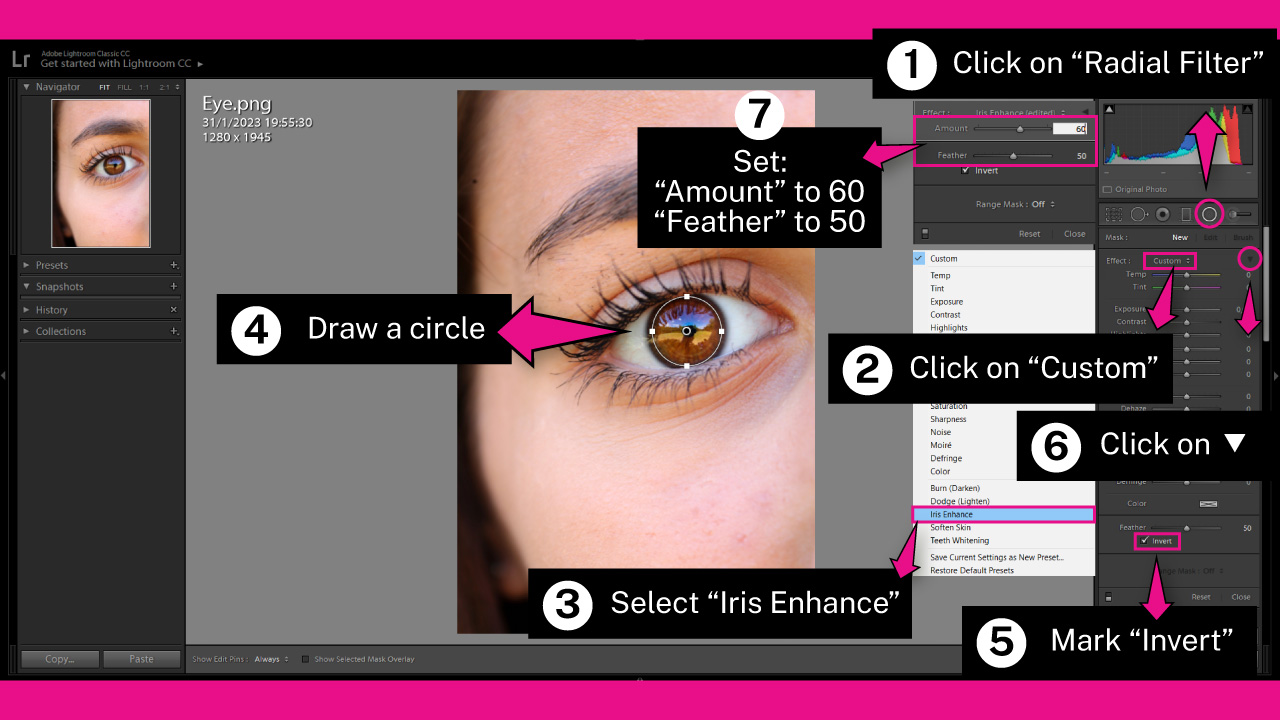
On the “Develop” module, click on the “Radial Filter” (Shift + M) tool located on the right side toolbar..
Or you can use the “Shift + M” command to shortcut it.
Once you are in “Radial Filter” (Shift + M) mode, hold the “Shift” key while you draw a circle over the iris.
It’s necessary to hold the “Shift” key in order to get a perfect symmetrical circle.
If the iris is partially hidden by the eyelid, you should draw an oval to fit with the visible iris shape.
If you can’t get the exact circle or oval in the first try, you can always modify the size and shape using the handles of the circle.
You can relocate the circle by dragging it, as well.
Once you’ve drawn the circle over the iris, click on the “Custom” menu right next to the “Effect” title.
On the drop-down menu, select the “Iris Enhance” option.
If the effect is working around the circle, and not inside the circle itself, mark the “Invert” checkbox.
To control the effect intensity, click on the “Effect” ▼ icon to collapse the panel.
Then you will have access to the “Amount” controller.
Adjust the “Amount” and “Feather” sliders if necessary.
I’ll set:
“Amount” around 60
“Feather” to 50
Keep in mind that these values may vary depending on your image, so feel free to run several tests until you get your desired result.
Step 3: Brighten Irises
Now it’s time to brighten the irises.
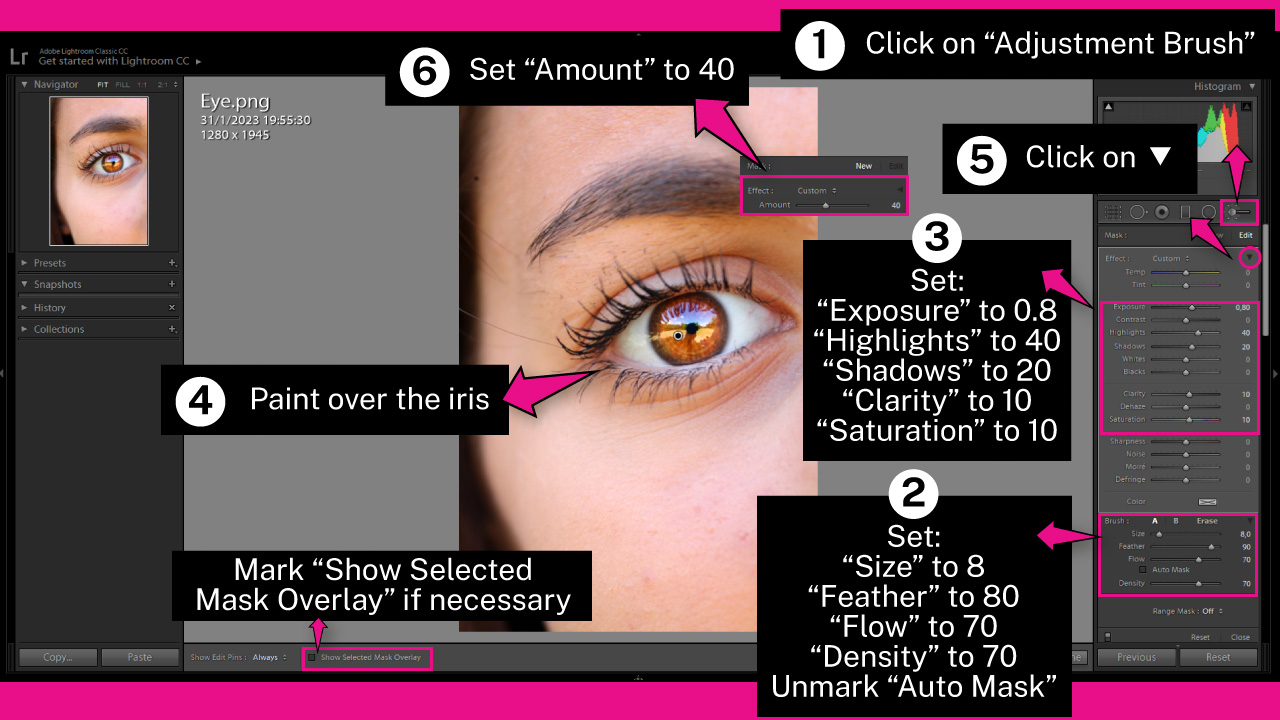
To brighten, we’ll use brushes in Lightroom, so click on the “Adjustment Brush” (K) tool located on the right side toolbar.
Once you’re on the “Adjustment Brush” (K) mode, you need to set the brush.
To set the brush, scroll a bit down the “Adjustment Brush” (K) panel, and on the “Brush” section, set:
“Size” to 8, or your desired value
“Feather” to 80
“Flow” to 70
“Density” to 70
Unmark the “Auto Mask” checkbox
You can also modify the “Brush” size by using the scroll wheel from your mouse.
Then scroll a bit up and set the following “Effect” adjustments:
“Exposure” to 0.8
“Highlights” to 40
“Shadows” to 20
“Clarity” to 10
“Saturation” to 10
Once again, you can take these settings as a starting point but the best values will depend on your image/photograph, so you will need to play with these settings a bit to get the best results!
Once you’re done, brush over the iris to make it brighter.
If you want to see the area where you are applying the brush, mark the “Show Selected Mask Overlay” checkbox, located in the toolbar at the bottom of the screen.
If you want to hide it, just unmark it.
If you want to remove a section of a masked area, hold the “Alt/Option” key while you brush over that area.
You can also get this done by clicking on the “Erase” tool located on the right side toolbar, next to the “Brush” title.
Once you’re done, you can adjust the effect intensity by clicking on the “Effect” ▼ icon, to collapse the panel.
Then, you will have access to the “Amount” controller.
Next, adjust the “Amount” slider if necessary. I’ll set it around 40, but you can set the value that suits your photo better.
The Result

This is the result of how to enhance and brighten eyes in Lightroom
Frequently Asked Questions on “How to Brighten Eyes in Lightroom”
How to increase or decrease the amount of applied effect in Lightroom?
To adjust the intensity of a Graduated Filter, Radial Filter, or Adjustment Brush in Lightroom, first click the effects icon (down-arrow symbol) to collapse the related panel. Then, access the “Amount” controller and adjust the value to increase or decrease the effect amount.
How can I duplicate an already applied effect in Lightroom?
First make sure to have the “Show Edit Pins” feature on “Always” or “Auto”. You can find it in the toolbar at the bottom of the screen. In the photo, locate the pin that represents the effect you want to duplicate. Next, right-click on the pin to unfold the options menu, and select “Duplicate”.
How to remove a section of a masked area in Lightroom?
To remove a section of the masked area in Lightroom, you can either: hold the “Alt/Option” key while brushing over the desired area or, click on the “Erase” tool located next to the “Brush” title in the right side toolbar.

I am a professional blogger and entrepreneur with a strong interest and passion in photo editing. On MindRelic, I happily share my expertise in the photo editing niche with all of you guys!