

Watermarks are often used by photographers, designers, and other creative professionals to protect their work and serve as a client proof.
While a generic watermark may suffice for some, many prefer to create a unique watermark that represents them as a professional, company, or brand.
Lightroom offers a convenient way to add watermarks to images in bulk.
The “Watermark Editor” has the option to add text or graphic watermarks, which can be customized using various settings.
It may take some time to perfect the watermark, but once it’s finalized, it can be saved as a preset and easily applied to future images.
If you want to learn more about how to add a watermark using Lightroom, this article has everything you need to know.
How to Add a Watermark on Lightroom
Go to the Library module and select the images. Then go to File and select Export. In the Export window, click on the Watermarking menu and mark Watermark. Click on the drop-down menu and select Edit Watermarks. Adjust the Watermark settings and click Save. Finally, click on Export.
Step 1: Go to the Library Module
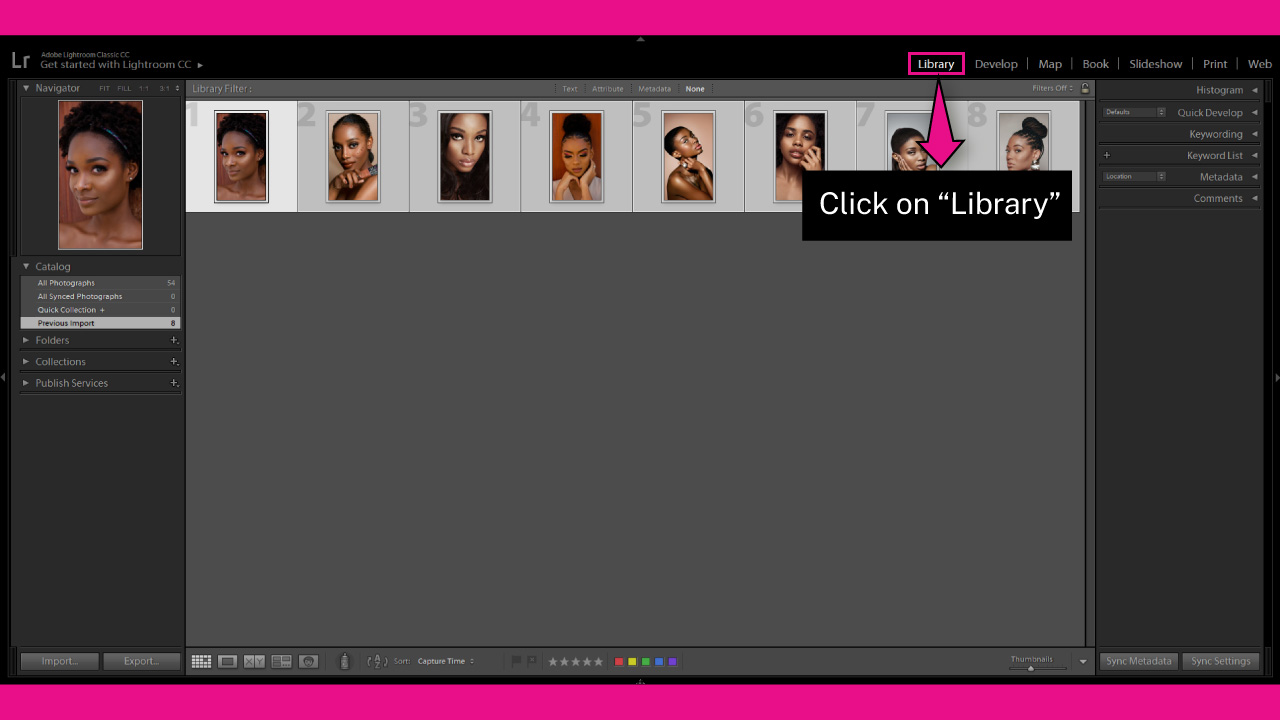
Once you have imported your photos, make sure you are on the “Library” module in the toolbar at the top of the screen. If you cannot see them, click on the ▼ icon to collapse the hidden modules panel.
You can also access the “Library” module by going to “Window > Library” in the toolbar at the top of the screen.
Or by pressing the “Ctrl + Alt + 1” (Windows) or “Cmd + Option + 1” (Mac) command.
Step 2: Select Images
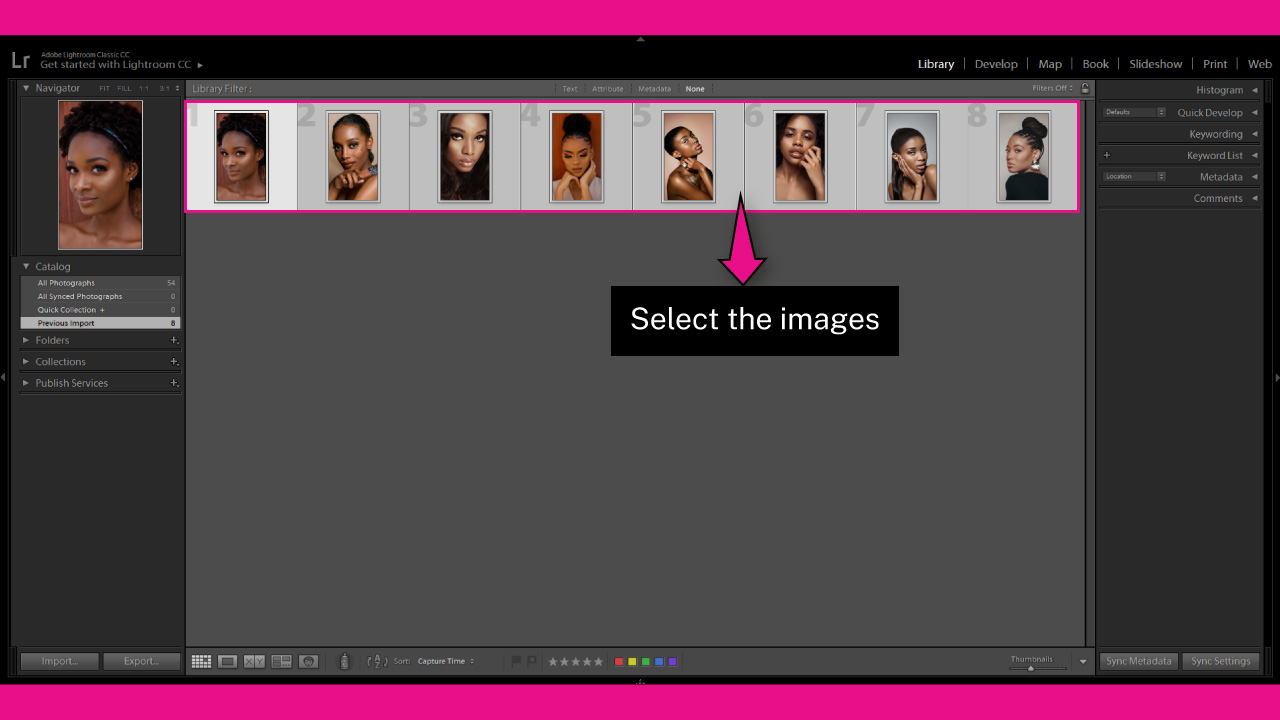
We need to select the images that you want to add a watermark to.
To select all the images from the “Library” module, use the “Ctrl + A” (Windows) / “Cmd + A” (Mac) command.
To select specific images, hold the “Ctrl” (Windows) / “Cmd” (Mac) key as you click on the desired images.
To select images in bulk, hold the “Shift” key, click on the first image in the list, and then click on the last image
Step 3: Open the Watermark Editor

The “Watermark Editor” is located in the “Export” window. This means that to add a watermark, you must export from Lightroom.
To open the Export window, go to “File > Export” in the menu at the top of the screen.
You can also use a shortcut by pressing the “Ctrl + Shift + E” (Windows) or “Cmd + Shift + E” (Mac) command.
Next, click on the “Watermarking” menu to display its settings. Check the “Watermark” box to enable the drop-down menu next to it.
Click on the drop-down menu and select the “Watermark Editor” option to open the “Watermark Editor” window.
Step 4: Add a Graphic Watermark
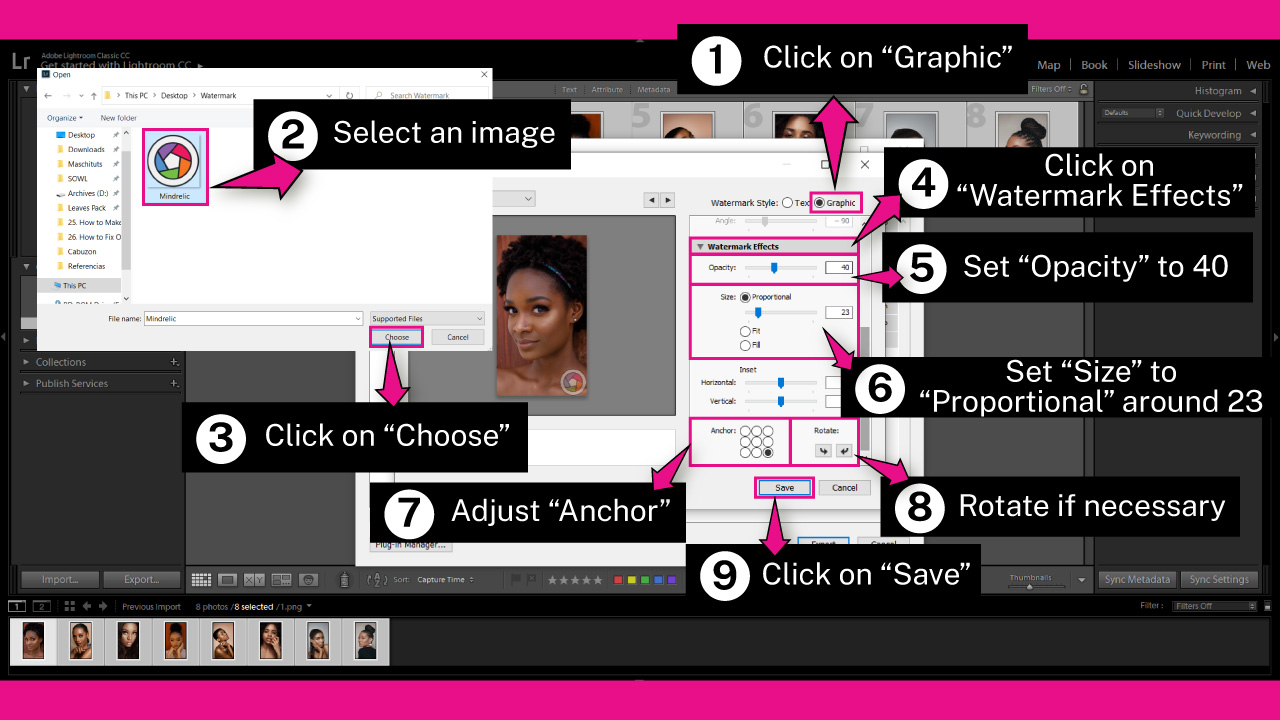
In the “Watermark Editor” window, you can add a “Text” or “Graphic” watermark.
In this step, we’ll cover how to add a “Graphic” watermark, and in Steps 5 and 6, we’ll cover the “Text” procedure.
To add a “Graphic” watermark, click on the “Graphic” option in the top-right corner of the window.
Once you select the “Graphic” option, a window will pop up.
Browse your directory and locate the watermark you want to add. Select the image, and then click on the “Choose” button to import.
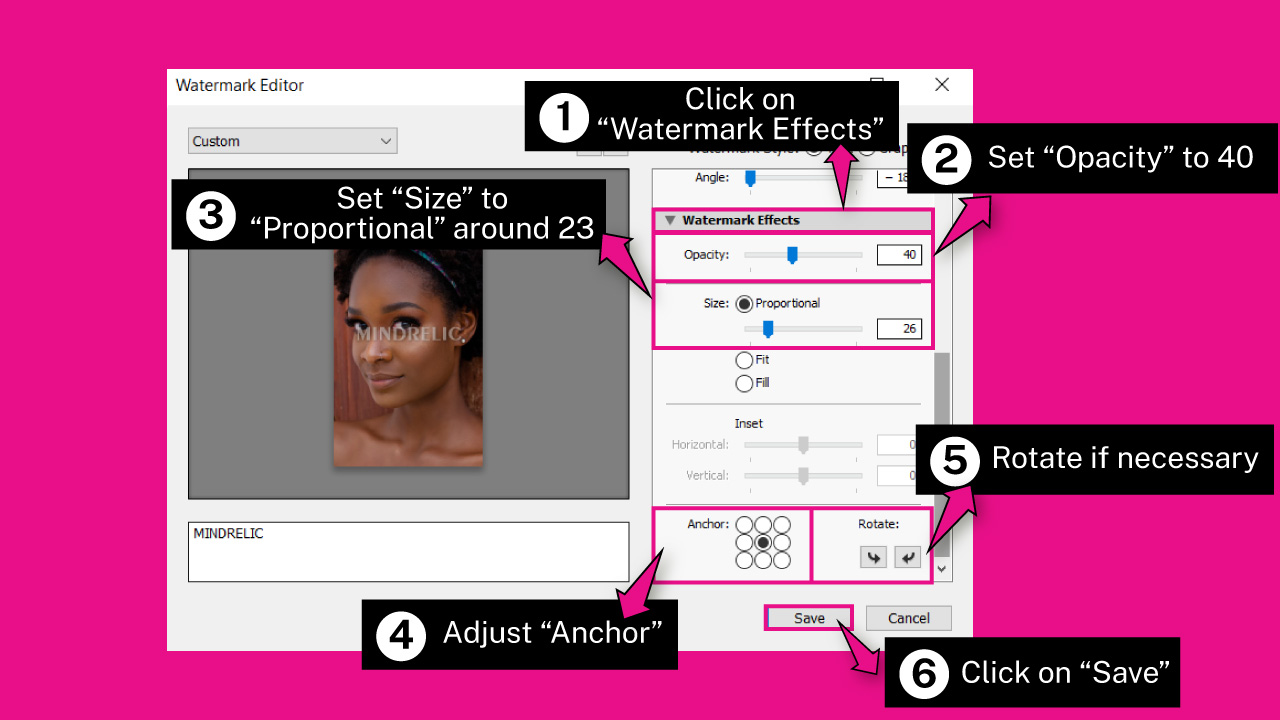
After importing the watermark, scroll down the right-side toolbar and click on the “Watermark Effects” menu to collapse its settings.
If you want to add some transparency to your graphic, adjust the “Opacity” slider.
I’ll set it to 40, but you can pick the opacity level that suits you better.
Then you can resize your graphic by adjusting the “Size” tool. You can choose between “Proportional”, “Fit”, or “Fill”.
Set it to the “Proportional” option and adjust its slider if you want to make a custom resize.
Since my logo is multicolored, it’s best to keep it compact to prevent it from being too eye-catching and causing difficulty in visualizing the image.
So I’ll set it around 23, but you can enter the value that suits you better.
You can also resize the watermark by dragging the handles of the bounding box on the image preview screen.
Or, if you prefer, you can select “Fit” or “Fill” options.
The “Fit” option will resize the watermark to fit within the bounds of the image with no cropping, while the “Fill” will expand the watermark to fill the whole image.
Use the “Anchor” tool located at the bottom of the window to change the watermark placement. I’ll place my logo at the bottom-right corner.
But if you had set the “Size” to “Fill” or “Fit,” the watermark would look better if you selected the “Center” position.
On the “Insert” tool, you can move the graphic to the exact place you want.
Use the “Horizontal” and “Vertical” sliders to move the graphic horizontally and vertically.
Finally, rotate the watermark by clicking the “Rotate” tool arrows if necessary.
Once you have finished customizing your watermark, click on the “Save” button.
Step 5: Adjust Text Watermark Options
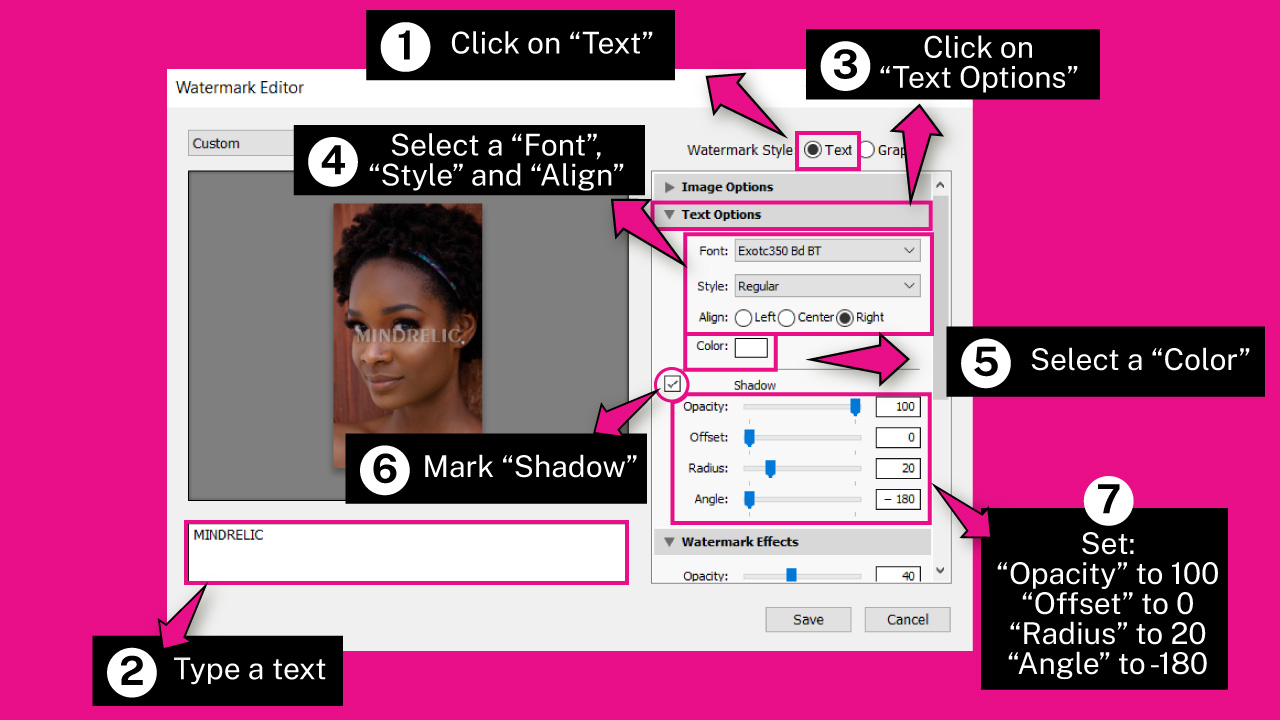
If you want to add a text watermark, click on the “Text” option in the top-right corner of the window.
Next, type your desired text in the text field under the preview screen.
Once you have entered your text, click on the “Text Options” menu to collapse its settings.
Select your desired “Font”, “Style”, and “Align”, then click on the “Color” box to choose a color. I’ll go with white.
When the “Color Picker” window pops up, you’ll notice that the default color mode is set to grayscales.
If you want to choose any color, simply select a shade of gray and then drag the right color slider to the top. This will switch the “Color Picker” to RGB mode.
Check the “Shadow” box if you want your text to have a shadow, then adjust the “Opacity,” “Offset,” “Radius,” and “Angle” values.
The “Opacity” slider adjusts the shadow transparency.
The “Offset” slider controls the distance between the text and its shadow.
The “Radius” slider controls the softness of the shadow. Move it to the left to make it harder or to the right to make it softer.
The “Angle” slider controls the direction of the shadow.
I’ll adjust the “Shadow” settings to:
“Opacity” 100
“Offset” 0
“Radius” 20
“Angle” -180
Remember that these adjustments depend on your preferences
Step 6: Adjust Text Watermark Effects
Click on the “Watermark Effects” menu to collapse its settings.
Adjust the “Opacity” value if you want to make your text transparent. I’ll set it to 40, but you can choose your desired value.
To resize the text, you can choose from three different options: “Proportional”, “Fit”, or “Fill”.
Select “Proportional” and adjust its slider to make a custom resize.
Select “Fit” to resize the image to fit within the bounds of the image with no cropping.
Or, select “Fill” to expand the watermark to fill the whole image.
I’ll choose “Proportional” and set the slider to 26.
Use the “Anchor” tool at the bottom of the window to change the watermark placement.
I want to place my text in the center, so I’ll choose the “Center” position, but you can select any position you prefer.
With the “Insert” tool, you can move the text to the exact position you want. Use the “Horizontal” and “Vertical” sliders to move the text horizontally and vertically.
Finally, can rotate the text by clicking the “Rotate” tool arrows if necessary.
Once you’ve finished customizing your watermark, click on the “Save” button.
Step 7: Create a Watermark Preset and Export
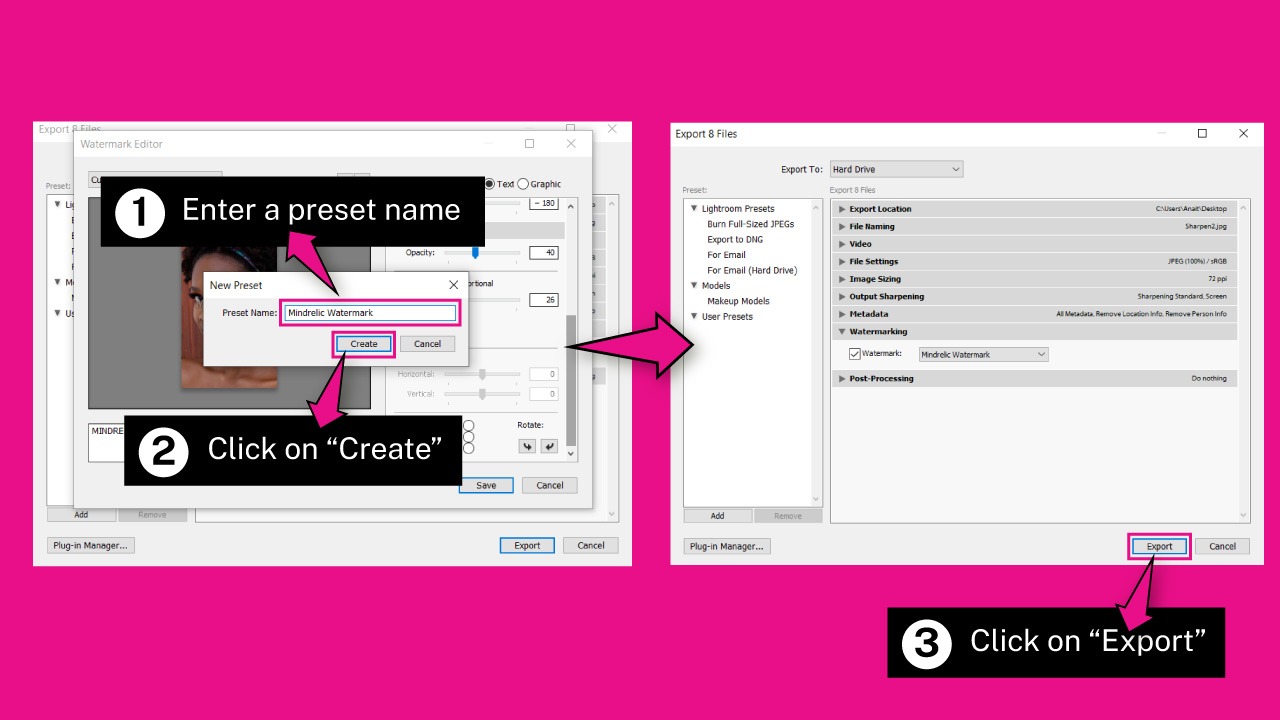
After clicking on the “Save” button, a “New Preset” window will pop up.
Type a name in the “Preset Name” field and click “Create”. For example, I’ll enter “Mindrelic Watermark”.
Since we’ve saved the watermark in a preset, the next time we can simply add the same watermark by clicking on the “Watermark” drop-down menu and selecting the saved preset.
To finish adding the watermark to our selected photos, click on “Export”.
The Result

This is the result of how to add a watermark on Lightroom.
Frequently Asked Questions on “How to Add a Watermark on Lightroom”
Where is the Watermarking tool in Lightroom?
The “Watermarking” tool is located on the “Export” window. Go to “File” and select “Export” on the toolbar at the top of the screen. Then click on the “Watermarking” menu to expand it. Check the “Watermark” box and select “Edit Watermarks” from the drop-down menu.
How to save a watermark in a preset in Lightroom?
To save a watermark in a preset, first create your watermark using the “Watermark Editor” in the “Export” window. Once you’ve finished, click the “Save” button, and the “Preset” window will pop up. Type in a preset name and click “Create” to save your watermark as a preset.
How to use a watermark preset in Lightroom?
If you’ve already created a watermark preset, you can use it whenever you want. To use a watermark preset, go to File and then select Export in the Lightroom menu. In the Export window, click on the Watermarking menu. Check the Watermark box, and select your preset from the drop-down menu.
How to add diagonal lines watermark in Lightroom?
Lightroom’s Watermark Editor does not include a diagonal lines watermark option. However, you can add diagonal lines manually by creating them in Photoshop or another app, saving them as a .PNG file, and importing them into the Watermark Editor window by setting the “Watermark Style” to “Graphic.
How to add color text watermarks in Lightroom?
In the Watermark Editor, set the “Watermark Style” to “Text.” Click on the “Color” box to open the “Color Picker” window. By default, the color mode will be set to grayscale. Choose a gray shade, and then drag the right color slider to the top to switch to the RGB color mode.

I am a professional blogger and entrepreneur with a strong interest and passion in photo editing. On MindRelic, I happily share my expertise in the photo editing niche with all of you guys!
tadalafil canada online pharmacy
tadalafil canada online pharmacy