
You’ve taken a great picture, everything is perfect… Only to notice the infamous yellow teeth.
Luckily there is a way to bring out those pearly whites.
In this tutorial, we will look at two ways to whiten teeth in Lightroom.
The first technique will utilize Lightroom’s built-in “Whiten Teeth” preset.
In the second option, we will learn how to whiten teeth from scratch without the “Whiten Teeth” preset.
How to whiten teeth in Lightroom
For this tutorial, we will be working with a photo of one person, so we will only need to create one mask.
However, once you learn how to whiten teeth you will be able to easily apply this step to photos with multiple people and varying shades of teeth.
Step 1: Import an image
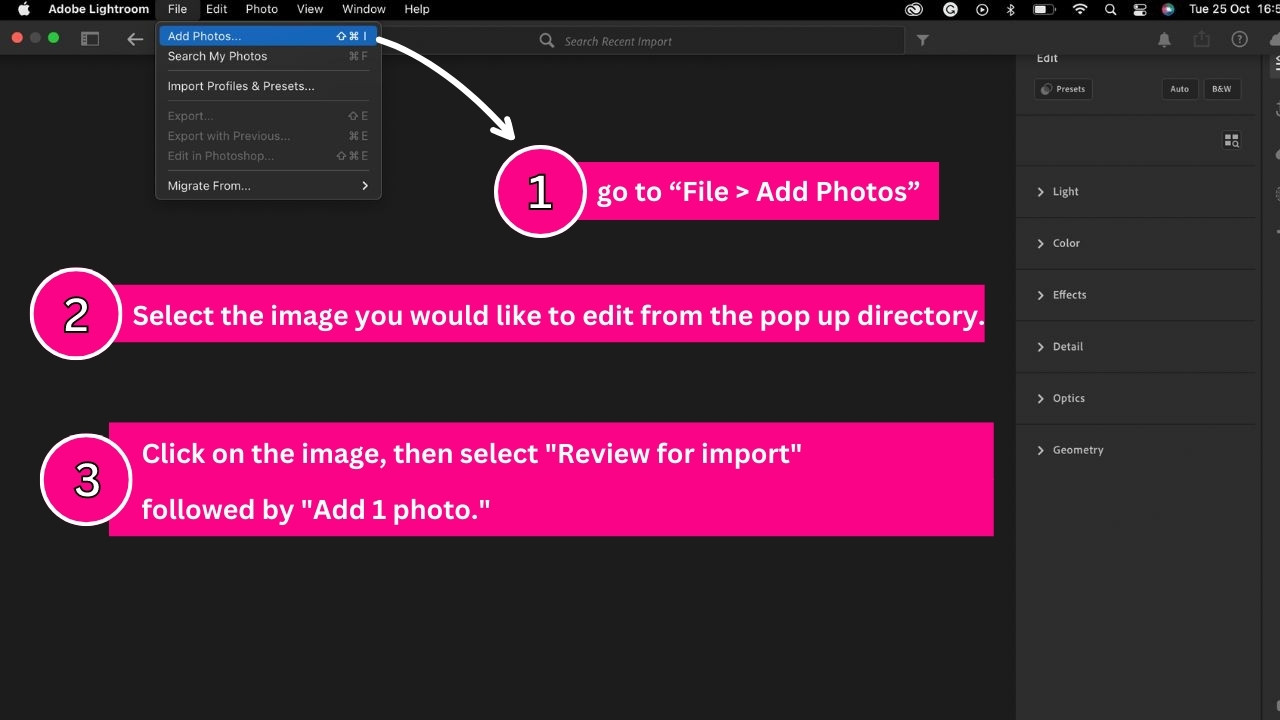
To import an image, go to “File > Add Photos” on the menu at the top of the screen.
Or press the “Ctrl + Shift + I” command to shortcut it.
Select the image you would like to edit from the pop-up directory.
Click on the image, then select “Review for import” followed by “Add 1 photo.”
Step 2: Select the “Brush” (B) tool under the “Masking” (M) tab
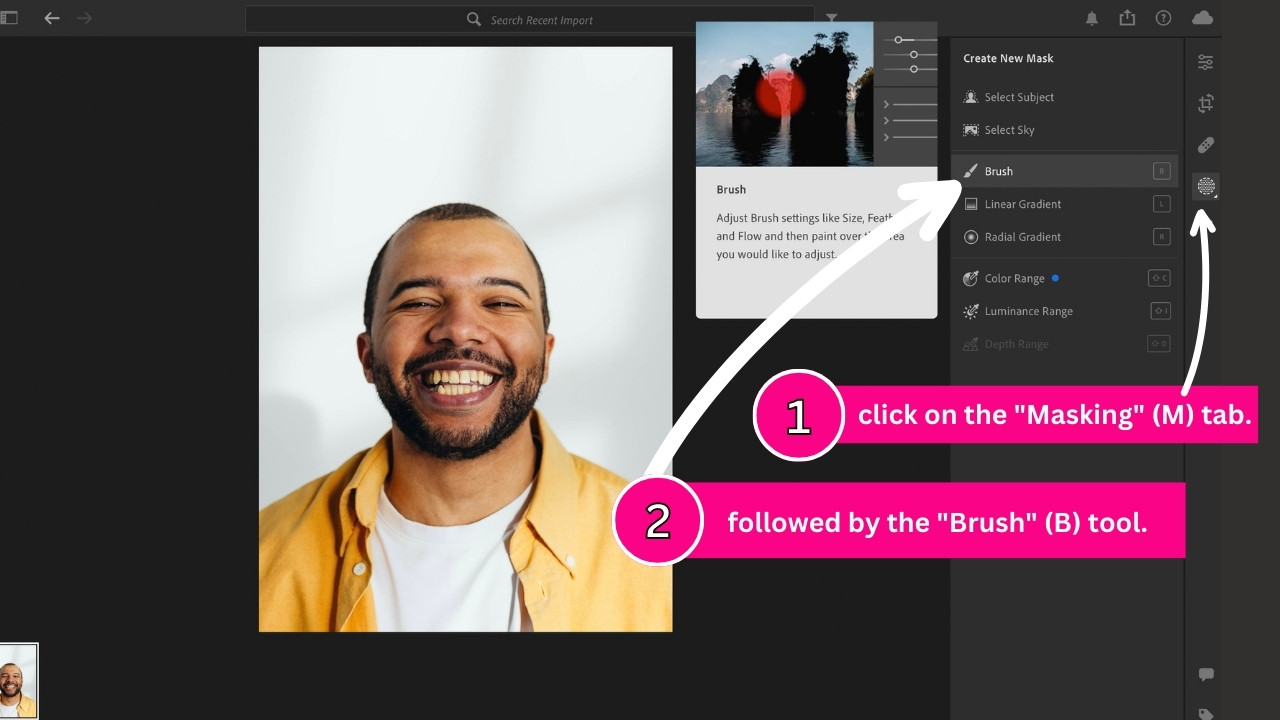
Once you have selected and imported your image. Start by clicking on the “Masking” tab on the right-side panel.
Choose the “Brush” (B) tool from the list of Mask tools.
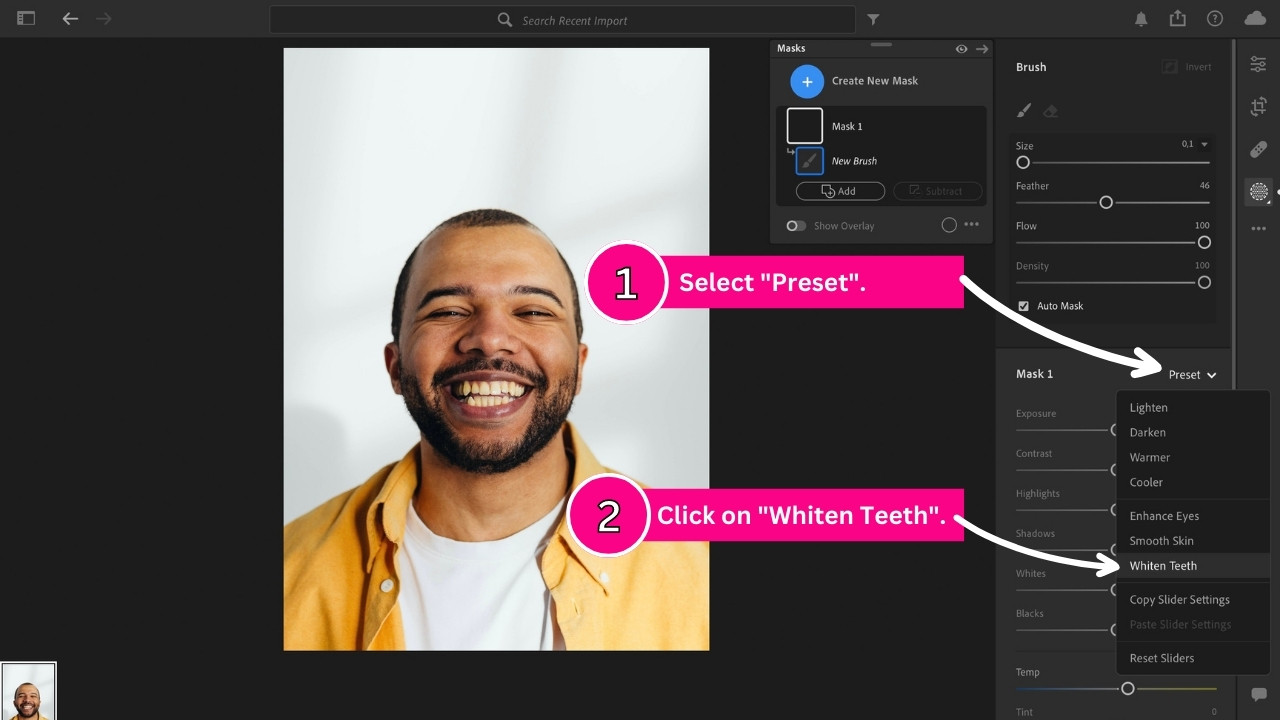
Step 3: Select the “Whiten Teeth” filter
Next, we need to click on “Preset” and select “Whiten Teeth” from the drop-down menu.
Step 4: Utilise the “Whiten Teeth” filter to brush over the yellow teeth in your image.
Now that we have the correct tools selected, it’s time to get rid of the yellow teeth, with the “whiten Teeth” preset.
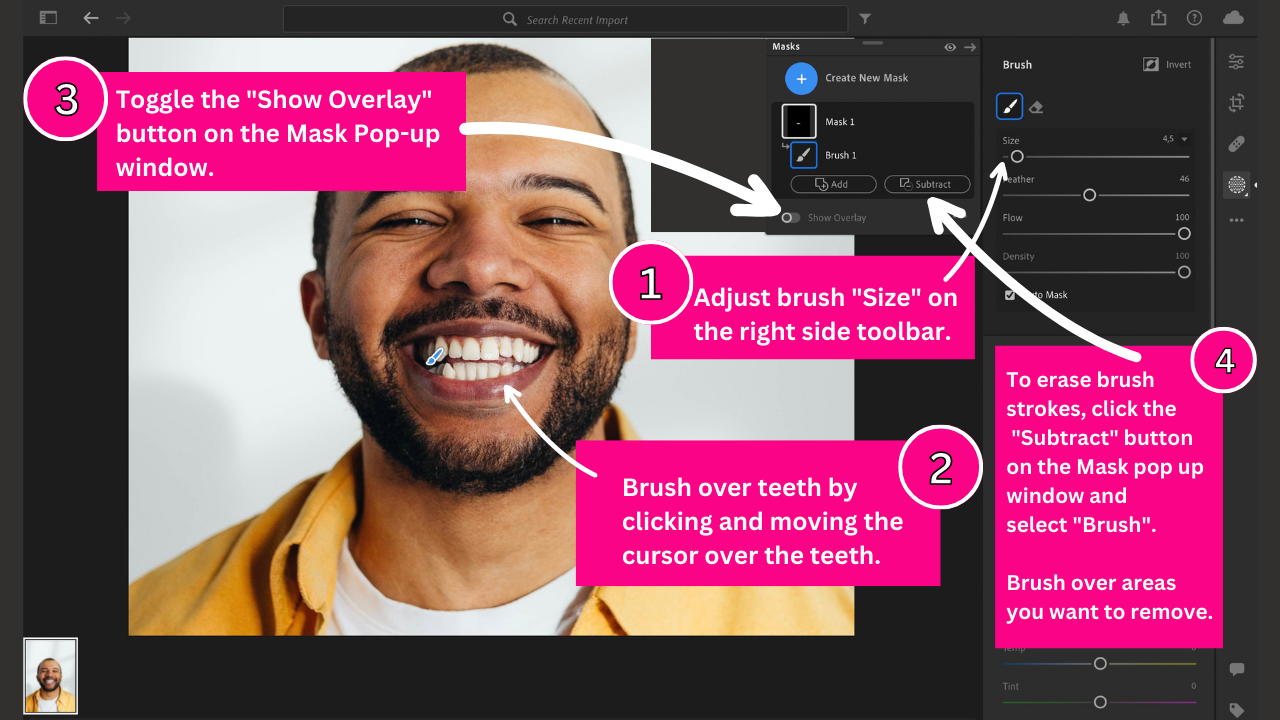
Begin by adjusting the brush size on the right side toolbar.
For this tutorial, a brush size of “4,5” is a good place to start but you can change the size of your brush as you go if needed.
Once you have chosen your desired brush size,
Begin brushing over the teeth in your photo by clicking and moving the cursor over specific areas.
You may toggle the “Show Overlay” button on the Mask pop-up window to show you the exact areas you have selected.
If you would like to adjust your brush strokes, you can utilize the eraser tool.
To erase your brush strokes click the “Subtract” button on the Mask pop-up window and then select “Brush”.
Now brush over the areas you would like to erase.
When using the “Whiten Teeth” preset we will not be adjusting the “Feather”, “Flow” and “Density” sliders because the preset will select these for us.
However, we will go through and adjust them in the second half of this tutorial when we learn how to whiten teeth without the “Whiten Teeth” preset.
Once you have finished brushing over the teeth in your image, you will see that the teeth are now white.
For a quick easy fix, the preset is great and accurate.
However, should you want to do a more in-depth edit you may follow the steps below on how to whiten teeth from scratch without the “whiten teeth” preset.
Step 5: Adjust the “Size”, “Feather”, “Flow” and “Density” of the brush.
Follow steps 1 and 2 from above to import the image and select the mask and brush.
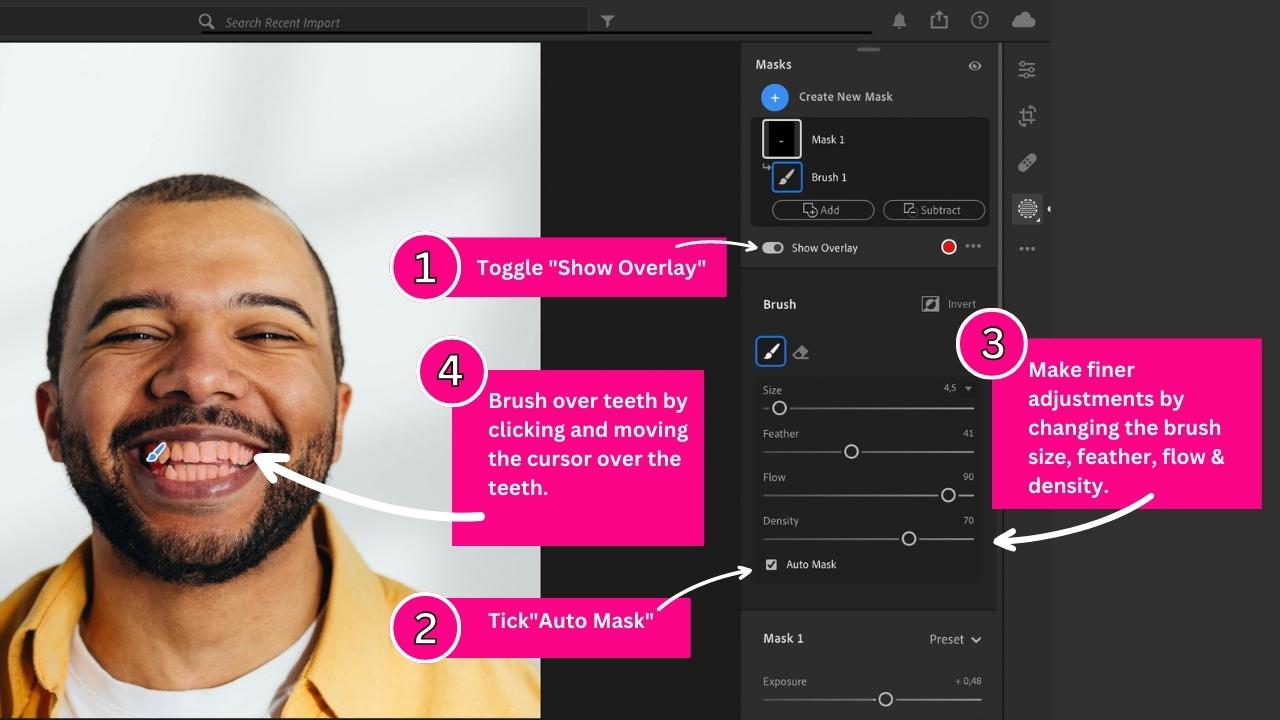
Ensure that you have toggled the “Show Overlay” button so that you are able to see which parts of your image you have selected.
Adjust your brush size, starting at a brush size of “4,5”.
Since we are working on a small area of our image we will need to zoom in and fine-tune our brush strokes.
To zoom in using a mousepad, place two fingers on the touchpad and pinch in or stretch out your fingers.
Alternatively, you can hold down the space bar and left-click the mouse to zoom in.
In order to make finer adjustments and ensure that we outline the teeth perfectly, we will need to adjust our brush size to get into different areas of our image.
We can zoom in and decrease our brush size, to brush over spots we may have initially missed.
Before we begin brushing over our teeth, a helpful tool that we can utilize is the “Auto Mask” tool, found on the right side taskbar under the “Brush” panel.
By simply ticking the check box in front of “Auto Mask”, Lightroom will assist you in creating your mask by confining your brush strokes to specific areas of the same exposure and color.
For example, with this tutorial, the “Auto Mask” tool can assist us in confining our brush strokes to the teeth, avoiding accidentally brushing over the gums or lips in our image.
This helpful tool is very effective and will save you a lot of time.
On the right side toolbar under “Brush” you will notice 3 sliders under “size”, called “Feather”, “Flow” and “Density”.
The “Feather” slider affects the softness of the brush edges.
If you set the “Feather” to a high value close to or equal to 100, your brush will have very soft edges and the transition between your brushed areas and the remaining image will have a subtle, soft edge.
Alternatively, if you set the “Feather” to a low value close to or equal to 0, your brush will have harsh edges and the transition between your brushed areas and the remaining image will have sharp, harsh edges.
You can adjust the “Feather” using shortcut keys.
Press “Shift + ]” to increase the “Feather” or press “Shift + [” to decrease the “Feather”.
For this tutorial, we do not want our brush to be too soft because we do not want our edit to bleed into the surrounding lips or face of the person in our image.
We also do not want our brush to be too harsh because this may make our edit look fake and too noticeable.
We will therefore start with a feather of “41”.
Once you understand the meaning of the different sliders, you may adjust the settings according to the requirements of your own image.
Another helpful tip is to hold down the “Shift” key while brushing over your image, this will keep the brush lines to either 90 degrees or 45 degrees.
This is rather useful when the object you are brushing over has straight edges.
The next slider we can adjust is “Flow”.
The “Flow” slider controls how much the brush will affect the brushed area.
If you set the “Flow” to 0%, no matter how many times you brush over an area, the brush will not affect the area.
If you set the “Flow” to 100%, the brush will affect the painted area 100%.
This is helpful if you would like to add varying amounts of an effect to different areas within your image.
For example, if you have some teeth that are more yellow than others, you may want to set the “flow” to 100% in order to edit those teeth maximally.
Alternatively, you might choose a lower “Flow” setting for teeth that do not need as much editing.
The last slider that we can adjust is the “Density” slider which is very similar to the “Flow” slider.
“Density” controls the transparency of the effect and will limit how much of the effect is applied to the image.
If you set the “Density” slider to 40%, no matter how many times you brush over the teeth in your image, only 40% of the effect will be applied.
It is helpful to utilize the “Flow” and “Density” sliders together to give you a very precise edit.
Together you can control how much of the edit is applied and set a limit on how much of the edit is applied.
For this tutorial, we do not want the edit to be too harsh, so we will set the “Density” slider to 70%.
Meaning the effect will only be applied to a maximum of 70%, no matter how many times we brush over the teeth.
We will set the “Flow” slider to 90% because we want to ensure that the effect is applied strongly without coming across too harsh.
With all the settings complete, it’s time to brush over the teeth you would like to whiten.
Click and drag the cursor over the area you want to edit.
Remember, we have selected “Auto Mask” which will assist you in brushing over the teeth.
Take your time and ensure that you are happy with what you have selected before moving on.
It may also be helpful to learn some shortcuts for working with masks.
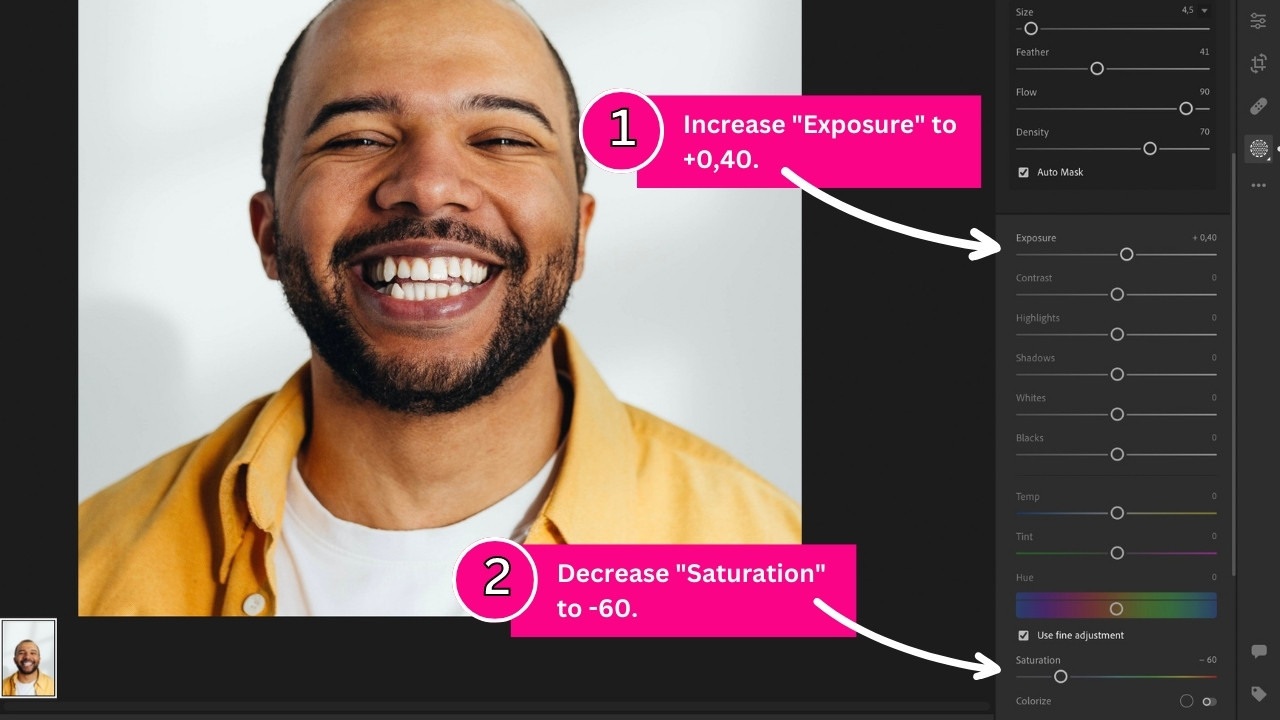
Step 6: Increase “Exposure” and decrease “Saturation”.
We have now created an Auto Mask, adjusted our brush size, feather, flow, and density, and brushed over the teeth we want to whiten.
Now it’s time to dial in the settings that are actually going to whiten the teeth.
First, we want to increase the exposure.
Exposure refers to the amount of light in a photo.
Since our aim is to whiten the teeth, increasing the exposure will increase the amount of light on the teeth, making them appear whiter.
For this tutorial, we will set the exposure to “+0,40”, however, for your own image you may want to play around with the amount until you are happy.
Next, we need to decrease the saturation of the teeth.
Saturation refers to the intensity of all the colors in an image.
In order to whiten the teeth, we want to remove any colors in the teeth, specifically yellow.
We, therefore, want to decrease the saturation to roughly “-60” to remove the yellow visible on the teeth in the image.
When it comes to different images, there will be varying shades of yellowing in the teeth and you will therefore need to use your own discretion as to how much you need to decrease the saturation.
Start by setting the saturation to “-60” and then look at the teeth in your image and adjust accordingly.
If your teeth look too white, increase the saturation until you are happy.
On the other hand, if your teeth still look too yellow, decrease the saturation some more.
It is important to note that decreasing the saturation too much may bring out a hint of blue in your image, leaving the teeth looking dull and washed out.
To counter this, avoid decreasing the saturation too much and instead increase the exposure.
As always, it is important not to overdo an edit on any image.
Making teeth too white can very easily create a fake look and make the edit extremely noticeable.
Subtlety is key.
We want to whiten the teeth to a point where the teeth are white but appear natural.
It is however up to you how far you would like to take the edit.
Remember, you may also create multiple masks if there is more than one set of teeth that need whitening.
Simply select “Create New Mask” under the “Mask” tab and follow the previous steps for each separate mask.
Some teeth may need more whitening than others, therefore you will need to choose specific settings for each set of teeth.
You now have all the tools to whiten any teeth using Lightroom.
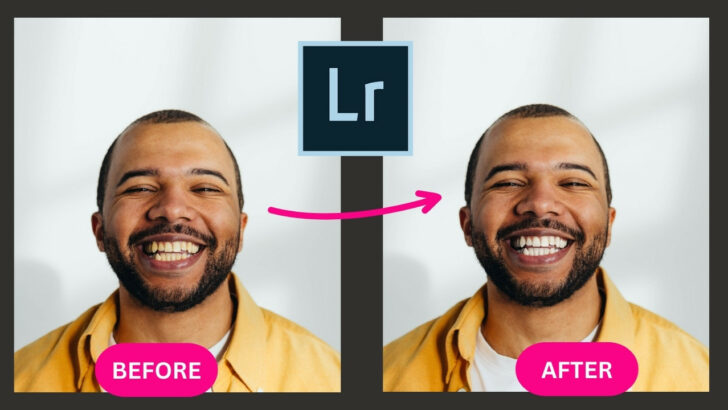
The Result
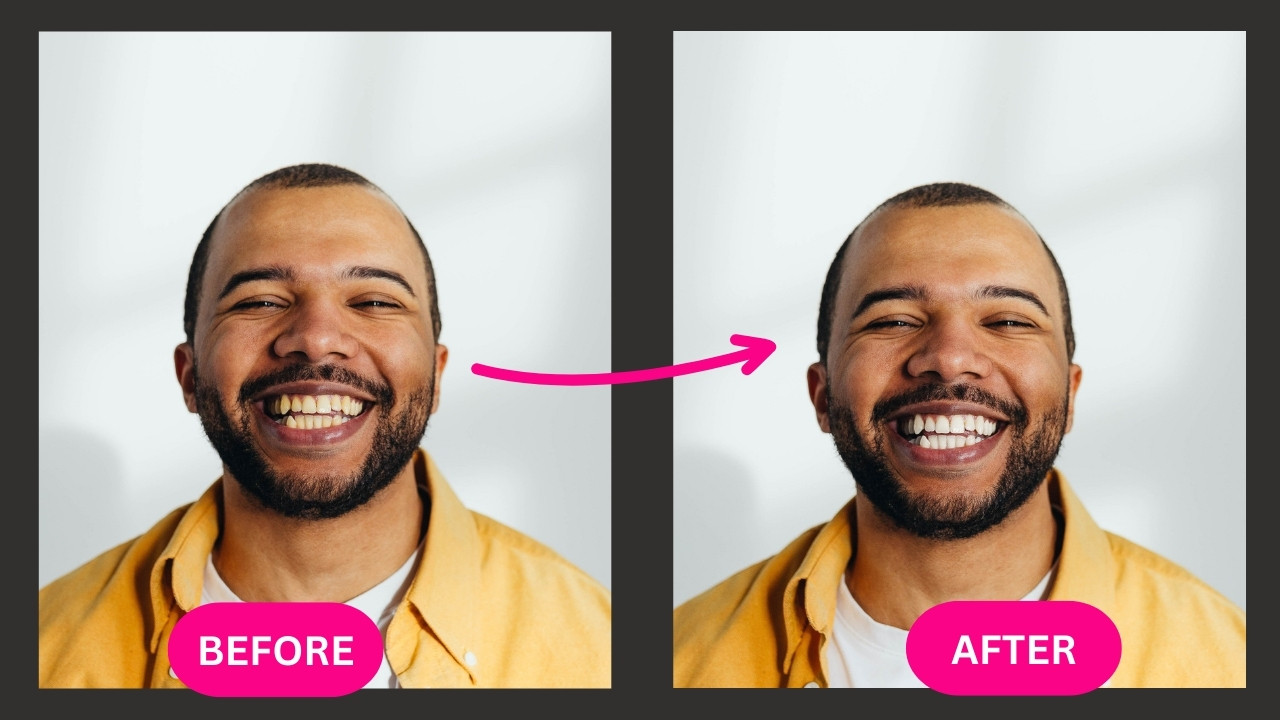
Here is a final before and after of whitening teeth in Lightroom.
You can see we were able to achieve a really great result while still maintaining a natural edit.
Now, to finish things off, here’s a quick summary for you (see the next paragraph).
How can we edit teeth whiter in Lightroom if not all teeth display the same degree of yellow?
If some teeth are more yellow than others we can edit them separately by creating individual masks for each tooth.
To create a mask click on the “Masking” tab on the right-side panel. Choose the “Brush” (B) tool from the list of Mask tools. Brush over the area you would like to mask. Once you have created separate masks for the varying shades of yellow teeth, you can adjust the settings on each individual mask accordingly.
For the teeth that are very yellow, you can increase the exposure and decrease the saturation more than you did on the other teeth.
Before we wrap this up, here’s a little summary for you (see the next paragraph).
How to whiten teeth in Lightroom
To whiten teeth utilizing the built-in “Whiten Teeth” preset, begin by clicking on the “Masking” (M) tab. Select the “Brush” (B) tool and click on the “Preset” button. Select “Whiten Teeth” and paint over the yellow teeth. To whiten teeth from scratch, select the “Brush” (B) tool under the “Masking” (M) tab. Paint over the yellow teeth. Increase the exposure and decrease the saturation.

I am a professional blogger and entrepreneur with a strong interest and passion in photo editing. On MindRelic, I happily share my expertise in the photo editing niche with all of you guys!