
Among the most popular effects in Lightroom, you can find dodge and burn.
Those are basic techniques that, properly used, could take your images to the next level.
Lightroom counts with well-built tools designed to dodge and burn images.
You can apply these effects to the whole image, or to specific limited areas.
In this article you’ll learn how to dodge and burn, but you’ll also get to know about some secret tips that professional designers and editors use to enhance their images.
Let’s find out how!
How to Dodge and Burn in Lightroom
Click on the “Develop” module. To dodge or burn the whole image, click on “Basic” and set “Exposure” to a higher value to dodge, or to a lower value to burn. To apply to a specific area, click on “Adjust Brush” (K), set the “Exposure” value and paint over the areas you want to apply the effect to.
Step 1: Select the Develop Module
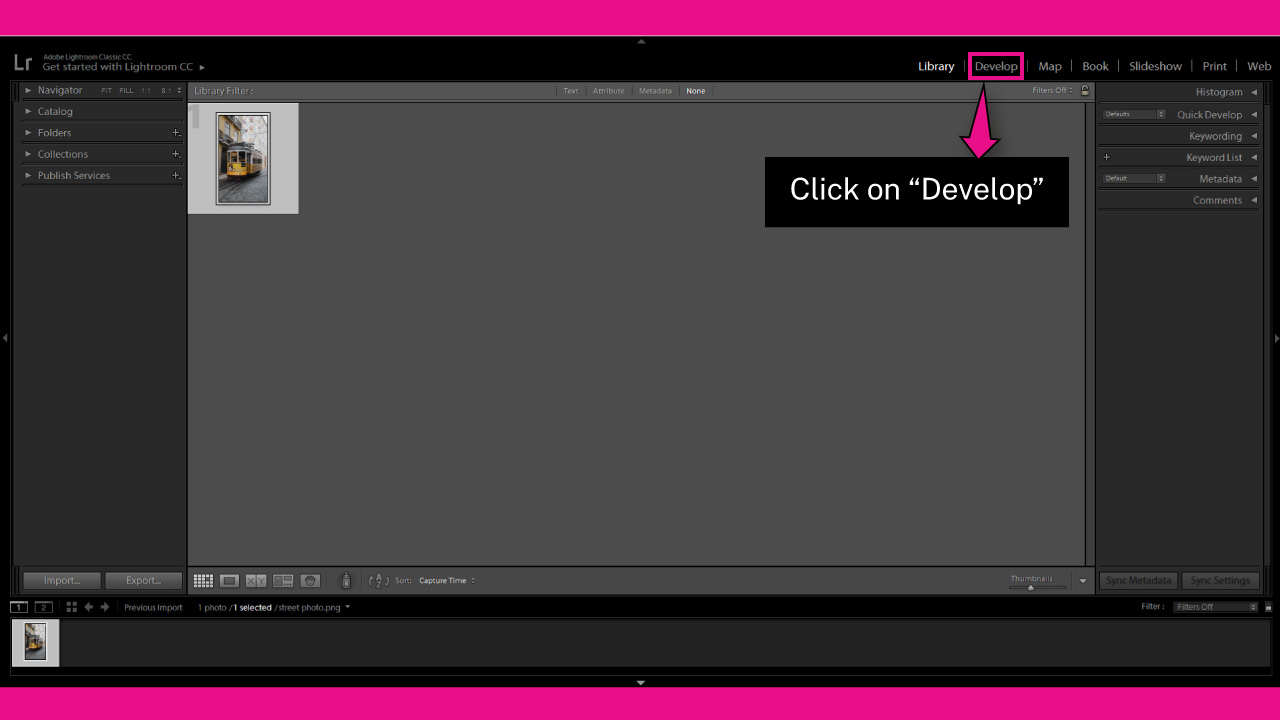
Once you have imported your image in Lightroom, go to the “Develop” module on the toolbar at the top of the screen.
If you can’t visualize it, click on the ▼ icon to unfold the hidden modules panel.
You can also access the “Develop” module by going to “Window > Develop” on the toolbar at the top of the screen.
Or by pressing the “Ctrl + Alt + 2” (Windows) or “Cmd + Option + 2” (Mac) command.
Step 2: Apply Dodge or Burn to the Whole Image
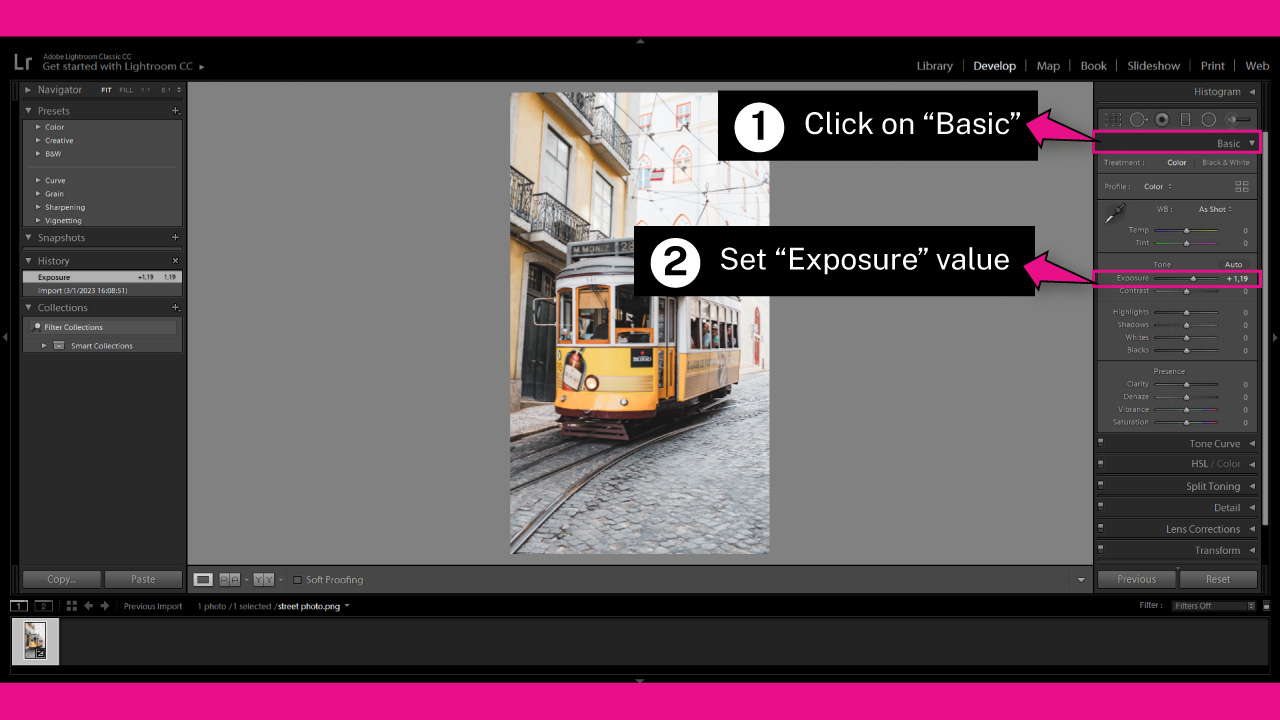
If you want to apply Dodge or Burn effects to the whole image, continue with this step.
If you want to apply Dodge or Burn effects only to a specific area of the image, skip straight to “Step 3”.
To apply dodge or burn effects to the whole image, click on the “Basic” drop-down menu, on the right side toolbar.
Set the “Exposure” slider to a higher value (right) if you want to dodge.
Set the “Exposure” slider to a low value (left) if you want to burn.
Step 3: Set the Masking Brush
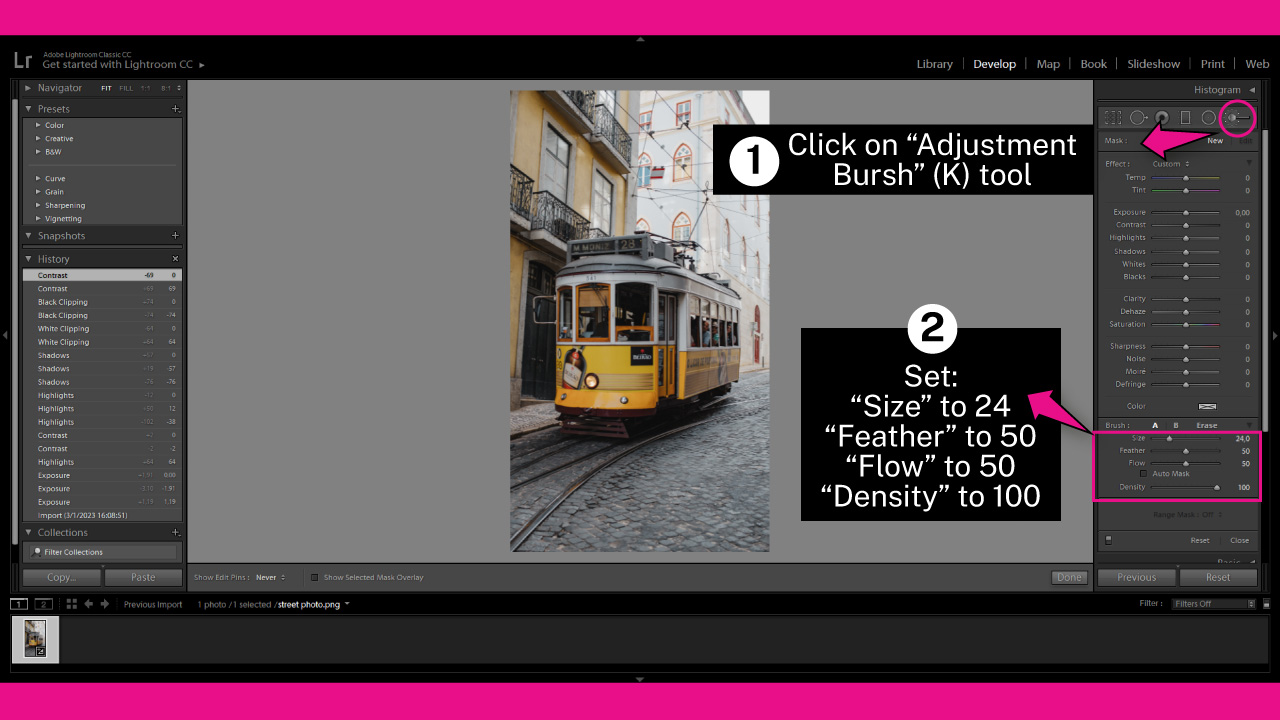
Select the “Adjustment Brush” (K) tool on the right side toolbar.
Scroll a tad bit down and find the “Brush” adjustments.
I’ll set mine as the following:
“Size” to 24
“Feather” to 50
“Flow” to 50
“Density” to 100
During the process, you can vary the “Size” of the brush using the mouse wheel.
Took the previously set values just as a guide. You might have to modify these values when working on your image in order to achieve better results.
Step 4: Dodge a Specific Area
To dodge or burn your image, you need to increase or decrease the “Exposure” level.
So, scroll a bit up and locate the “Exposure” slider.
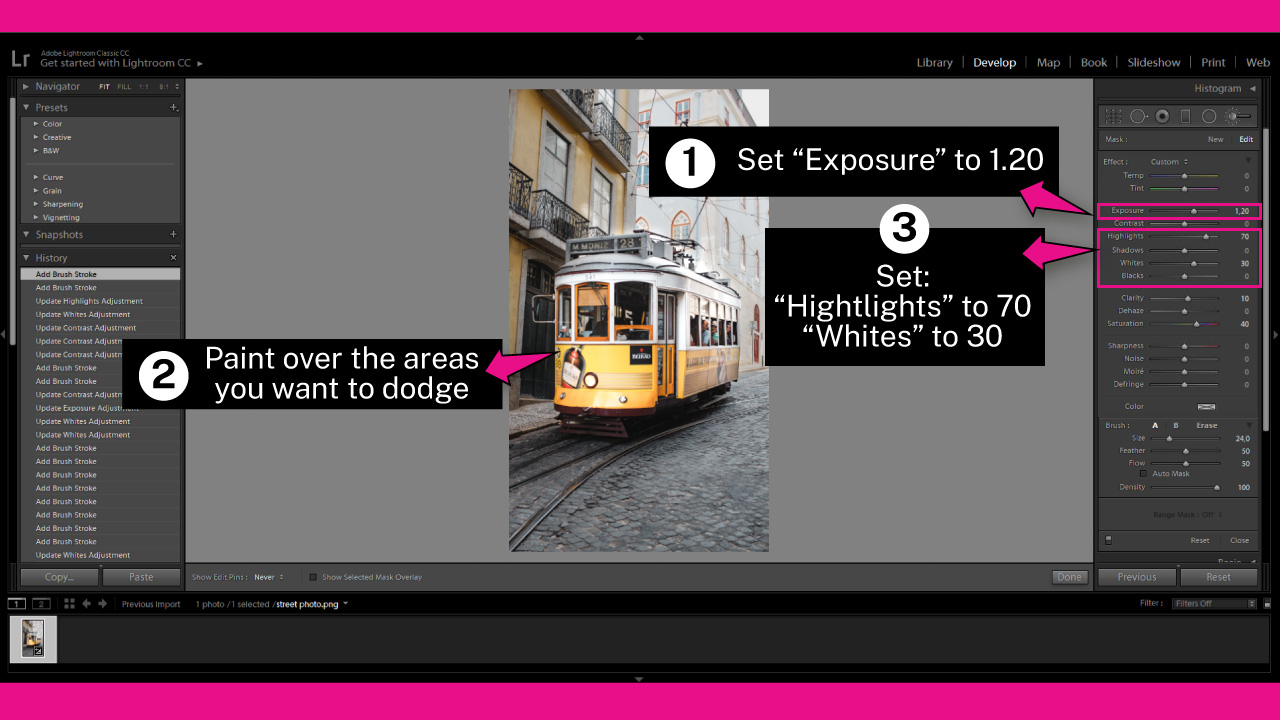
Increase the “Exposure” value around 1.20 (you can modify this value later).
Then paint over the image areas you want to dodge. I’ll dodge the tram to stand out.
Since we’re applying a mask, and not the dodge effect right over the image, you can adjust the sliders after applying the brush.
This way you can achieve the exact dodge intensity you are looking for.
If you want to get better results during the dodging process, it’s a good idea to also adjust values for “Highlights” and “Whites”.
So, increase the “Highlights” slider to 70, and the “Whites” slider to 30.
These values may work differently for your image, so don’t hesitate to run several tests until you find the best combination.
Step 5: Limiting the Dodge Mask Range
To take your image to the next level, you have to limit the dodge mask range.
When applying the dodge effect, it’ll affect all the areas you paint pretty much homogeneously.
This means the dodge effect applies to all ranges: shadows, midtones and highlights.
To avoid losing shadow intensity, we shouldn’t be dodging on shadows.
We should only apply dodging to highlights and to a small range of midtones.
Therefore, we now need to limit the range.
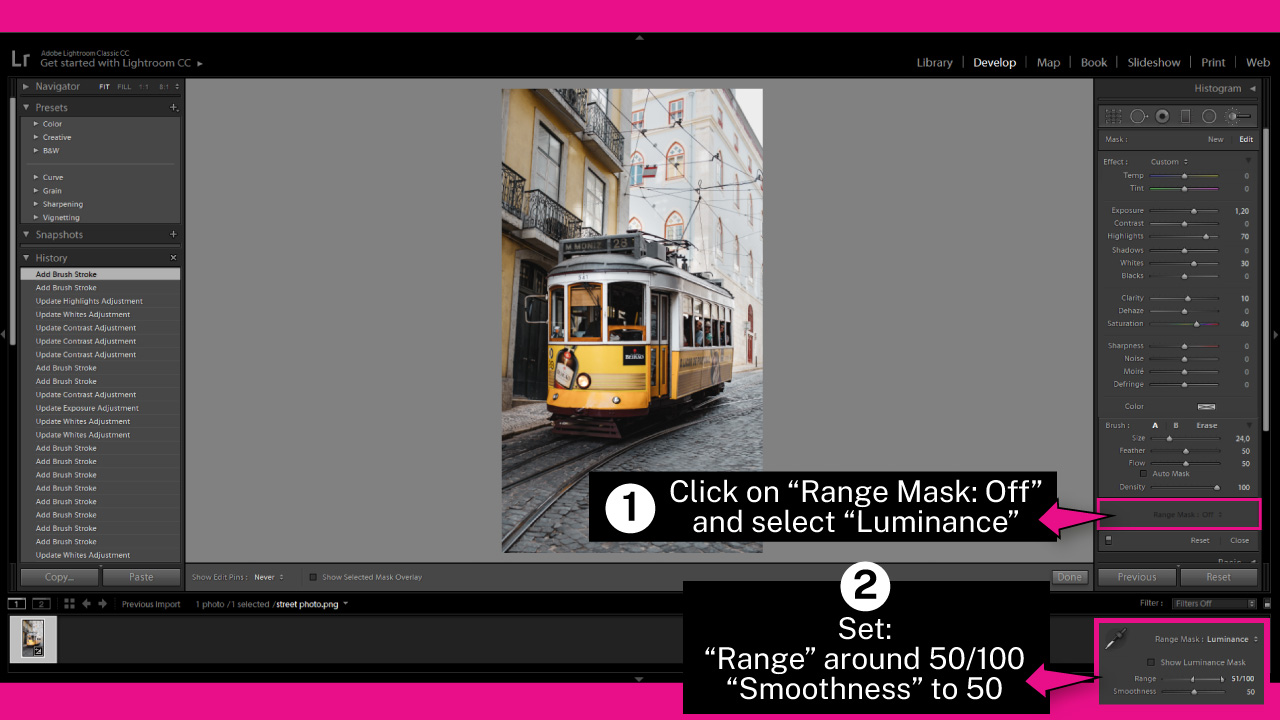
To get this done, click on “Range Mask: Off” under the “Brush” settings, on the right side toolbar.
On the popup menu, select the “Luminance” option.
Then you have to set the “Range” slider. This control has two handles on each end of the slider.
Drag the left slider to the center, so the range goes from middle to center.
The value should be around 50/100.
Finally, set the “Smoothness” around 50.
Now the dodge effect will be working only on highlights and a limited range of midtones.
Step 6: Burn a Specific Area
If you have dodged the image as we explained in the previous steps, and now you want to burn it, you first need to add a new mask.
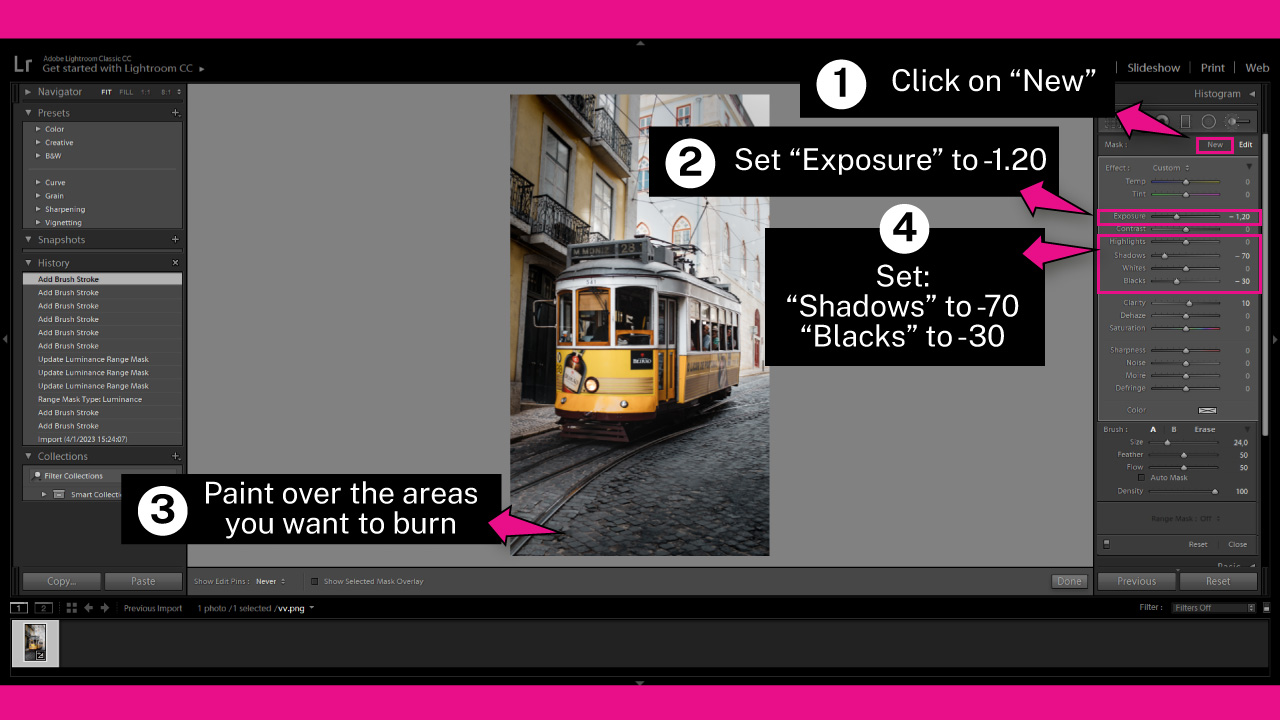
To add a new mask, click on the “New” option, next to “Edit”, on the right side toolbar.
If you skipped the previous two steps and haven’t dodged the image, you don’t need to add a new mask.
To burn a specific area, decrease the “Exposure” value around -1.20 (you can modify this value later).
Then paint over the image areas you want to burn.
I’ll burn the ground and the left side building to make the tram stand out even more.
Remember that we’re applying a mask, and not the burn effect right over the image.
This means you can adjust the sliders after you’re done painting with the brush.
If you want to get better results during the burning process, it’s a good idea to adjust “Shadows” and “Blacks” too.
So, decrease the “Shadows” slider to -70, and the “Blacks” slider to -30.
Step 7: Limiting the Burn Mask Range
As mentioned in “Step 5”, when you apply the burn effect, it applies homogeneously in all the areas you paint over.
This includes all ranges, including shadows, midtones and highlights.
To avoid losing highlights intensity, we shouldn’t be applying burn to highlights.
We should only apply burning to shadows and to a small range of midtones.
Therefore, we now need to limit the range.
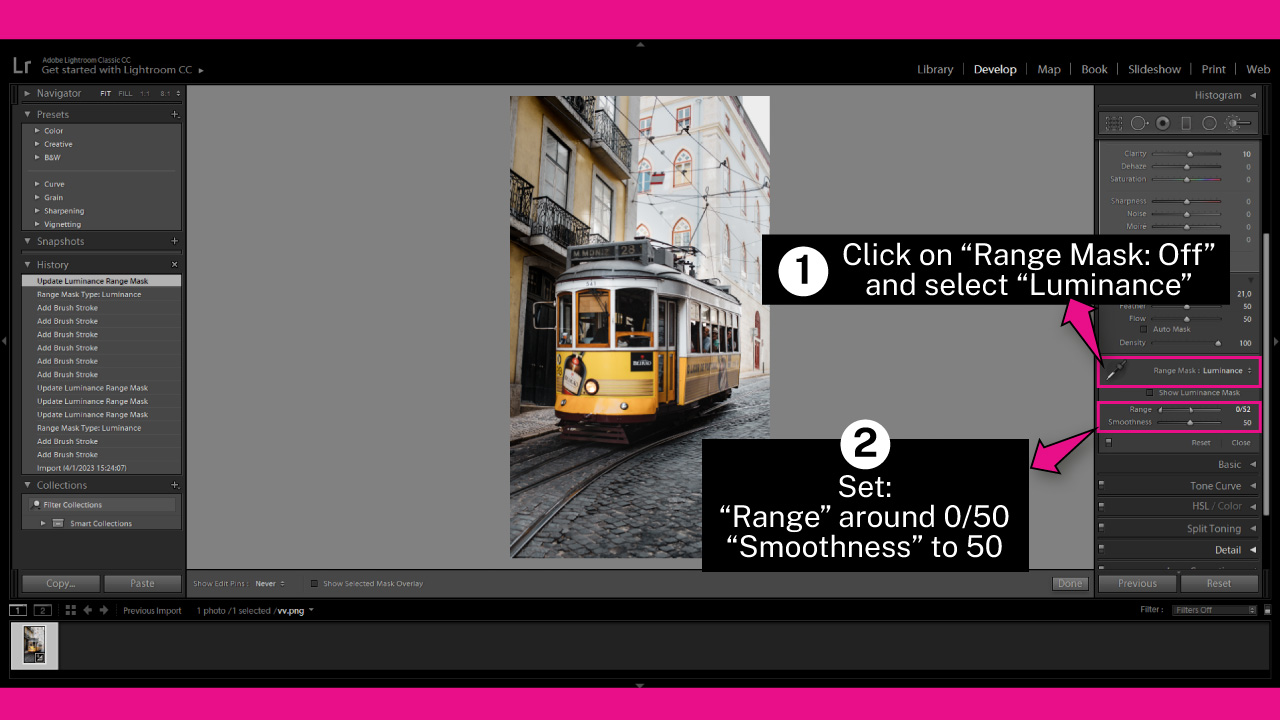
To get this done, click on “Range Mask: Off” under the “Brush” settings, on the right side toolbar.
On the popup menu, select the “Luminance” option.
On the “Range” slider, drag the right slider to the center, so the range goes from left to center.
The value should be around 0/50
Now the burn effect will be working only on shadows and a limited range of midtones.
Step 8: Set General Adjustments
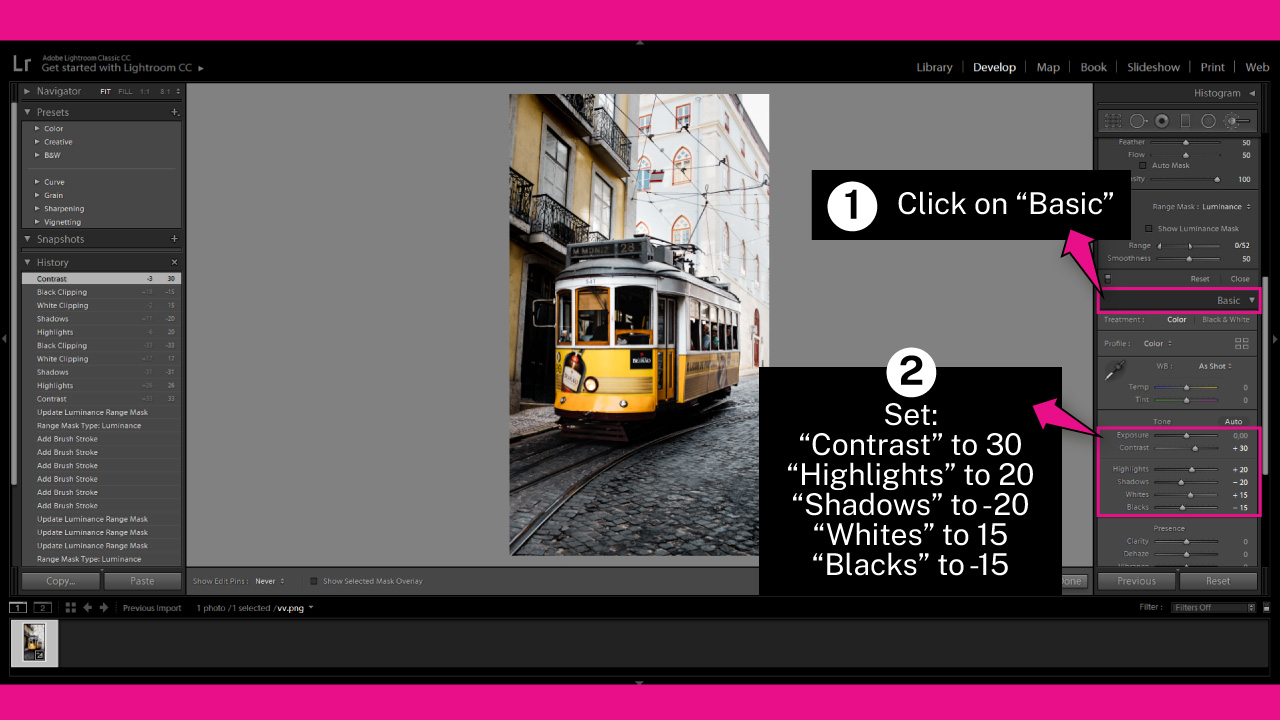
To finish the process, it’s always a good idea to set general adjustments to sharpen dodge and burn effects even more.
Scroll a bit down on the left side toolbar until you locate the “Basic” drop-down menu. The same one we used on “Step 3”.
Set sliders the following way:
“Contrast” to 30
“Highlights” to 20
“Shadows” to -20
“Whites” to 15
“Blacks” to -15
Of course these values may vary depending on your image.
The main idea is to increase the contrast.
Then, you must take “Highlights” and “Whites” to positive values, and “Shadows” and “Blacks” to negative values.
Use “White” and “Black” sliders with moderation, since these effects are very sensitive.
The Result

This is the result of how to dodge and burn specific areas of your image to enhance it and make it more dramatic.
Frequently Asked Questions on “How to Dodge and Burn in Lightroom”
What does the Exposure slider do in Lightroom?
The “Exposure” slider modifies the amount of light on an image. It’s also known as the “Dodge” or “Burn” tool.
What do the “Shadows” and “Highlights” sliders do in Lightroom?
The “Shadows” slider modifies the light intensity on the shadow areas of an image. The “Highlights” slider modifies the light intensity on the highlight areas of an image.
What do the ”Blacks” and “Whites” sliders do in Lightroom?
The “Blacks” slider modifies the intensity of the darkest spots of an image. The “Whites” slider modifies the intensity of the brightest spots of an image.

I am a professional blogger and entrepreneur with a strong interest and passion in photo editing. On MindRelic, I happily share my expertise in the photo editing niche with all of you guys!