
Double chin is a common concern that many people face as they age.
However, it can also be caused by factors such as being overweight, having a fuller face, or even poor posture while taking photos.
People who are conscious of their appearance often try to lift their chin or extend their neck to avoid a double chin in photos.
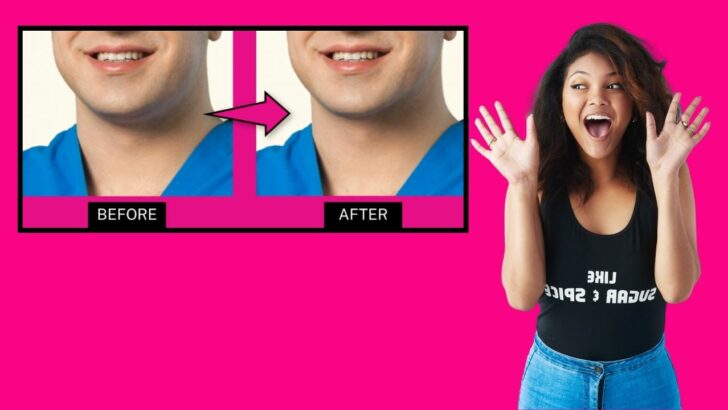
It is worth noting that a double chin can make individuals appear older, heavier, or less put-together. The difference between a photo with and without a double chin may be subtle but noticeable after all.
If you are interested in enhancing your photos by removing a double chin, you are on the right track.
In this article, we will explore the top two methods for removing double chins in photos: Photoshop and GIMP.
Additionally, we will provide some FAQs regarding other techniques for hiding a double chin, including those available on iPhone, Android, and one extra method to do it online.
By following these tips and techniques, you can achieve natural-looking results and improve appearances in photos.
Let’s get started!
How to Get Rid of a Double Chin in Photos
It can be done with Photoshop or GIMP. In both apps, the basic method involves duplicating the photo layer twice and masking the jaw on the top layer. Then select the bottom layer and use Liquify or Warp Transform Tool to forward warp the double chin under the jaw. Finally, blur the jaw edges.
How to Get Rid of a Double Chin in Photos Using Photoshop
- Use the “Pen” (P) tool to define the shape of the jaw
- Rename the path
- Duplicate photo layer twice
- Mask the path on the “Above” layer
- Duplicate the “Above” masked layer
- Convert the “Below” layer to a “Smart Filter”
- Select the “Below” layer and adjust “Liquify” settings
- Forward warp the double chin under the jaw
- Blur the jaw edges
Step 1: Define the Shape of the Jaw
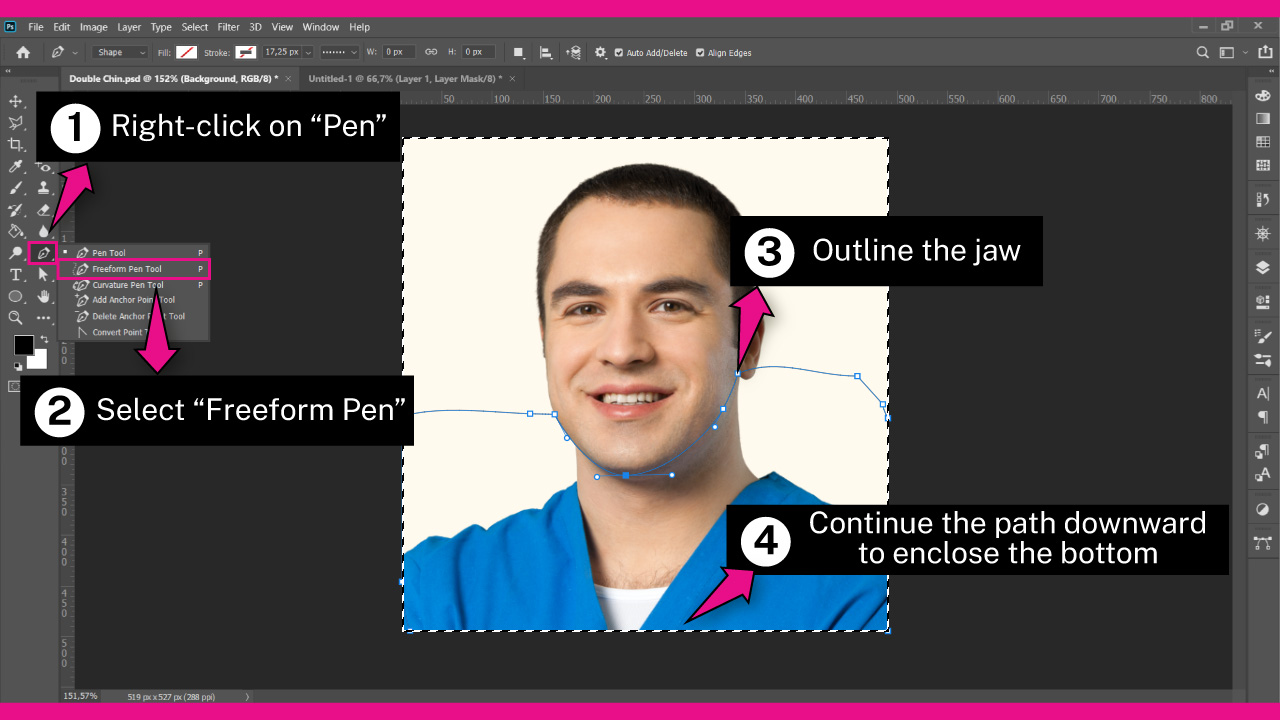
This technique involves warping the double chin under the jaw. Therefore, the first step is to define the shape of the jaw using the “Pen” tool to outline it.
You can work with the classical “Pen” (P) tool or use the “Freeform Pen” (P) tool. I will use the “Freeform Pen” (P) tool, but the choice is up to you.
To select the “Freeform Pen” (P) tool, right-click on the “Pen” (P) tool located on the left-side toolbar to collapse the hidden tools.
Next, click, hold, and drag the “Freeform Pen” (P) tool to outline the shape of the jaw. Outline the shape of the jaw as if there were no double chin.
If you have selected the classical “Pen” (P) tool, you will need to add anchor points one by one to outline the shape of the jaw.
To add anchor points, click, hold, and drag to control the curve of the line.
After defining the shape of the jaw, continue the path downward to enclose the entire bottom of the image.
You can edit the anchor points by holding the “Ctrl” or “Cmd” key and dragging the anchor points or its handles.
Step 2: Rename Path
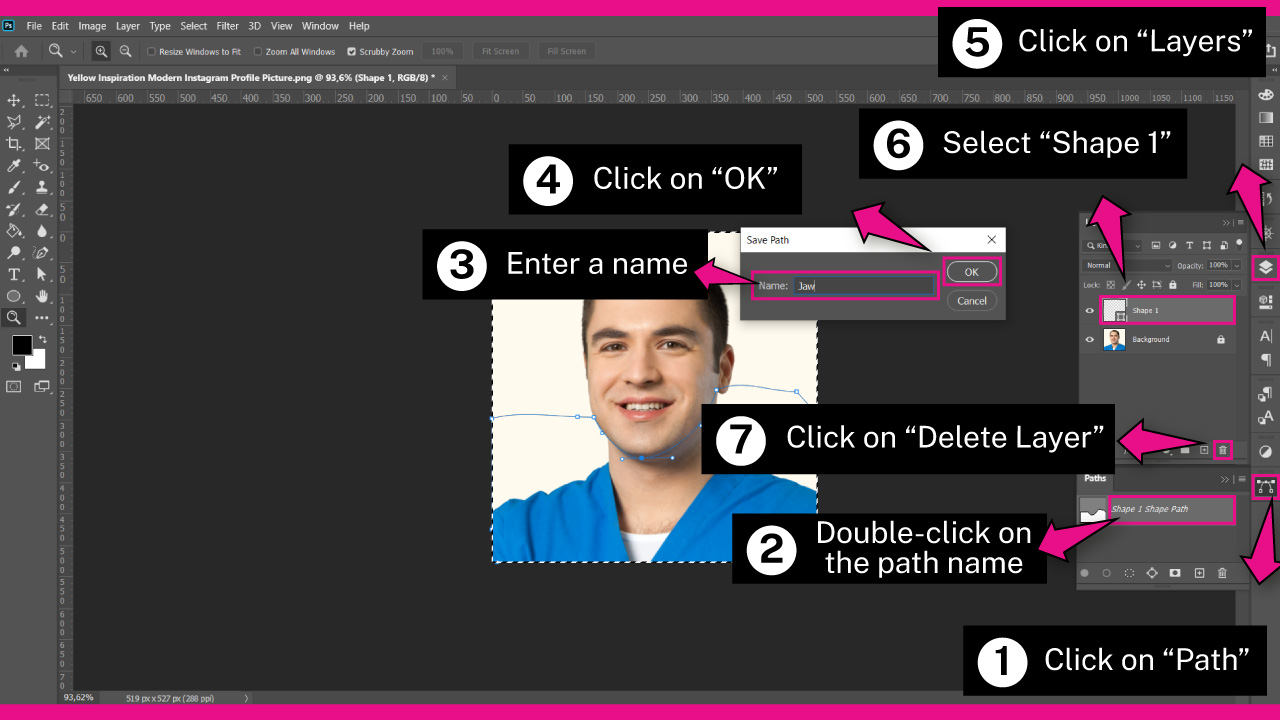
Now, we need to go to the “Paths” panel, which is located on the right side toolbar.
If you can’t find it, you may need to enable it first by going to “Windows > Paths” on the toolbar at the top of the screen.
On the “Paths” panel, double-click on the name of the path to rename it.
In the pop-up window, type in a name. For example, I will type “Jaw.”
Then click on “OK”.
Next, go to the “Layers” (F7) panel, also located on the right side toolbar.
If you can’t find it, you may need to enable it first by going to “Windows > Layers” or by pressing the “F7” key on your keyboard.
On the “Layers” (F7) panel, select the “Path 1” layer and click on the “Delete Layer” button at the bottom of the screen.
Since we have renamed the “Jaw” path in the “Paths” panel it was saved there. So we can delete it from the “Layers” panel.
Step 3: Duplicate the Photo
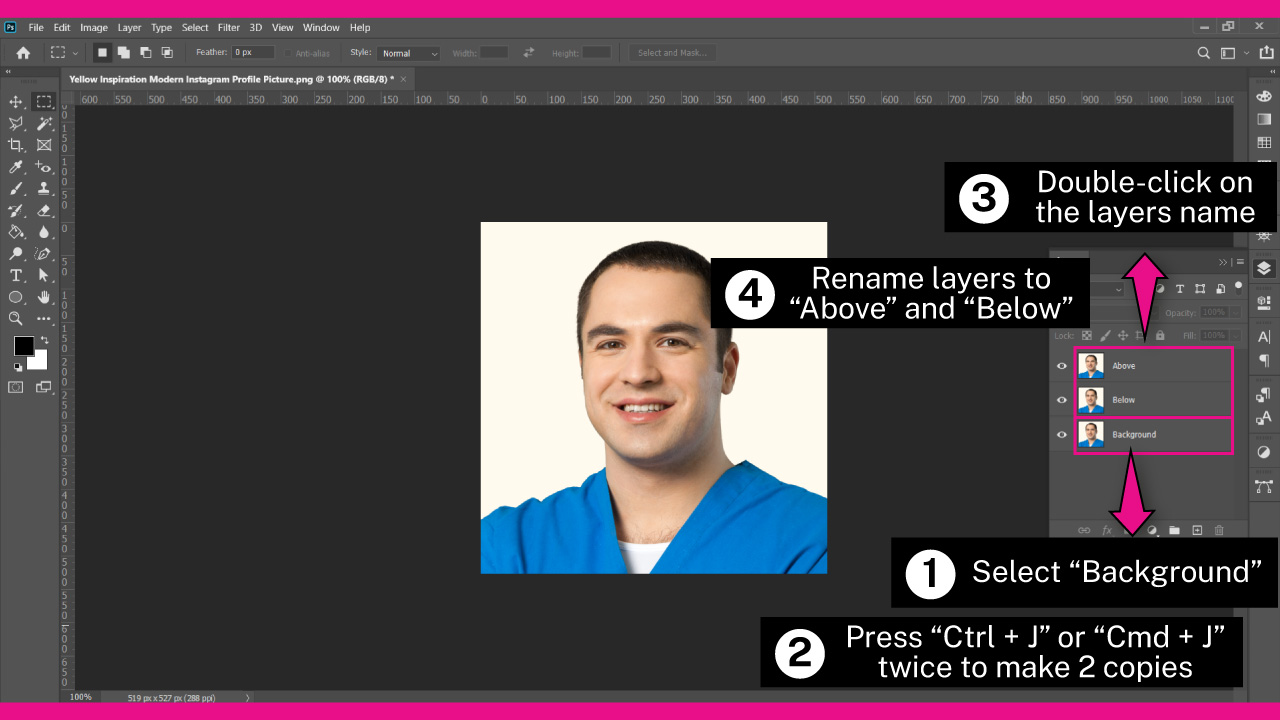
In the “Layers” (F7) panel, select the “Background” layer (or the layer containing the photo) and press the “Ctrl + J” or “Cmd + J” command twice to make two copies of the layer.
You can also duplicate layers by right-clicking on the layer and selecting the “Duplicate Layer” option from the unfolded menu.
Then double-click on the layer copies to rename them as “Above” and “Below,” referencing the layer above and the layer below.
Step 4: Mask the Path on the Above Layer
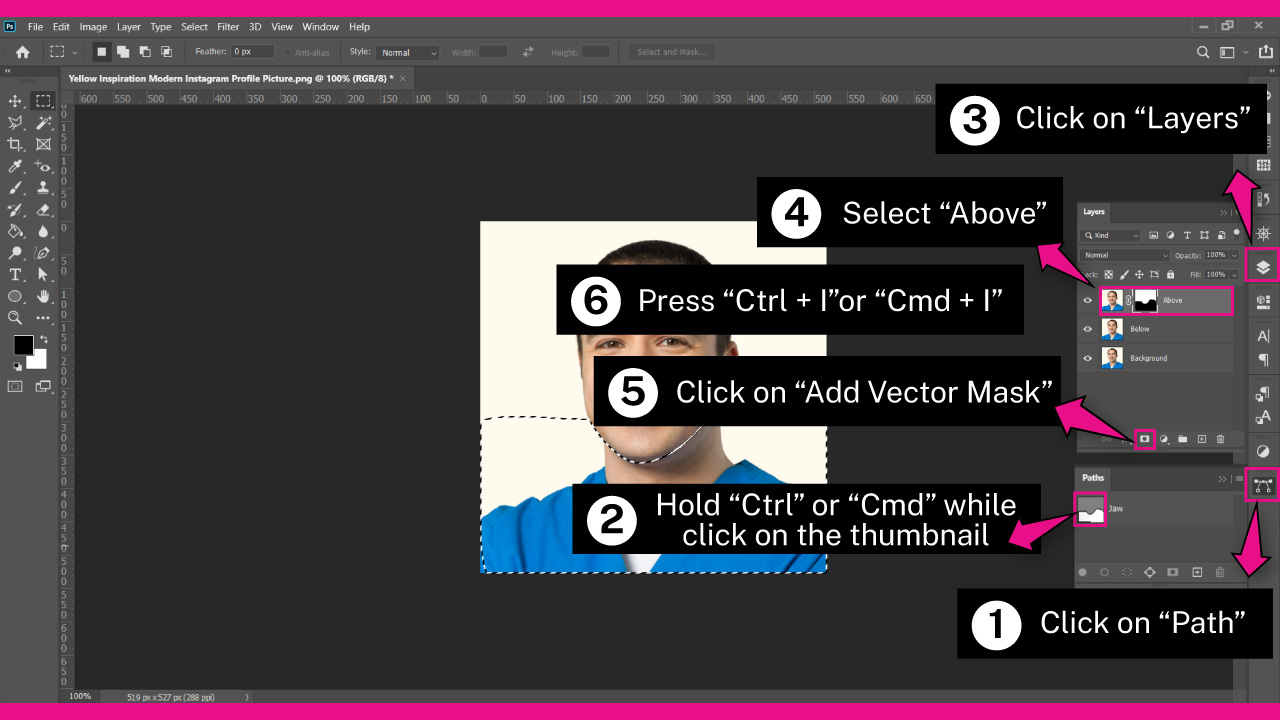
Go to the “Path” panel and hold the “Ctrl” or “Cmd” key while you click on the “Jaw” path thumbnail.
Now we need to mask the “Above” layer.
To do this, go to the “Layers” panel, select the “Above” layer and click on the “Add Vector Mask” button at the bottom of the panel.
To ensure that you have masked the correct area, check the mask’s thumbnail. The white area should be at the top while the black area should be at the bottom. If it’s not, you have to invert the selection.
To invert the selection, press the “Ctrl + I” or “Cmd + I” command on your keyboard.
Step 5: Duplicate the Masked Layer
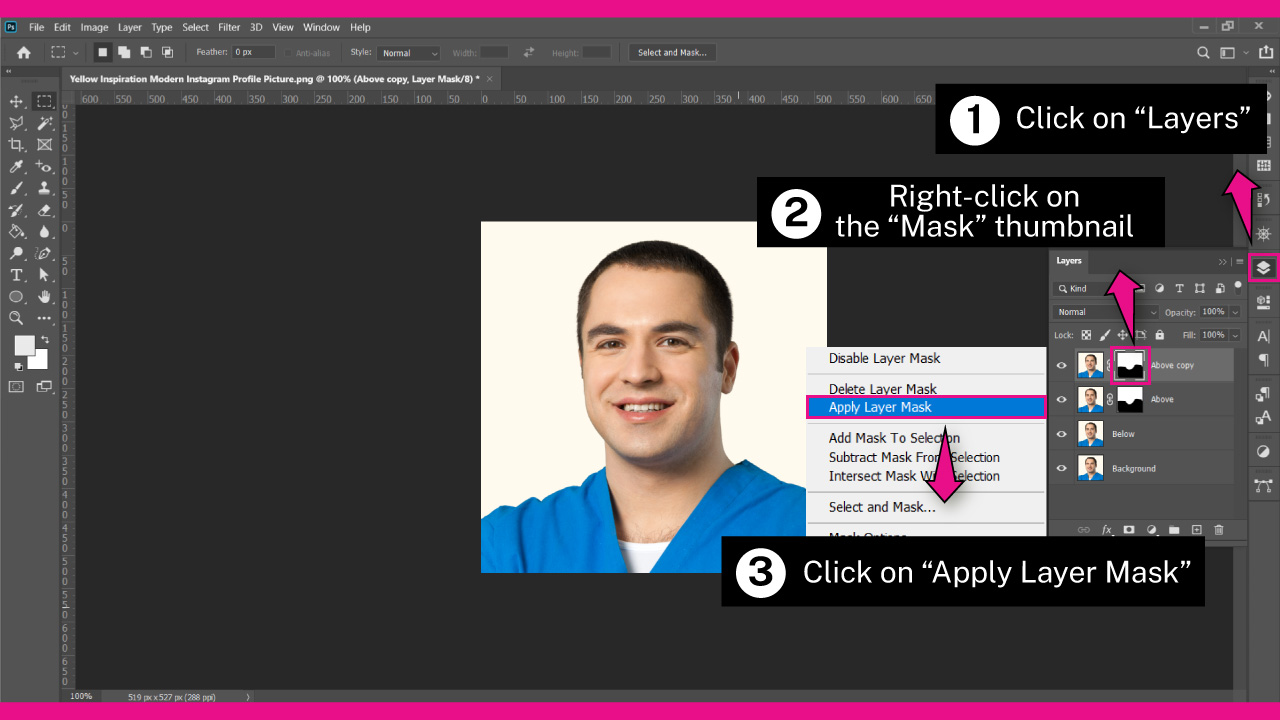
Unfortunately, the “Liquify” tool does not recognize masked layers as masked, so we need to proceed with this step before going straight to the “Liquify” tool.
We need to duplicate and flat the masked layer to be able to see the real-time warping when we push the double chin under the jaw.
To duplicate the masked layer, first, make sure you have selected the “Above” layer and then press the “Ctrl + J” or “Cmd + J” command.
Next, select the duplicated layer and right-click on the “Mask” thumbnail to unfold the options menu. Select the “Apply Layer Mask” option.
Once you do this, the layer will become a flat layer.
Step 6: Convert the Below Layer to a Smart Filter
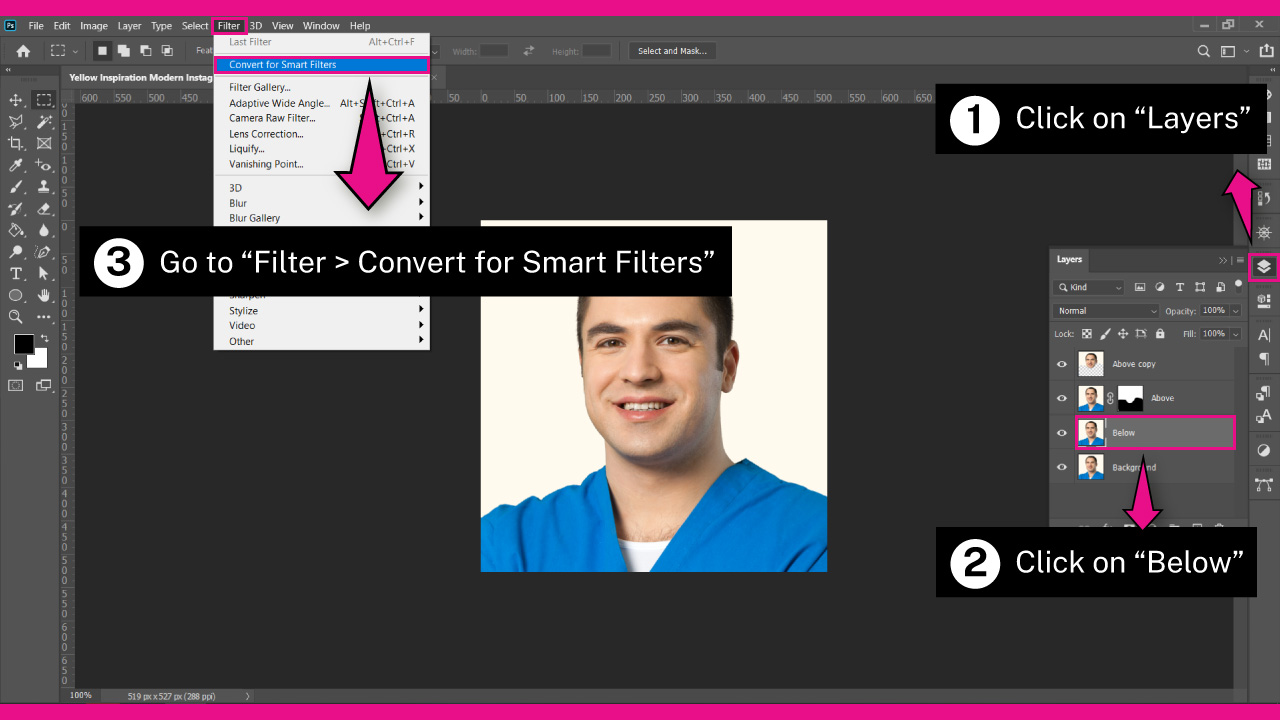
Before proceeding to the main process of getting rid of the double chin with the “Liquify” tool, we need to convert the “Below” layer into a “Smart Filter“.
To do this, select the “Below” layer from the “Layers” panel, and then go to “Filter > Convert for Smart Filters” in the menu at the top of the screen
Step 7: Adjust the Liquify Settings
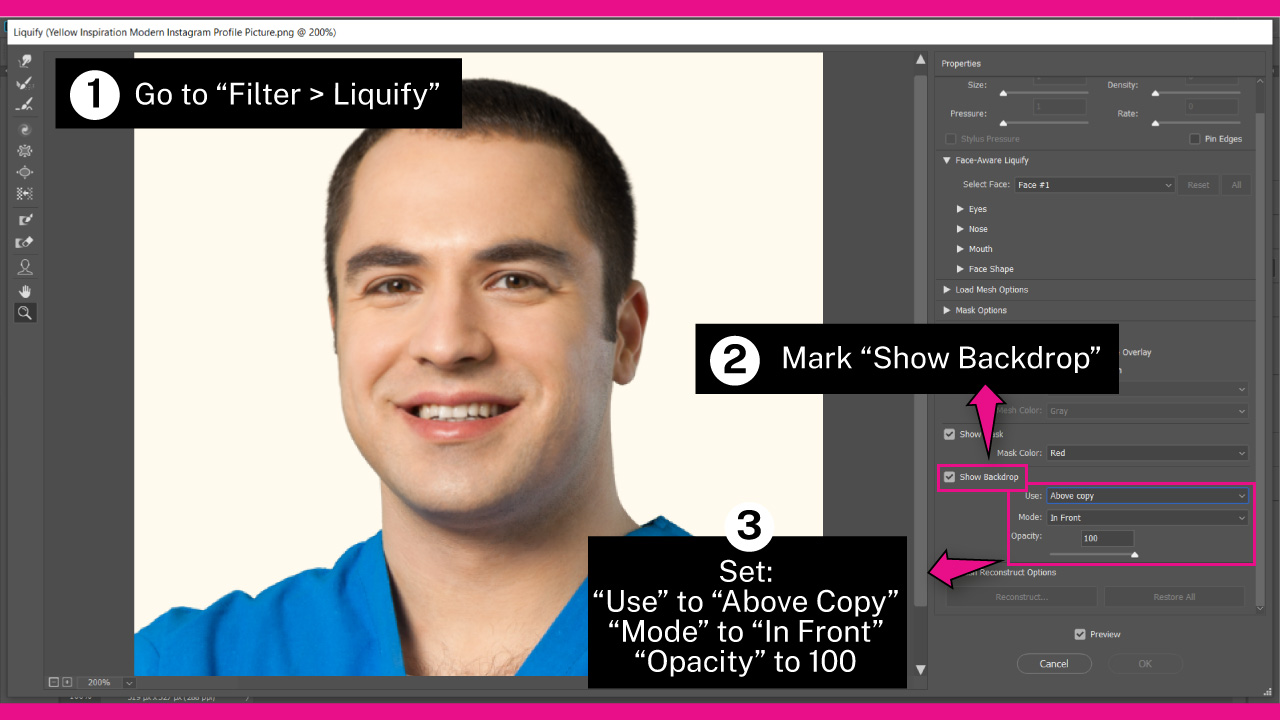
Make sure you have still selected the “Below” layer in the “Layers” panel.
Then go to “Filter > Liquify”, also found in the menu at the top of the screen.
Alternatively, you can press the “Shift + Ctrl + X” or “Shift + Cmd + X” command on your keyboard.
In the “Liquify” window, scroll down the right panel and mark the “Show Backdrop” checkbox to enable its settings.
In the “Use” field, select “Above Copy”, and in the “Mode” field, set it to “In Front”.
Next, set the “Opacity” value to 100.
Step 8: Forward Warp the Double Chin
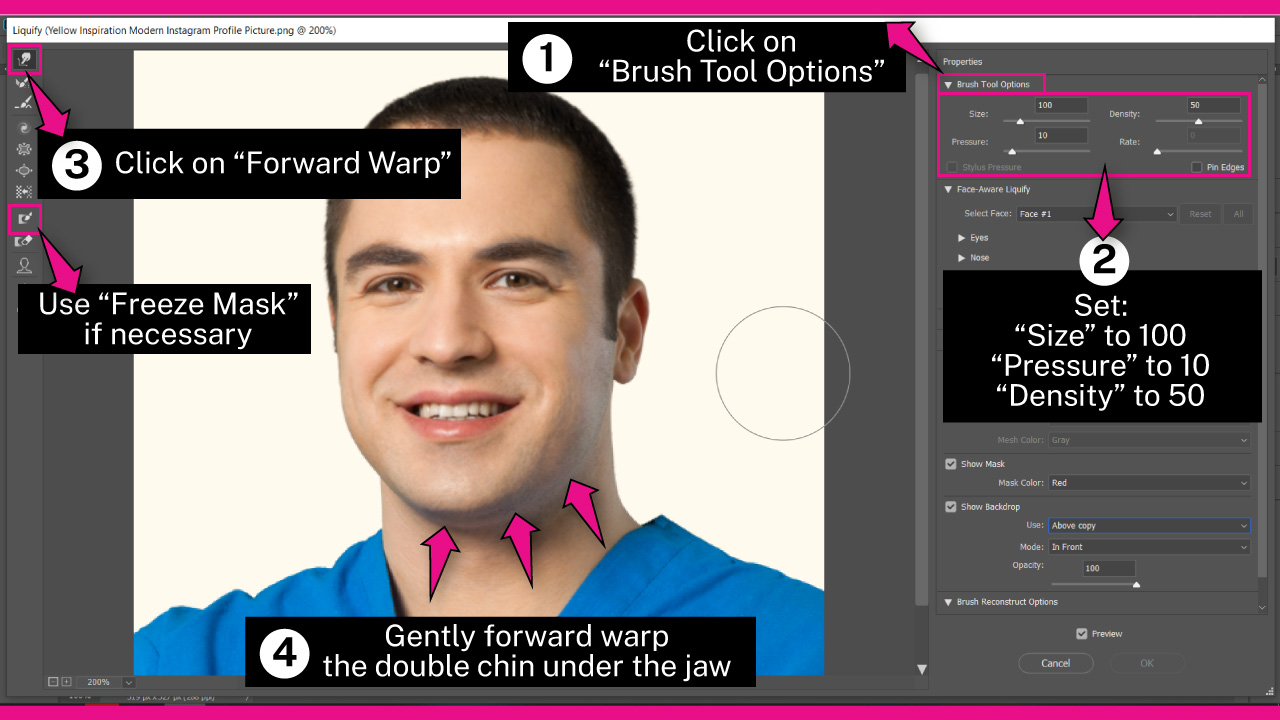
Select the “Forward Warp” (W) tool located on the left-side panel.
If an alert window pops up, just mark the “Don’t Show Again” checkbox and click “OK.”
Scroll the right panel to the top and click on “Brush Tool Options” to collapse its panel.
Then set:
- “Size” to 100
- “Pressure” to 10
- “Density” to 50
Use the “Forward Warp” (W) tool to gently forward warp the double chin under the jaw. If your subject has long hair, be careful not to distort it too.
If you want to ensure you won’t accidentally warp the hair, you can use the “Freeze Mask” (F) tool, also located on the left-side toolbar.
Once you’ve selected the “Freeze Mask” (F) tool, brush over the areas you don’t want to warp.
Step 9: Blur the Jaw Edges
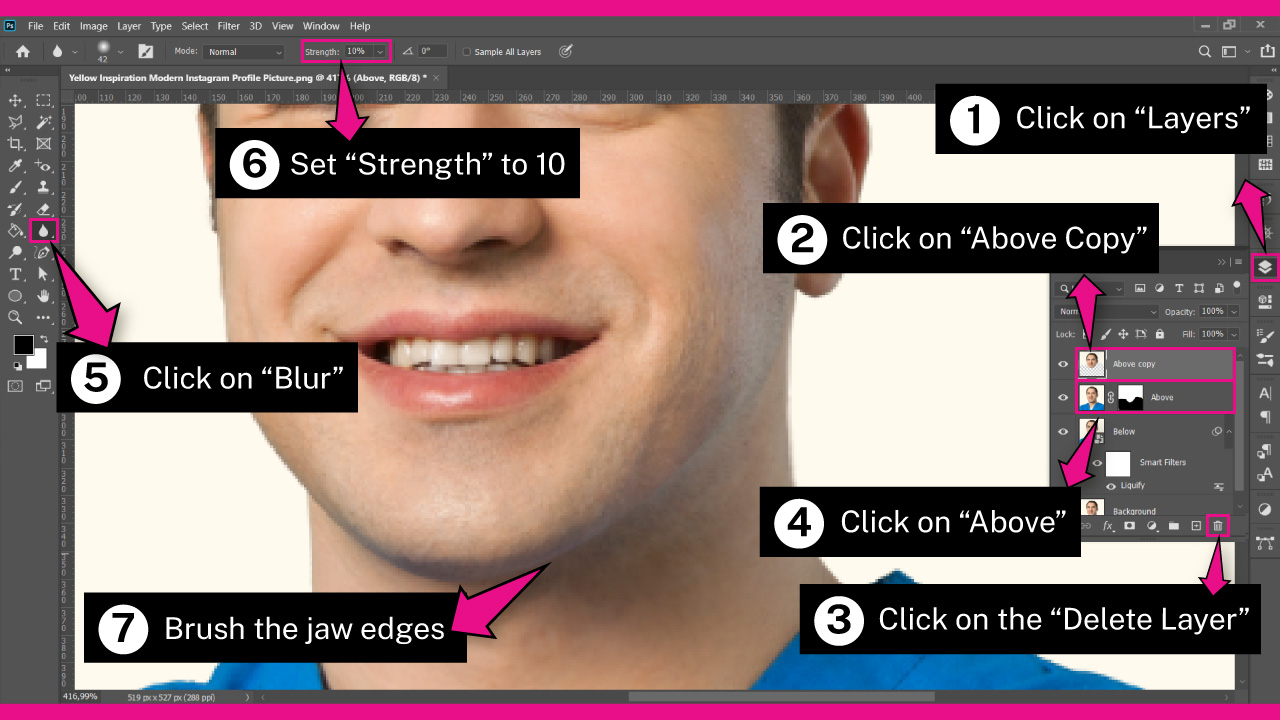
We already have a decent result, but if you want to take it further, you can blur the edges of the jaw to blend the changes better.
To blur the jaw edges, first go to the “Layers” (F7) panel and select the “Above Copy” layer.
Next, click on the “Delete Layer” button to delete it.
We don’t need this layer anymore since we only used it to preview the liquify effect in real-time.
Then select the “Above” masked layer and click on the “Blur” tool located on the left side toolbar.
Next, set the “Strength” value to around 10 on the toolbar at the top of the screen.
Finally, brush over the edges of the jaw to blend them with the rest of the image.
The Result

This is the result of “How to Get Rid of a Double Chin in Photos Using Photoshop”.
After finishing the double chin correction, you may want to edit the portrait in Lightroom to enhance the photo and make it eye-catching.
Keep in mind that if you are going to use this photo as a client proof, you may want to add a watermark in Lightroom instead of sending them the final file.
How to Get Rid of a Double Chin in Photos Using GIMP
Duplicate the photo layer twice. Use the “Paths”(B) tool to define the shape of the jaw. Select the area enclosed by the path and mask the “Above” layer. Select the “Below” layer and after adjusting the “Warp Transform” tool, forward warp the double chin under the jaw. Blur the edges of the jaw.
Step 1: Duplicate Layers
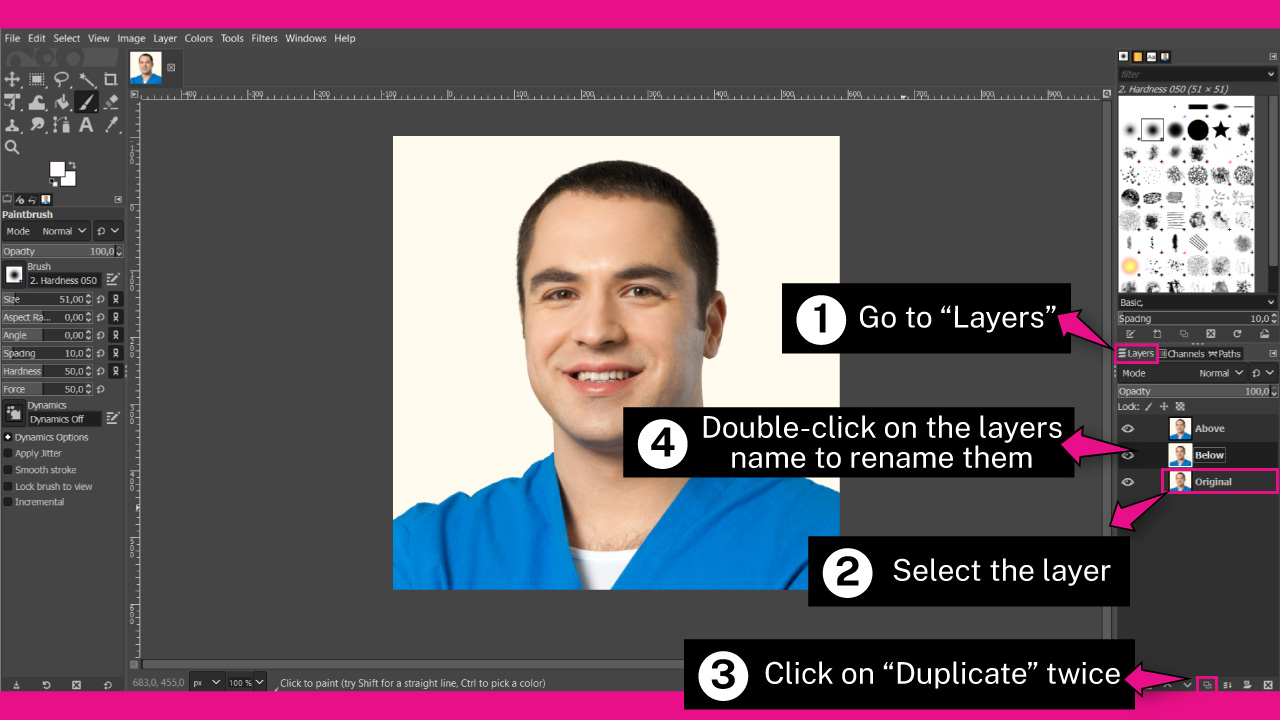
Once you have imported your image into GIMP, go to the “Layers” panel (“Ctrl + L” / “Cmd + L”) usually located on the right-side toolbar.
If you can’t find it, you may have to enable it first by going to “Windows > Dockable Dialogs > Layers” on the menu at the top of the screen. Alternatively, you can press the “Ctrl + L” / “Cmd + L” command on your keyboard.
On the “Layers” (“Ctrl + L” / “Cmd + L”) panel, select the layer that contains the photo.
Next, click on the “Duplicate” button twice at the bottom of the panel to create two copies, resulting in a total of three layers.
Then double-click on the layers’ names and rename them as “Above,” “Below,” and “Original,” in that order from top to bottom.
Renaming layers is important to work neatly and identify layers easily later.
Step 2: Define the Shape of the Jaw
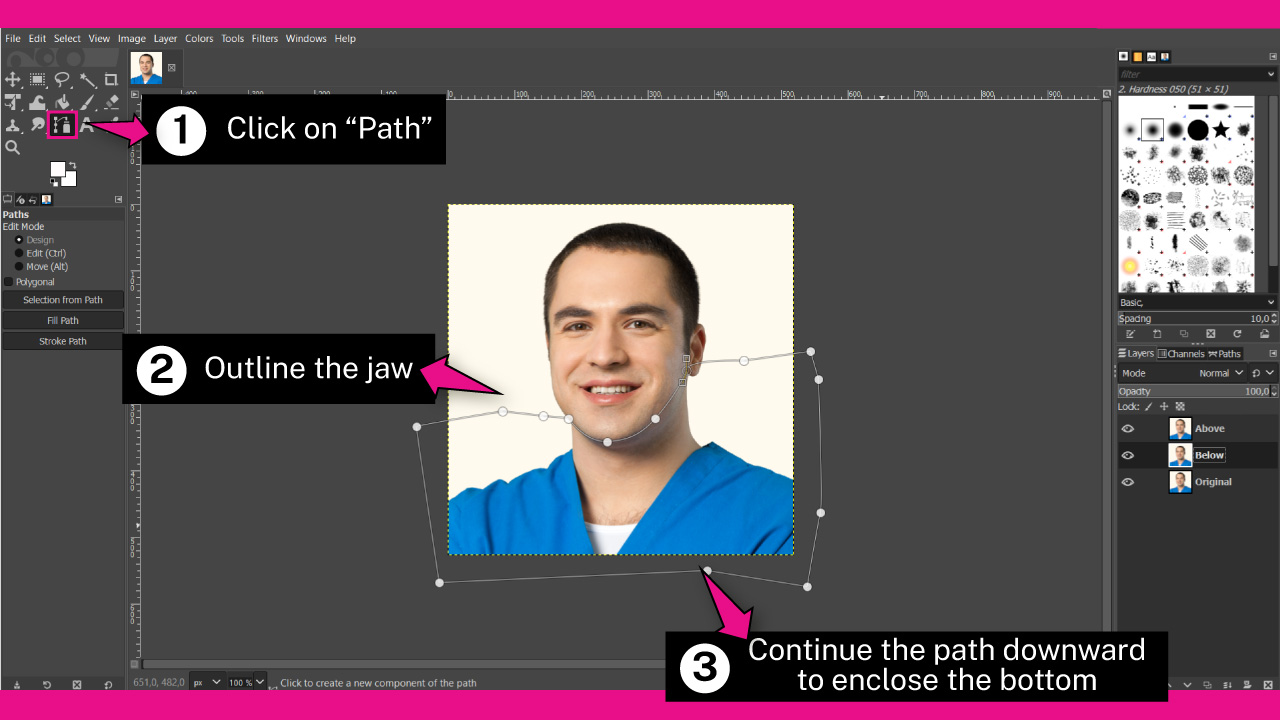
Click on the “Paths” (B) tool located on the left side toolbar, or press the “B” key on your keyboard as a shortcut.
Then, outline the jaw by adding anchor points. To add anchor points, click, hold, and drag to control the line curve.
After defining the shape of the jaw, continue the path downward to enclose the entire bottom of the image.
Hold the “Ctrl” or “Cmd” key as you click on the first anchor point to link the two ends of the path.
You can edit the anchor points by holding the “Ctrl” or “Cmd” key and dragging the anchor points or their handles.
If you want to move the whole path, hold the “Alt” or “Option” key as you drag the path.
If you feel more comfortable, you can use the “Free Select” (F) tool to outline the jaw, also located on the left side toolbar. However, it’s more difficult to make a meticulous selection.
Step 3: Mask the Layer

Go to the “Select > From Path” option in the menu at the top of the screen, or use the “Shift + V” shortcut on your keyboard.
After doing so, the area enclosed by the path will be selected.
Next, go to the “Layers” panel (“Ctrl + L” / “Cmd + L”), select the “Above” layer, and click on the “Mask” button at the bottom of the panel.
On the “Mask” pop-up window, choose “Selection” and click on “Add.”
After masking the layer, check the mask thumbnail to ensure that the black area is at the bottom and the white area is at the top.
If it displays upside down, press the “Ctrl + Z” command to undo the previous step. When you repeat the process, on the “Mask” window, mark the “Invert” checkbox located at the bottom of the options.
Step 4: Adjust the Warp Transform Tool Settings
To fix the double chin, we will forward warp it under the jaw.
To get started, go to the “Layers” (“Ctrl + L” / “Cmd + L”) panel and select the “Below” layer to work on from now on.
Now, we need to use the “Liquify” tool in GIMP, which is called “Warp Transform”.
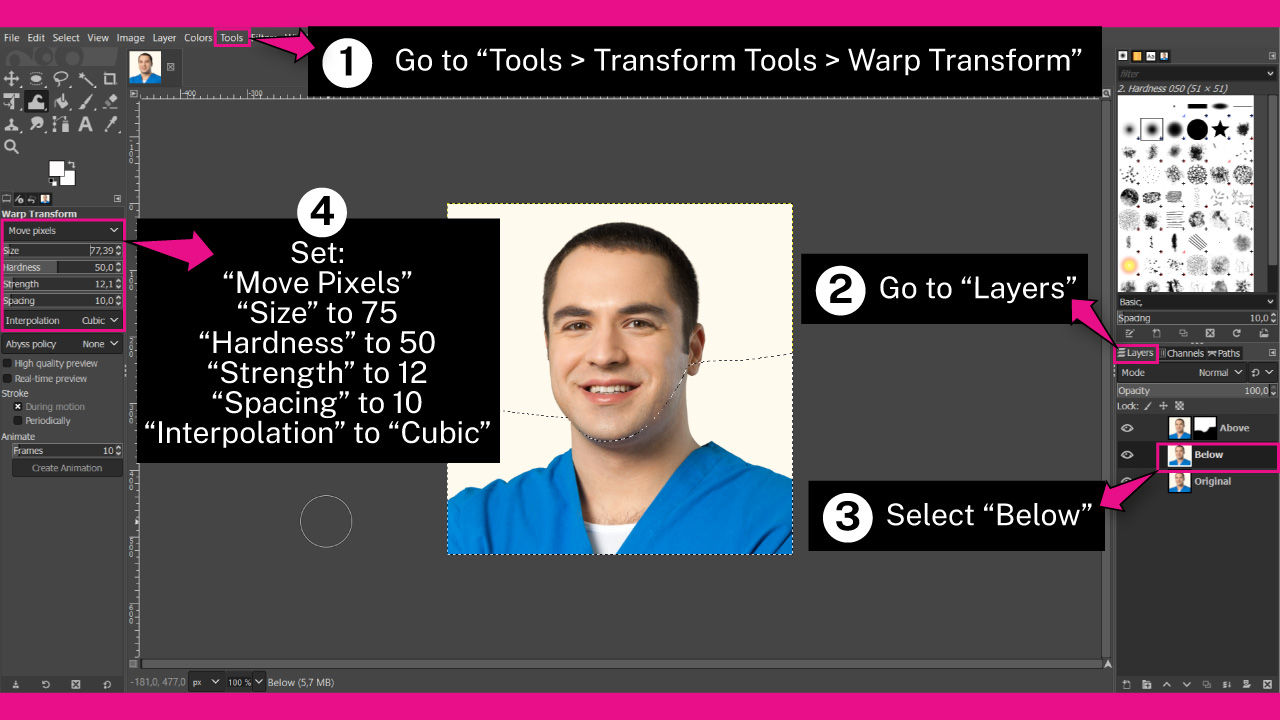
To select the “Warp” (W) tool, go to “Tools > Transform Tools > Warp Transform” in the menu at the top of the screen.
Alternatively, you can press the “W” key on your keyboard to access it more quickly.
Next, we need to set the “Warp Transform” (W) tool.
So, go to the left side toolbar and set:
- “Move Pixels”
- “Size” around 75 (you may need to vary this value several times during the warping process)
- “Hardness” to 50
- “Strength” to 12
- “Spacing” to 10
- “Interpolation” to “Cubic”
Step 5: Forward Warp the Double Chin
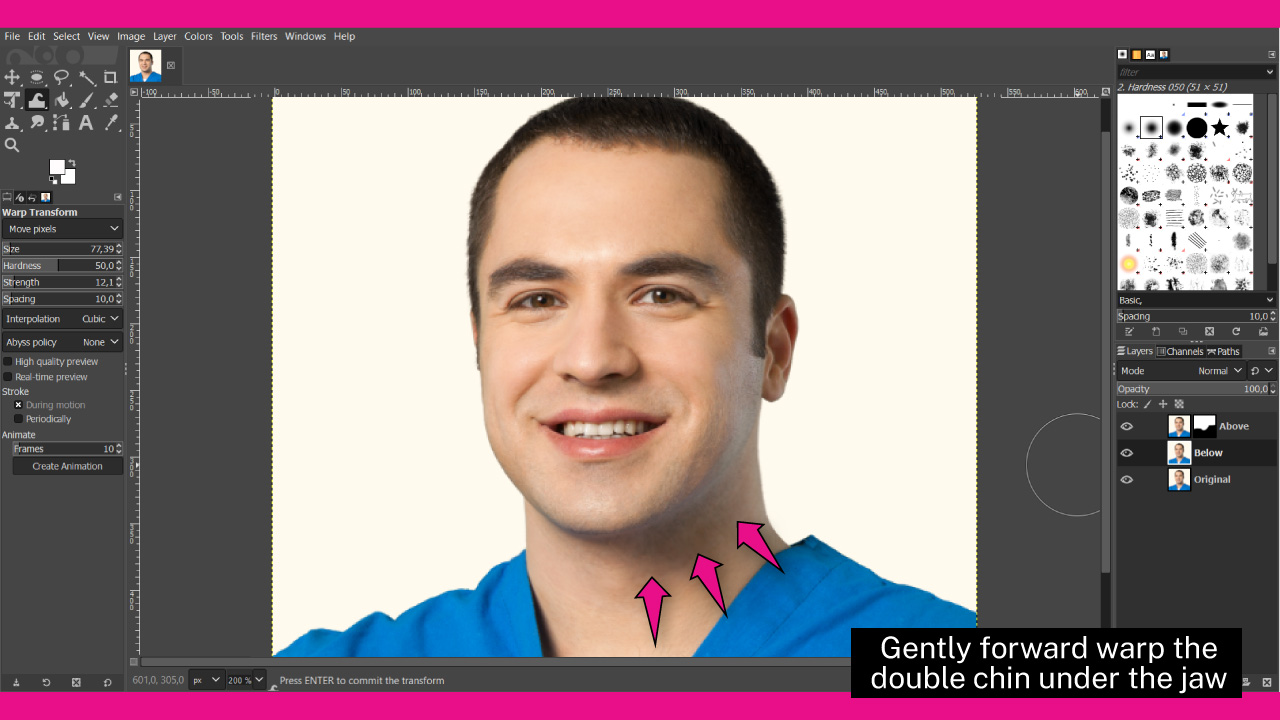
After adjusting the “Warp Transform” (W) tool, it’s time to get down to business.
Use the “Forward Warp” (W) tool to gently warp the double chin forward under the jaw. If your subject has long hair, be careful not to warp the hair too.
Change the brush “Size” if necessary.
Step 6: Blur the Jaw Edges
We already have a decent result, but if you want to go further, you can blur the jaw edges to blend the changes better.
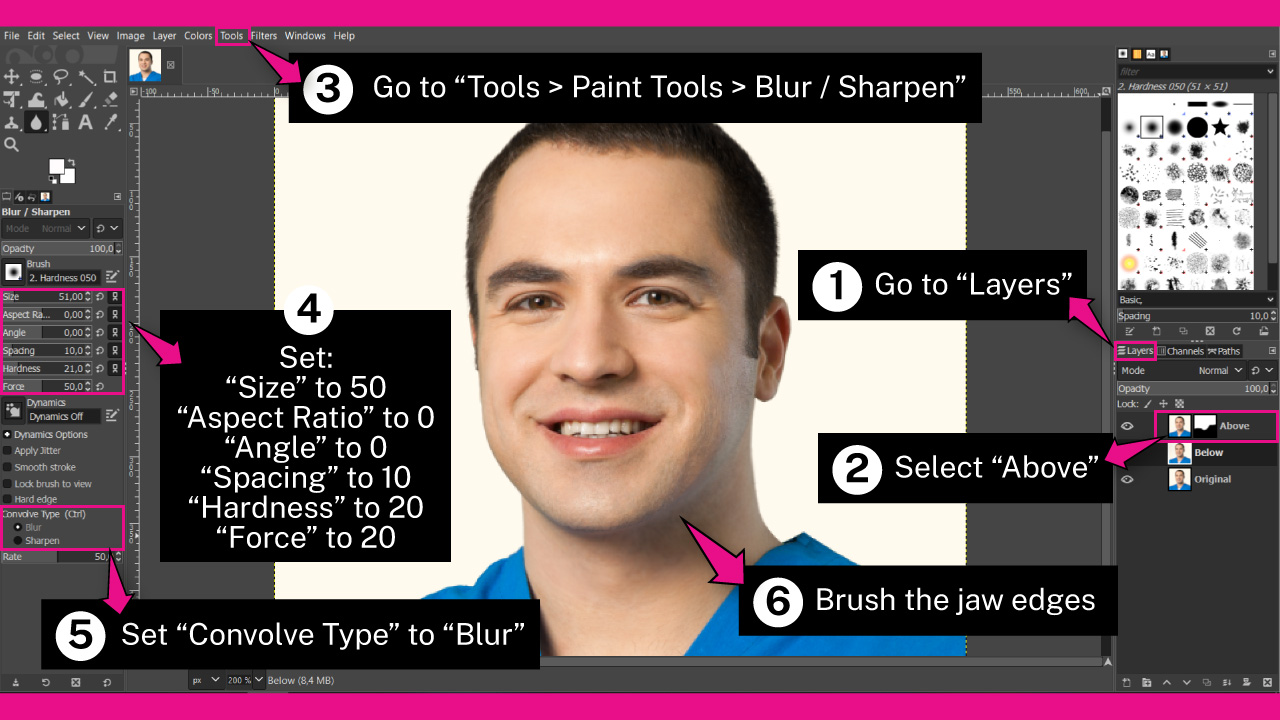
To blur the jaw edges, first go to the “Layers” (“Ctrl + L” / “Cmd + L”) panel and select the “Above” layer to work with from now on.
Next, go to “Tools > Paint Tools > Blur / Sharpen” in the menu at the top of the screen, or you can press the “Shift + U” command from your keyboard to shortcut it.
Once you have selected the “Blur / Sharpen” (Shift + U) tool, adjust its settings from the left side toolbar.
On the left side toolbar, set:
- “Size” around 50 or your desired value
- “Aspect Ratio” to 0
- “Angle” to 0
- “Spacing” to 10
- “Hardness” to 20
- “Force” to 20
Make sure that the “Convolve Type” is set to “Blur”.
Finally, brush over the edges of the jaw to blend them with the rest of the image.
The Result
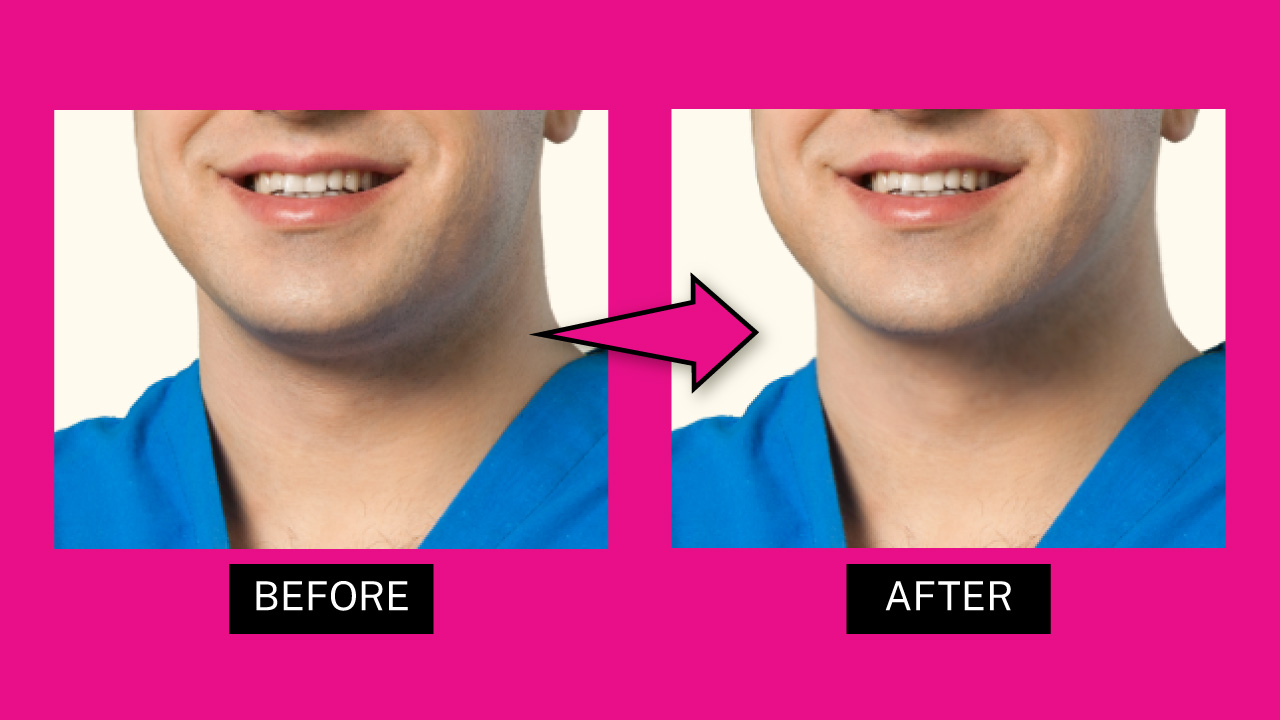
This is the result of “How to Get Rid of a Double Chin in Photos Using GIMP”.
After fixing the double chin, you may also be interested in softening the skin in Lightroom and whitening the teeth in Lightroom.
Keep in mind that if you are going to use this photo as a client proof, you may want to add a watermark to the photo without using Photoshop, instead of sending them the final file.
Frequently Asked Questions on “How to Get Rid of a Double Chin in Photos”
How to Get Rid of a Double Chin in Photos on an iPhone or Android?
There are some apps like AirBrush or FaceTune that can help you hide a double chin in a photo. These are paid apps. However, they usually have a free trial for 7 days.
How to Hide a Double Chin in Photos Using the Airbrush app?
After opening the photo on the Airbrush app, tap on the “Sculpt” tool on the menu at the bottom of the screen. Next, tap on the “Chin” option. Finally, move the dot slider to the left to decrease the chin volume.
How to Hide a Double Chin in Photos Using the FaceTune app?
After opening the photo on the FaceTune app, tap on the “Face” option on the menu at the bottom of the screen. Next, tap on the “Jaw” option. Finally, move the slider to refine the size of the jawline.
How to Hide a Double Chin in Photos Online?
Go to Fotor.com and click on “Edit a Photo”. Upload a photo, and then click on “Beauty” followed by “Reshape” located on the left side toolbar. Next, set the “Size” around 30 and the “Brush Intensity” to 10%. Gently forward warp the double chin upwards to hide it. Finally, click on “Apply”.

I am a professional blogger and entrepreneur with a strong interest and passion in photo editing. On MindRelic, I happily share my expertise in the photo editing niche with all of you guys!
cialis 5mg side effects
cialis 5mg side effects