

Sometimes when we need to upload and share our work on websites or social media, we run the risk that our images get downloaded with no authorization, or even get stolen by other people, attributing the ownership of that image to themselves.
Even though some websites try to prevent this type of action by restricting the possibility to download images from other accounts, we all know there are still many ways to download these images anyway.
That’s why sometimes it’s a very good idea to add watermarks to our images, so we can prevent these kinds of inconveniences.
You can use watermarks in a very subtle way, just to let users know who’s the author of a photo or image.
In this tutorial we’ll learn how to add different types of watermarks, starting with a simple text, and then adding some effects to make it pop from the background when necessary.
Then, we’ll learn how to add diagonal lines as watermarks for stronger image protection.
We’ll also learn how to add logos or signatures, and how to make tile patterns covering the whole image.
Finally, we’ll learn how to make a watermark template to apply it in bulk when you work with several images simultaneously.
The cherry on top is that we’ll exclusively use free online apps, so you don’t even have to pay a single cent or install anything to get this done.
Let’s find out how.
How to Put a Watermark on a Photo Without Photoshop
To add a watermark to a single image, go to canva.com or watermark.ws and design your watermark using a text box or uploading a logo. To add it to several images, create a watermark template on pixlr.com/e and then add it to all your images.
How to Put a Watermark on a Photo Using Canva
Go to canva.com and import a file by clicking on “Import a File”. Next, click on “Use in a Design”, and in the edition mode click on “Upload Files” to import a logo. Place and resize the logo. Set “Transparency” to 50%. Finally, click on “Share > Download > Download” to save the image.
Step 1: Go to the Canva Website

Open your favorite browser, and go to the canva.com website.
You need an account to work on the Canva platform.
If you already have an account, click on the “Log In” button located at the top of the screen.
Otherwise, click on “Sign In” to create an account. You can continue with “Google”, “Facebook”, or “Microsoft” among other signing in methods.
Step 2: Import a Photo

Click on the “Create a Design” button located at the top of the screen.
On the unfolded menu, click on the “Import File” button located at the bottom of the menu.
Once the window pops up, browse in your directory and locate the photo you want to work on.
Select the image, and then click on the “Open” button.
Step 3: Use the Photo in a Design

Now, make sure you have “Your Projects” selected on the “Projects” menu.
Then, click on the “Images” tab to find the recently uploaded image.
Once you find your image, click on it to open the “Edition” mode.
The “Edition” window will pop up. Click on the “Use in a Design” button located at the top of the screen to start designing the watermark.
Step 4: Upload your Logo or Signature
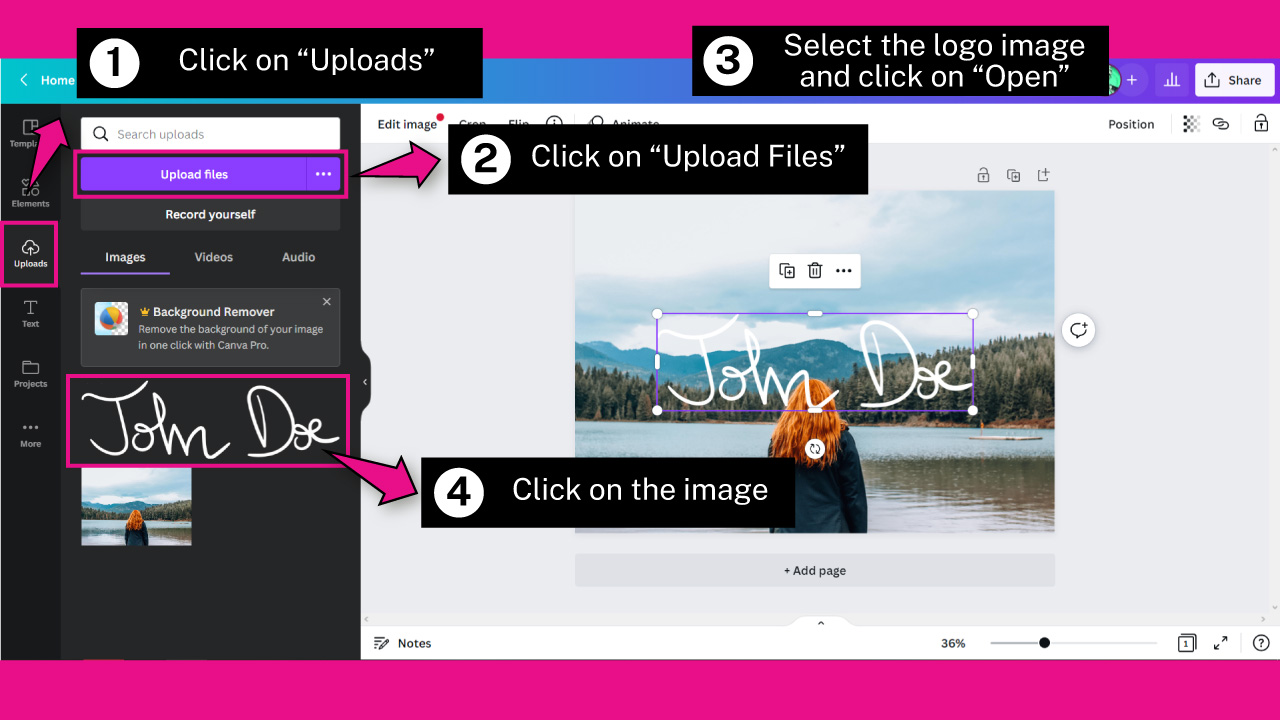
Once you’re in “Design” mode, go to “Upload > Upload Files” on the left side toolbar.
Once again, on the pop up window, browse in your directory and locate the logo or signature you want to work on.
Select the image and then click on the “Open” button.
Once you’ve done this, your logo will be displayed on the left side toolbar.
Click on it to add it to the photo.
Step 5: Resize and Make the Logo Transparent
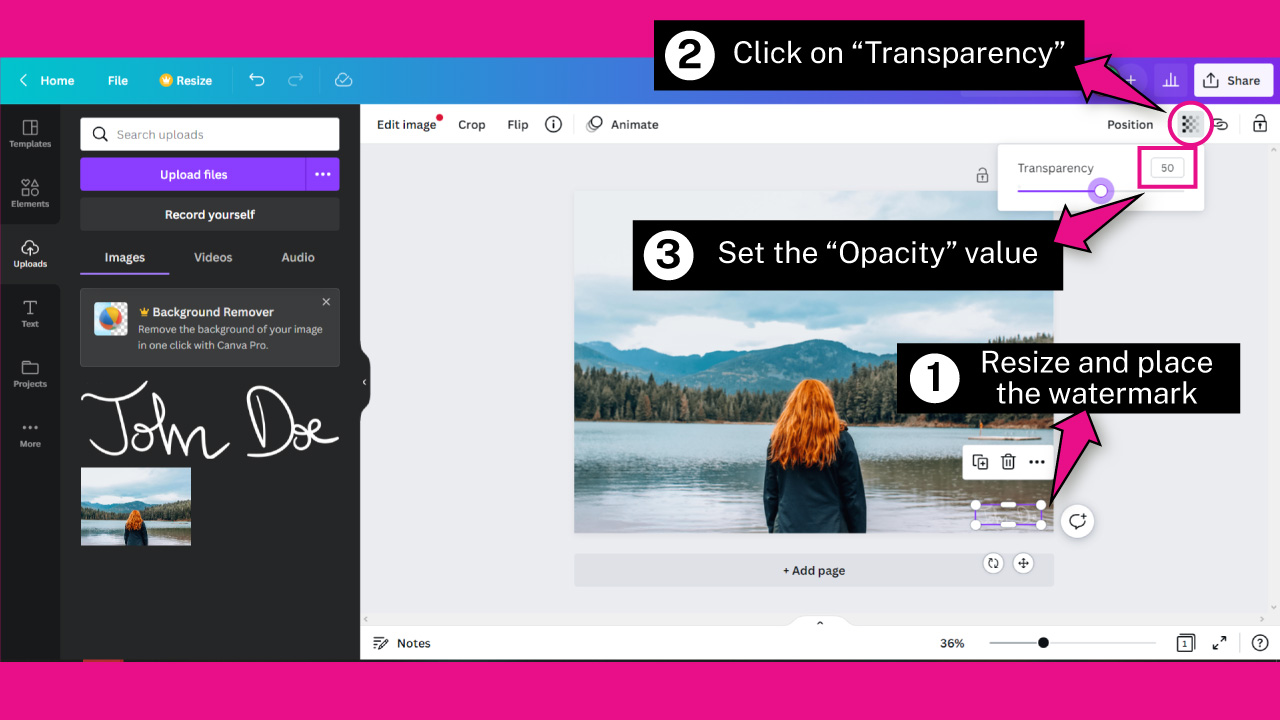
Use the bounding box handles to resize the logo by left-clicking, holding and dragging.
Put it in place. I’ll place it on the bottom right corner.
Now, to make the logo transparent in Canva, first make sure that your logo is selected.
Then click on the “Transparency” button located on the toolbar at the top of the screen, and set its value to 50%, or your desired value.
Step 6: Save the Watermark Photo
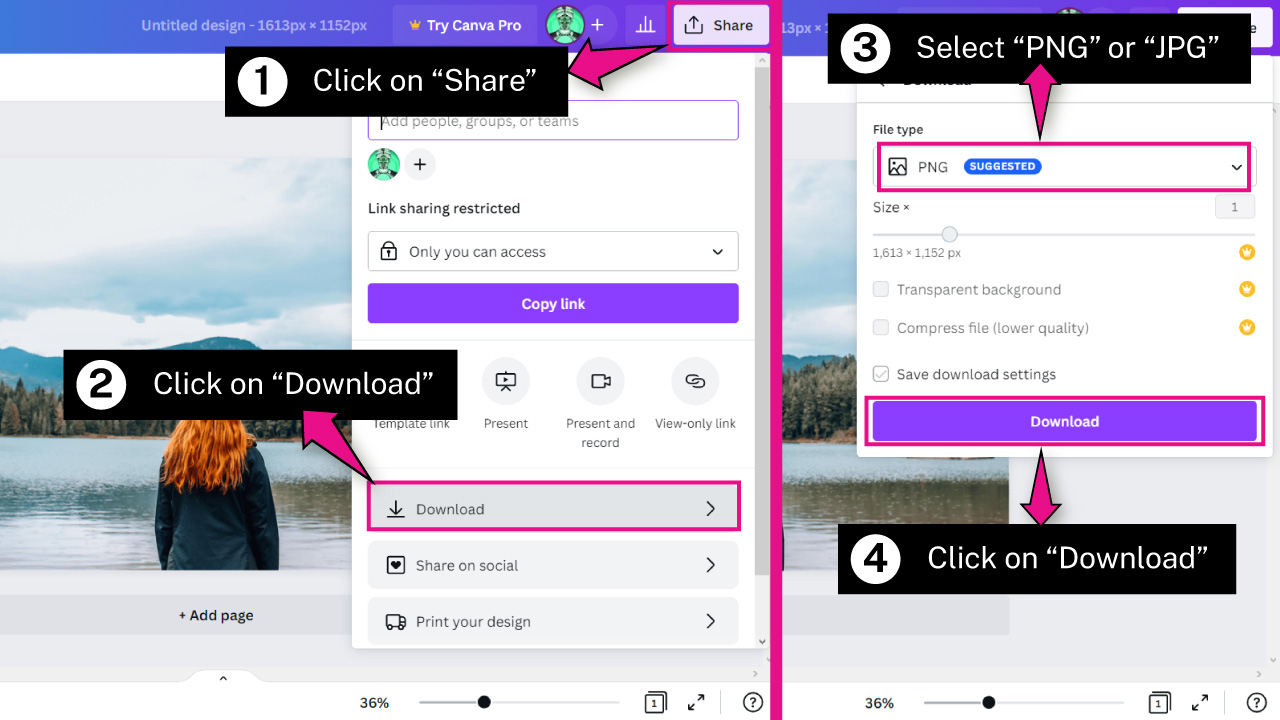
To save Canva images on your computer, click on the “Share” button located on the toolbar at the top of the screen.
Select the “Download” option from the unfolded menu to unfold settings.
On the “File Type” field, pick “PNG” or “JPG” and then click on “Download” to save it on your computer.
How to Put a Watermark on a Photo Using “Watermark” Website
Go to watermark.ws and upload a photo. Go to watermark edition mode. Add a text or upload a logo. Make it transparent. If you want, add diagonal lines and/or make it a tile pattern. In text watermarks you can also add background, stroke and shadows. Save the image.
Step 1: Go to the Watermark Website
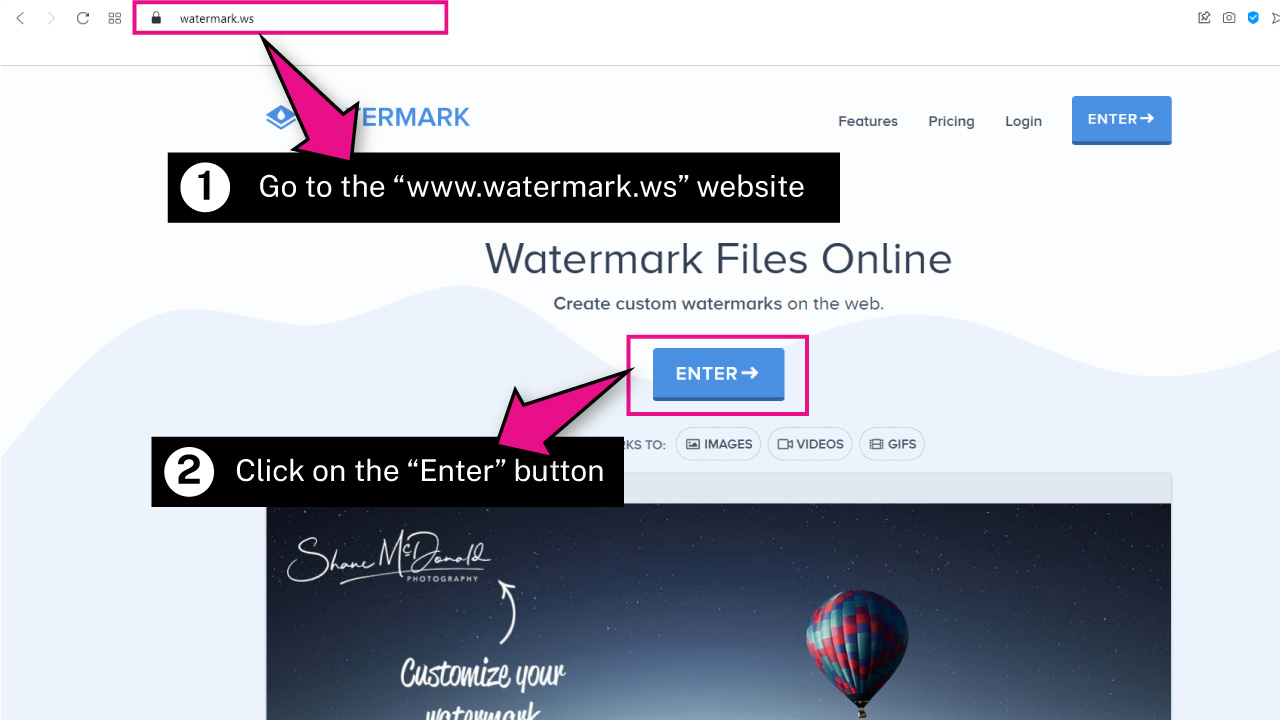
Open your favorite browser, and go to the watermark.ws website.
Click on the “Enter” button.
Step 2: Upload an Image
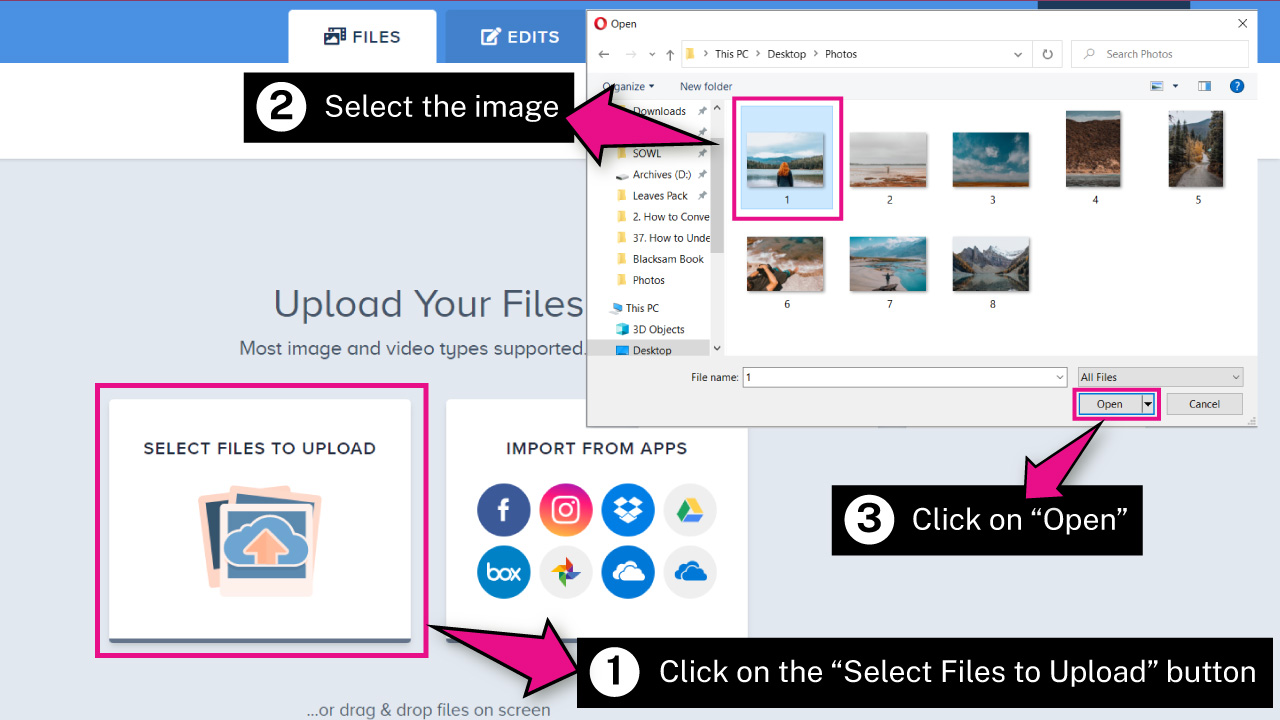
If the image you want to work on is in your computer, click on the “Select Files to Upload” button. Otherwise, click on “Import From Apps”.
If you pick the “Import From Apps” option, you’ll need to connect the app with the “Watermark” website by entering the username and password.
In this group of options, you can also enter an image URL if your image is online.
I’ll pick the “Select Files to Upload” option since the image I want to work on is in my computer.
On the pop up window, browse in your directory and locate the image you want to work on.
Select the image and then click on the “Open” button.
Wait a few seconds until the image is uploaded.
Even if the website offers you the possibility to upload several images at the same time, the free version won’t allow you to save the processed images in bulk.
If you want to edit several images, you’ll have to do it one by one, unless you upgrade to premium.
Step 3: Enter to the Edition Mode
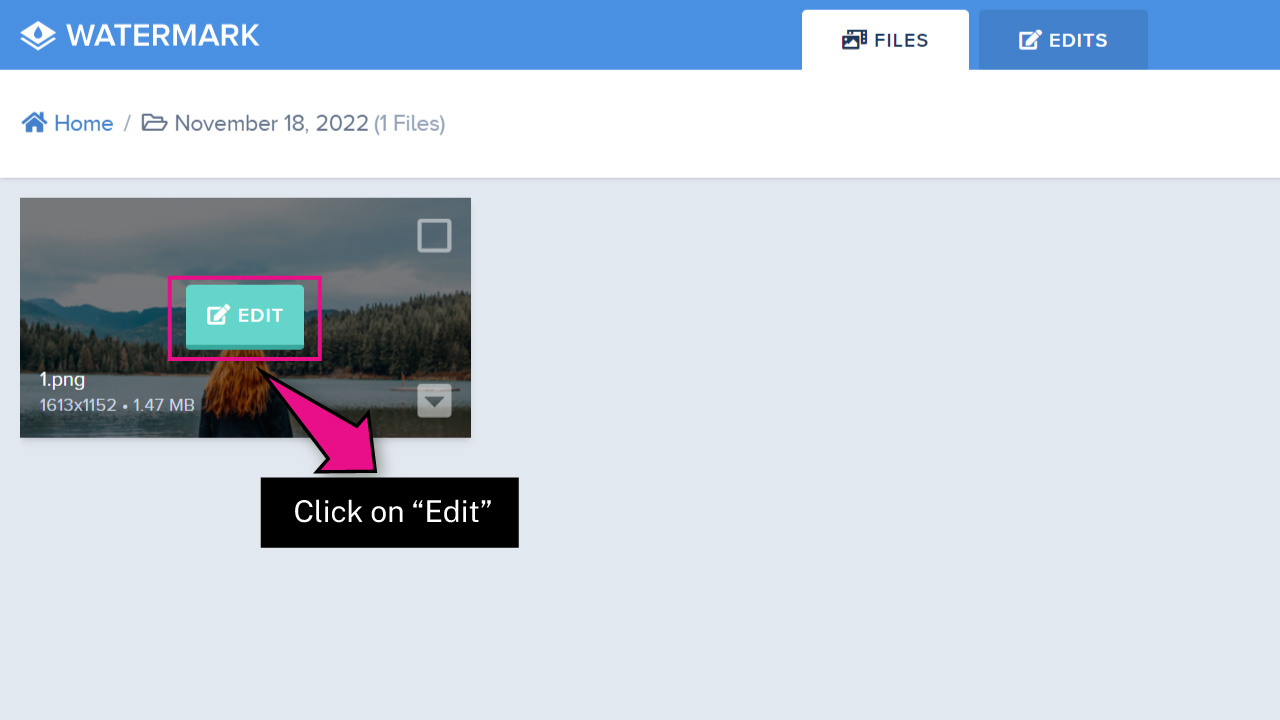
Click on the “Edit” button over the uploaded image to start with the edition.
Step 4: Add a Watermark Text
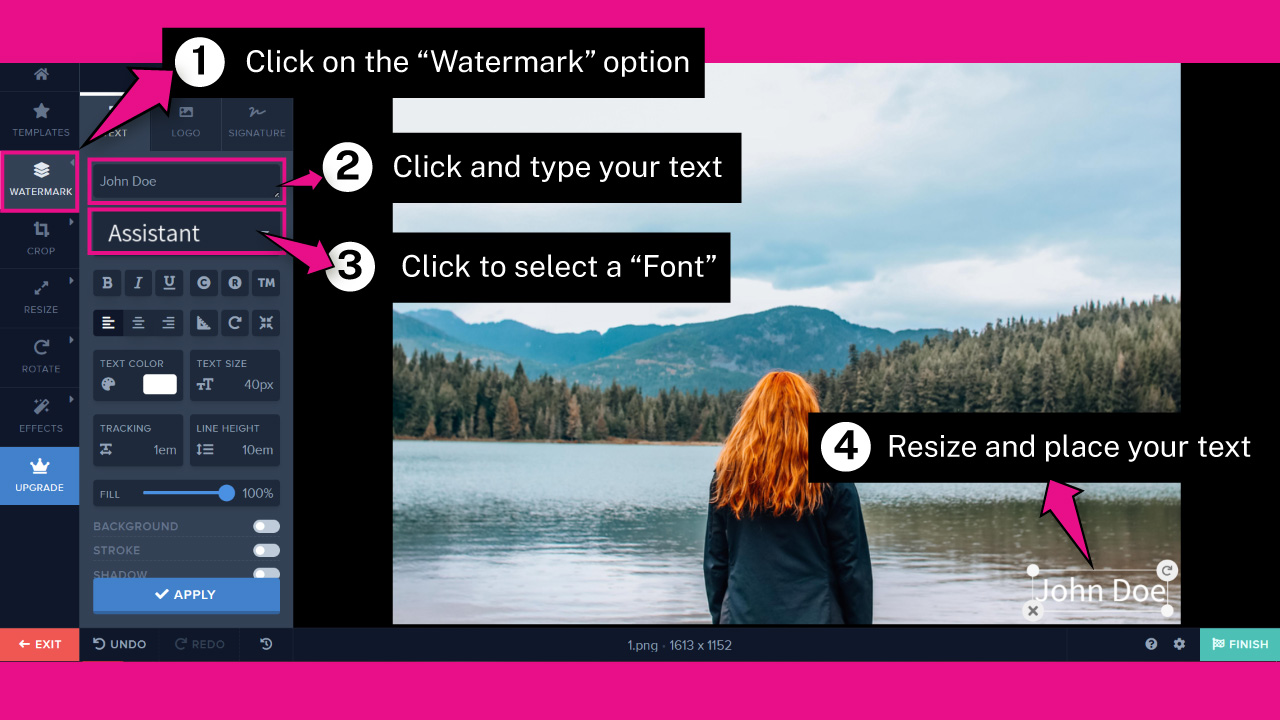
Once you’re in edition mode, click on the “Watermark” option on the toolbar located on the left side of the screen.
If you want to add a watermark text, make sure you are on the “Text” tab.
Then click on the “Your Text Here” field, and type a text.
Next, click on the second field and select a “Font” for the text. I’ll pick “Assistant”.
You have a list of free fonts available to pick, and some more premium options as well.
However, if you need a specific font you can’t find in the list, you can also upload your desired font by clicking on the “+ Import” button located at the top of the “Font” unfolded menu.
Use the bounding box handles to resize the text by left-clicking, holding and dragging.
Then put the text in place by also left-clicking, holding and dragging all over the bounding box. I’ll place it at the bottom right corner.
Use the rotation tool available on the bounding box if necessary.
Step 5: Adjust Text Features
There are some available functions to customize your text.
You can set values for “Font Style” and “Text Align”. There are also “Straighten Angle”, “Rotate Right” and “Move to Center” tools.
I’ll leave these options as by default.
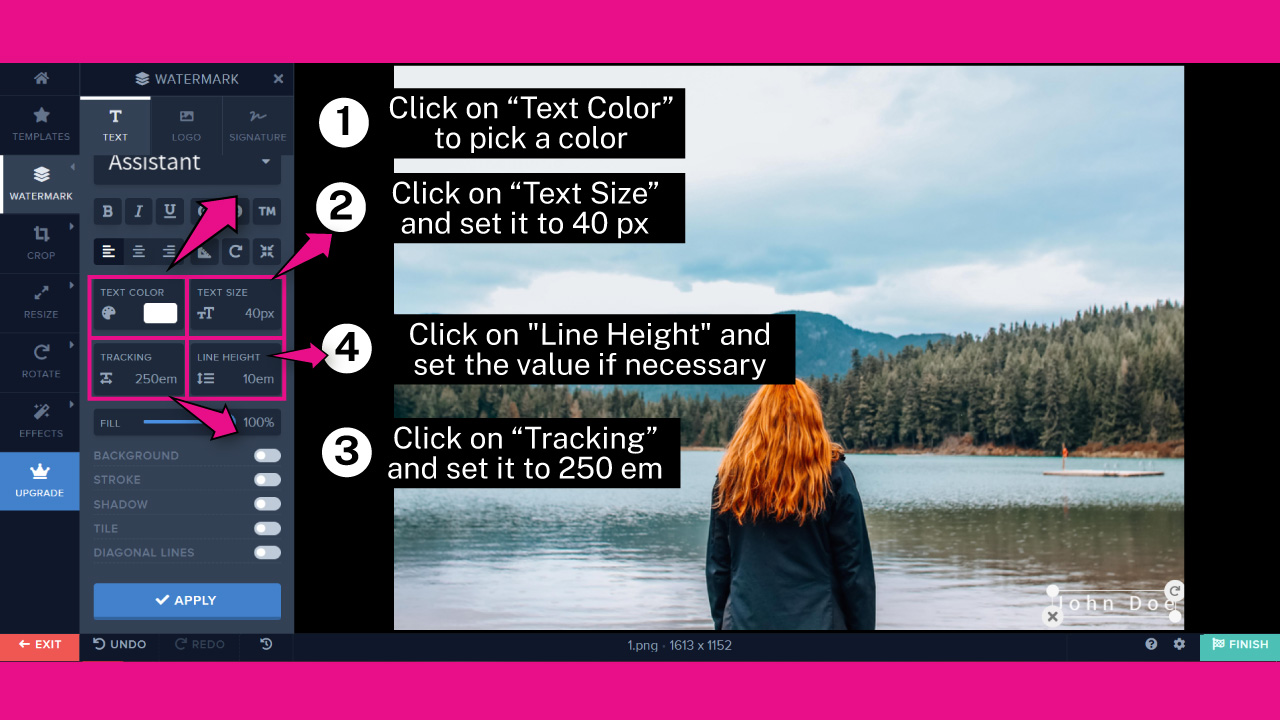
Click on the “Text Color” button to pick a color. I’ll leave the color white as by default.
Now set values for “Text Size”, “Tracking” and “Line Height”.
I’ll set:
“Text Size” to 40 px
“Tracking” to 250 em (the highest value)
“Line Height” to 10 em (as by default)
You should consider adjusting this last value if you are using multiple text lines.
Step 6: Adjust Transparency/Fill for your Text
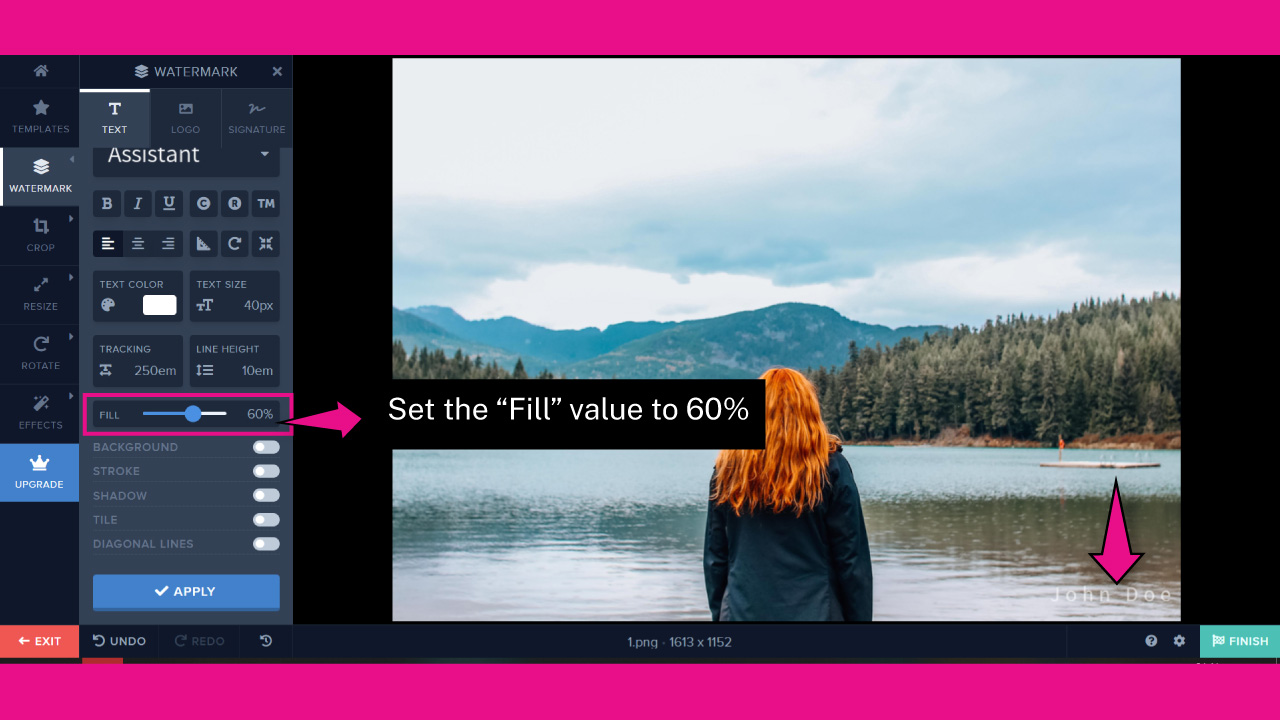
In the Watermark website, transparency is named as “Fill”.
Usually, image watermarks have a certain level of transparency.
If you want to increase your text’s transparency, drag the “Fill” slider to a lower value.
I’ll set it to 60%.
We’ll be covering how to adjust all the available features to customize “Text Watermark” until “Step 11”. You can use the one feature you prefer, or all of them. I’ll show you how to adjust every single one, step by step.
Step 7: Add a Background to the Watermark
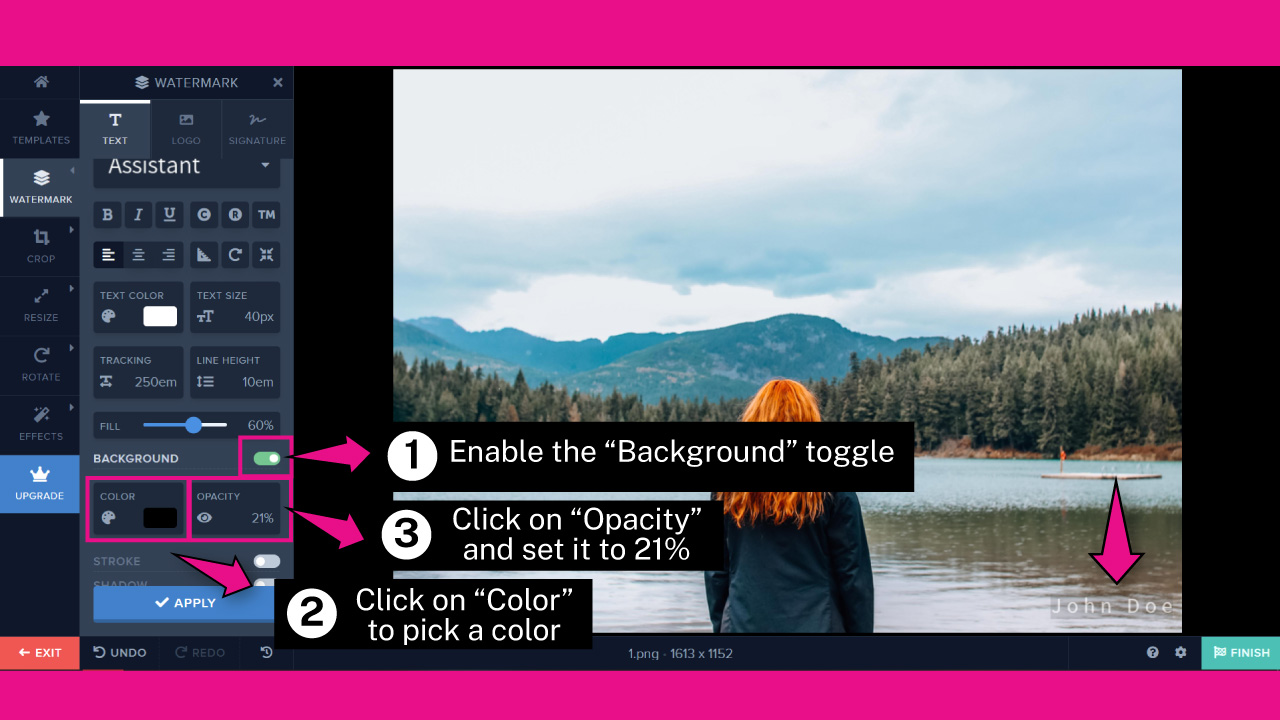
If you want to add a background to your watermark, click on the “Background” toggle to enable it.
Then, click on the “Color” field to pick a color. I’ll leave black as by default.
Finally, click on the “Opacity” field and set its value to 21% or necessary, depending on the intensity your watermark background requires.
Step 8: Add Strokes to the Watermark
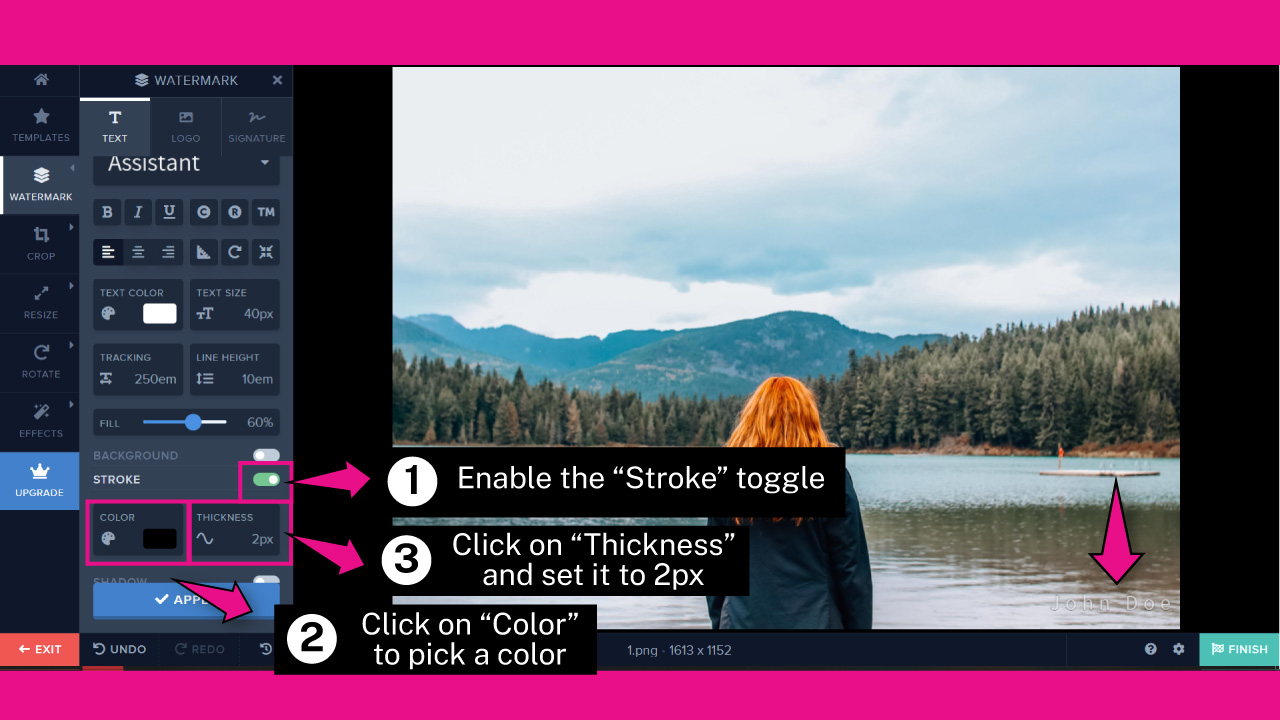
If you want to add strokes to your watermark, click on the “Stroke” toggle to enable strokes.
Then, click on the “Color” field to pick a color. I’ll leave black as by default.
Finally, click on the “Thickness” field to set the stroke weight. I’ll set it to 2 px.
Step 9: Add Shadows to the Watermark

If you want to add shadows to your watermark, click on the “Shadow” toggle to enable shadows.
Then, click on the “Color” field to pick a color. I’ll leave black as by default.
Next, set the “Blur” value. The higher the value, the fuzzier the shadow will be. I’ll set it to 10 px.
Now you can set “Vertical” and “Horizontal” shadow offset.
I’ll leave the “Vertical” value to 3 px, and the “Horizontal” value to 0 px as by default.
Step 10: Make a Watermark Tile Pattern
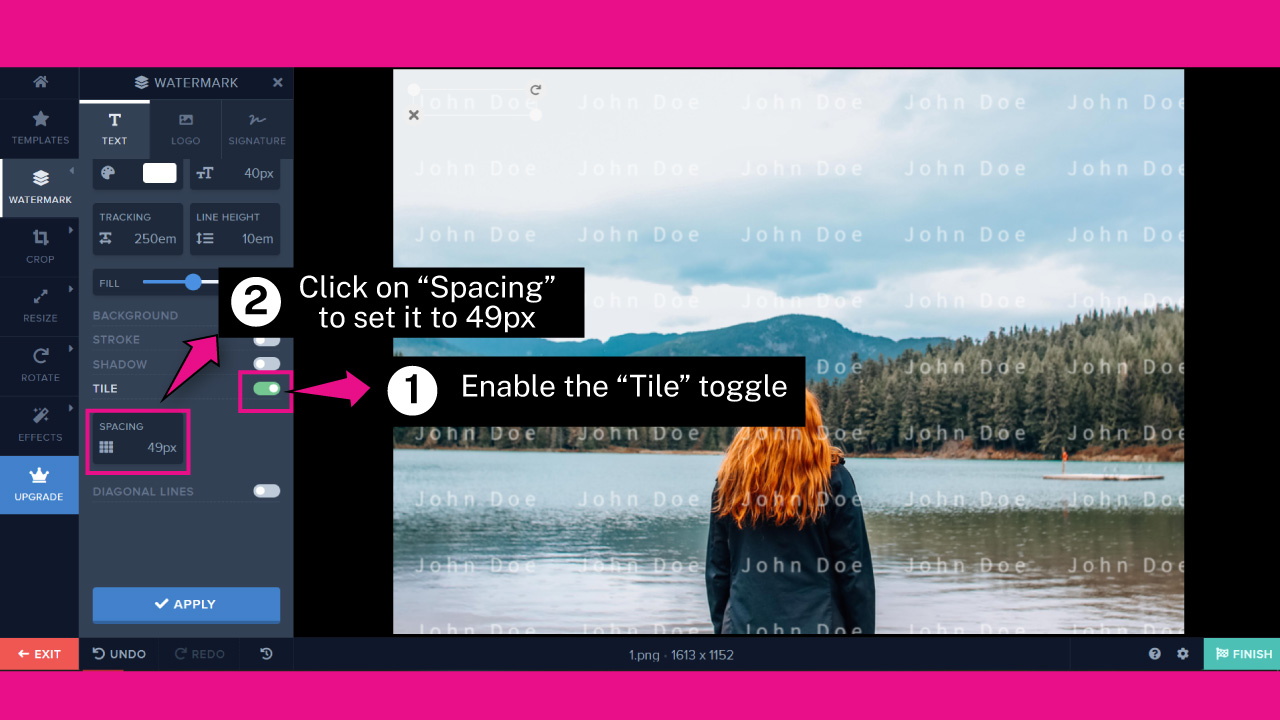
If you want to make a tile pattern with your watermark, click on the “Tile” toggle to enable it.
Then, click on the “Spacing” value to adjust the space between each watermark. The higher the value, the higher the spacing and the lower the number of repeated watermarks will be.
I’ll set this value to 49 px.
Step 11: Add Diagonal Lines

If you want to add diagonal lines to your watermark, click on the “Diagonal Lines” toggle to enable them.
Then click on the “Color” field to pick a color. I’ll leave white as by default.
Finally, set the “Opacity” value. I’ll set it to 50%.
Step 12: Upload your Own Logo or Image

If you want to use your own logo or image, you can also upload it by clicking on the “Logo” tab.
Click on “Add Logo”, and then on the “Select Files to Upload” box.
On the pop up window, browse in your directory and locate the image you want to work on.
Select the image and then click on the “Open” button.
You can use both, an image with a background with or without transparencies.
However, if the image you’ll be working on counts with a fill background you want to remove, it’s recommended to remove the background before uploading the image, since this website’s background removing tool is only available for the premium version.
You can quickly remove backgrounds from pictures in Canva.
Once the image has been uploaded, use the bounding box handles to resize the image, and then put it in place. I’ll place it at the bottom right corner.
Use the rotation tool if necessary.
Step 13: Adjust Transparency/Fill for your Logo

If you want to add transparency to your uploaded image, drag the “Fill” slider to a lower value.
I’ll set it to 60%.
Use the “Straighten Angle”, “Rotate Right” and “Move to Center” tools if necessary.
Step 14: Add Diagonal Lines
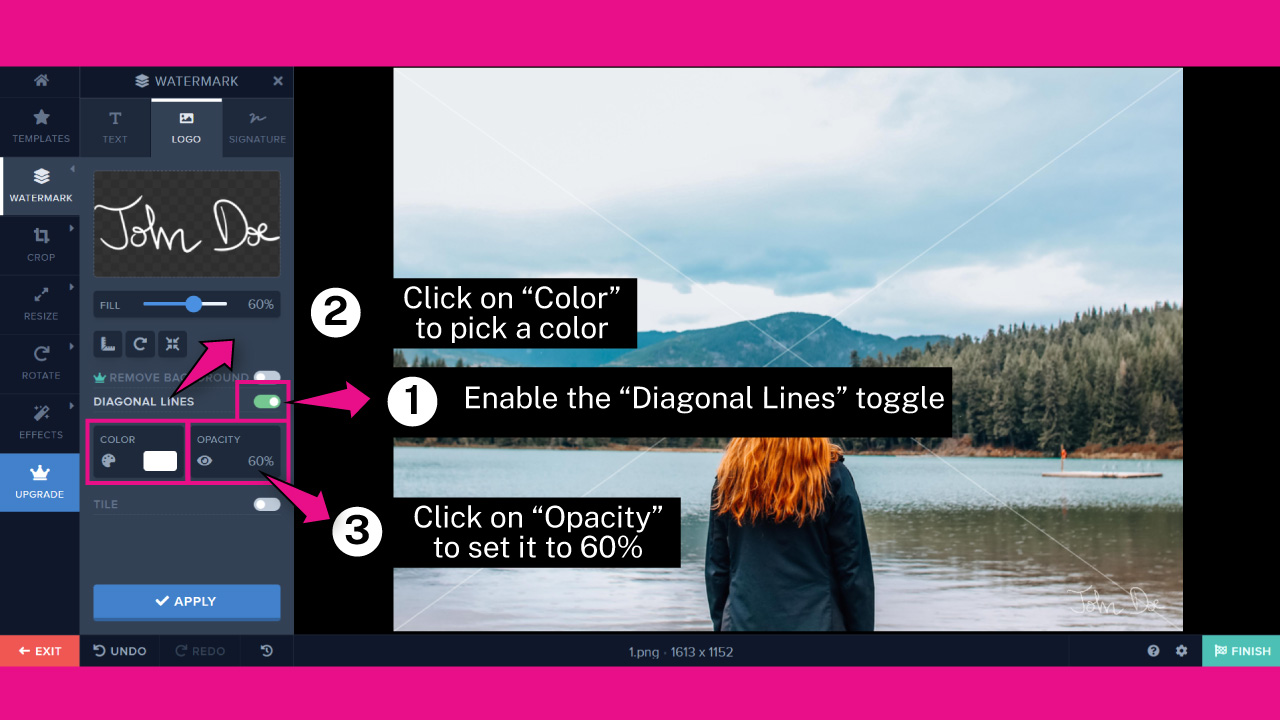
The procedure to add diagonal lines to an uploaded logo is the same we followed on “Step 11” for the text watermark.
Click on the “Diagonal Lines” toggle to enable them. Then click on the “Color” field to pick a color. I’ll leave white as by default.
Then set the “Opacity” value. I’ll set it to 60%.
Step 15: Make a Logo Watermark Tile Pattern
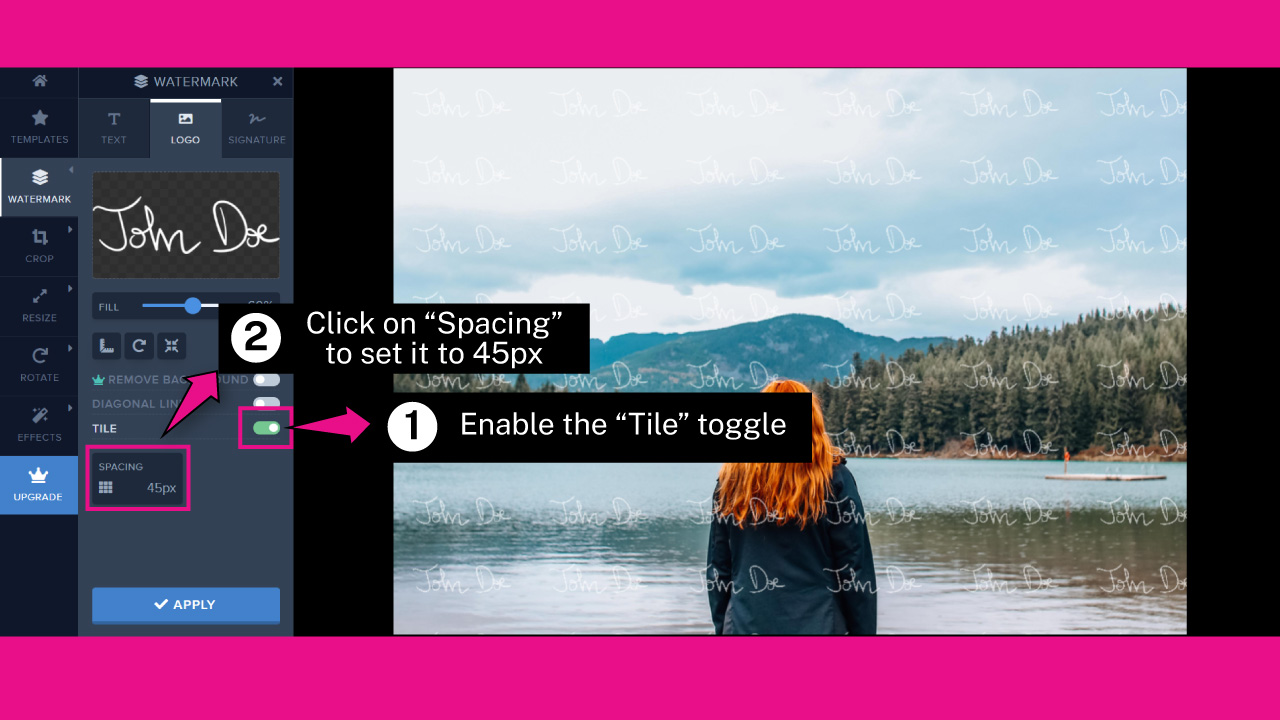
This procedure is also similar to the one we followed on “Step 10”.
Click on the “Tile” toggle to enable it.
Then set the “Spacing” value. I’ll set it to 45 px.
Step 16: Save the Image
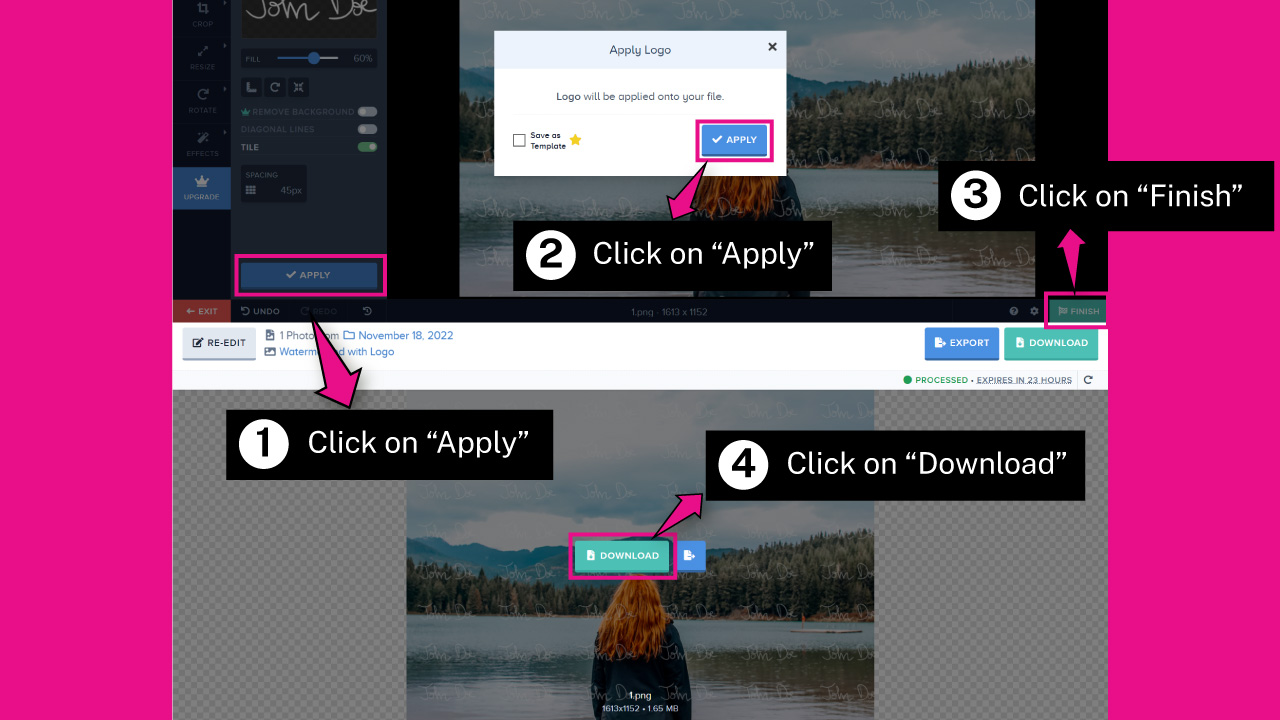
Once you’re satisfied with your custom watermark, click on the “Apply” button located at the bottom of the edition panel.
On the “Apply Logo” pop up window, uncheck the “Save as Template” button, since this tool is only available for premium users, and then click on the “Apply” button.
Next, click on the “Finish” button, located at the bottom right corner of the platform.
Wait a few seconds until the image is processed.
Once it’s done, place your mouse pointer over the image until the “Download” button displays, and then click on it to download it to your computer.
How to Put a Watermark on Photos in Bulk Using Pixlr
Go to pixlr.com/e. Upload an image. Design your watermark. Hide the background image. Save the template in PNG. Open another Pixlr session and upload all the images. Upload the watermark template. Save the image. Hide the image on top to make the one above visible. Save it and repeat the procedure.
Step 1: Go to the Pixlr Website
To make a watermark template to add in bulk to several images, you must create two versions of it. One for horizontal images, and the other one for vertical images.
I’ll be working with a horizontally oriented photo in the following steps, but keep in mind you should repeat the procedure to get a vertical template version as well.
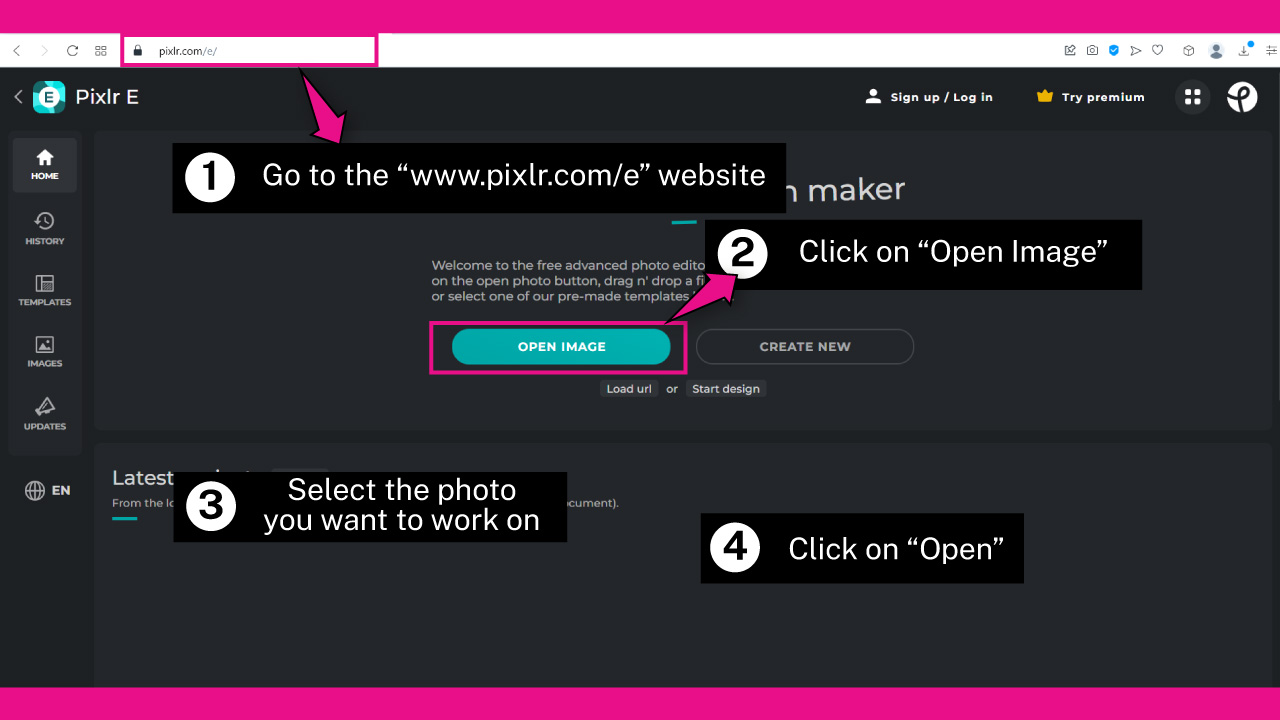
So, go to the pixlr.com/e website and click on the “Open Image” button.
On the pop up window, browse in your directory and locate one of the photo you want to work on.
Select the image and then click on the “Open” button.
Step 2: Add a Watermark Text
If you want to add a logo/signature watermark to your image, skip straight to “Step 8”.
If you want to add a text watermark to your image, continue reading.
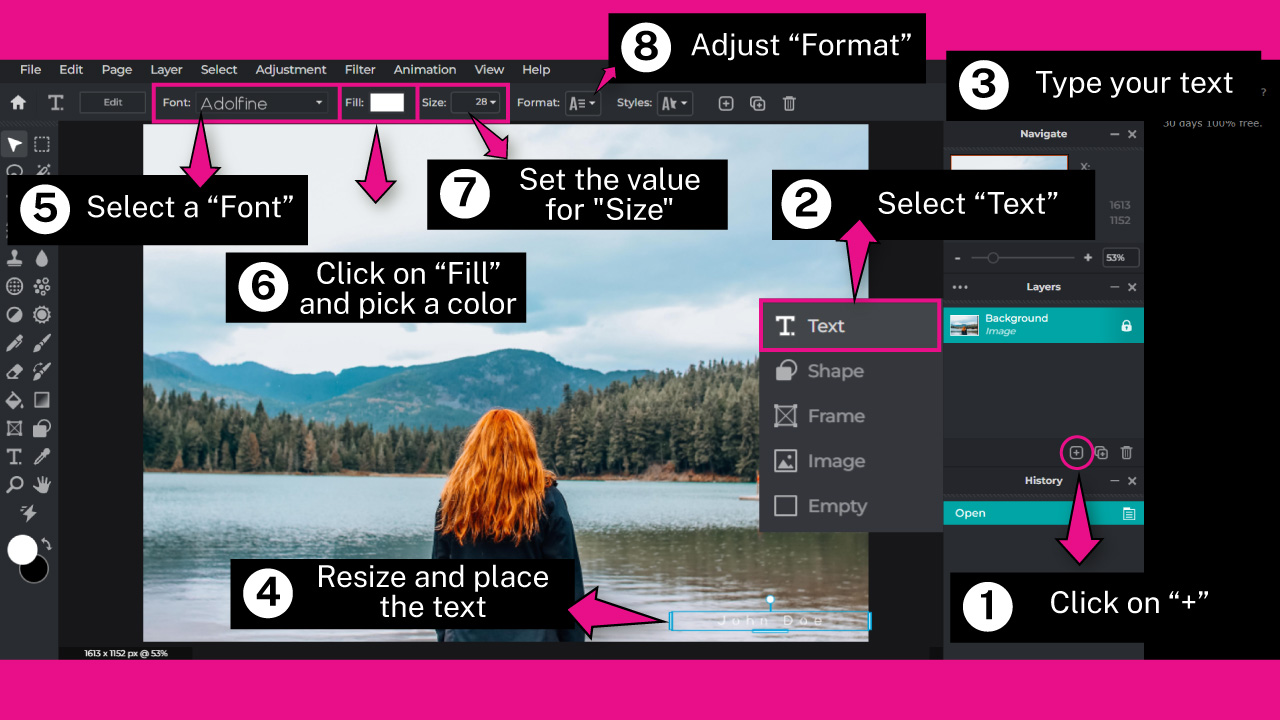
To add a text, go to the “Layers” panel on the right side toolbar, and click on the “+” icon button to add a new layer.
On the unfolded menu, select “Text”.
A text box will display on the canva. Type your desired text on it.
Use the bounding box handles to resize the text by left-clicking, holding and dragging.
Then put the text in place by also left-clicking, holding and dragging over the bounding box. I’ll place it at the bottom right corner.
There are some available functions to customize your text located on the toolbar at the top of the screen
Select a “Font” by clicking on the “Font” box. I’ll pick “Adolfine” for this example.
You can also add your own font by clicking on the “Add Local Font” button located at the bottom of the “Font” unfolded menu.
Click on the “Fill” box to pick a color. I’ll pick white.
Then, click on the “Size” box to set the font size. I’ll set it to 28 px.
Finally, click on the “Format” field to adjust the text format.
I’ll only modify the “Text Spacing” value to 100.
Step 3: Rasterize the Layer
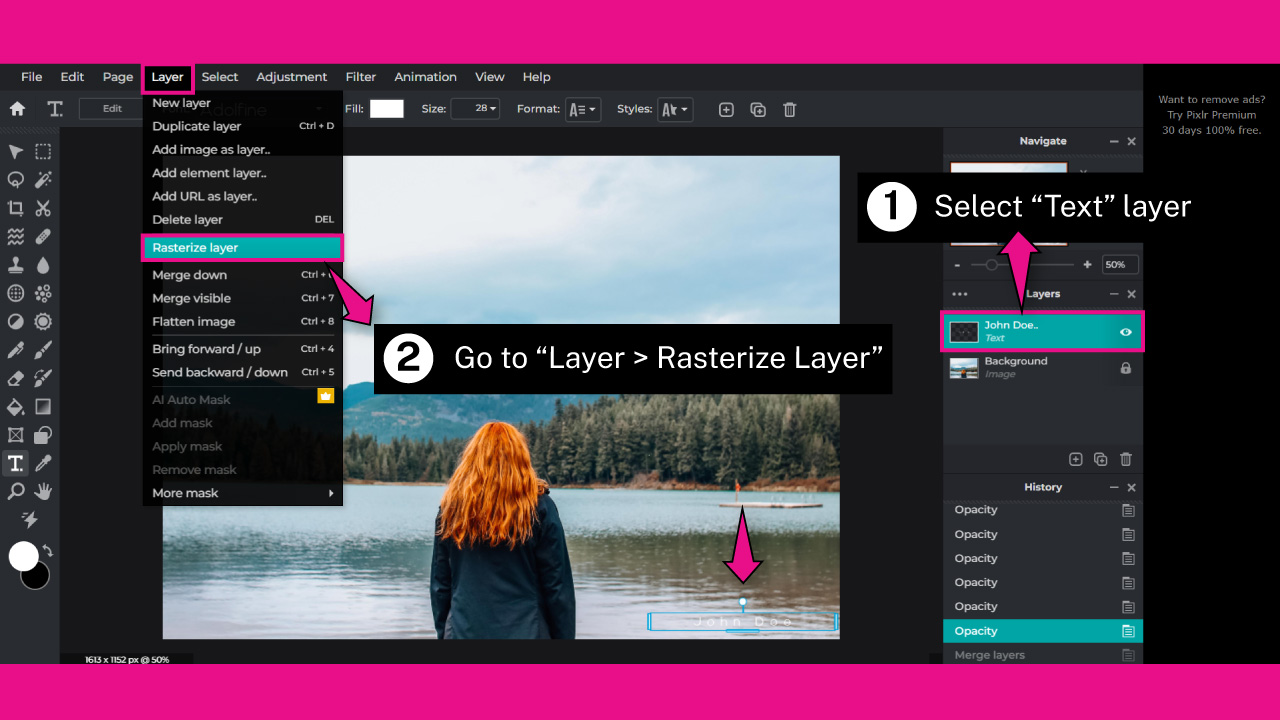
Once you’re happy with your text format, it is recommendable to rasterize the text so you can add effects to it.
To rasterize an image, first make sure you have the “Text” layer selected on the “Layers” panel.
Then go to “Layer > Rasterize Layer” on the menu at the top of the screen.
Step 4: Make the Text Transparent
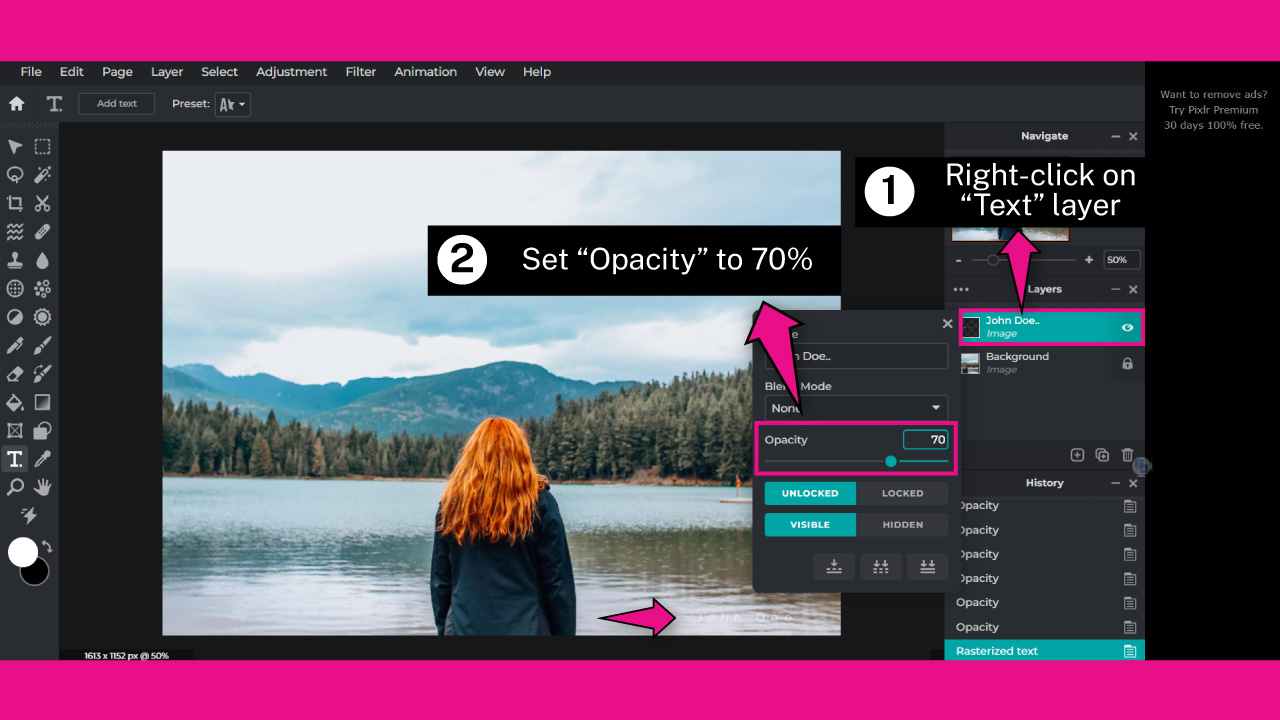
Go to the “Layers” panel and right-click on the layer.
On the popup window, set the “Transparency” around 70%.
For the next three steps we’ll be breaking down a few ideas to customize your text watermark. You can apply all of them at once, just one, or none.
Step 5: Add Shadows to the Watermark
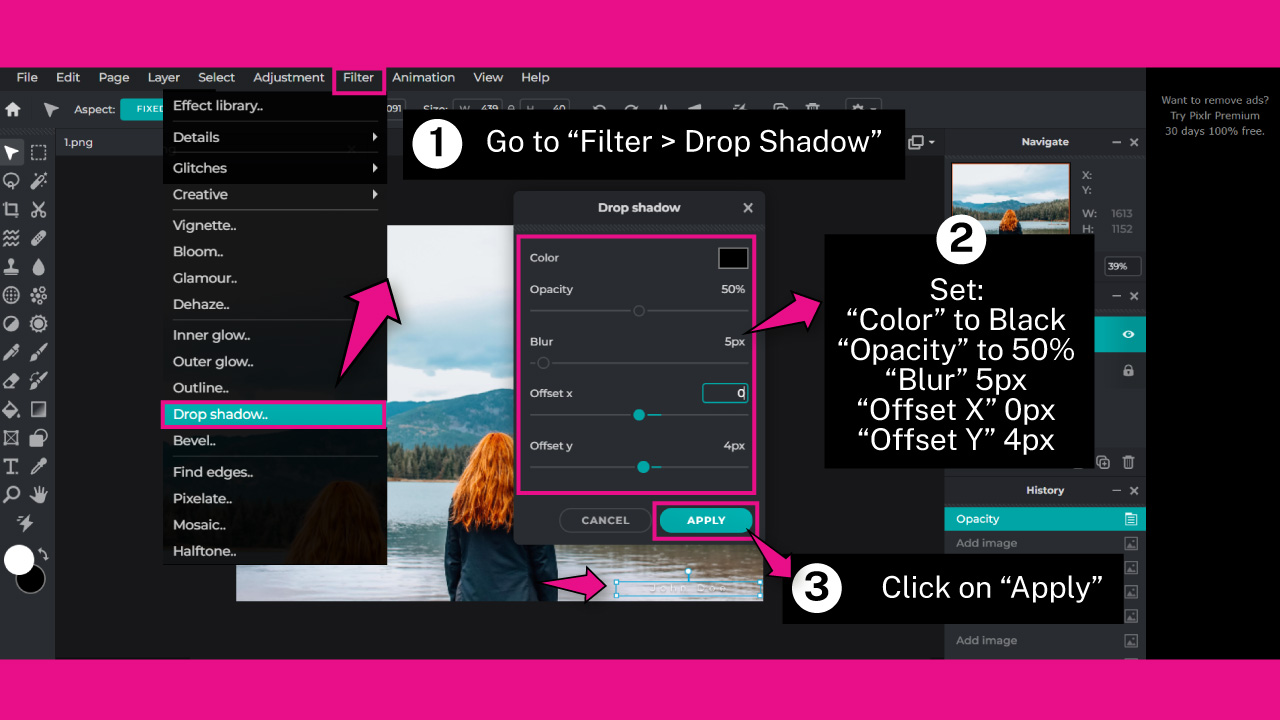
If you want to add shadows to your watermark to help your text pop from the background, go to “Filter > Drop Shadow” on the menu at the top of the screen.
Once the “Drop Shadow” window pops up, you can adjust the shadow settings.
I’ll set it this way:
“Color” to Black
“Opacity” to 50%
“Blur” 5px
“Offset X” 0px
“Offset Y” 4px
Click on “Apply” to save changes.
Step 6: Add Strokes to the Watermark
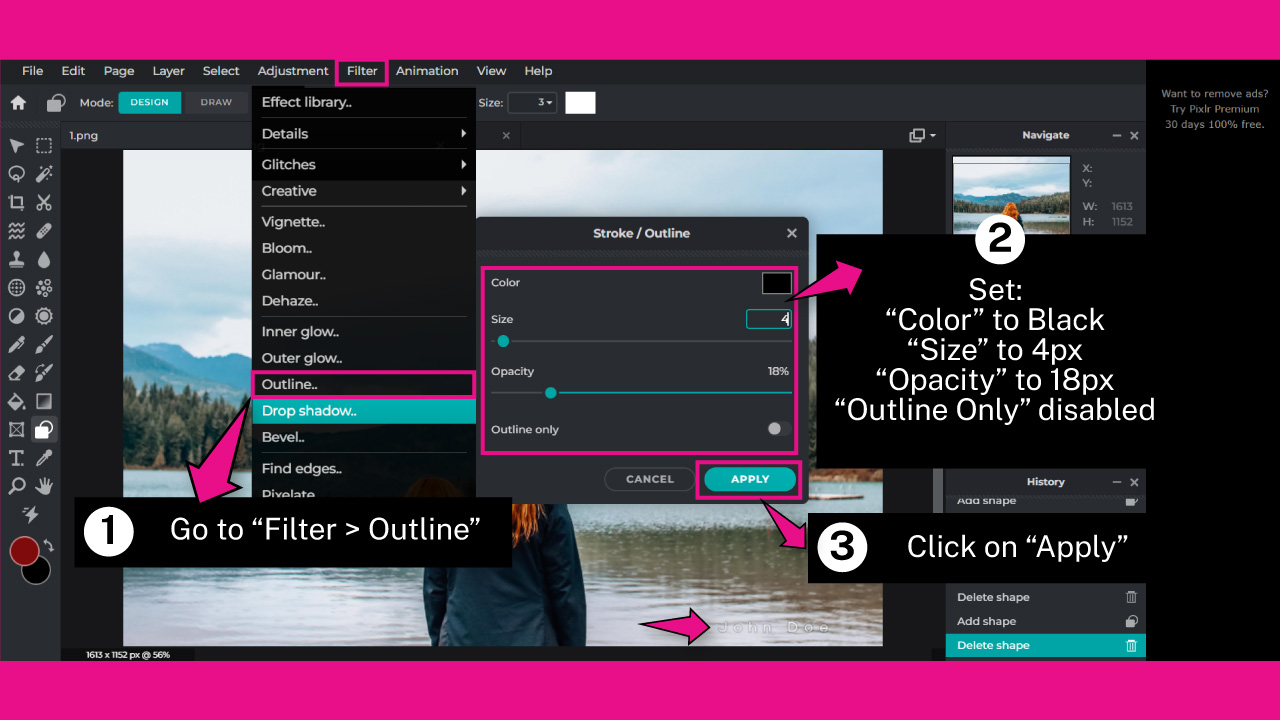
If you want to add strokes to your watermark to help your text pop from the background, go to “Filter > Outline” on the menu at the top of the screen.
Once the “Stroke / Outline” window pops up, you can adjust the stroke settings.
I’ll set it this way:
“Color” to Black
“Size” to 4px
“Opacity” to 18%
“Outline Only” toggle disabled.
Click on “Apply” to save changes
Step 7: Add Background to the Watermark
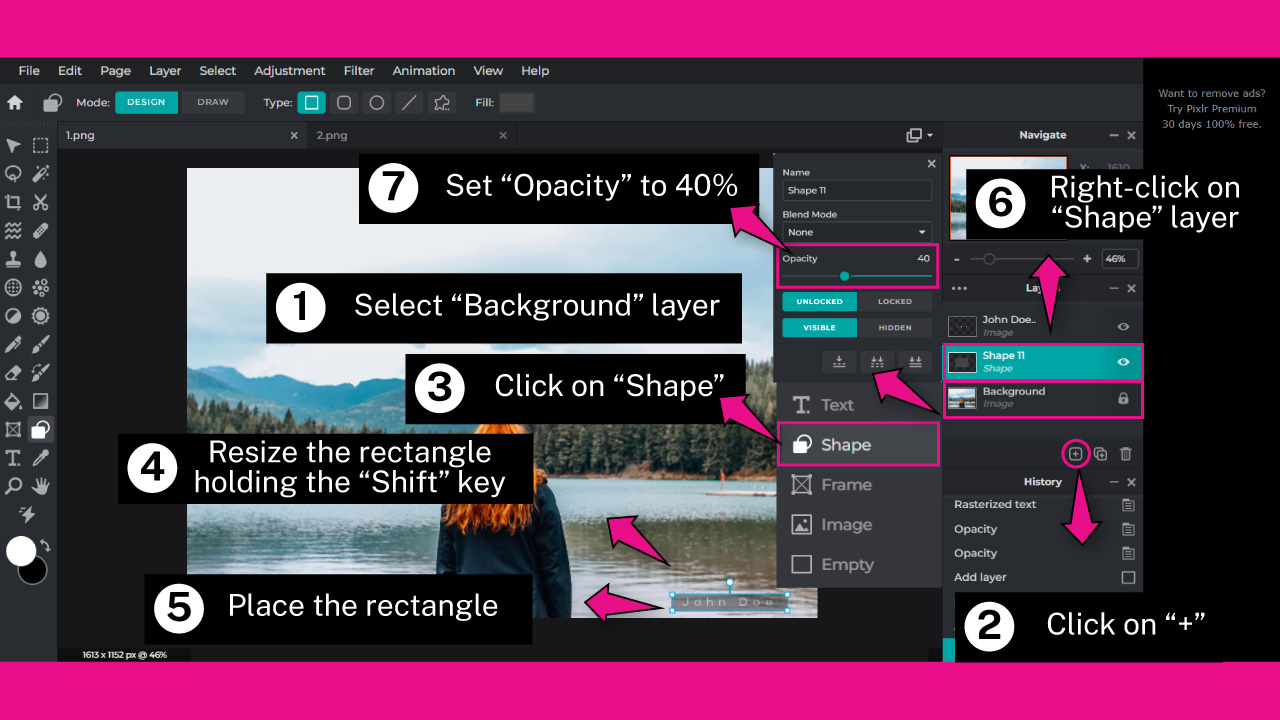
If you want to add a background to your watermark to help your text pop from the background, go to the “Layers” panel.
Click on the “Background” layer, and then click on the “+” icon. On the unfolded options window, select the “Shape” option. A gray rectangle will be displayed on the center of the canva.
Resize the rectangle by holding the “Shift” key while you left-click, hold and drag the handles of the bounding box.
You have to hold the “Shift” key to unlock the rectangle proportions and resize it to fit your text background.
Next, place the rectangle right behind the text.
On the top side toolbar, click on the “Fill” color box to pick a color. I’ll pick black.
Finally, if you want to add transparency to your background to suit your text better, go to the “Layers” panel and right-click on the brand new “Shape” layer. On the unfolded window, set the value for the “Opacity” field.
I’ll set it to 40%.
Step 8: Add a Logo or Signature as Watermark
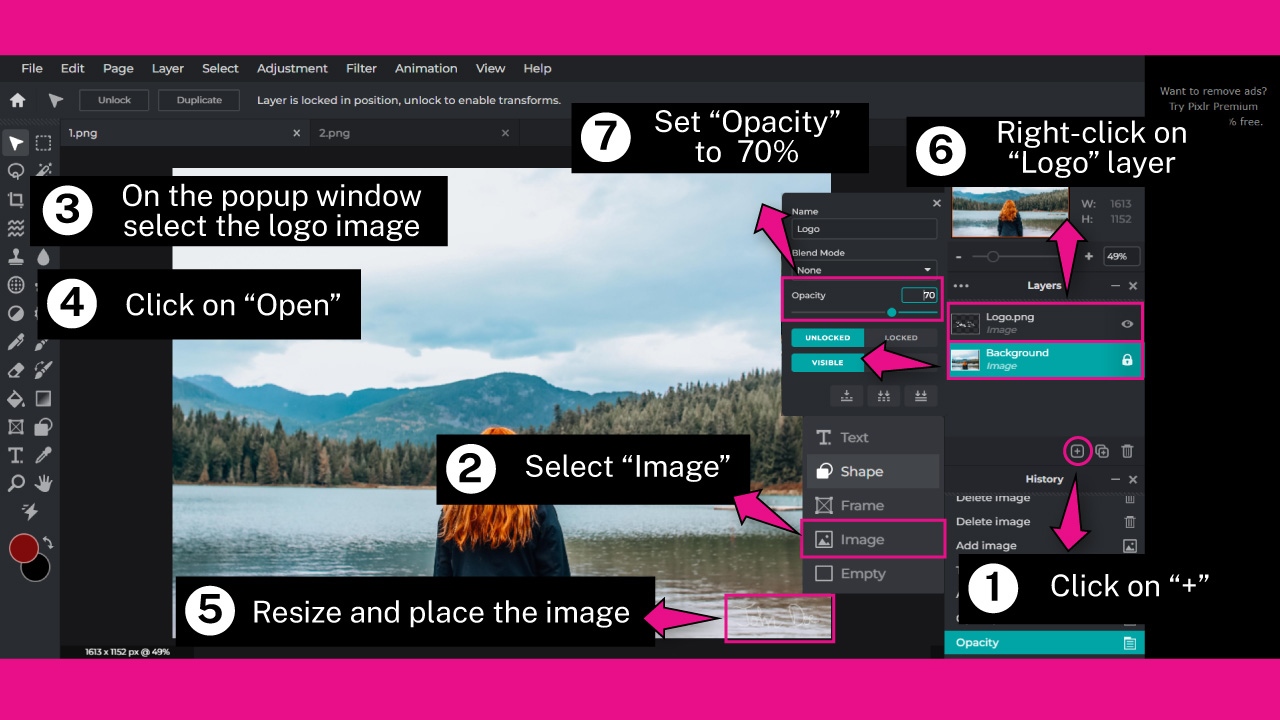
If you want to add a logo or a signature watermark that you previously prepared, go to the “Layers” panel.
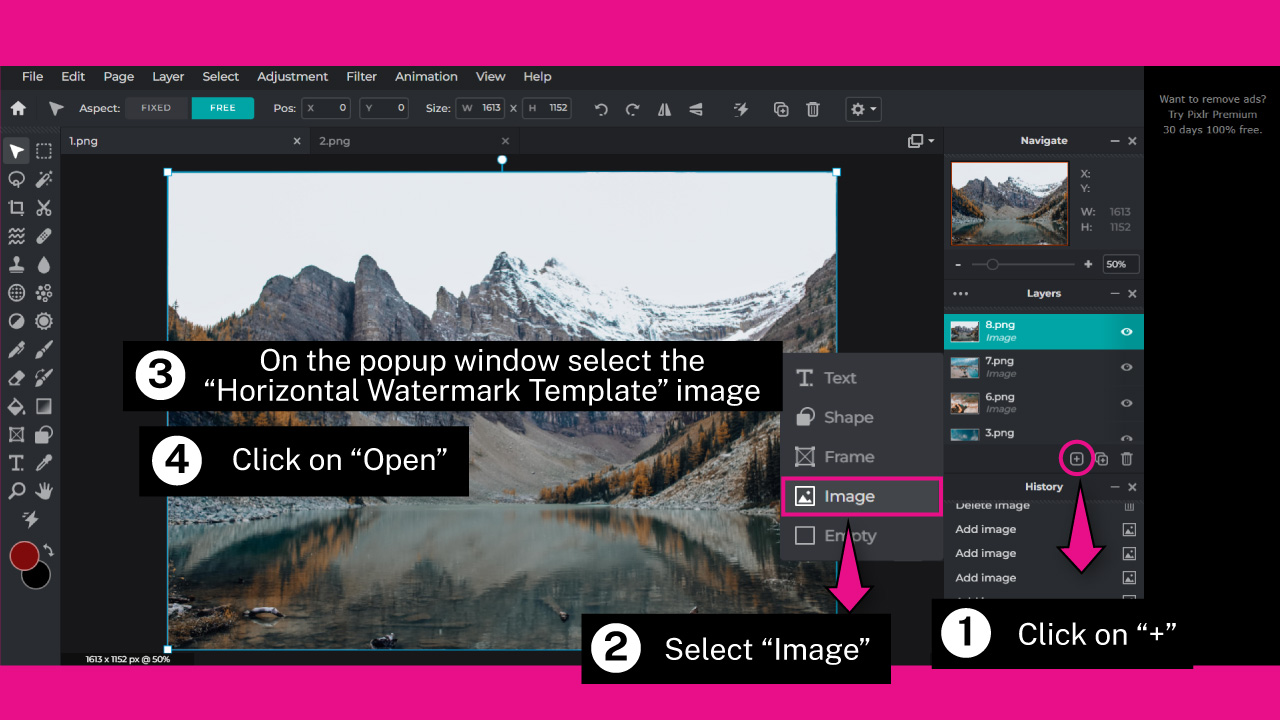
Click on the “+” icon to add a new layer. On the unfolded menu, select “Image”.
Once the window pops up, browse in your directory and locate the logo or signature image.
Select the image and then click on the “Open” button.
Resize the logo using the handles of the bounding box. Then place it.
Finally, right-click on the “Logo” layer from the “Layers” panel.
On the pop up window, set the “Opacity” around 70%.
Step 9: Add Diagonal Lines as Watermarks
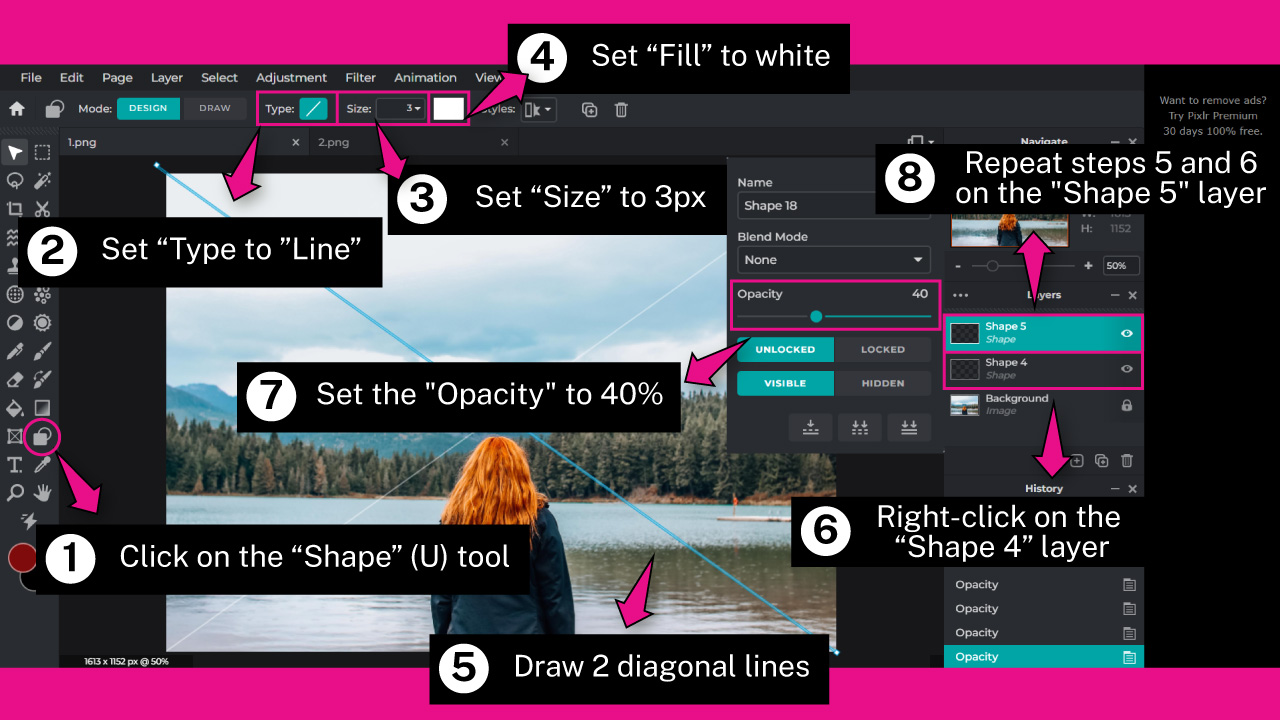
If you want to add diagonal lines as watermarks, click on the “Shape” (U) tool located on the left side toolbar.
On the toolbar at the top of the screen, select the “Line” tool.
Then set the “Size” field, and click on the “Fill” box to pick a color.
I’ll set the “Size” value to 3px, and pick white as the fill color.
Once you have your line set, draw two diagonal lines crossing the canva from corner to corner.
Make them transparent by going to the “Layers” panel and right-clicking on each “Shape” layer.
On the pop up window, set the “Opacity” value to 40%.
Step 10: Hide the Background
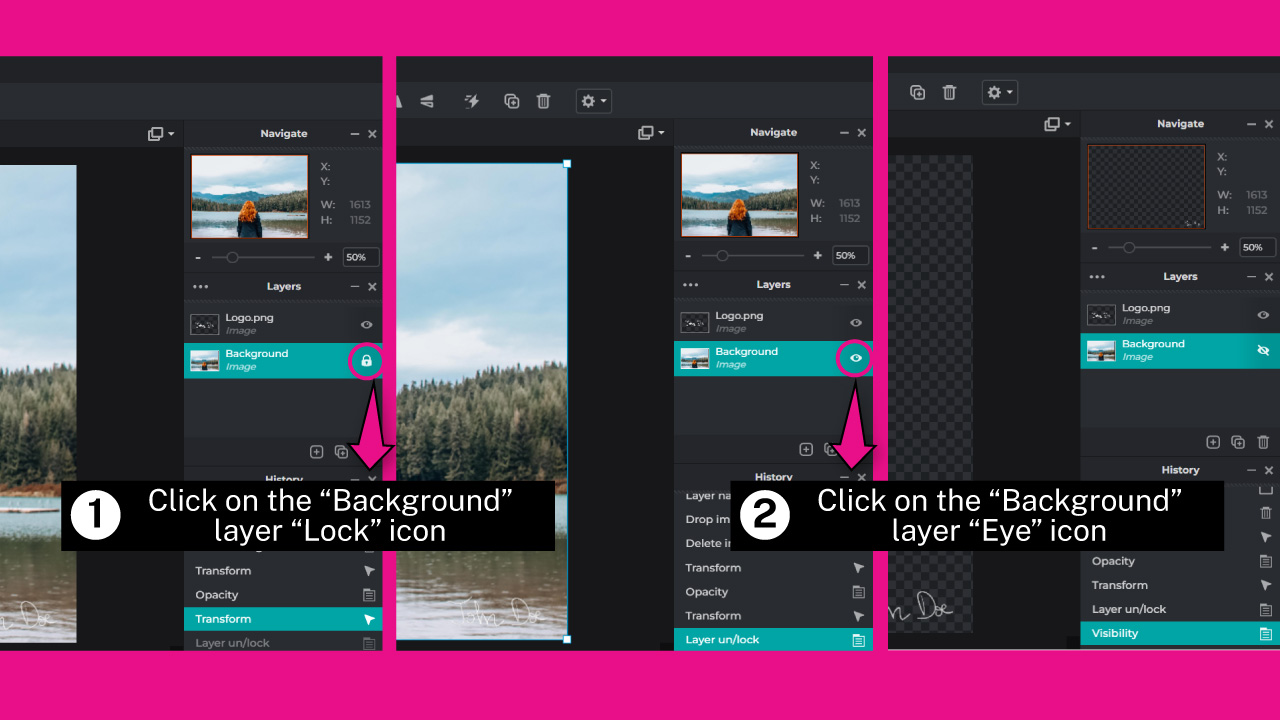
Once you finish editing your text, logo, or diagonal lines watermark, you need to convert the watermark to a template in order to be able to apply it to photos in bulk.
To get this done, go to the “Layers” panel.
Click on the “Background” layer “Lock” icon to unlock it.
Once you’ve done this, the “Eye” icon should be displayed under the “Lock” icon.
Click on the “Eye” icon to hide the background layer.
Now you have set your watermark with no background.
Step 11: Save the Watermark Template
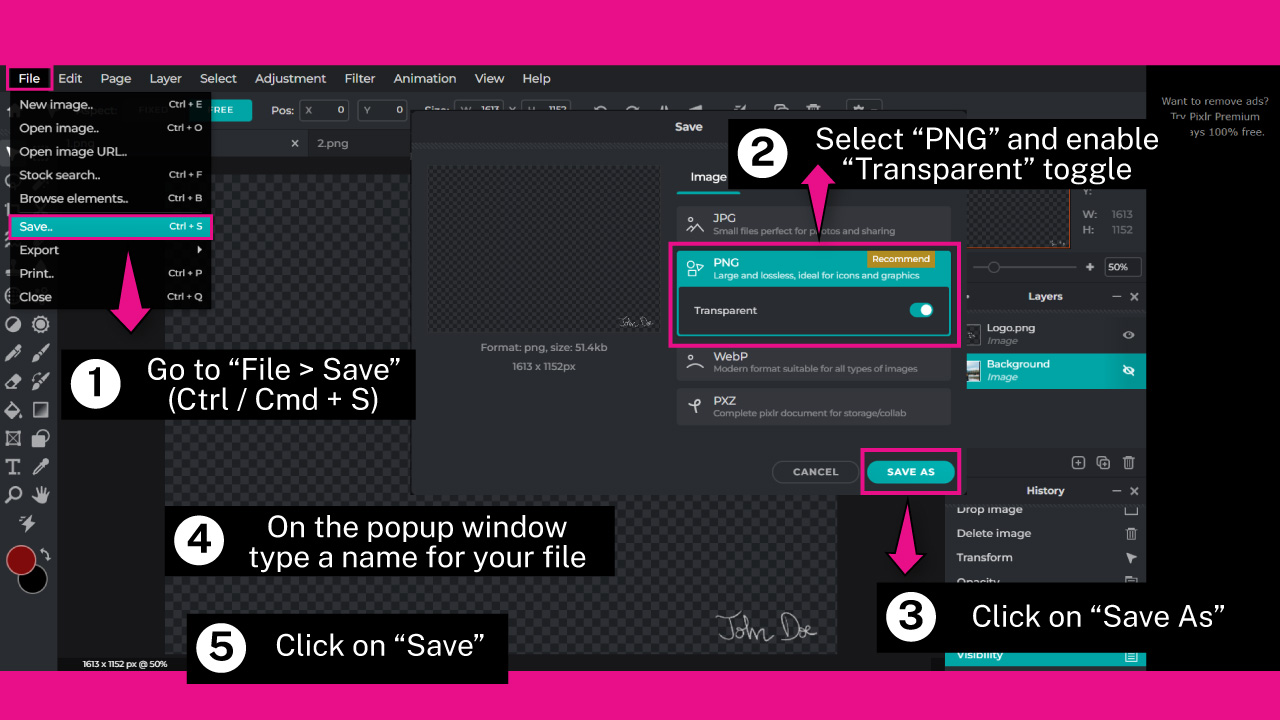
To save your edited image, go to “File > Save” on the menu at the top of the screen.
Or press the “Ctrl + S” command on Windows, or “Cmd + S” on Mac to shortcut it.
Select the “PNG” option and make sure the “Transparent” toggle is enabled.
On the pop up window, type “Horizontal Watermark Template” or your desired name, and click on the “Save” button.
You need to have an account to be able to download your edited image. You can create an account for free. The process is very quick and simple.
“Sing Up” registering an email address, or “Log In” using your “Google”, “Facebook” or “Apple” account.
Once you’re logged in, you will be able to download the image to your computer.
Step 12: Open a Horizontal Image
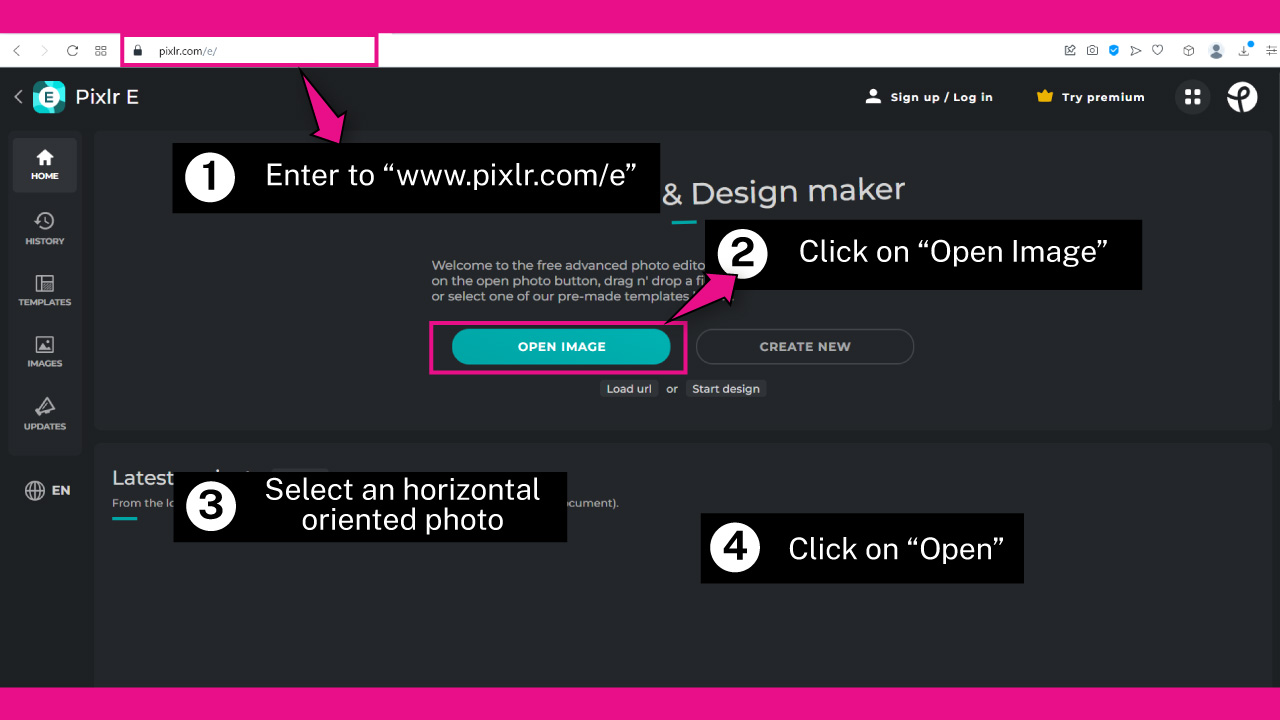
To add the watermark template to several images, go to the pixlr.com/e website once again, and click on the “Open Image” button.
On the pop up window, browse in your directory and locate a horizontally oriented image. Select the image, and then click on the “Open” button.
Step 13: Import All Horizontal Images
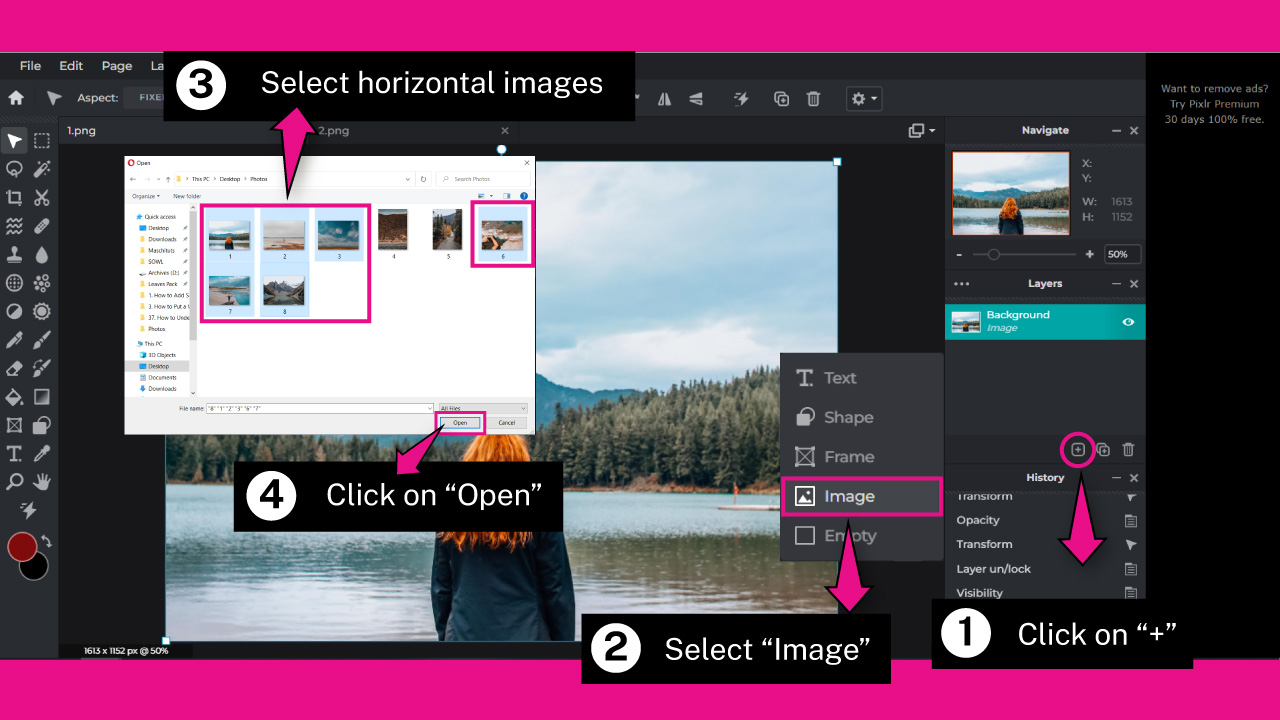
Go to the “Layers” panel and click on the “+” icon. On the unfolded menu select “Image”, and on the pop up window select all the horizontally oriented images.
To select several images at the same time, hold the “Ctrl” / “Cmd” key as you click on the images.
Then, click on the “Open” button to add the selected images to the current Pixlr session. These will be displayed on the “Layers” panel.
It’s recommended that all images have the same size, so you don’t have to make any further modifications. Otherwise, you should resize the template to adjust it for each image.
Step 14: Open the Watermark Template
On the “Layers” panel, select the layer on top.
Then, click on the “+” icon once again. On the unfolded menu select “Image”, and on the pop up window, select the horizontal watermark template you saved on “Step 11”.
This watermark will be applied on top of all horizontal images.
Step 15: Save Watermarked Images
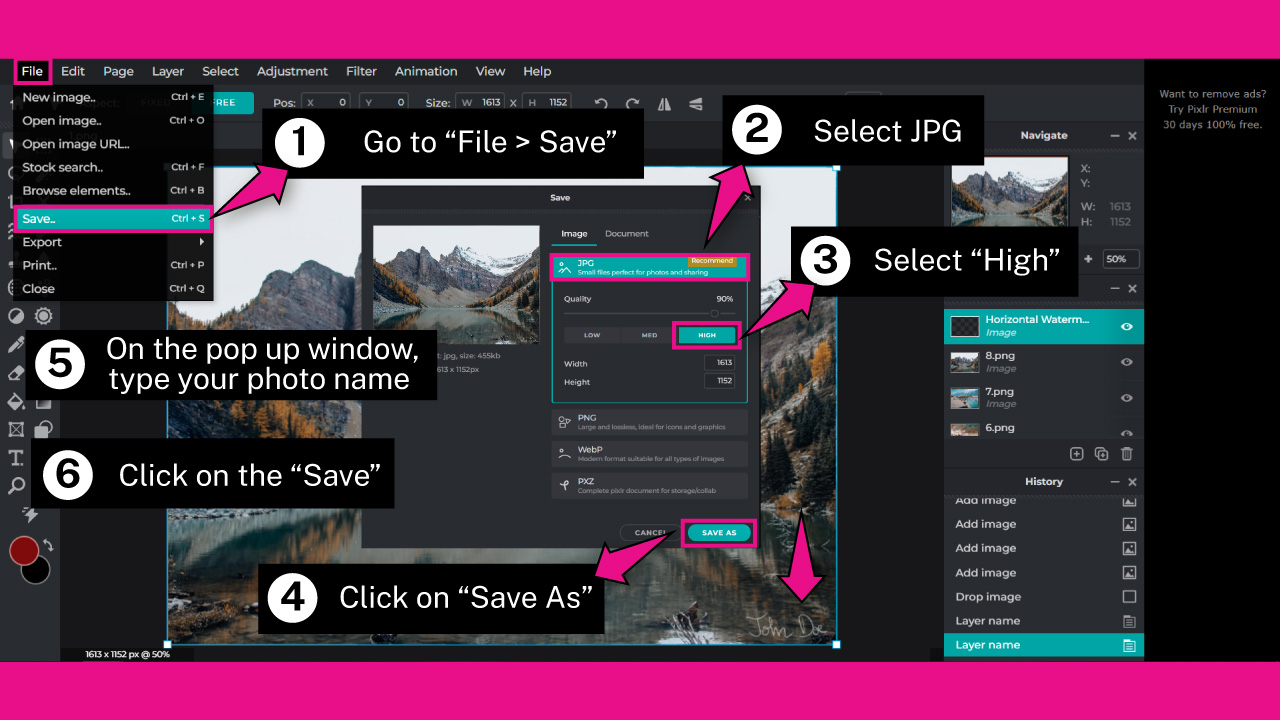
First you need to save the current image with the watermark, so go to “File > Save” on the menu at the top of the screen.
Or press the “Ctrl + S” command on Windows, or “Cmd + S” on Mac to shortcut it.
Select the “JPG” option, and then click on “High” quality. Next, click on the “Save As” button.
On the pop up window, type your photo name and click on the “Save” button.
Step 16: Save Watermarked Images in Bulk
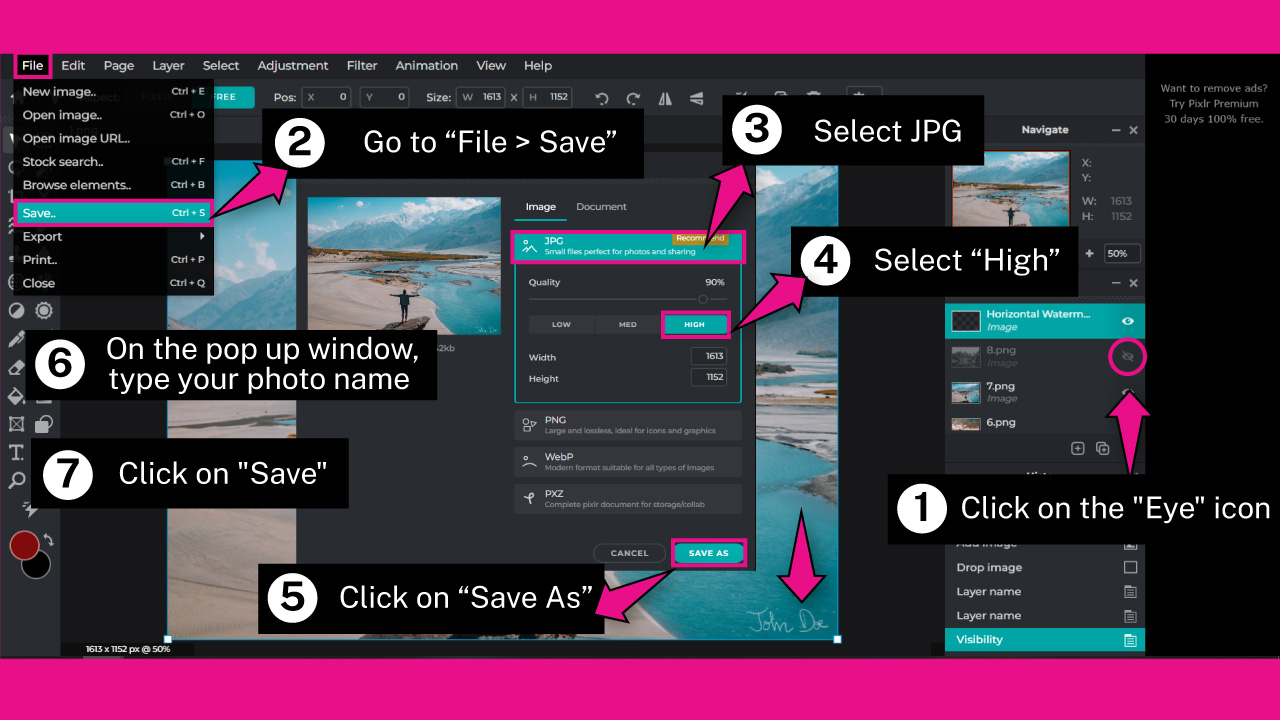
To save watermarked images in bulk, go to the “Layers” panel and hide the last image layer by clicking on its “Eye” icon.
This will be the “8.png” layer for my session.
Once you’ve done this, the watermark template will be displayed on the image right above.
Now we need to save the image like we did in the previous step.
Go to “File > Save” on the menu at the top of the screen.
Or press the “Ctrl + S” command on Windows, or “Cmd + S” on Mac to shortcut it.
Select the “JPG” option, and then click on “High” quality. Next, click on the “Save As” button.
On the pop up window, type your photo name and click on the “Save” button.
Repeat “Step 16” until you finish with the whole image list you imported.
Frequently Asked Questions on “How to Put a Watermark on a Photo without Photoshop”
How can I add a Signature on the website watermark.ws?
Signature tool isn’t available yet, but soon it will. Meantime, you can draw your signature on Pixlr, Krita, Gimp, or any similar software. Then save it in a transparent background and upload it on the “Watermark” website as a signature.
How to put a watermark on photos in bulk on the website watermark.ws?
“Watermark” has a tool to apply watermarks in bulk, however this is limited for premium users. If you want to add in several photos, you have to use another app like Pixlr.
What are the “Straighten Angle”, “Rotate Right” and “Move to Center” tools from watermark.ws for?
The “Straighten Angle” tool is to reset the angle of a rotated watermark. The “Rotate Right” tool is to rotate the watermark 90° each time. And the “Move to Center” tool is to center the watermark to the middle of the canva.
How to Import a Font on watermark.ws?
To import a font in the “Watermark” website, go to the “Edition” mode. Then click on the “Watermark” option on the left side menu. Next, click on the “Font” box to unfold the menu. At the top of the menu you will find a “+ Import” button. Click on it and select a font from your local files.
How to make a watermark text or logo tile in Pixlr?
Unfortunately there is no automatic function to make your watermark text or logo tile. You have to do it manually by copying and pasting until it covers the whole screen.

I am a professional blogger and entrepreneur with a strong interest and passion in photo editing. On MindRelic, I happily share my expertise in the photo editing niche with all of you guys!