

Sometimes when we try to edit a photo for a meme, or just to make our friends laugh, we’re quite not sure what app we should use.
Have you ever worked on an edition for several minutes, or even hours, just to find out later that you need to purchase a paid plan if you want to download your edited image?
Well, we’re about to show you two easy, quick, online and free methods you can use to get crazy good editions.
The first method features FaceSwap, a very simple app that allows you to swap faces or heads in a very quick and easy way.
The second method involves two apps, PicWish and Pixlr. PicWish removes backgrounds, but you can also remove the rest of the body as well.
Then we’ll use Pixlr to overlay the background and the cropped face image.
Of course, there are plenty of other apps capable of getting the job done, but most of them are paid apps, and in most cases the free version somehow limits the program.
How to Put a Face on another Body Without Photoshop
You can either: Go to faceswaponline.com and click on Compositor. Upload the photos, crop the face and increase Feather value. Or, go to PicWish and click on Remove Background. Upload an image and erase the body. Then go to Pixlr to overlap the cropped face and the new body.
How to Put a Face on another Body Using FaceSwap
Go to the FaceSwap website and click on the “Compositor” tab. Go to “Insert > Image (Upload)” to upload the photos. Use the “Lasso” tool to trace the face contour and crop the face. Resize and place the face. Set the “Feather” slider to a higher value. Go to “File > Download” to download the image.
Step 1: Go to the FaceSwap Website
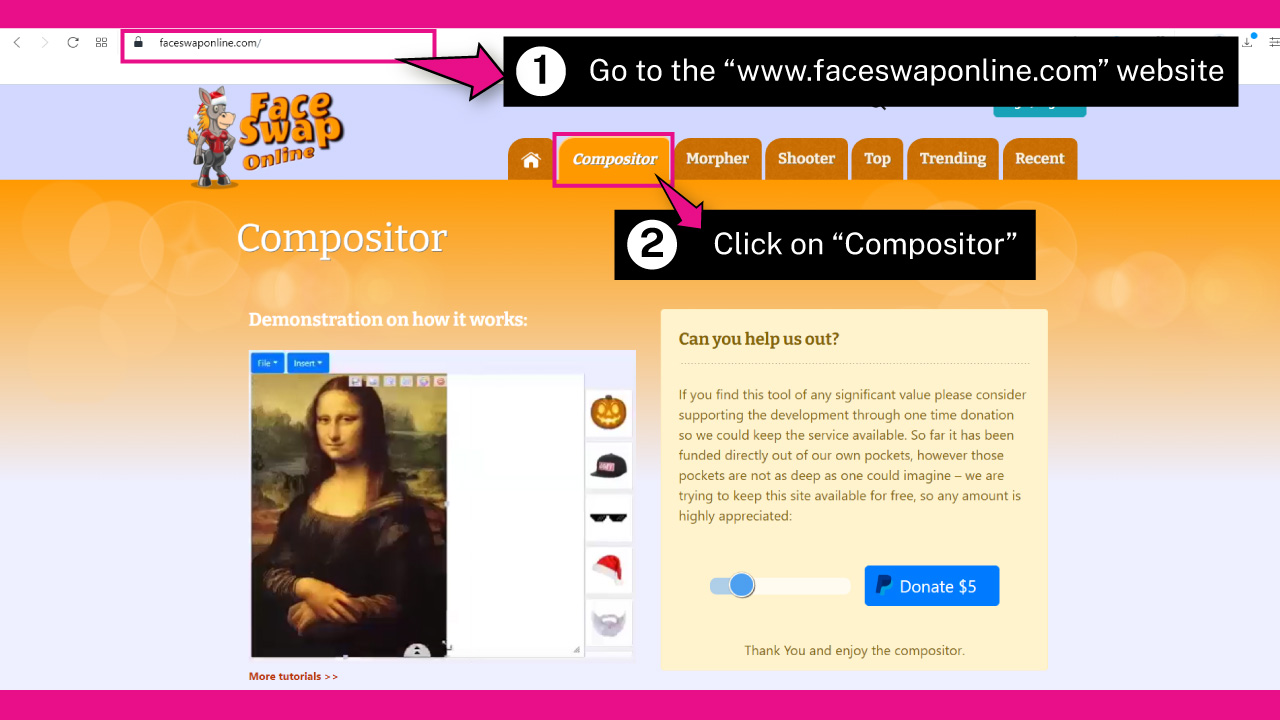
Open your browser, go to the faceswaponline.com website and click on the “Compositor” tab.
Step 2: Import the Images
Once on the “Compositor” tab, scroll down a bit to find the canva workplace.
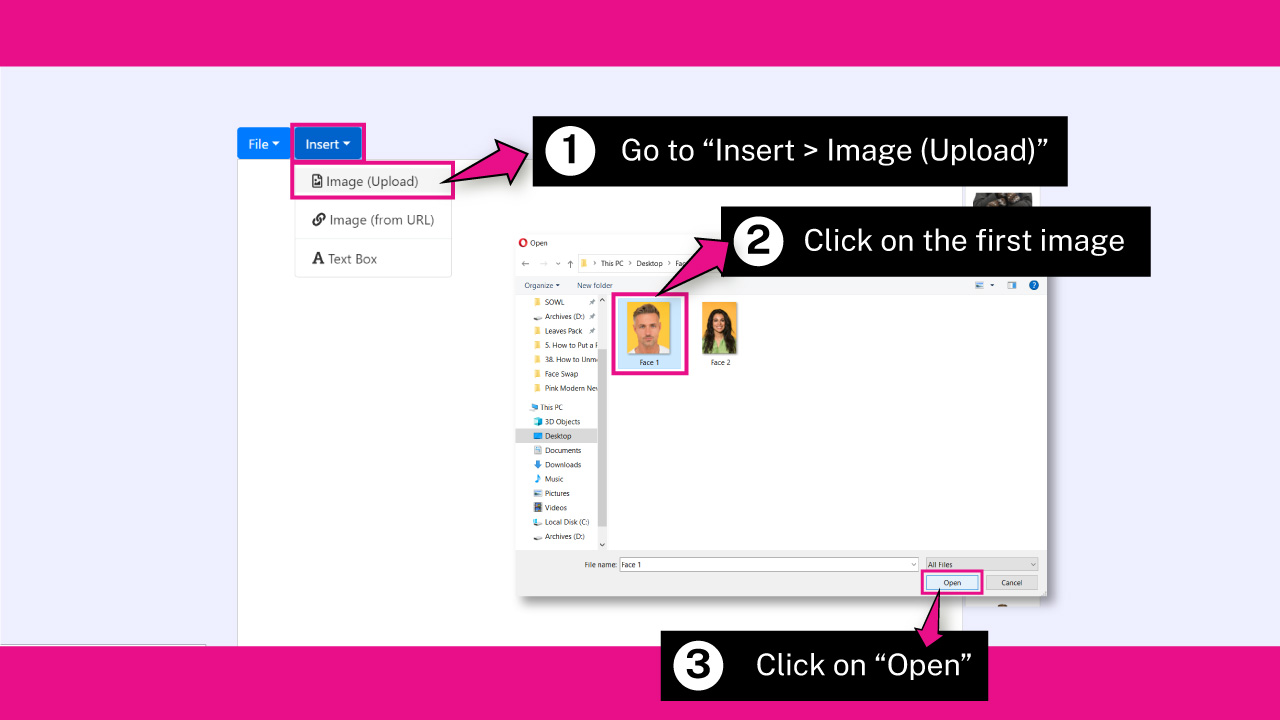
Click on the “Insert” button. If your images are on your computer, click on the “Image (Upload)” option.
If you want to use online images, select the “Image (From URL)” option and enter the URLs.
My images are on my computer, so I’ll select the “Image (Upload)” option.
When the local files window pops up, browse in your directory and locate the first image you want to work with. This photo will work as a base where we’ll place the new face.
Select the image, and then click on the “Open” button.
Now import the second photo following the same process, and go to “Insert > Image (Upload)”. Select the second photo and click on the “Open” button.
Step 3: Crop the Face

Click on the “Arrows” button from the bottom toolbar to collapse it and increase your working space.
Then, click on the “Lasso” tool located at the top of the second image, next to the rest of the tools.
Once you’ve clicked on the “Lasso” tool, the second image will automatically display with transparecy. This is mostly useful when you already resized both images and made the faces the same.
Use the “Lasso” tool to trace the face contour. It doesn’t have to be perfect.
Once you join both lasso ends, the face will crop automatically.
Keep in mind there is no “Undo” or “Ctrl + Z” / “Cmd + Z” option in this app. So if you want to go back in your selection, you will need to delete the image by clicking on the “Do Not Enter” red circle sign and import the image again.
Even though this app is so basic that it doesn’t even have a “Zoom” tool, you can still use the “Ctrl + +” (Windows) or “Cmd + +” (Mac) command to zoom in.
To zoom out use the “Ctrl + -” (Windows) or “Cmd + -” (Mac) command.
Step 4: Resize and Place the Cropped Face
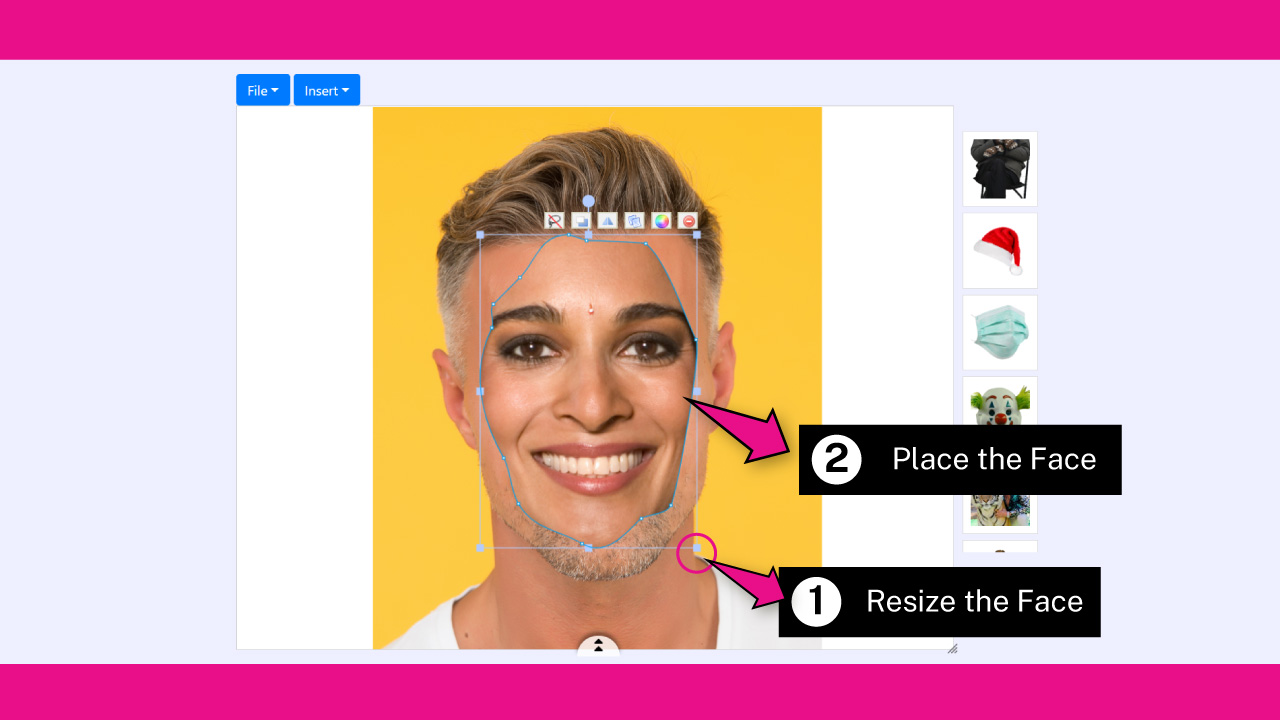
Once you have the face cropped, resize the image by left-clicking, holding and dragging the handles of the bounding box.
Then place it over the background image to match the main features of both faces.
Even if you can’t undo and go back to previous states as we stated on the previous step, you can make some retouches to the cropped face using the anchor points.
If the cropping is not quite good enough in certain spots, you can try to fix it by left-clicking, holding and dragging the anchor points.
You can use the anchor point handles as well to adjust the anchor point curves.
Step 5: Adjust the “Feather” Value
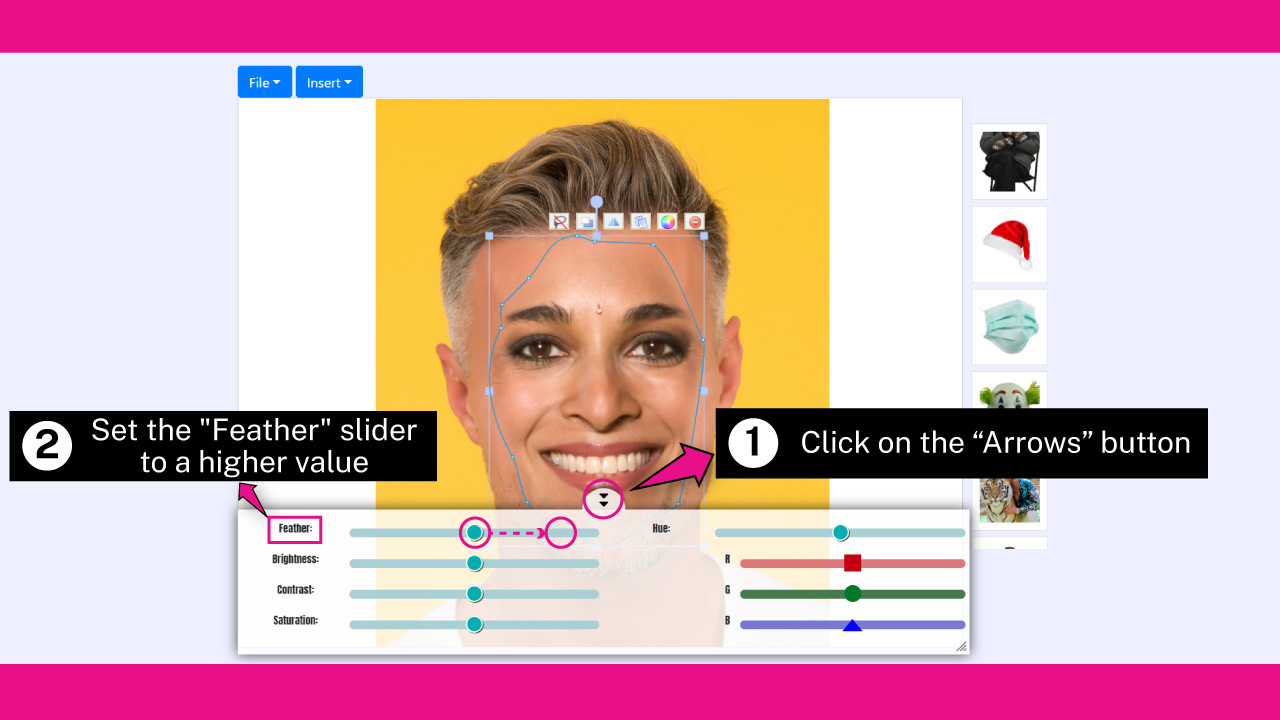
Now click on the “Arrows” button at the bottom of the screen to open the collapsed toolbar.
Then, drag the “Feather” slider to the right to make the cropped edges blurry and match the background better.
There are more available tools you can use to match both faces, like “Brightness”, “Contrast” and “Saturation” or, “Hue”, “Reds”, “Greens” and “Blues”.
Use these tools if necessary. I’ll leave these values by default.
Step 6: Save the Image
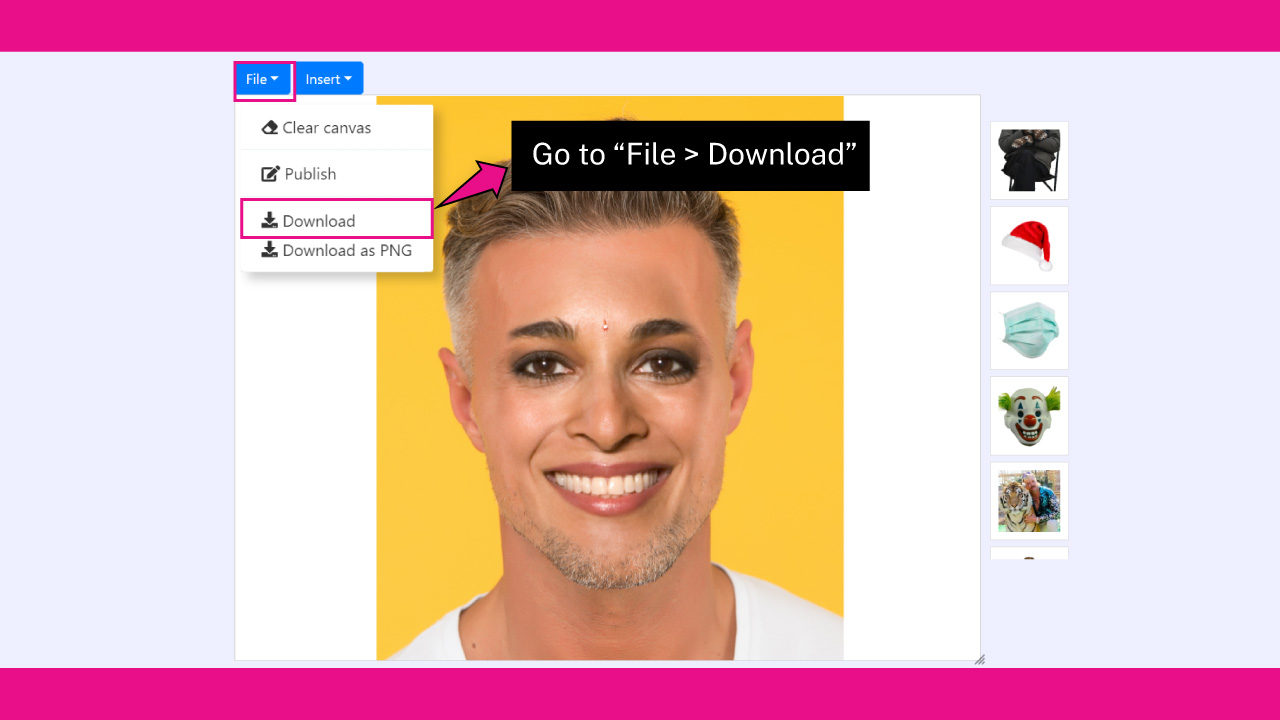
To save and download the image, click on the “File” button, and on the unfolded menu select “Download” if you want your image in the JPG extension.
Otherwise, click on “Download as PNG”.
Once you’ve selected your extension, the image will automatically download. There’s no need to open an account.
The Result
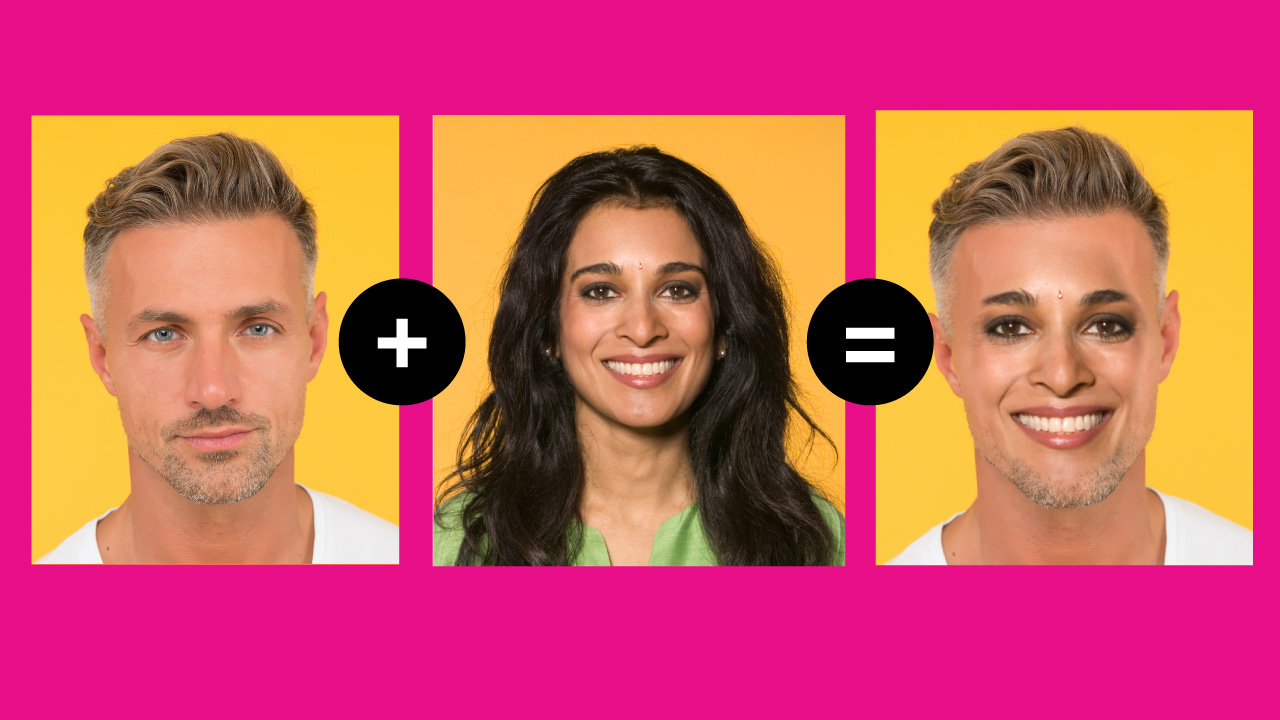
This is the result on how to put a face on another body using FaceSwap.
How to Put a Face on another Body using PicWish & Pixlr
Go to the PicWish website and click on the Remove Background tool. Upload an image and erase the rest of the body. Download the face image. Go to the Pixlr website and upload the base and face photos. Resize and place the face. Get rid of the face extra areas. Save the image.
Step 1: Go to the PicWish Website and Upload an Image
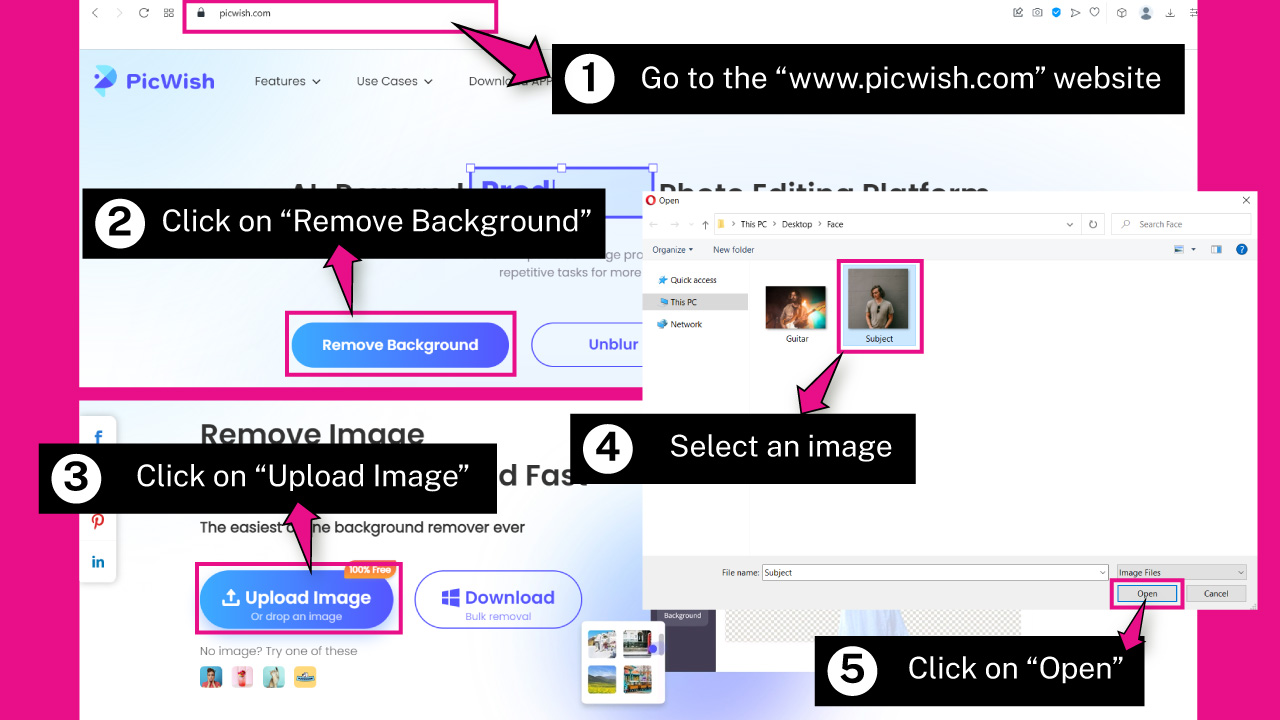
Open your favorite browser and go to the picwish.com website. Click on the “Remove Background” button.
Next, click on the “Upload Image” button to open the local files window.
Browse in your directory and locate the image you want to work with.
Select the image, and then click on the “Open” button.
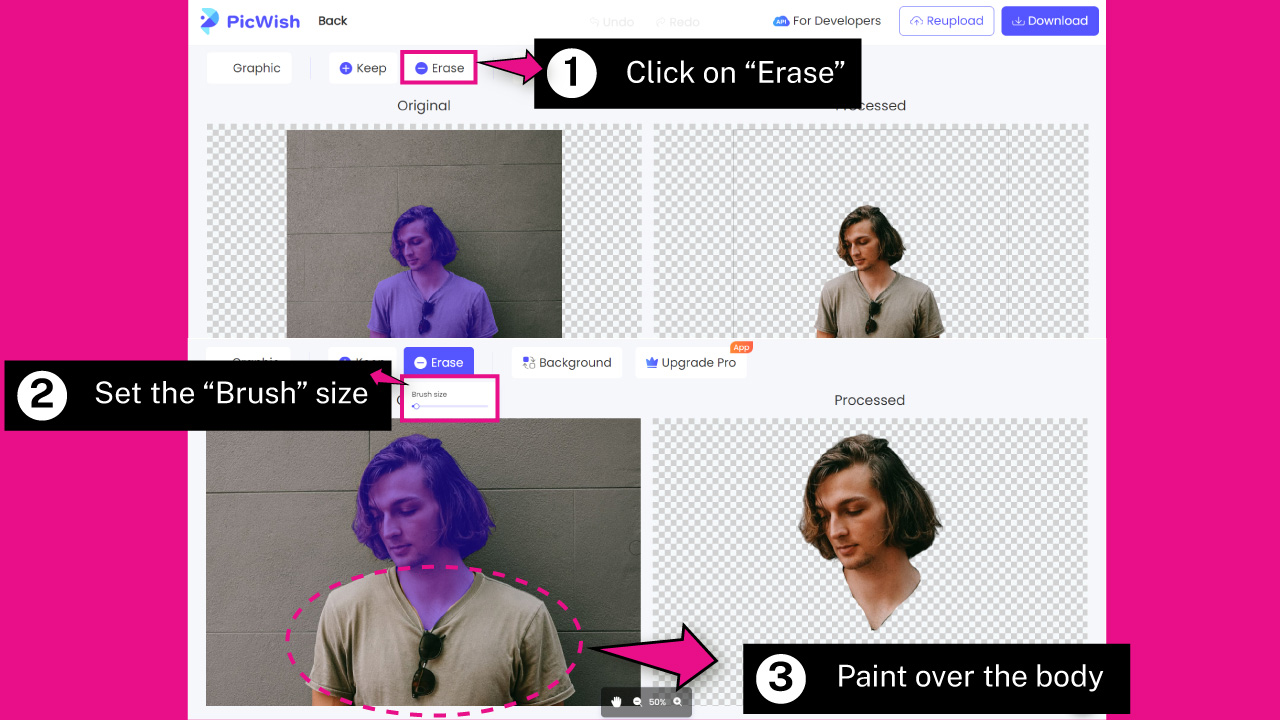
Step 2: Remove the Body
Wait a few seconds for the image to get processed. The background will be automatically removed.
You will get two versions. The “Processed” image on the right side, and the “Original” image on the left side.
If the processed image isn’t what you’re looking for, you can edit the selected area on the “Original” photo.
Since we only need the face of the subject, we have to erase the body as well.
To erase the body, click on the “Erase” button on the toolbar at the top of the screen.
Once you do this, a small window will unfold. There you can set the “Brush Size” value.
Adjust the “Brush Size” slider value to your desired size.
Next, paint over the subject’s body to get rid of it. We only want to keep the face and the neck. The endings of the neck don’t have to be perfect, we’ll take care of that later.
Keep in mind that the blue area on the “Original” image is the area that will be kept on the processed image.
If you mistakenly erased any areas you wanted to keep, just click on the “Keep” button located on the same toolbar at the top of the screen, and paint over those areas to recover them.
You can use the “Zoom” tool at the bottom of the screen to “Zoom In” and make an accurate body removal.
Step 3: Download the Image
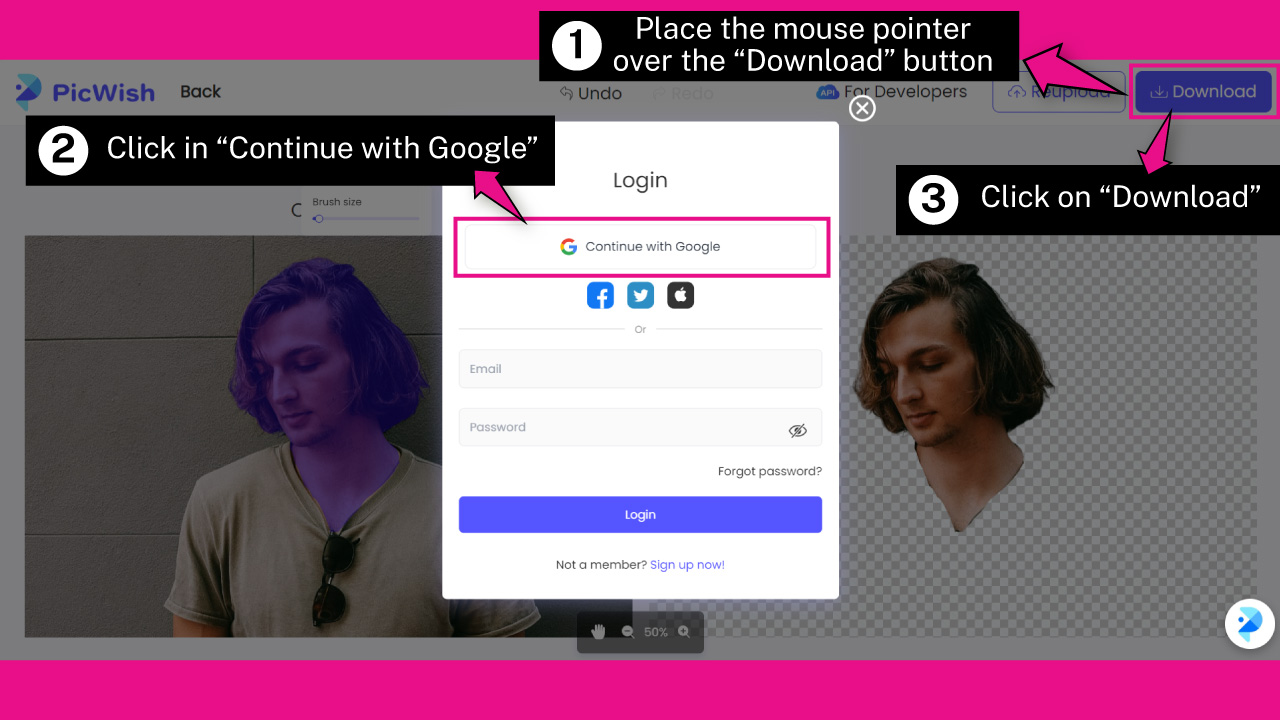
In order to download the image, you will need to “Log In” first.
Once you place the mouse pointer over the “Download” button located at the top right corner of the screen, a “Log In” window will pop up automatically.
There you can click on the “Sign Up Now!” link at the bottom of the window and continue with the registration steps, or you can use your “Google”, “Facebook”, “Twitter” or “Apple ID” account to sign up.
I’ll use my “Google” account, so I’ll click on the “Continue with Google” button.
Once you’re logged in, click on the “Download” button and in a few seconds the photo will save on your computer.
Step 4: Go to the Pixlr Website and Upload an Image
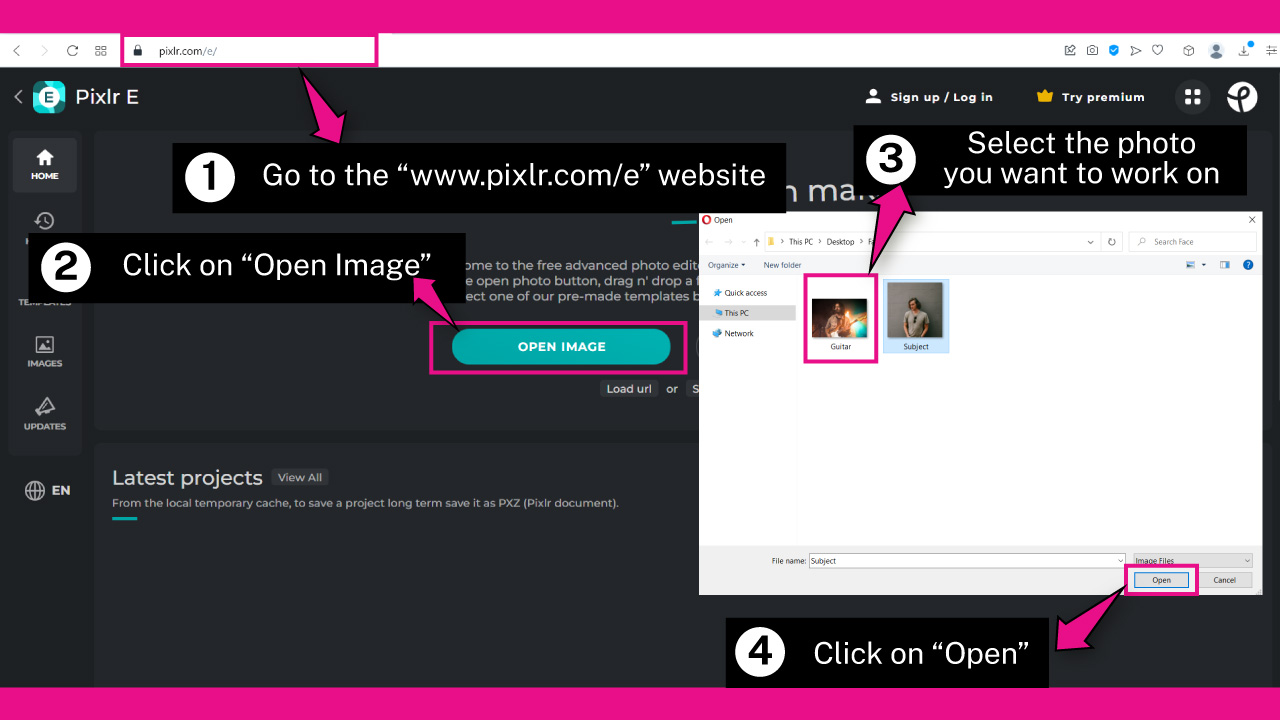
Go to the pixlr.com/e website and click on the “Open Image” button.
On the pop up window, browse in your directory and locate the photo you want to use as a base to put the face on.
Select the photo, and then click on the “Open” button.
Step 5: Import the Face Image
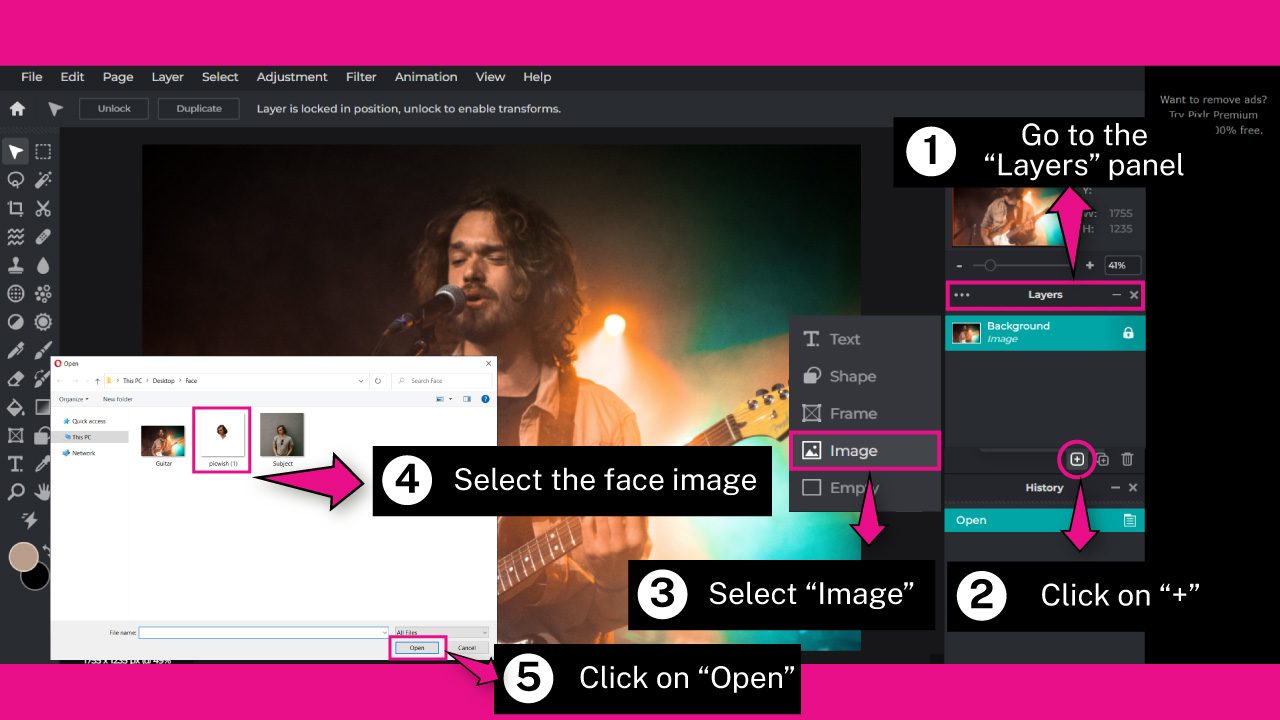
Once you’re on the “Pixlr” edition mode, go to the “Layers” panel on the menu from the right side toolbar, and click on the “+” button.
On the unfolded menu, select the “Image” option.
On the pop up window, browse in your directory and locate the face photo you downloaded on “Step 3”.
Select the photo, and then click on the “Open” button.
Step 6: Resize, Place and Rotate the Face
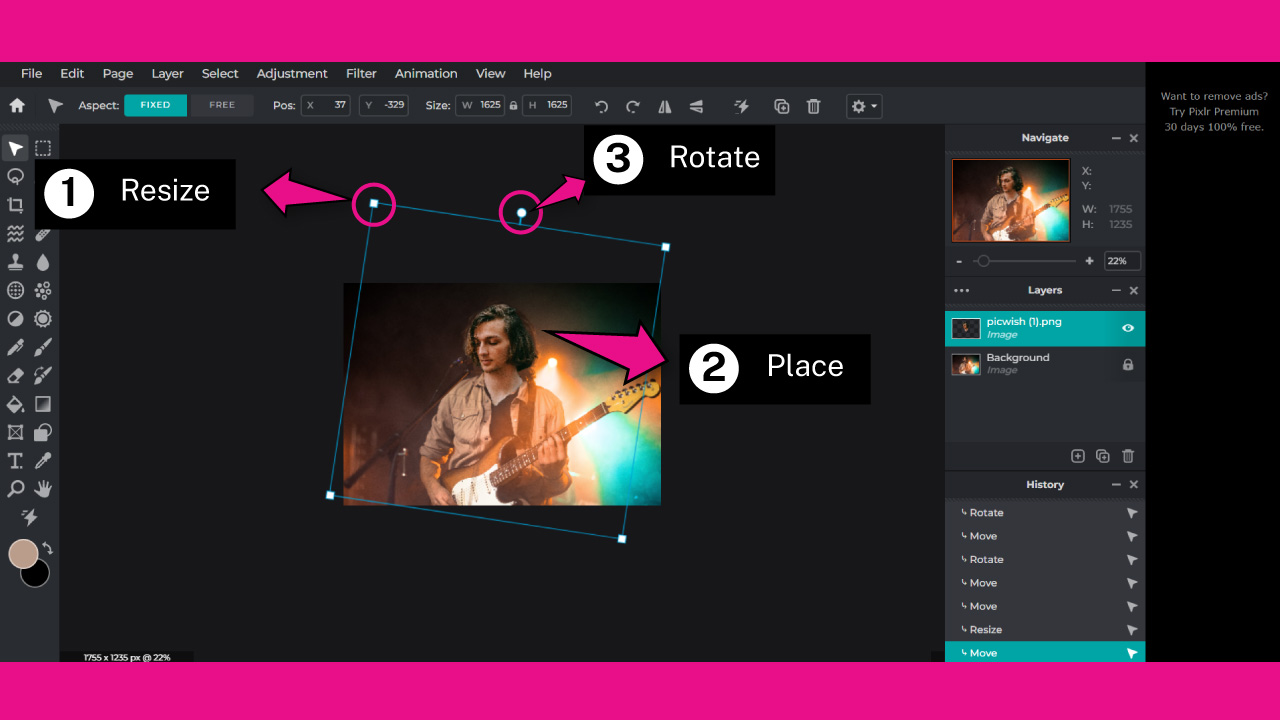
Once the face image gets imported, left-click, hold and drag the handles of the bounding box to resize the image.
Then, place the image over the other person’s face.
Finally, rotate the image by also left-clicking, holding and dragging the mouse over the white circle to fit the person’s body.
Step 7: Get Rid of the Face Remnant Areas
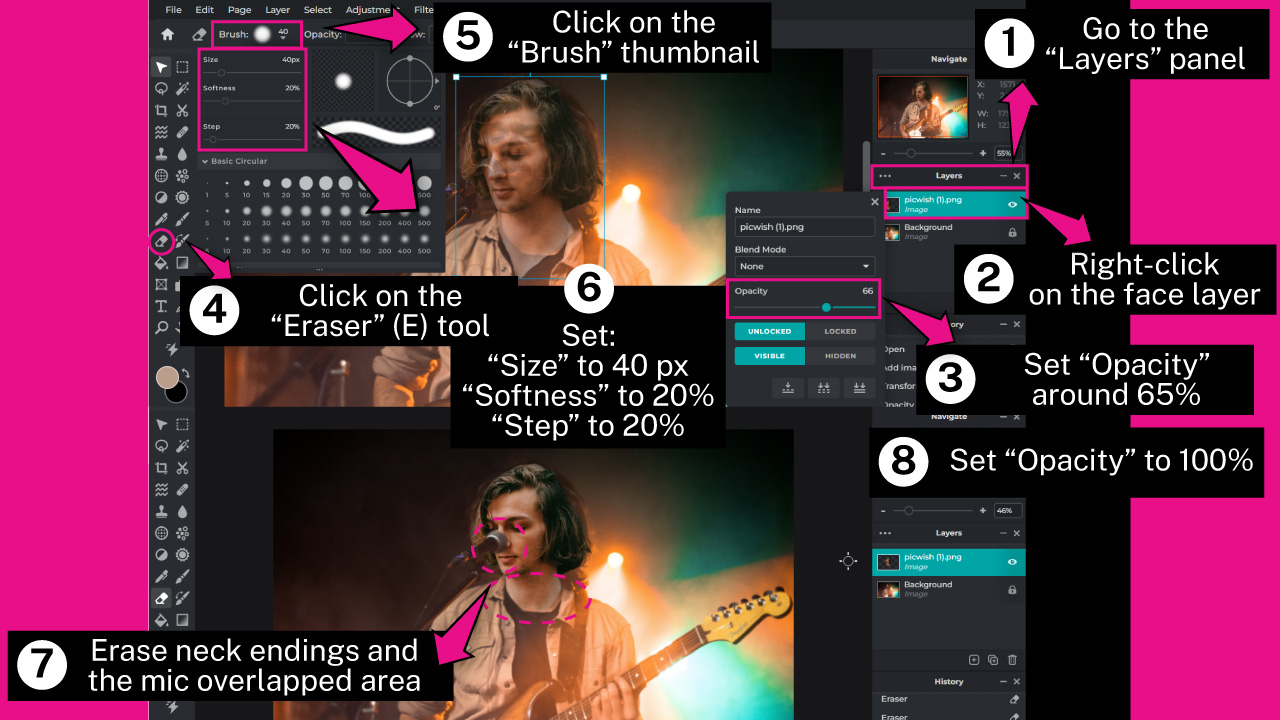
Now we need to remove some remnant face areas to fit the other person’s body better.
We need to take care of any possible object partially covering the face, as well. This happens in my image with the microphone.
To solve this kind of problem, we need to first make the face layer transparent, so we can perform a more accurate removal.
To get this done, go to the “Layers” panel, and right-click on the face layer. On the pop up window, set the “Opacity” around 65%.
Then select the “Eraser” (E) tool, located on the left side toolbar.
Next, click on the “Eraser Brush” thumbnail on the toolbar at the top of the screen to adjust the brush settings.
On the pop up window, set:
“Size” around 40 px (this value may vary during the removal process)
“Softness” to 20%
“Step” to 20%
Then use the “Eraser” (E) tool to erase part of the neck to fit the body.
Next, erase the area where the microphone and the face overlap.
Once you are done, go back to the “Layers” panel and right-click on the face layer.
On the pop up window, set the “Opacity” to 100% again.
Step 8: Add Gaussian Blur
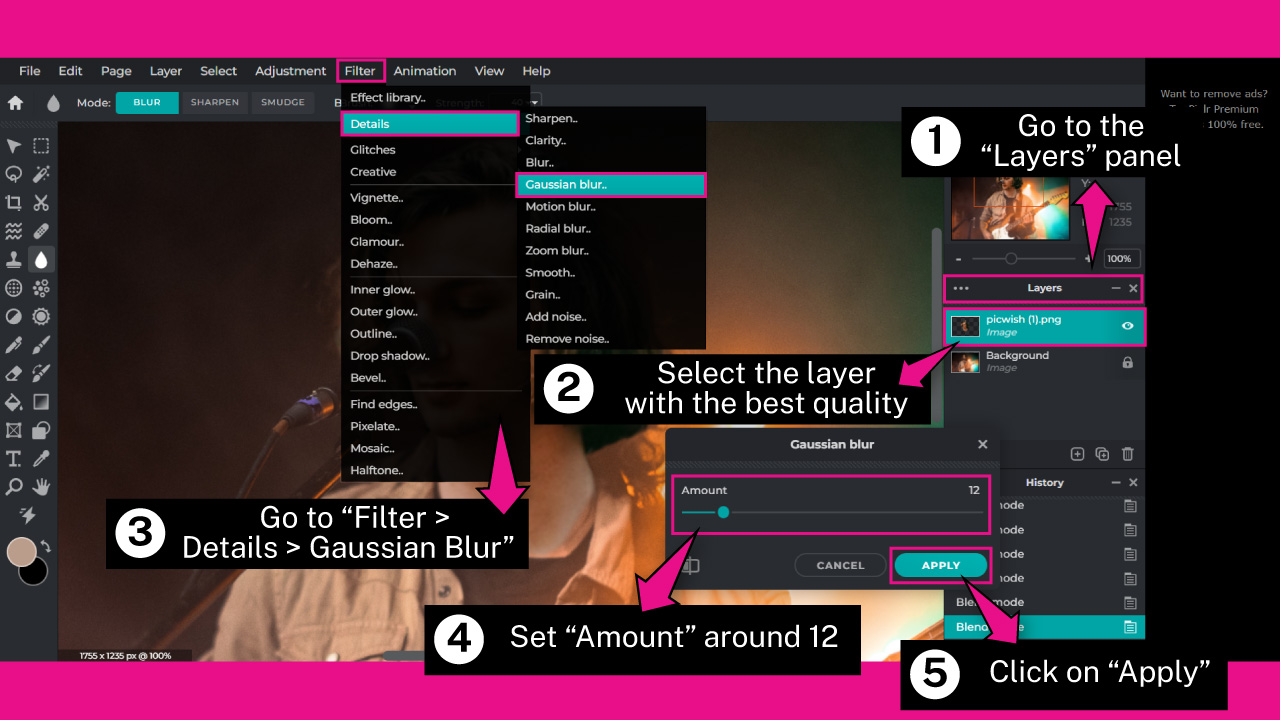
The following two steps are optional and will depend on your particular image.
Apply them only if necessary. Otherwise, skip straight to “Step” 10” to learn how to download the edited image.
The quality and sharpness of the images I used to swipe the faces are quite different.
To make them look similar, I will have to add some blur filters to the one with the better quality.
To get this done, go to the “Layers” panel and click on the layer with the best quality image. This would be the face layer in my case.
Then go to “Filter > Details > Gaussian Blur” on the menu at the top of the screen.
On the “Gaussian Blur” pop up window, set the “Amount” value. This value will depend on your particular image. Just make sure that blurriness of both images looks similar. Run a few tests to get the right value. I’ll set mine to 12.
Once you’re happy with the blur preview, click on the “Apply” button.
Step 9: Use the Liquify Tool
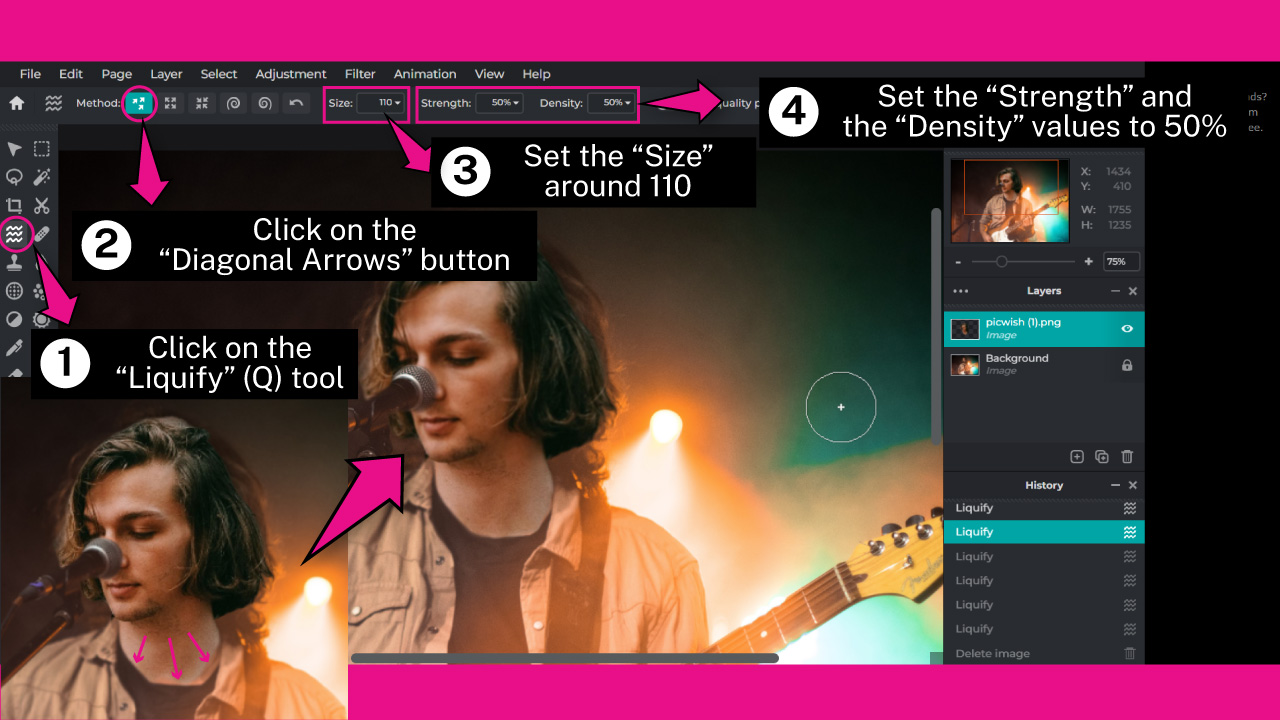
As you may have noticed, even though we removed the neck remnants on “Step 7”, there is still a missing area. We couldn’t fix that missing area by then, but now we’ll take care of it.
To solve this problem, we’ll use the “Liquify” (Q) tool located on the left side toolbar.
Select the “Liquify” (Q) tool and adjust the tools available on the toolbar at the top of the screen.
Since I need to warp the neck a little bit, I’ll select the “Diagonal Arrows” on the “Method” field.
Next, set the liquify brush “Size” to your desired value. This value will depend on your photo. I’ll set it around 110.
Finally set the values for “Strength” and “Density”.
The “Strength” value determines how strong or weak you want the distortion to be.
The “Density” value determines the extension size of the affected area.
I’ll leave these values to 50% as by default.
Finally, use the “Liquify” (Q) tool to warp the neck.
Step 10: Save the Image
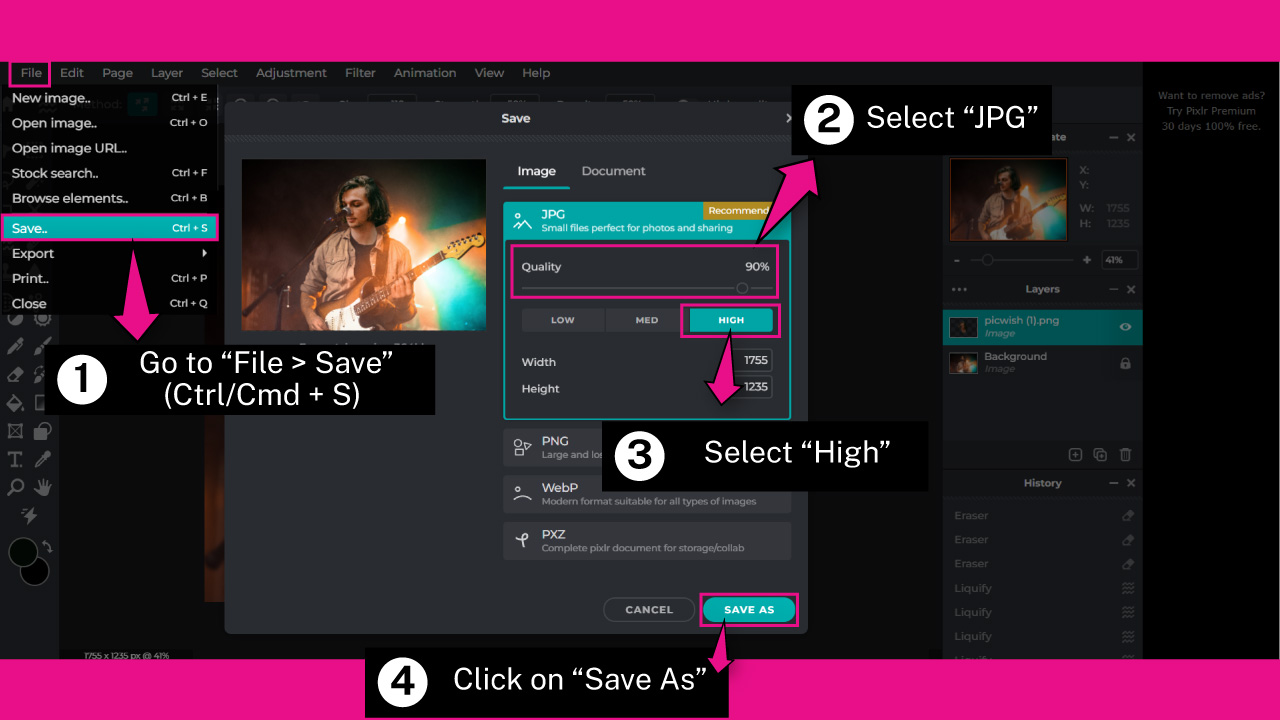
Once you’re done with your edition, you need to save and download the image.
To save your image, go to “File > Save” on the menu at the top of the screen.
Or press the “Ctrl + Z” (Windows) | ”Cmd + Z” (Mac) command to shortcut it.
(Windows: Ctrl + Z | Mac: Cmd + Z)
Select the “JPG” option, and then select “High” quality.
On the pop up window, type your desired name and click on the “Save As” button.
You need to have an account to be able to download your edited image.
You can create an account for free.
The process is very quick and simple.
“Sing Up” registering an email address, or “Log In” using your “Google”, “Facebook” or “Apple” account.
Once you’re logged in, you will be able to download the image to your computer.
The Result
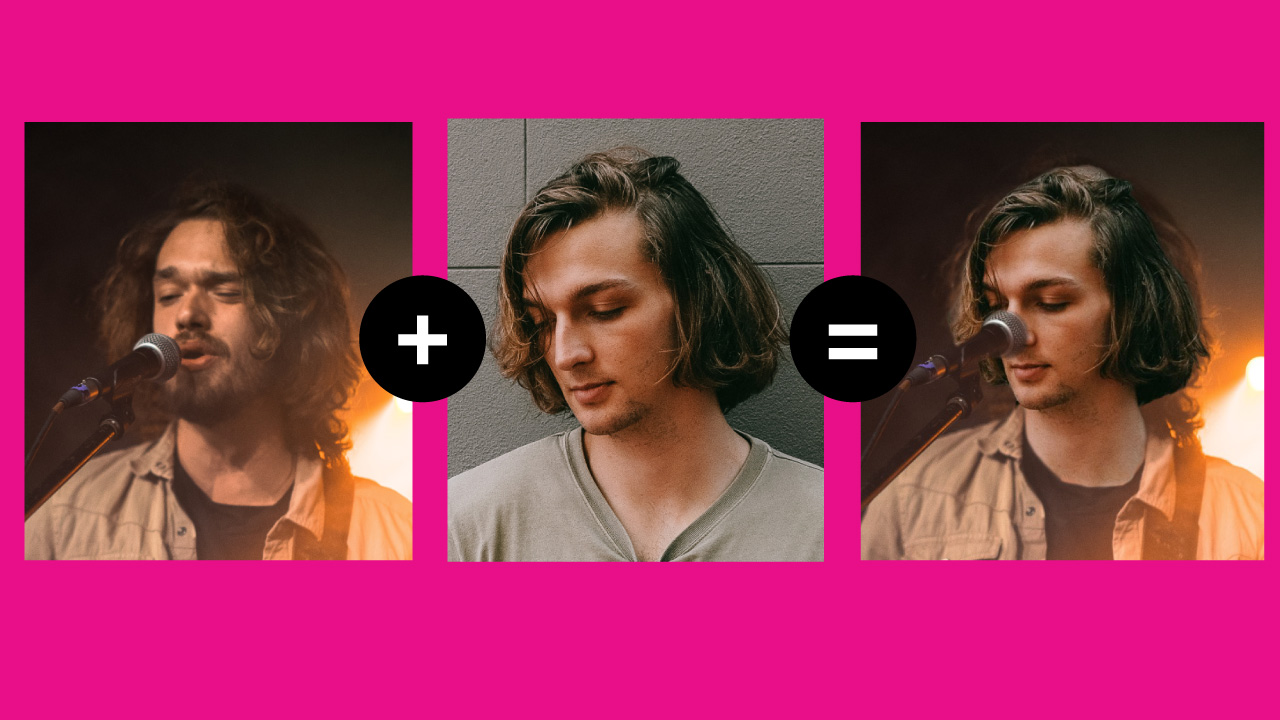
This is the result on how to put a face on another body using PicWish and Pixlr.
Frequently Asked Questions on “How to Put a Face on another Body Without Photoshop”
How can I undo actions in the FaceSwap App?
FaceSwap doesn’t have an undo option. If you want to undo, you have to delete the image by clicking on the “Do Not Enter” red circle symbol, and then import the image again.
How can I Zoom In in the FaceSwap App?
FaceSwap doesn’t have a “Zoom” tool, however you can zoom in and out by using “Ctrl + +” and “Ctrl + -” commands on Windows, or “Cmd + +” “Cmd + -” commands on Mac.

I am a professional blogger and entrepreneur with a strong interest and passion in photo editing. On MindRelic, I happily share my expertise in the photo editing niche with all of you guys!