
You’re already done editing your photos in Lightroom, and now it’s time to export.
Export images in Lightroom can be a matter of a few clicks, or a specific series of steps, depending on your needs.
Export features include very basic things such as choosing the folder where to export, selecting the image size, or enhancing image quality.
You can select a name format template, add watermarking, or program what to do right after exporting the images.
Of course, not all of these adjustments are mandatory, but most of them will save you a lot of time when exporting images in bulk.
Since all these settings are optional, you can select exactly which ones will apply and which ones will not.
In this article we’ll review and explain each available feature to export from Lightroom. So you can learn how and when to use them.
At the end, we’ll learn how to save our adjustments as a preset, so we can quickly use the same settings later when needed.
Keep reading and learn all you need to know about how to export from Lightroom!
How to Export from Lightroom
- Go to the “Library” module
- Select the images to export
- Open the “Export Images” window
- Adjust “Export Location” settings
- Adjust “File Name” settings if necessary
- Adjust “Video Settings” if necessary
- Adjust “File Settings”
- Adjust “Image Sizing” settings if necessary
- Adjust “Output Sharpening” settings
- Adjust “Metadata” settings
- Adjust “Watermarking” settings if necessary
- Adjust “Post Processing” settings if necessary
- Save “Export Adjustments” as a Preset if necessary
- Click on “Export”
Step 1: Go to the “Library” Module
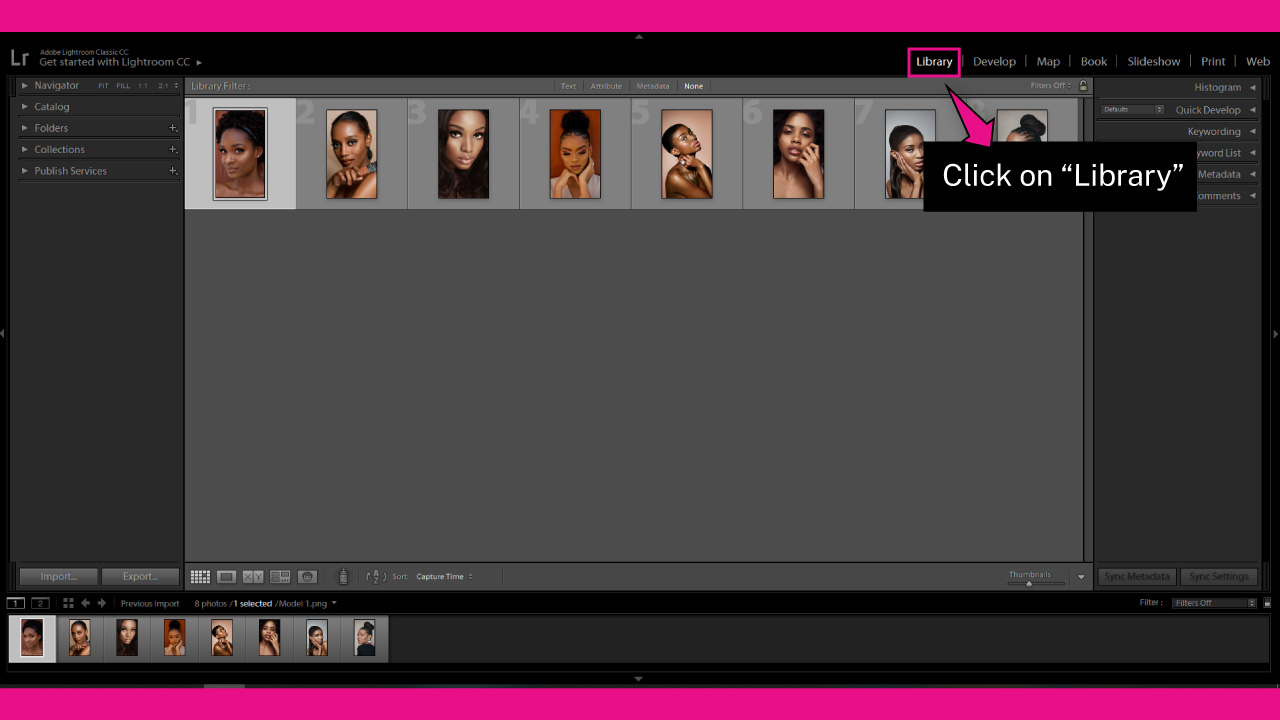
First we need to select the images we want to export.
For this, go to the “Library” module on the toolbar at the top of the screen.
If you can’t visualize it, click on the ▼ icon to unfold the navigator panel.
You can also access the “Library” module by going to “Window > Library” on the toolbar at the top of the screen.
Or by pressing the “Ctrl + Alt + 1” (Windows) or “Cmd + Option + 1” (Mac) command.
Step 2: Select Images
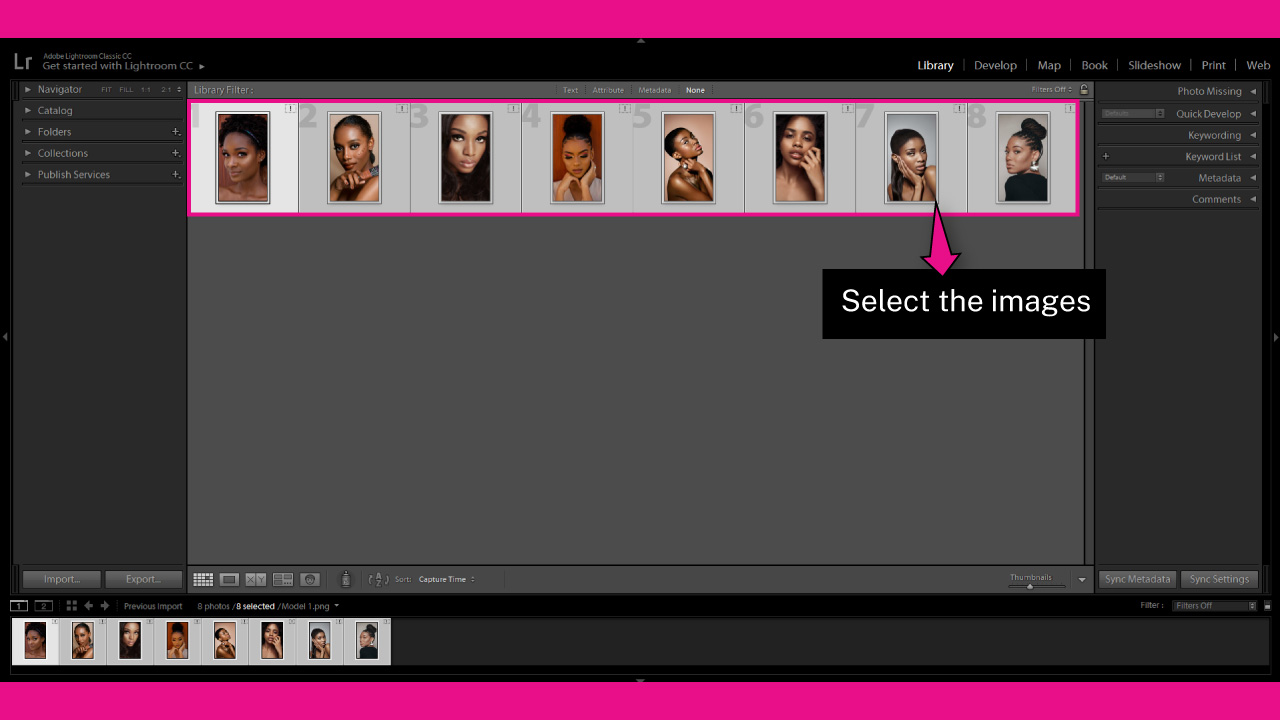
We need to select the images we want to export.
To select all the images from the “Library” module, press the “Ctrl + A” (Windows) / “Cmd + A” (Mac) command.
To select multiple specific images, hold the “Ctrl” (Win) / “Cmd” (Mac) key as you click on the specific images you want to add to your list.
To select images in bulk, hold the “Shift” key, click on the first image from the list, and then click on the last image.
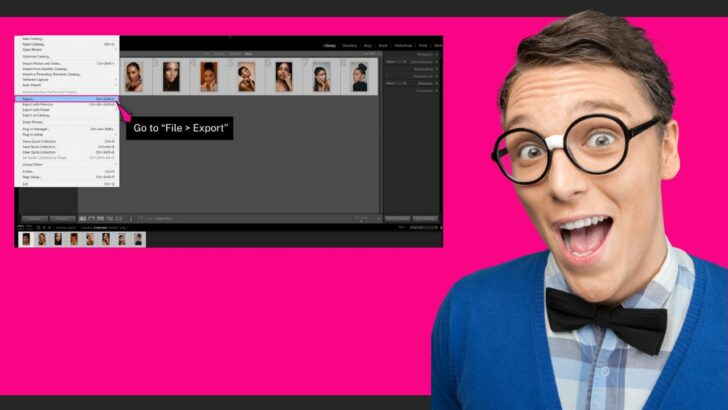
Step 3: Open the “Export Images” Window
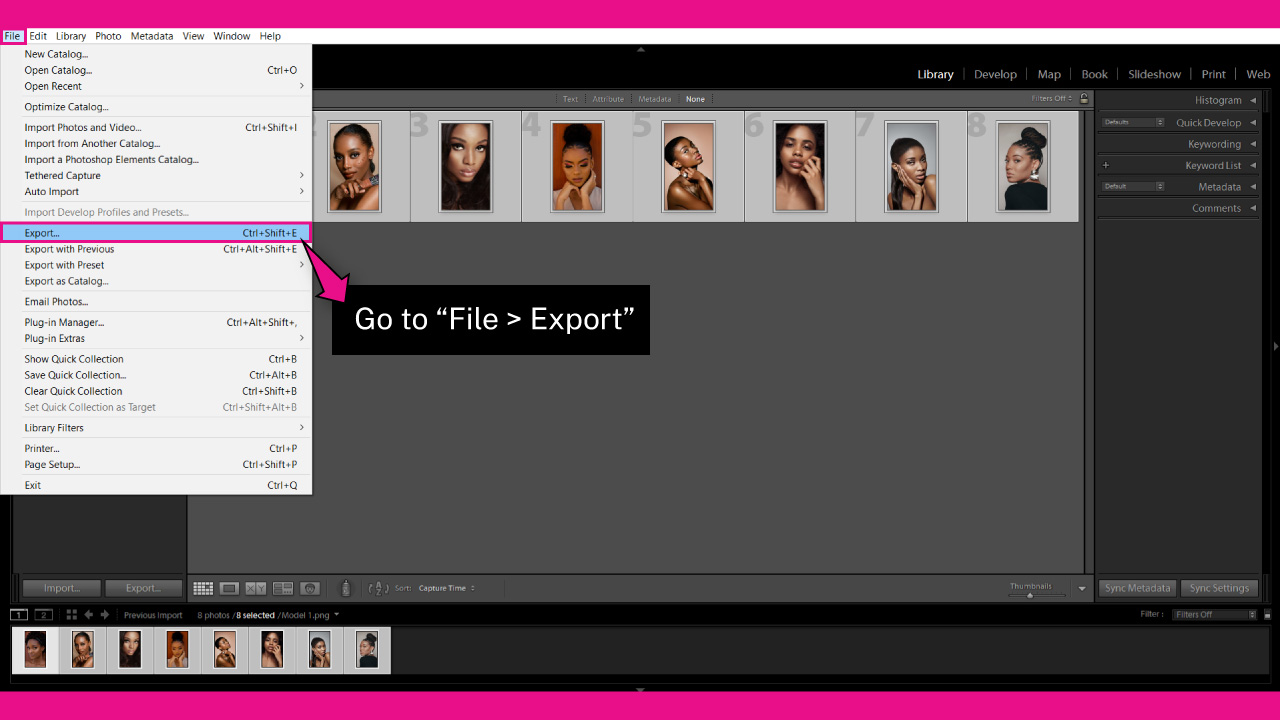
Once you have your images selected, go to “File > Export” on the menu at the top of the screen.
You can also shortcut it by pressing the “Ctrl + Shift + E” (Win) or “Cmd + Shift + E” (Mac) command.
Step 4: Adjust “Export Location” Settings
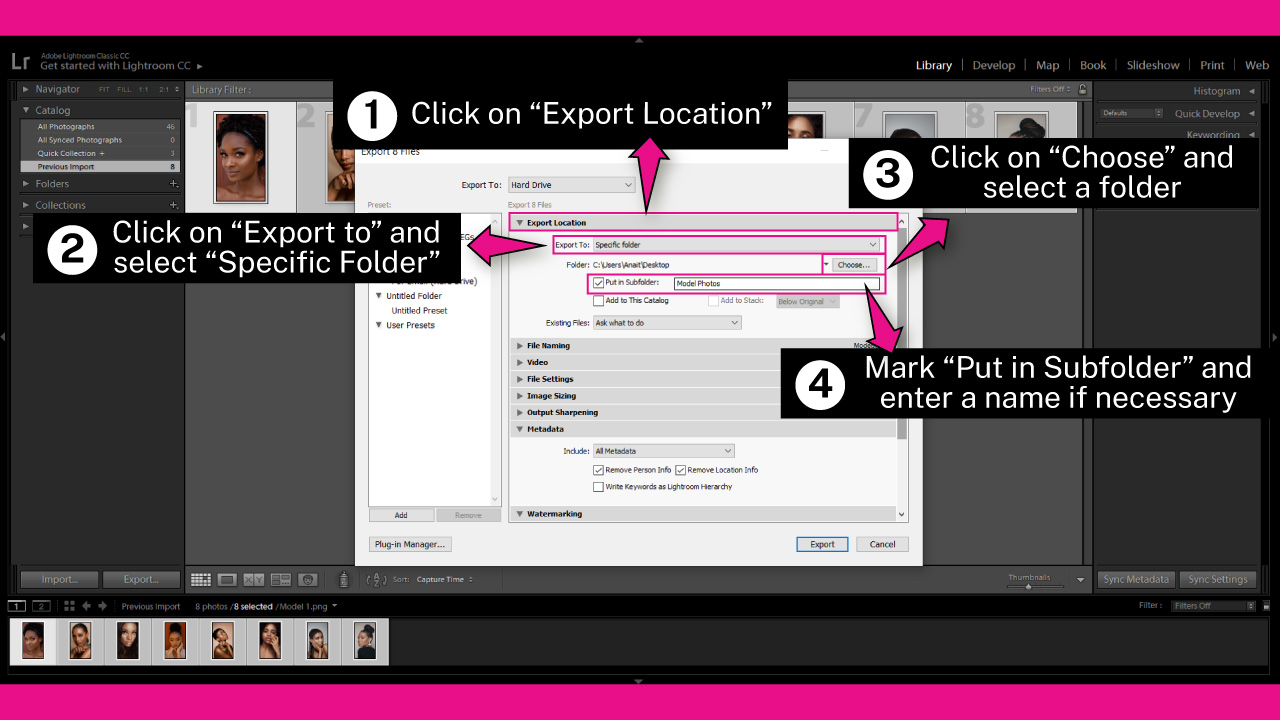
On the “Export” pop up window, click on the “Export Location” drop-down menu.
Click on the “Export to” menu, and select where you want to save your images.
You can select between“Specific Folder”, “Same Folder as the Original Photo”, “Choose Folder Later”, “Desktop”, among others.
I’ll select “Specific Folder” for this example.
Now click on the “Choose” button, and on the pop up window browse in your directory and locate the file where you want to save.
Once you’re done, click on “Select Folder” to save your preferences.
If you want to create a brand new folder inside the folder you selected, mark the “Put in Subfolder” checkbox, and then type the folder’s name.
I’ll enter “Model Photos” for this example.
You can mark “Add to This Catalog” if you want to add these images to your catalog. So you will have quick access to your images from the Lightroom “Catalog” panel.
I’ll leave this checkbox unmarked.
Finally, there is a useful tool that allows you to program what to do when two images have the same name when exporting images.
To set what Lightroom should do, click on the “Existing Files” menu and select between: “Ask What to Do”, “Choose a New Name for the Exported File”, “Overwrite Without Warnings” or “Skip”.
I’ll select the “Ask What to Do” option which is set by default.
Step 5: Adjust “File Name” Settings
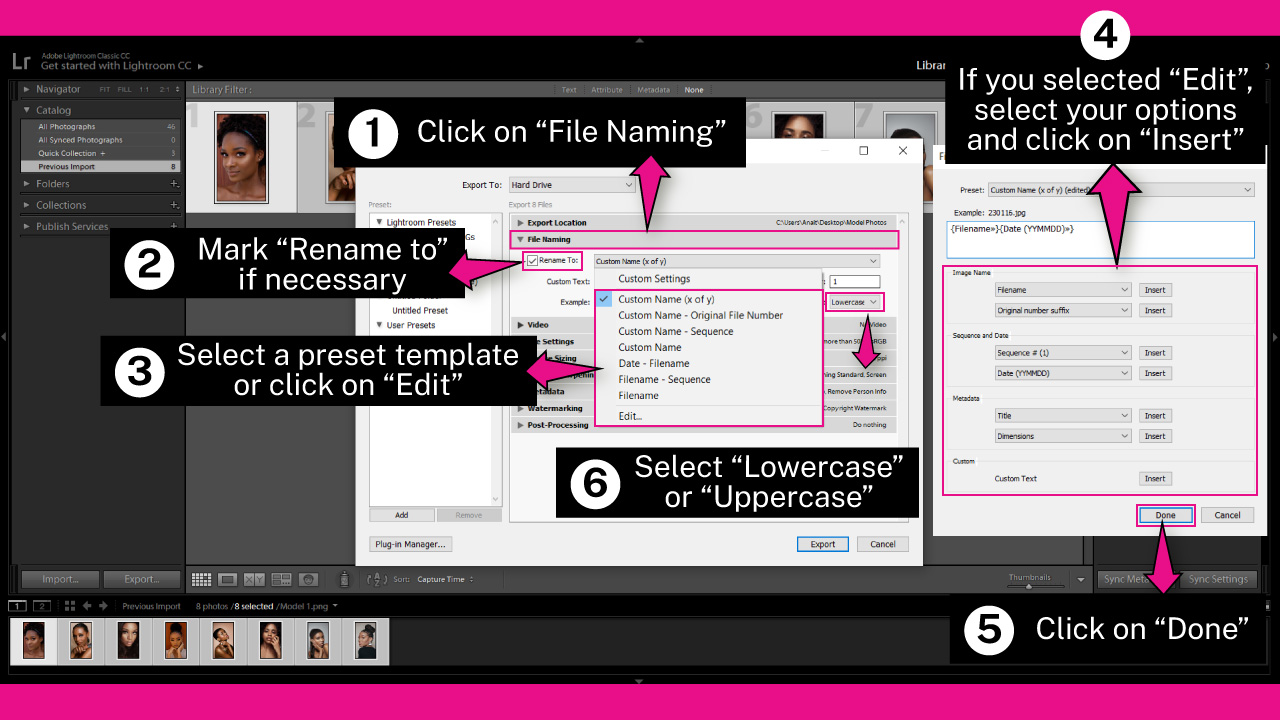
If you want your exported images to have a custom name, click on the “File Naming” drop-down menu.
Then mark the “Rename To” checkbox to enable the settings.
Click on the “Rename To” menu, and select the option that fits you better.
You can select between:
“Custom Name (x of y)” if you want your images to have, for instance, the following name format: “Model (1 of 8).jpg”
Of course you can enter your desired image name, and choose the number it should start with.
“Custom Name – Original File Number” if you want your images to have the same numbers the original photos have, but with a custom text.
Once you pick this option, a text field where you can enter a name will be enabled. I entered “Model” for this example. But you can of course enter whatever name you prefer.
The name format would be, for instance: “Model-1.jpg”
“Custom Name – Sequence” is similar to “Custom Name (x of y), but it doesn’t show the total number of photos.
The name format would be, for instance: “Model-1.jpg”.
“Custom Name” if you simply want to enter any name. Once you select this option, a field where you can enter the name you want will be enabled.
For this example, I’ll enter “Model”. So the saving format would be: “Model.jpg”.
“Model.jpg” will be the name of the first image.
But since I’m exporting several images, from the second image onwards, the name will end with a dash and a number, like: “Model-1.jpg”.
This will be the name of the second image.
“Data – Filename” if you want to include the date. The name format would be something like: “20230116-Model 1.jpg”.
The name of the file will continue being the original file name.
“Filename – Sequence” if you want to keep the original photo name, but also add another ending sequence.
The format name would be for example: “Model 1-1.jpg”
“Filename” if you want to keep the original filename. The name format could be for example: “Model 1.jpg”
If you want to create a custom name, click on the “Edit” option at the bottom of the list to open the “Filename Template Editor” window.
On the “Filename Template Editor” pop up window, you will be able to select a combination of information you want to add to the images names.
The window is divided into four groups:
“Image Name”
“Sequence and Date”
“Metadata”
“Custom”
The first three groups count with two menus where you can select between multiple info you want to include. For example: folder name, date format, suffix, city, country, lens, etc.
With the last one, “Custom”, you can enter a custom text.
The custom text field will be enabled before you click on the “Done” button.
There are tons of options and combinations you can select.
Finally, select the file “Extension” between “Lowercase” and “Uppercase”.
This field modifies the extension format between “.jpg” and “.JPG”.
Step 6: Adjust “Video” Settings
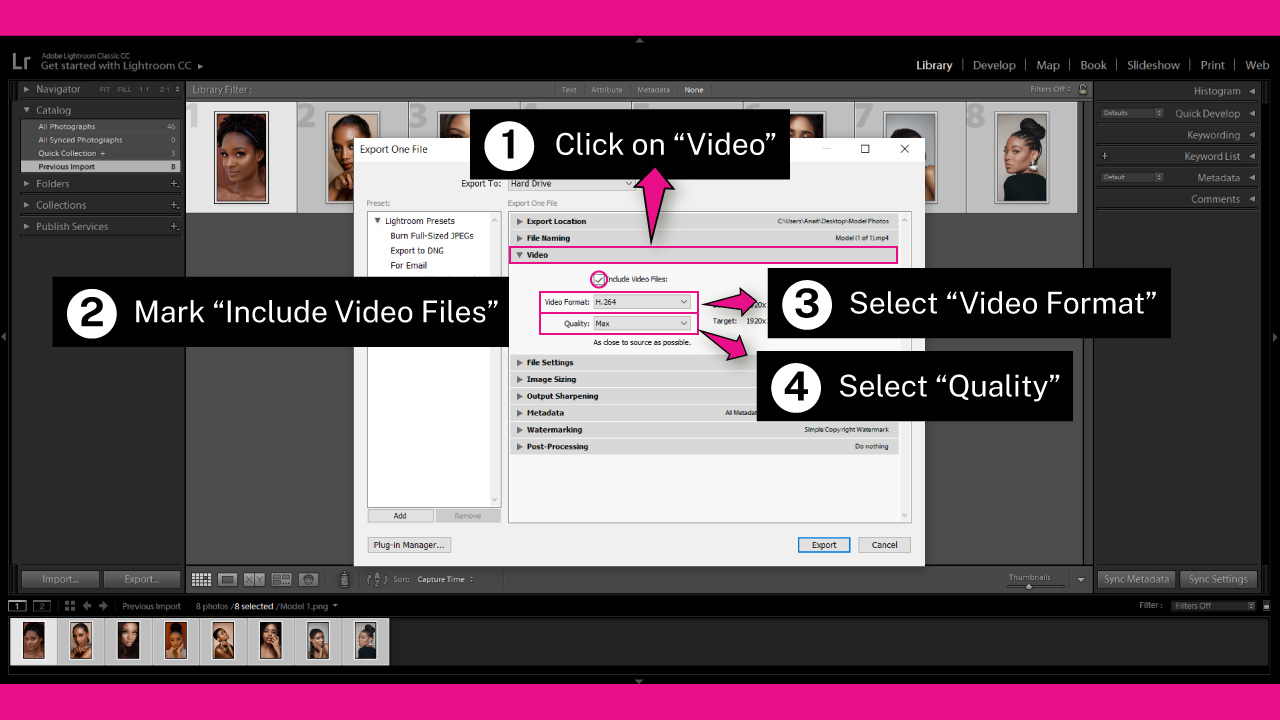
If you are exporting files which include videos as well, click on the “Video” drop-down menu.
Then mark the “Include Video Files” checkbox to enable exporting videos.
Next, click on the “Video Format” menu and select between: “DPX”, “H.264” and “Original”.
I’ll select “H.264” which is the most used format. But you can select the format that fits you better.
Then select the “Quality” between “Low”, “Medium”, “High” and “Max”.
I’ll select “Max”, but you can select the export quality you prefer.
Step 7: Adjust “File Settings”
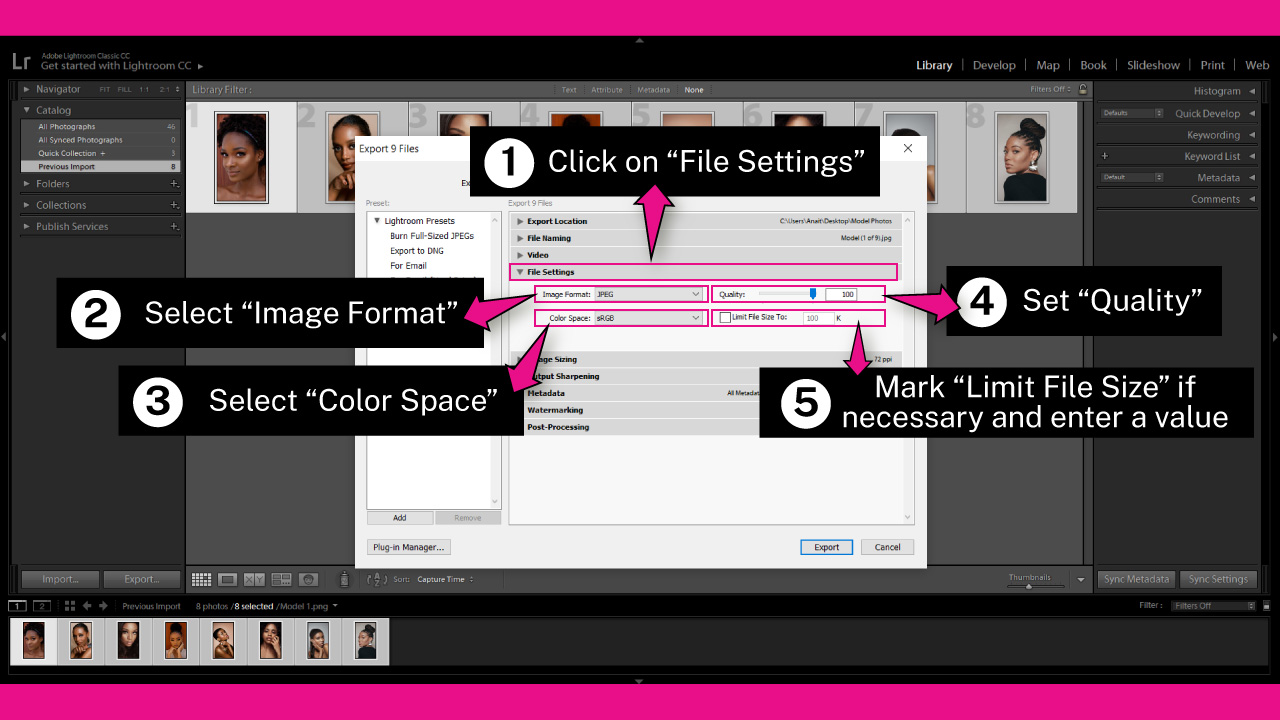
To modify the file format, color mode, quality and file size limit, click on the “File Settings” drop-down menu.
Once you’ve done this, click on the “Image Format” menu and select the format you want your images to be saved into.
You can select between: JPEG, PSD, TIFF, DNG and Original.
I’ll pick for example JPEG, but you can pick whichever fits you better.
Then, click on the “Color Space” menu to pick the color mode.
You can pick between: “sRGB”, “Display P3”, “Adobe RGB (1998)” or “ProPhoto RGB”.
I’ll select the default “sRGB” mode.
Next, set the “Quality” amount by adjusting the slider or entering a value.
I’ll set “Quality” to 100, but you can set any value you want.
Finally, mark the “Limit File Size” checkbox if you want to limit the file size.
Once you’ve marked the checkbox, enter the maximum image size in KB in that field.
Notice that if you mark this checkbox, the “Quality” feature will be disabled. These are incompatible options, of course.
I’ll leave the “Limit File Size” checkbox unmarked, since I don’t need to limit my file size this time. Actually, I want to keep my images in the best possible quality.
But if you need to limit your file size, mark the checkbox and set the limit.
Step 8: Adjust “Image Sizing” Settings
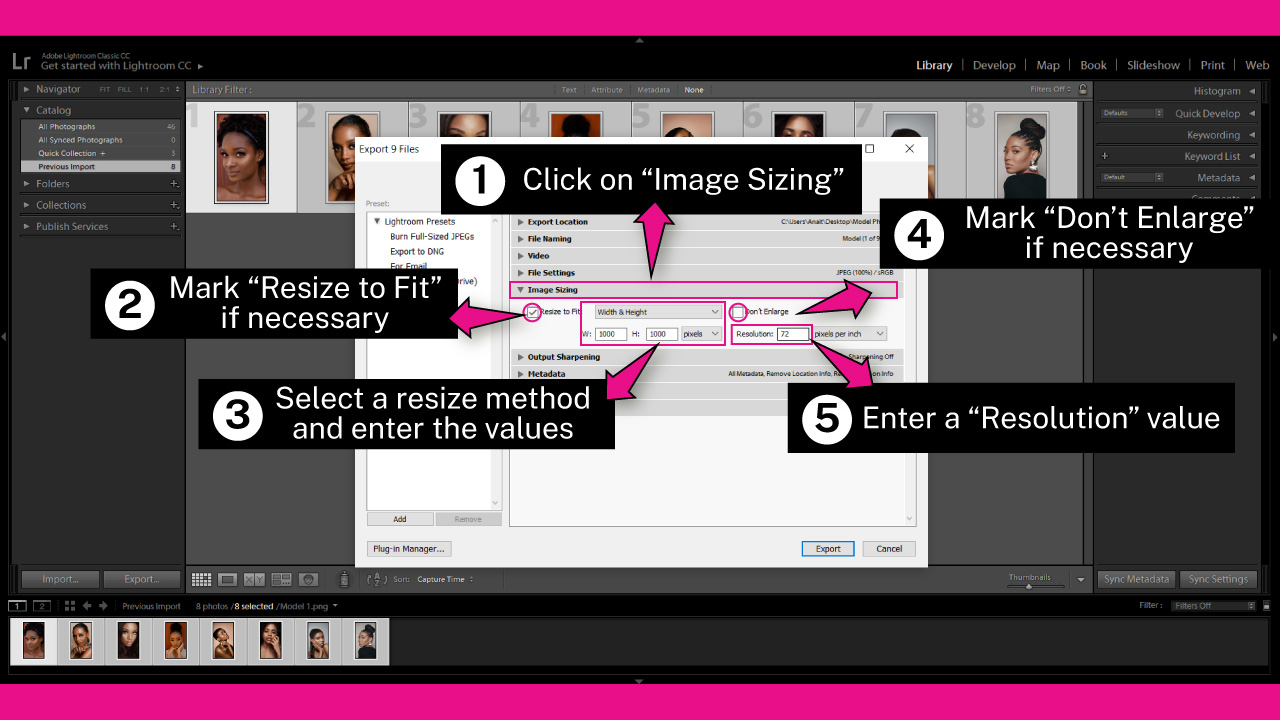
Click on the “Image Sizing” drop-down menu, and mark the “Resize to Fit” checkbox to enable sizing settings.
If you want to resize your images, but you don’t want to enlarge them, make sure to mark the “Don’t Enlarge” checkbox.
Keep in mind that image enlargement always implies quality losing.
I’ll leave this checkbox unmarked, as by default.
Then click on the menu, and select the method to resize the image.
You can pick between:
“Width and Weight”
“Dimensions”
“Long Edge”,
“Short Edge”
“Megapixels”
“Percentage”
Without distinction of whether the “Image Sizing” checkbox is marked or not, you can set the “Resolution” pixels per inch, also known as PPI.
I’ll leave this value as by default (72 PPI) since I’ll use these images only for the web.
But if you are planning to print them, set the value to 300 PPI.
Step 9: Adjust “Output Sharpening” Settings
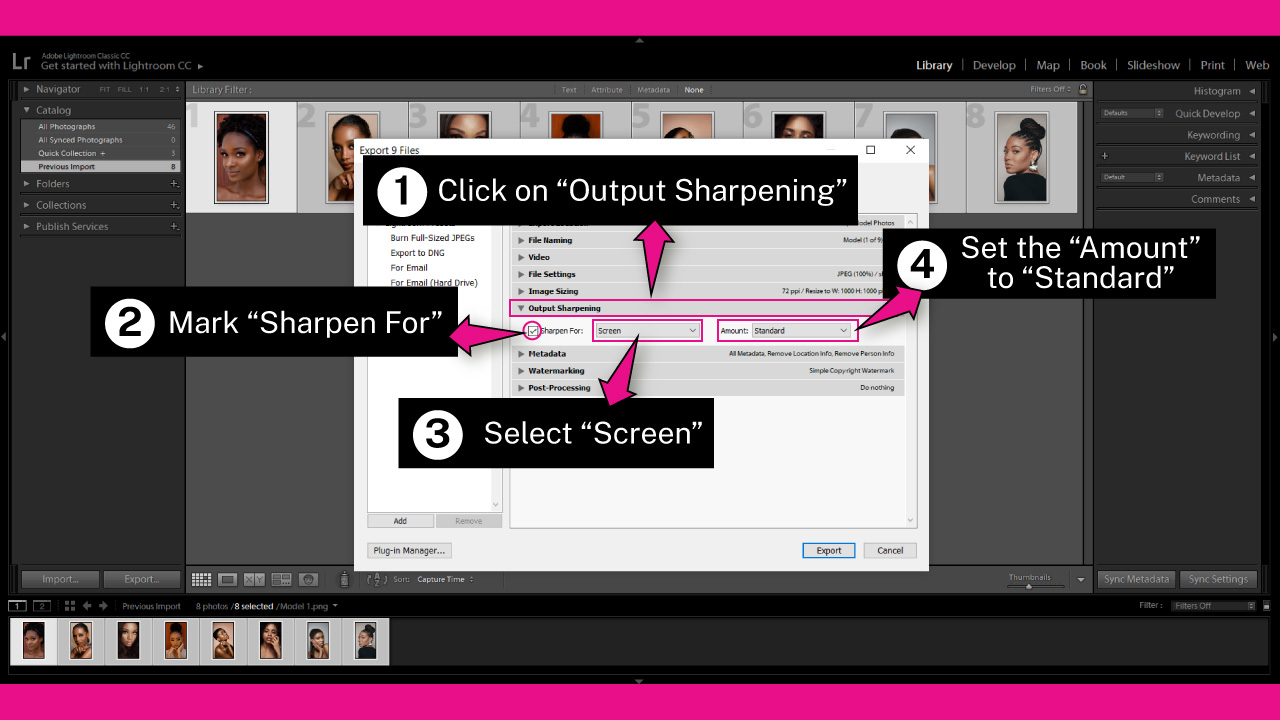
If you want your images to look crispier, especially if you resized them in the previous step, it’s a good idea to add sharpening.
To sharpen the output images, click on the “Output Sharpening” drop-down menu.
Mark the “Sharpen For” checkbox, and on the menu select between:
“Screen” if you’ll be using the images for web, or on screen.
“Matte Paper ” if you are planning to print the images in a matte paper.
“Glossy Paper” if you are planning to print the images in a glossy paper.
Then select the “Amount” of sharpening. You can select between “Low”, “Standard” or “High”.
Start by trying the “Standard” amount, and if you are not happy with the results, then try with “Low” or “High”.
I’ll go with “Screen” and “Standard”, since these are the settings that fit my images better. But you can run some tests until you get your desired result.
Step 10: Adjust “Metadata” Settings
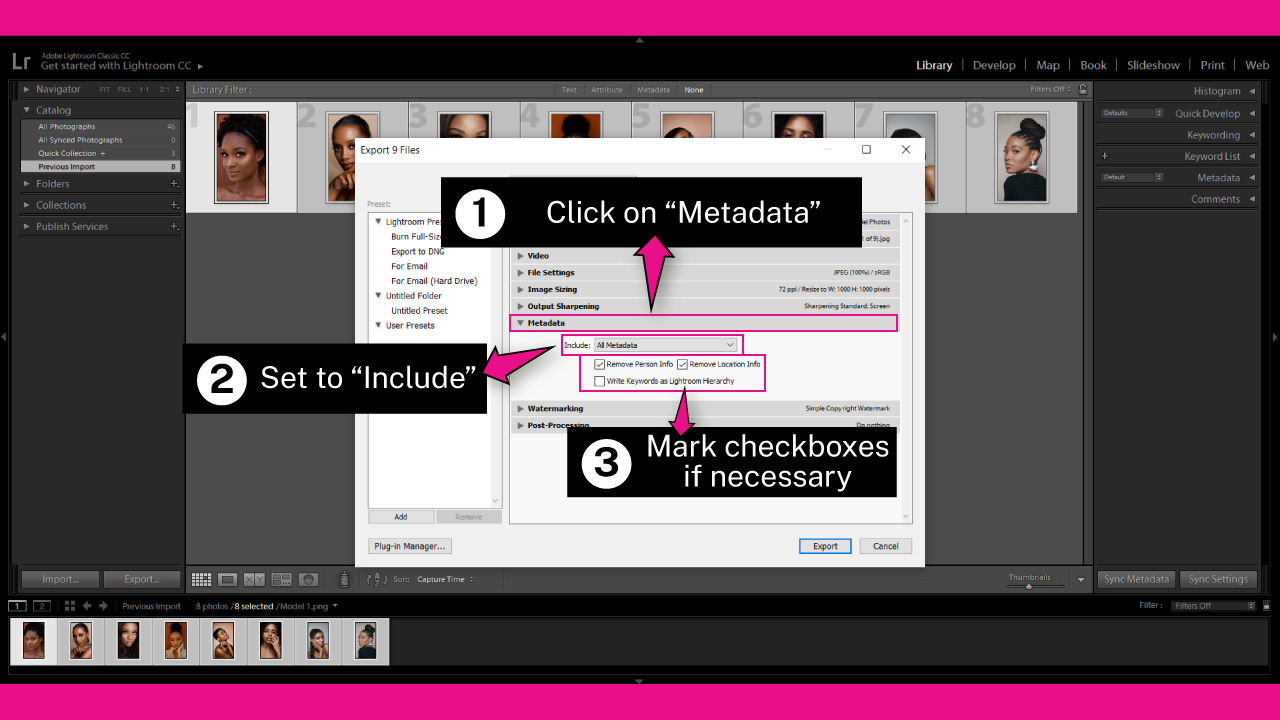
If you want to include metadata in your exported images, click on the “Metadata” drop-down menu.
It’s necessary to have previously added the metadata in order to include it in your images.
You can select the metadata you want to include by clicking on the “Include” menu.
You can select between:
“All Metadata”
“Copyright Only”
“Copyright & Contact Info Only”
“All Except Camera Raw”
“All Except Camera & Camera Raw Info”
I’ll go with the “All Metadata”, which is set by default.
Then, there are some checkboxes you can mark:
“Remove Person Info”
“Remove Location Info”
“Write Keywords as Lightroom Hierarchy”
Marking the “Remove Person Info” checkbox will remove person related info included in the metadata, such as Person Keywords, Person Shown in IPTC, etc.
Marking the “Remove Location Info” checkbox will remove location.
And marking the “Write Keywords as Lightroom Hierarchy” checkbox will include hierarchical keywords info in XMP.
This option will include all attached keywords and their containing keywords, and will ignore synonyms.
I’ll mark the “Remove Person Info” and “Remove Location Info” checkboxes, and unmark the “Write Keywords as Lightroom Hierarchy” checkbox for this example.
You can of course select the combination of options you prefer.
Step 11: Adjust “Watermarking” Settings
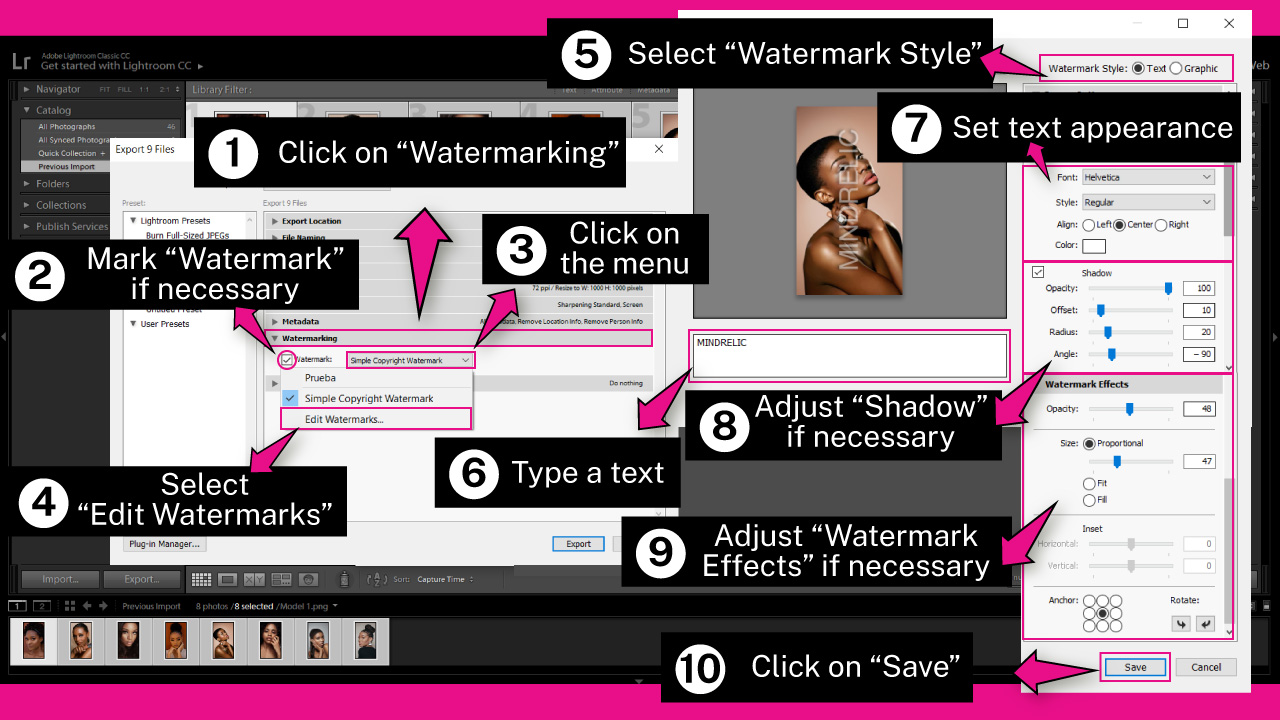
If you want to add a watermark as a client proof or for any other propouses, click on the “Watermarking” drop-down menu.
Mark the “Watermark” checkbox to enable the watermark settings.
Next, click on the menu and select “Edit Watermarks” to open the “Watermark Editor” window.
On the “Watermark Editor” pop up window, select the “Watermark Style” option on the top right corner of the window. You can select between: “Text” or “Graphic”.
Select the “Graphic” option if you want to add a graphic. On the pop up window, browse in your directory and select the graphic you want to include.
Once you have selected, press the “Choose” button.
Select the “Text” option if you want to add a text. Then type a text on the field located under the image.
Next, click on the “Text Options” menu to unfold the settings.
Adjust the “Font”, “Style” and “Align” settings
Then click on the “Color” box to pick a color.
To resize the text, use the handles of the bounding box.
If you want your watermark to have shadow, mark the “Shadow” checkbox.
Then set the “Opacity”, “Offset”, “Radius” and “Angle” sliders to get your desired shadow effect.
Finally, if you want to add some extra effects to the watermark, click on the “Watermark Effects” menu.
There you can find some settings you can adjust, like “Opacity”, “Anchor”, “Rotate”, among others.
Once you’ve finished with the “Watermark” edition, click on “Save”.
A “New Preset” window will pop up, asking you to enter a name for the new preset. This will save you a lot of time, since you can apply your saved watermark preset to future exports.
Enter a name on the “Preset Name” field, and click on the “Create” button to save.
Step 12: Adjust “Post-Processing” Setting
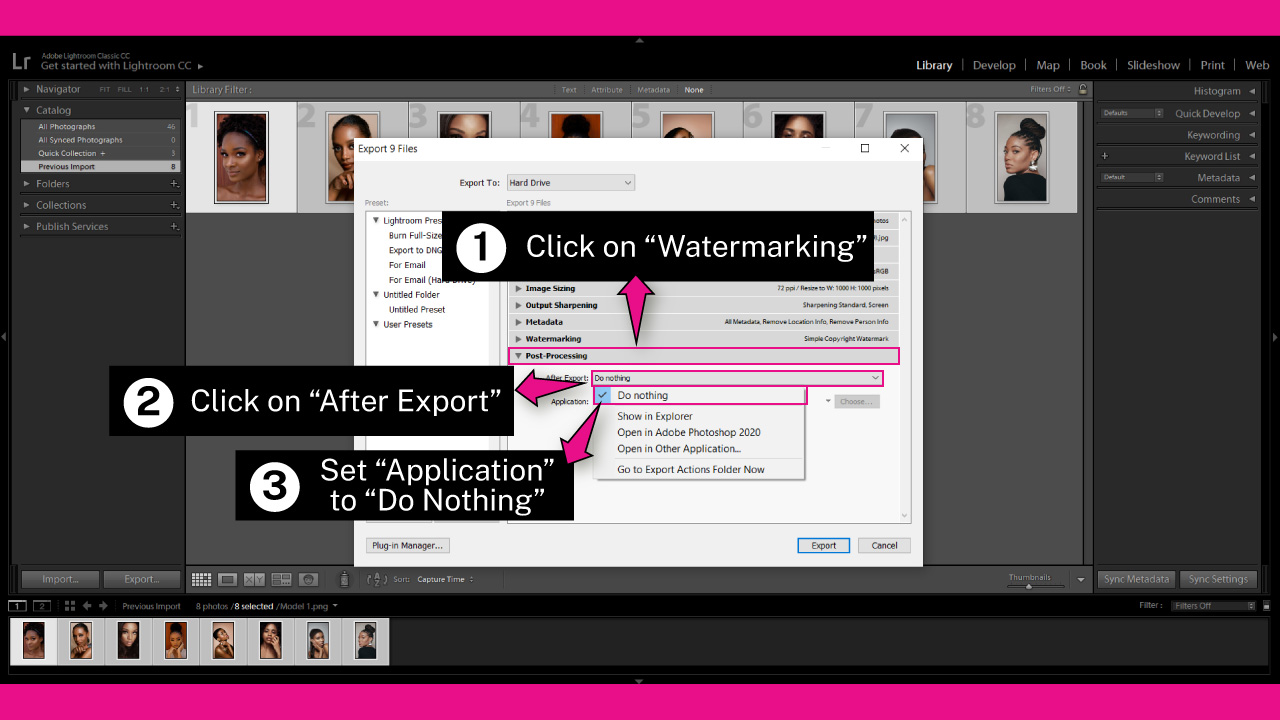
The last adjustment you can make when you’re exporting an image, is what to do after processing images.
If you want to open your exported images in Photoshop or any other similar app, click on the “Post-Processing” drop-down menu.
Then, click on the “After Export” menu, and select any option between:
“Show in Explorer”
“Open in Adobe Photoshop”
“Open in Other Application”
“Do Nothing”
Select the option you prefer.
For this example, I’ll select the default “Do Nothing” option.
Step 13: Save Export Adjustments in a Preset

If you want to save your exporting settings in a preset, do the following.
Click on the “Add” button located at the bottom left corner of the window.
On the “New Preset” pop up window, enter a name in the “Preset Name” field.
I’ll enter “Makeup Models” for this example.
On the “Folder” menu, select the folder you want to save the preset in.
If you want to save it in a new folder, click on the “New Folder” option.
On the “New Folder” pop up window, type a name on the “Folder Name” field.
I’ll enter “Models” for this example. Then, click on “Create” to save.
Next, on the “Preset” window, click on “Create” to save the preset.
Step 14: Export Images
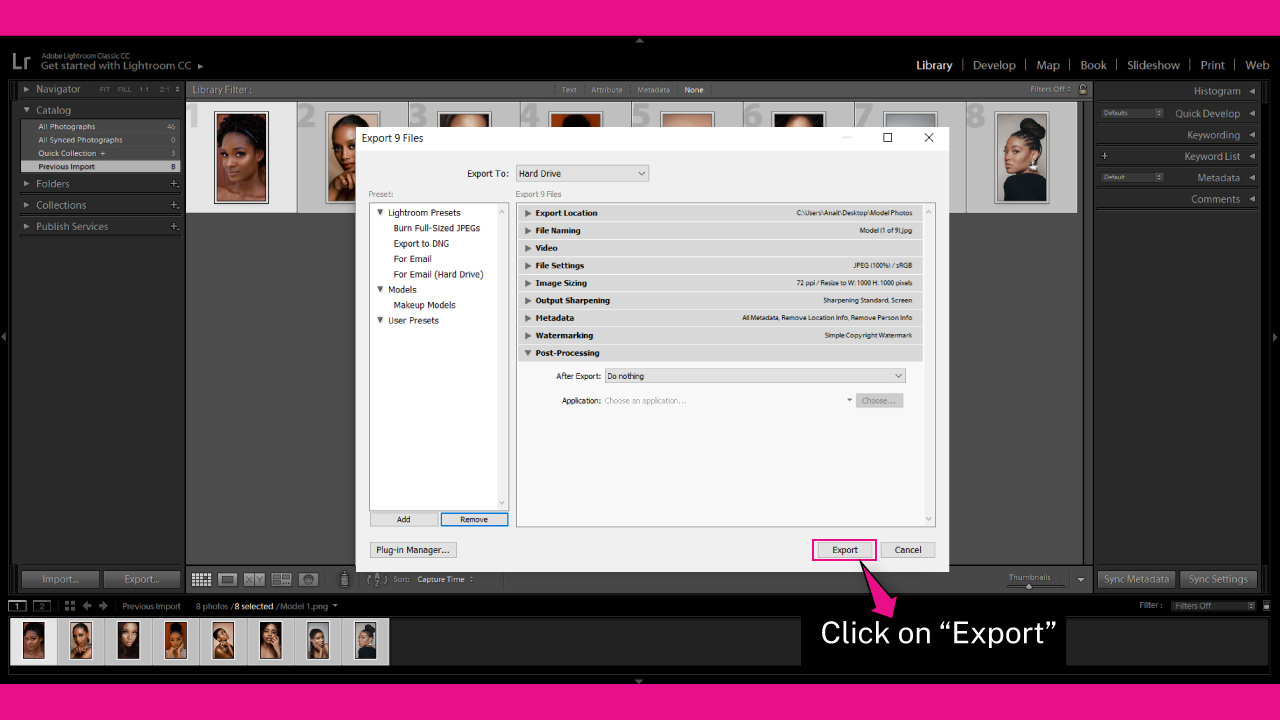
Once you’re done adjusting the export settings, click on the “Export” button to export your images.
Frequently Asked Questions on “How to Export from Lightroom”
How to export multiple photos in Lightroom?
Go to the “Library” module. Select the photos you want to export by holding the “Ctrl/Cmd” key as you click on images you want to add, or by holding “Ctrl/Cmd + A” to select them all. Go to “File” and then “Export”. Then, on the pop up window, click on the “Export” button.
How to create a custom file renaming template in Lightroom?
Go to “File” and then to “Export” on the menu at the top of the screen. Click on the “File Name” drop-down menu. Mark “Rename to”. Click on the menu and select “Edit”. On the pop up window, select the info you want to be displayed in the name, and click on “Insert”. Finally, click on “Done”.
How to save exporting settings as a preset in Lightroom?
Go to “File” and then to “Export” on the menu at the top of the screen. Adjust the export settings you want to save as a preset. Click on “Add” at the bottom right corner of the window. Type a name on the “Preset Name” field, and select a folder on the “Folder” menu. Click on “Create” to save.

I am a professional blogger and entrepreneur with a strong interest and passion in photo editing. On MindRelic, I happily share my expertise in the photo editing niche with all of you guys!