The eyes are often referred to as the window to the soul, and there’s a reason for that.
Whether this statement is factual or not, the eyes have a unique ability to reflect our innermost emotions, fears, and feelings.
They are a defining feature of our face and play a crucial role in conveying our expressions.
That’s why, as a photo editor, one of the key goals is to bring out the eyes, especially in portraits, making them look piercing, intense, and full of life.
However, this not only makes the subject appear more captivating, but it also draws the viewer’s attention to the eyes and helps to convey the subject’s emotions in a more powerful way.
Do you want to know the secret to making a subject’s eyes stand out in a photo and capturing their gaze? Look no further!
In this article, we’ll explore three simple steps to making eyes pop in any photo.
So, keep reading to uncover the secrets of eye-catching portraits that draw the viewer’s attention to the eyes.
How to Make Eyes Pop in Lightroom
Go to the Develop module. Select Adjustment Brush and adjust its settings to make irises pop. Brush over the irises. Duplicate the effect if necessary. Create a brand new brush and adjust Effect settings to make the whites of the eyes brighter. Finally brush over it.
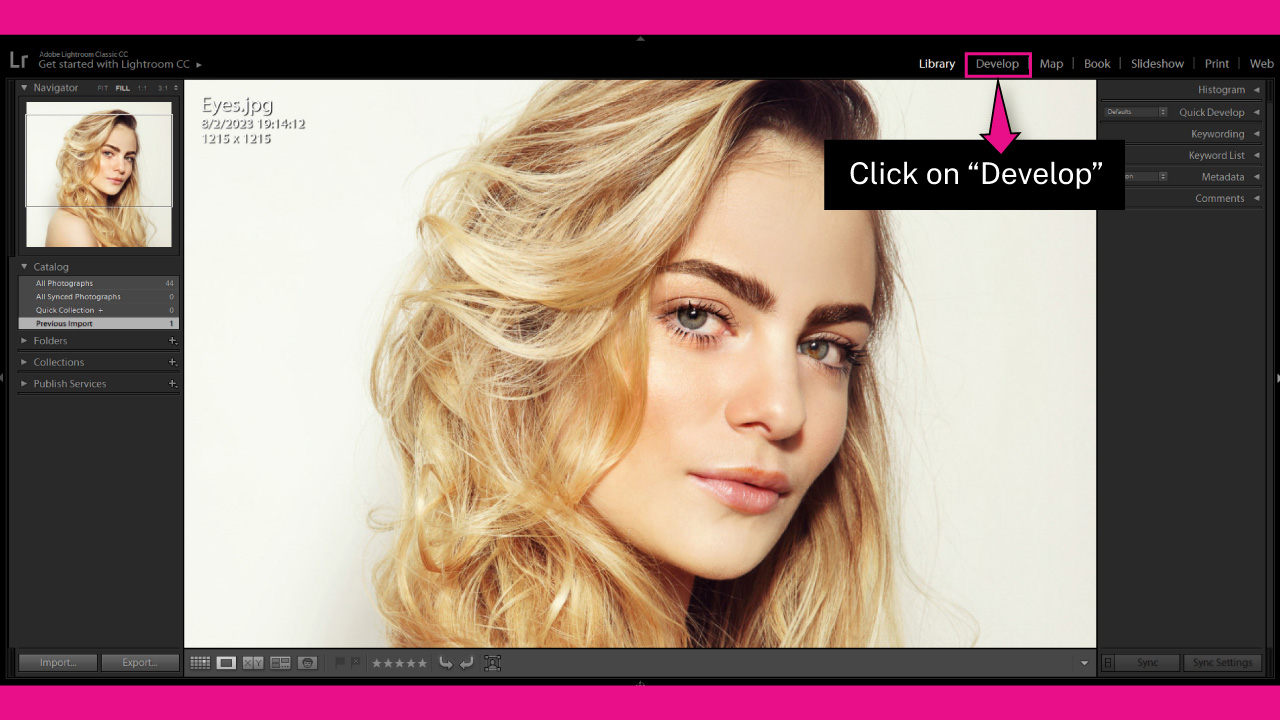
Step 1: Go to Develop Module
Once you have imported your photo, navigate to the “Develop” module in the toolbar at the top of the screen. If you cannot see it, click on the ▼ icon to expand the hidden modules panel.
You can also access the “Develop” module by going to “Window > Develop” in the toolbar at the top of the screen.
Or by pressing the “Ctrl + Alt + 2” (Windows) or “Cmd + Option + 2” (Mac) command.
Step 2: Make Irises Pop
To make irises pop, we’ll use brushes in Lightroom.
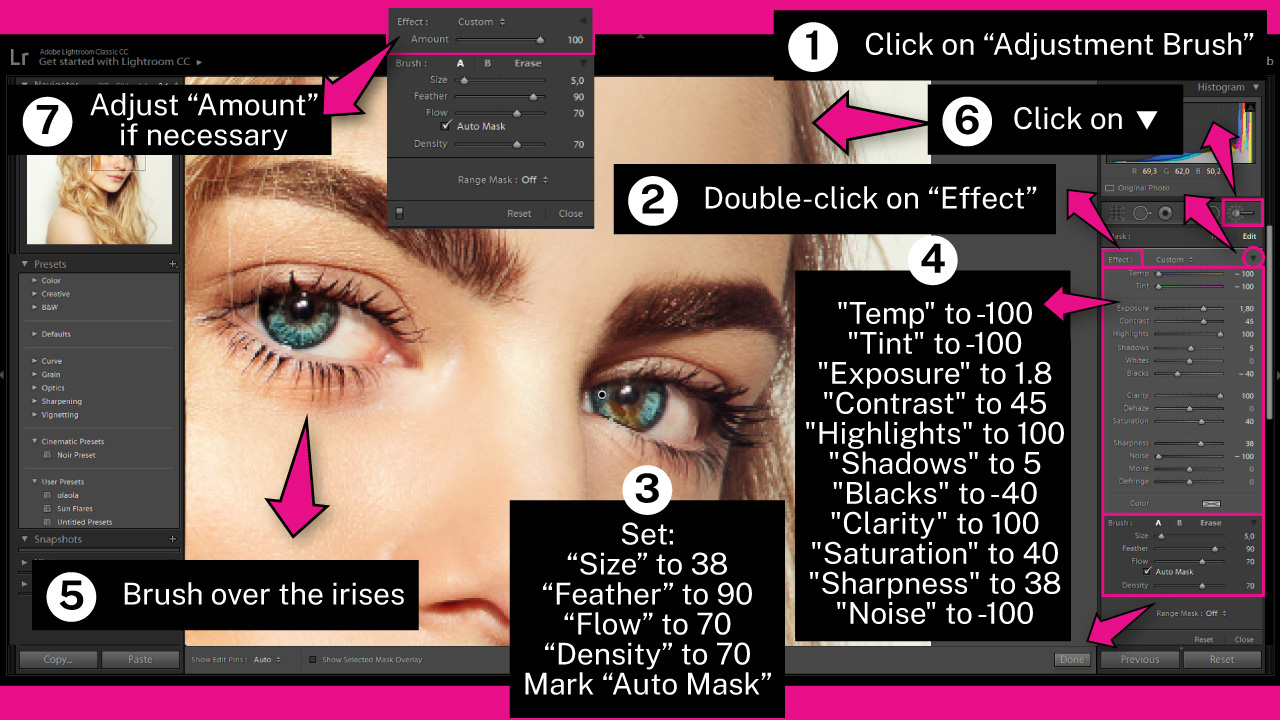
To access it, go to the “Develop” module and click on the “Adjustment Brush” (K) located on the right side toolbar.
Or you can press the “K” key from your keyboard to access it directly.
Once you’ve selected the “Adjustment Brush” (K) tool, double-click on the “Effect” title to reset any previous adjustments and start fresh.
To make irises pop, we need to dodge, add contrast and clarity, and finally intensify the eye color. For a subject with blue eyes, the following adjustments can be made:
On “Brush” set:
“Size” to 38 or your desired value
“Feather” to 90
“Flow” to 70
“Density” to 70
Mark “Auto Mask”
You can also adjust the brush size using the scroll wheel on your mouse.
For a subject with blue eyes, set “Effect” sliders to:
“Temp” to -100 (for blue eyes only)
“Tint” to -100 (for blue eyes only)
“Exposure” to 1.8
“Contrast” to 45
“Highlights” to 100
“Shadows” to 5
“Blacks” to -40
“Clarity” to 100
“Saturation” to 40
“Sharpness” to 38
“Noise” to -100
Note that these values may vary based on the image you’re working with, so feel free to run some tests to achieve your desired result.
For subjects with other eye colors, you can follow these settings, but readjust the “Temp” and “Tint” sliders to suit the eye color.
For green eyes:
Set the “Temp” to 0
Set “Tint” to -100
For brown eyes:
Set “Temp” to 70
Set “Tint” to 70
For yellow eyes:
Set “Temp” to 100
Set “Tint” to -100.
To add color to the irises, click on the “Color” box, which is also located on the right side toolbar, and select a similar color to intensify the eye color.
Once you have finished adjusting the settings, bush over the irises.
If you need to adjust the effect intensity, you can do it by clicking on the “Effect” ▼ icon to collapse the panel and access the “Amount” controller.
Then adjust the “Amount” slider as necessary.
I’ve set mine to 100 for an intense gaze.
Step 3: Duplicate Filter
This step is optional. If you feel that the effect isn’t as intense as you need it to be and you’ve already set the “Amount” to 100 in the previous step, you may need to duplicate the effect.
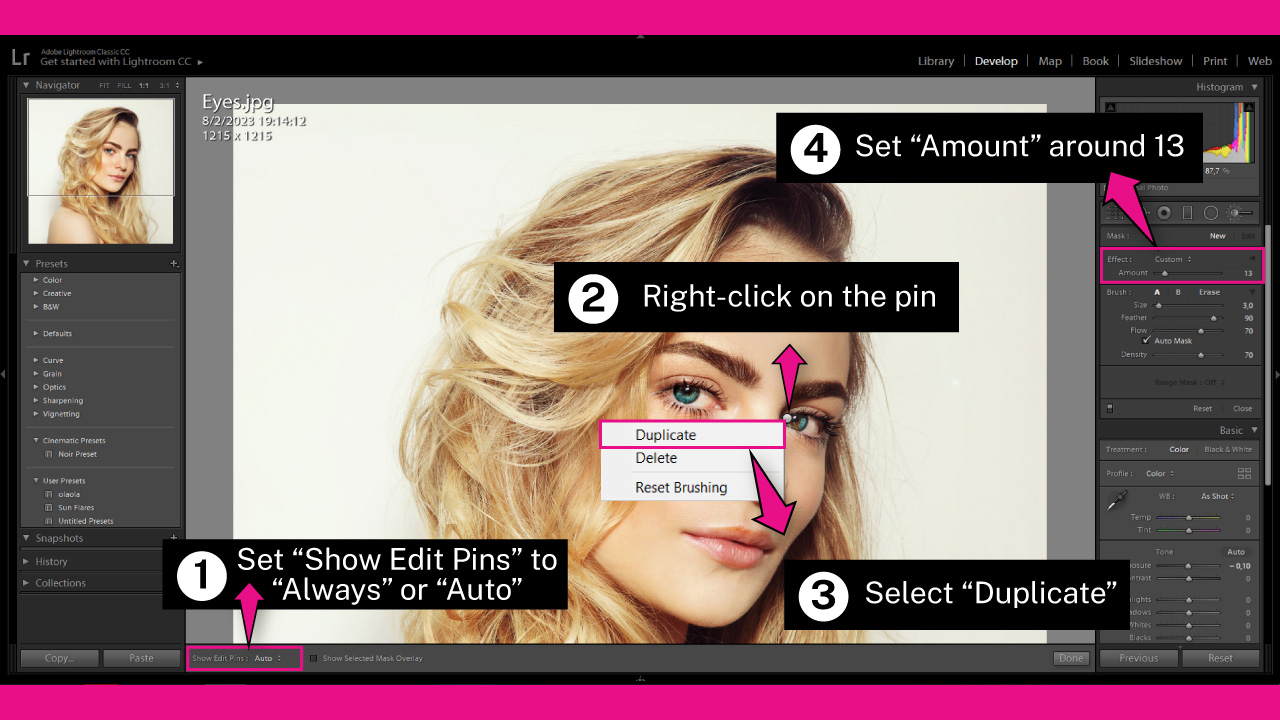
To duplicate the effect, ensure that the “Show Edit Pins” feature is set to “Always” or “Auto” on the toolbar at the bottom of the screen.
Once the pins are visible, you will see a pin on the photo, which represents the effect we applied in “Step 2”.
Right-click on the pin to open the options menu and select “Duplicate”.
After duplicating the effect, you may find that it is too harsh, as it effectively doubles the effect. To control the intensity of the duplicated effect, adjust the “Amount” value to a lower setting.
For example, you could set it to 13.
However, keep in mind that over-editing the eyes can make the results look unrealistic. Unless you’re trying to achieve a specific look, be cautious with the amount of effect you apply
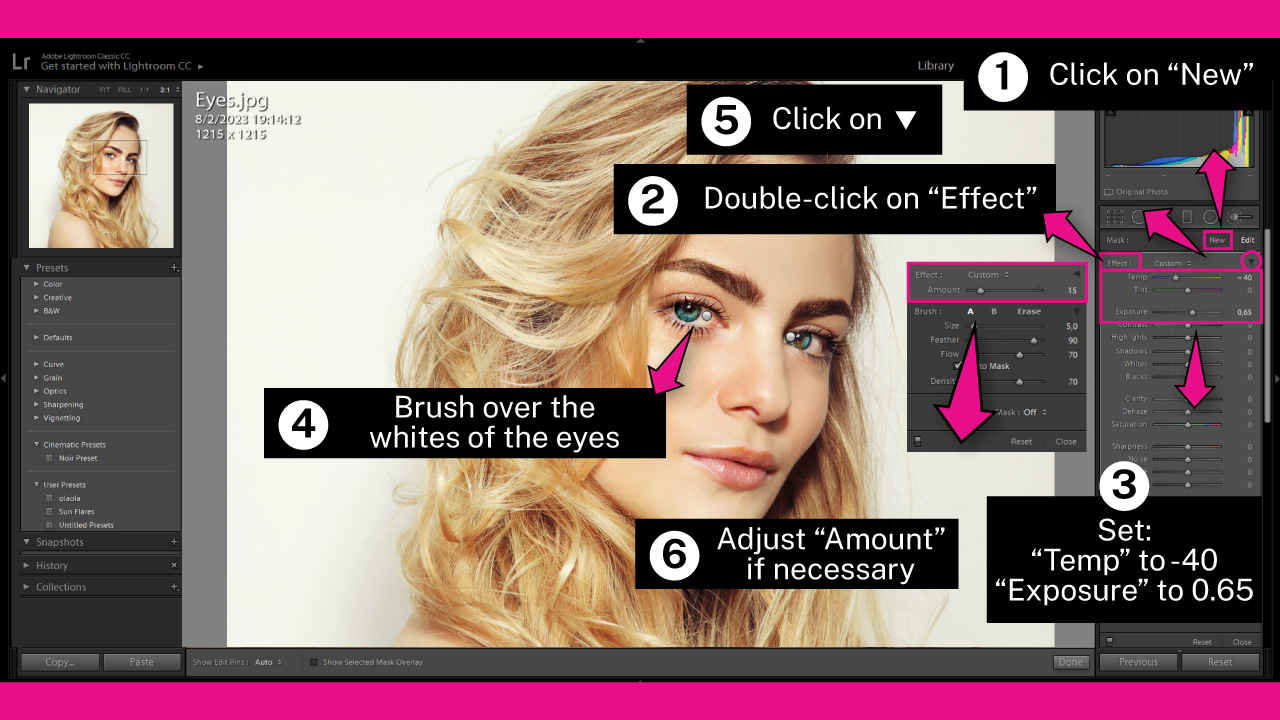
Step 4: Brighten the Whites of the Eyes (Sclera)
My subject’s eyes are a little reddish, so I’ll brighten and neutralize their color.
If your subject’s eyes are not reddish, it’s also recommended to brighten them slightly to make them pop, as they can sometimes look too dark in photos.
The whites of the eyes tend to have a bluish tint, they are not as pure white as many people think.
Brightening them can make the eyes stand out, but excessive whitening can look unrealistic, so use this technique wisely.
To brighten the whites of the eyes, first click the “New” button to create a new brush. Then double-click the “Effect” title to reset the settings.
In the “Effect” settings, set:
“Temp” to -40
“Exposure” to 0.65
If your subject’s eyes aren’t red, you don’t need to set “Temp” as harshly. Instead, you can set it around -10.
Keep in mind that the settings may vary depending on your image.
Finally, brush over the whites of the eyes to make them brighter.
If you want to adjust the intensity of the effect, you can collapse the panel by clicking the “Effect” ▼ icon and accessing the “Amount” controller.
Adjust the “Amount” slider as necessary. I’ll set mine to 15.
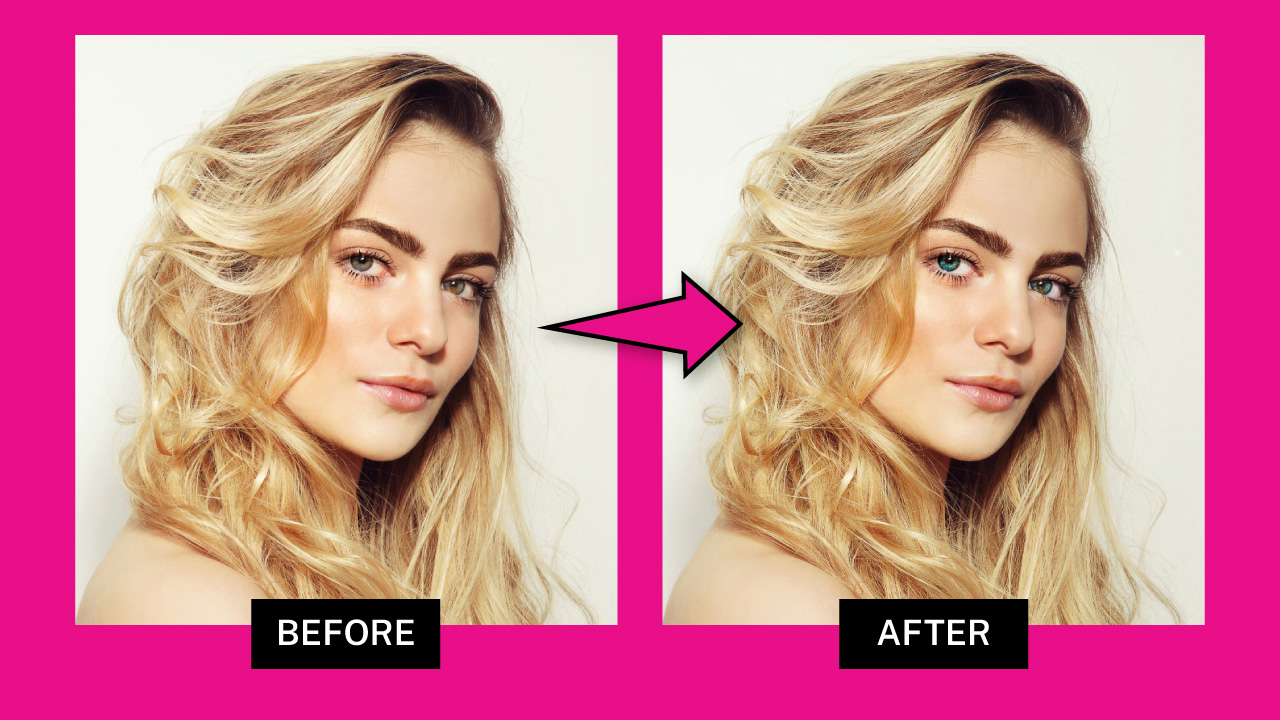
The Result
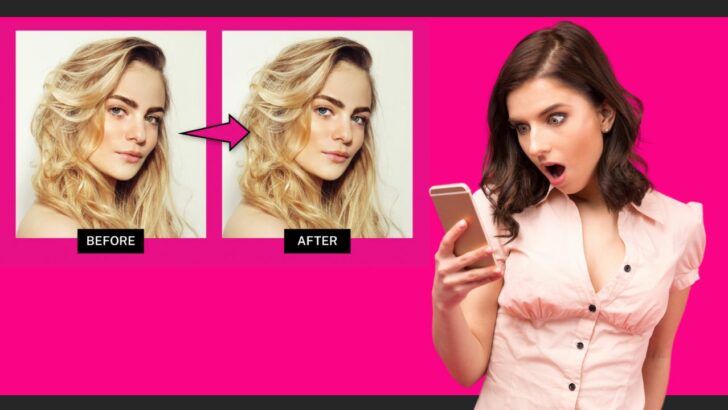
This is the before and after of making eyes pop in Lightroom.
Frequently Asked Questions on “How to Make Eyes Pop in Lightroom”
Is there a preset for making eyes pop in Lightroom?
There is a preset for making eyes pop in Lightroom. To use it, go to the “Develop” module and select the “Adjustment Brush” (K) tool. Then, click the “Custom” drop-down menu and select the “Iris Enhance” option. Finally, brush over the irises.
How can I make blue eyes pop in Lightroom?
Go to the “Develop” module, and select “Adjustment Brush” (K) tool. Then set: Temp to -100, Tint to -100, Exposure to 1.8, Contrast to 45, Highlights to 100, Shadows to 5, Blacks to -40, Clarity to 100, Saturation to 40, Sharpness to 38 and Noise to -100. Finally brush over the irises.
How can I make green eyes pop in Lightroom?
Go to the “Develop” module, and select “Adjustment Brush” (K) tool. Then set: Tint to -100, Exposure to 1.8, Contrast to 45, Highlights to 100, Shadows to 5, Blacks to -40, Clarity to 100, Saturation to 40, Sharpness to 38 and Noise to -100. Finally brush over the irises.
How can I make brown eyes pop in Lightroom?
Go to the “Develop” module, and select “Adjustment Brush” (K) tool. Then set: Temp to 70, Tint to 70, Exposure to 1.8, Contrast to 45, Highlights to 100, Shadows to 5, Blacks to -40, Clarity to 100, Saturation to 40, Sharpness to 38 and Noise to -100. Finally brush over the irises.
How can I make yellow eyes pop in Lightroom?
Go to the “Develop” module, and select “Adjustment Brush” (K) tool. Then set: Temp to 100, Tint to -100, Exposure to 1.8, Contrast to 45, Highlights to 100, Shadows to 5, Blacks to -40, Clarity to 100, Saturation to 40, Sharpness to 38 and Noise to -100. Finally brush over the irises.


elavil and hypertension
elavil and hypertension
purchase cheap cialis soft tabs
purchase cheap cialis soft tabs