
Exceptional skills in the use of brushes in Lightroom will make you stand out from the average photo editor.
Brushes not only allow you to enhance your images like most Lightroom tools do, they also offer you the possibility to customize the areas you want the effect to be applied to.
In this article we’ll learn how to use these brushes, reviewing the particular usage of every single setting.
With this knowledge acquired, you’ll be able to enhance your images by applying customized brushes at your own will.
Finally, we’ll be applying these tools to an example image to see these brushes in action.
Keep reading to learn how to give life to dull and flavorless photos taking them to the next level.
How to Use Brushes in Lightroom
Go to the Develop module and select the Adjust Brush tool. On the Brush settings, adjust Size, Feather, Flow and Density. Then on the Effect settings adjust Temp, Tint, Exposure, Contrast, Highlights, Shadows, Whites, Black, etc. Finally brush over the spots you want to apply the effect.
Step 1: Select “Adjust Brush” (K) Tool
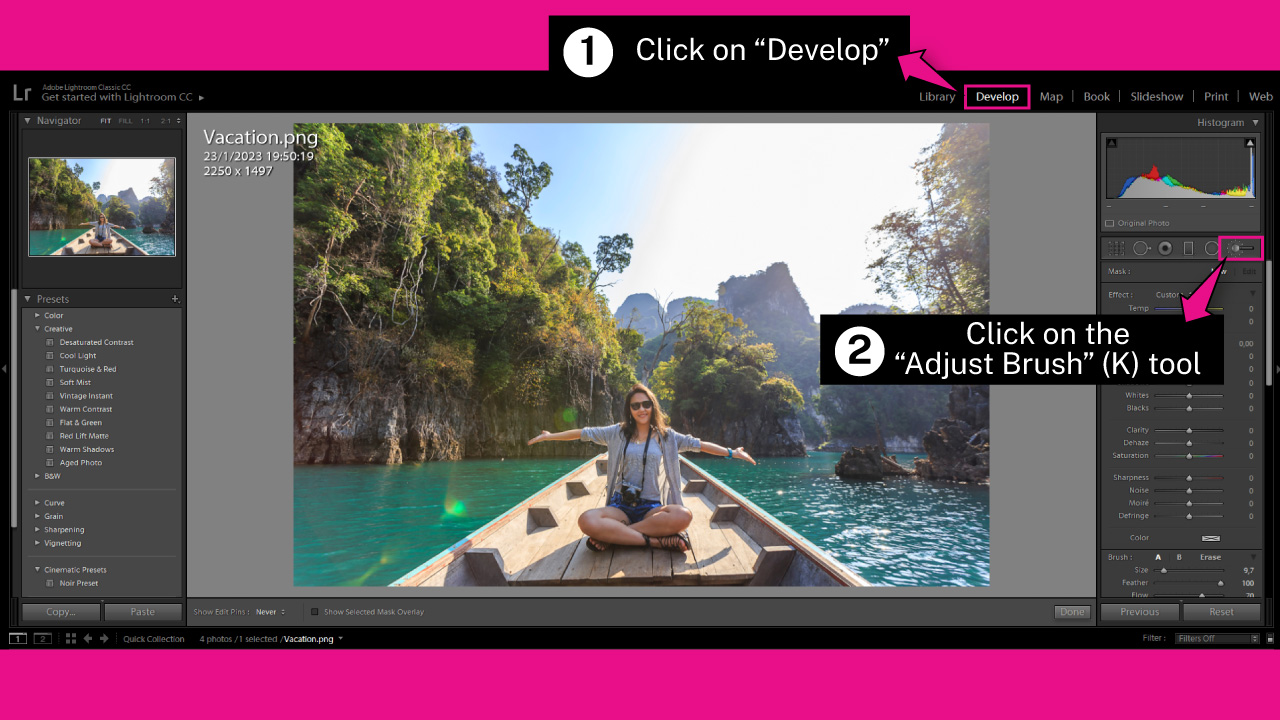
Once you’ve imported your image in Lightroom, go to the “Develop” module on the toolbar at the top of the screen.
If you can’t visualize it, click on the ▼ icon to unfold the hidden modules panel.
You can also access the “Develop” module by going to “Window > Develop” on the toolbar at the top of the screen.
Or by pressing the “Ctrl + Alt + 2” (Windows) or “Cmd + Option + 2” (Mac) command.
Once you’re on the “Develop” module, select the “Adjustment Brush” (K) tool on the right side toolbar.
Step 2: Adjust “Brush” Settings
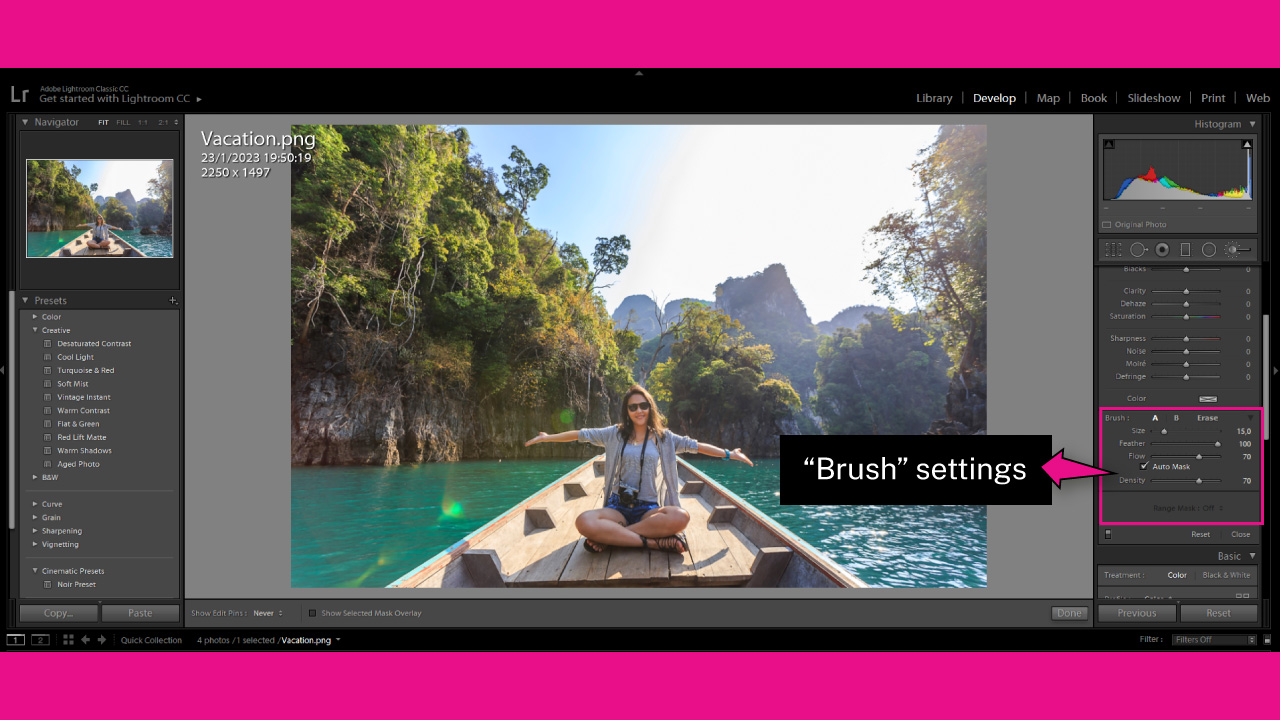
The “Adjust Brush” (K) tool is divided into two sections: “Effects” and “Brush”
In the section down below, you’ll find the “Brush” settings.
Here you can adjust the brush “Size”, “Feather”, “Flow” and “Density” settings.
You can also find the “Range Mask” and “Auto Mask ” features here, as well.
The “Size” slider will modify the brush size. You can also modify the size by using the scroll wheel from your mouse.
The “Feather” slider will change the smoothness or hardness of your brush.
As a rule of thumb, set it to 100 to get more natural and realistic effects.
The “Flow” slider controls how much brush effect you get with every stroke of your mouse. Flow has a cumulative effect.
If, for example, you set it to 20%, every time you brush over an area, you will add 20% of opacity. This means that if you brush 5 times over the same spot, you’ll reach 100% of opacity.
The “Density” slider is similar to the “Flow”, but without the cumulative effect.
If, for example, you set “Density” to 20%, then the maximum effect applied will always be 20%, no matter how many times you brush over the same spot.
Try setting “Flow” and “Density” sliders to 70%. Then, if you are still not happy with the results, slightly readjust the sliders to get your desired intensity.
Enabling the “Auto Mask” checkbox could help you to mask certain areas while ignoring other ones.
This tool will mask areas of similar colors to the first area you start brushing.
If, for example, you start brushing bright areas, like white or very clear colored areas, it will ignore dark areas like black, and the like.
However, if you get too close to dark areas, it will actually mask them. So use this tool carefully.
Mark “Auto Mask” checkbox to mask complex areas, when necessary.
The “Range Mask” tool constrains the applied range of effects.
You can restrict both by “Luminance”, or by “Color”.
Step 3: Adjust “Effect” Settings
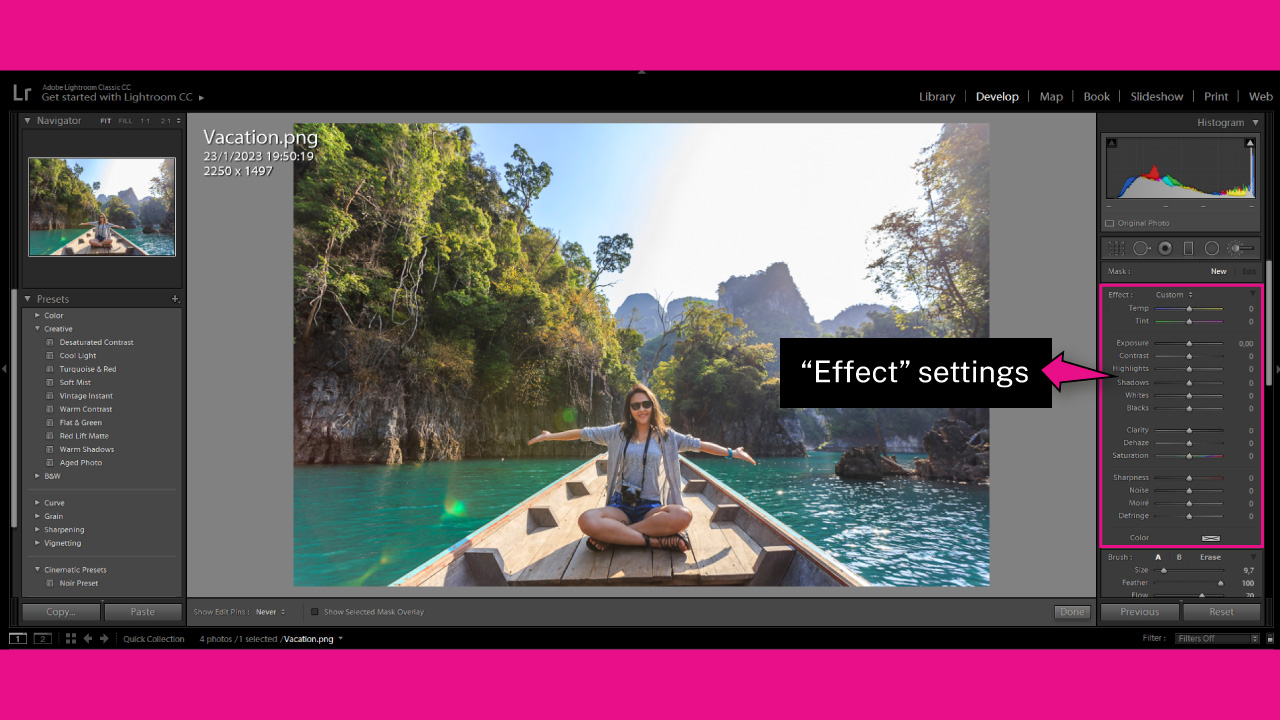
In the section right above the “Adjust Brush” (K) tool, you will find the “Effect” settings. Here you can adjust:
- “Temp”
- “Tint”
- “Exposure”
- “Contrast”
- “Highlights”
- “Shadows”
- “Whites”
- “Blacks”
- “Clarity”
- “Dehaze”
- “Saturation”
- “Sharpness”
- “Noise”
- “Moiré”
- “Defringe”
- “Color”
The “Temp” slider increases or decreases the temperature of your images, starting from blueish on the right, to yellowish on the left.
The “Tint” slider fixes the tone to balance it to white. You can use it to add tint to your photos for creative propouses, as well.
The “Exposure” slider, is also known as dodge and burn in Lightroom. This slider increases or decreases the brightness of your photo. Set it to the left to burn, or to the right to dodge.
The “Contrast” slider controls the difference between the light and dark areas of an image.
Increasing “Contrast” value will make your images look crispier. It could also make them lose certain details, though.
Decreasing “Contrast” can make your images retain certain details, but it could also make them look sort of dull, and also make them lack some dimension.
The “Highlights” slider increases or decreases the luminosity of the brightest areas of a photo. Set it to the left to recover details in lights, or set it to right to make the area brighter.
The “Shadows” slider increases or decreases the luminosity of the darkest areas of a photo. Set it to the left to make the area darker, or set it to right to recover details in shadows.
The “Whites” slider controls the white point brightness.
The “Blacks” slider controls the black point brightness.
The “Clarity” slider enhances your images by adding more structure to midtones.
The “Dehaze” slider adds or reduces haze by increasing or decreasing the overall contrast.
The “Saturation” slider adjusts color intensity. Set it to the left to convert your photo to grayscale, or set it to right to make the colors pop.
The “Sharpness” slider adds or reduces details by adding contrast to edges.
The “Noise” slider adds or reduces noise by smoothing or sharpening details.
The “Moiré” slider helps to reduce the moiré effect caused by pattern overlapping.
The “Defringe” slider helps to remove purple or green fringes caused by lens chromatic aberrations.
The “Color” box adds color to the masked areas of your photo.
Now, since we already know the function and purpose of each setting, we’ll put them to work in order to enhance our photo.
In the following steps we’ll be applying some of the reviewed tools. The settings will be directly related to the photo we’re working on. But values might obviously vary depending on the image.
Step 4: Add Shadows and Decrease Exposure
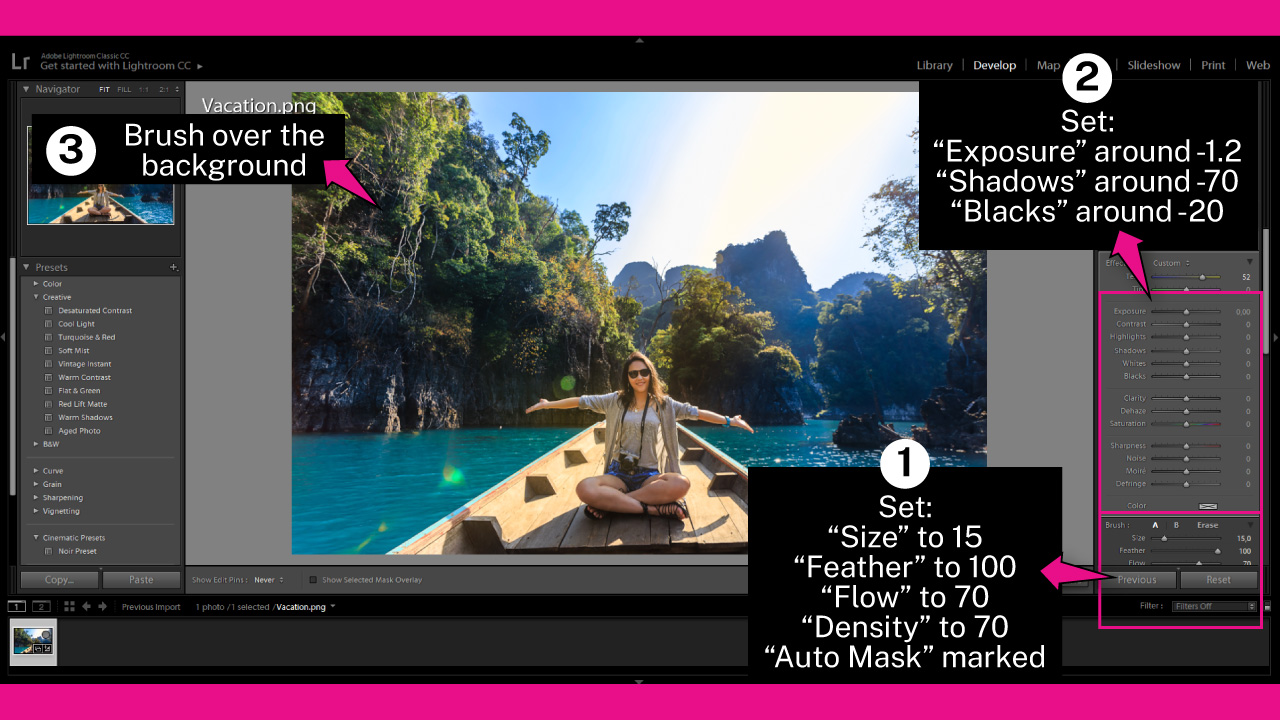
I want to make the girl stand out from the background, so I’ll darken the scene.
I’ll set:
“Size” to 15
“Feather” to 100
“Flow” to 70
“Density” to 70
“Auto Mask” enabled
“Exposure” around -1.2
“Shadows” around -70
“Blacks” around -20
Next, I’ll brush over the hills to make them darker.
If you want to remove a section of a masked area, hold the “Alt/Option” key while you brush over that area.
You can also get this done by clicking on the “Erase” tool located on the right side toolbar, next to the “Brush” title.
Step 5: Add Blue Temperature
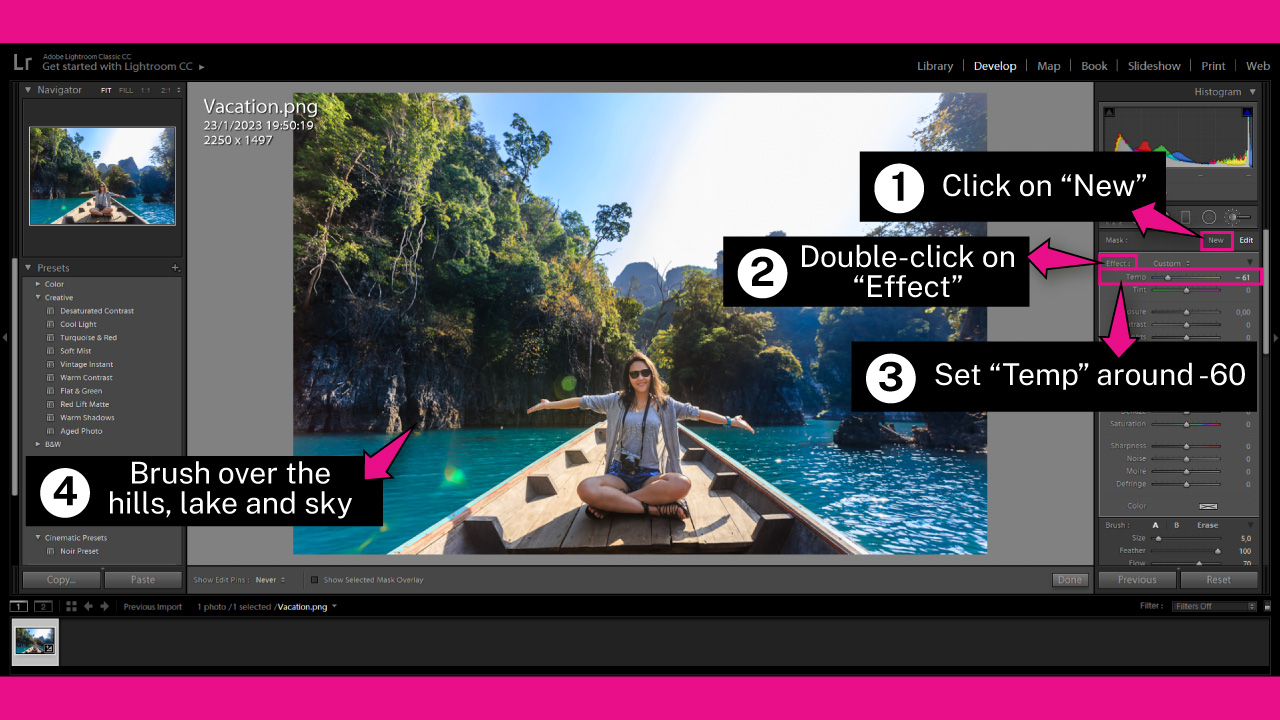
Now, I want to make the hills, lake and part of the sky bluer, to get a high contrast effect against the yellow of the sunshine over the boat and the girl.
To get this done, first it’s necessary to create a new bush.
For this, click on the “Add” feature to add a new brush.
Then, double-click on the “Effect” title to reset the adjustments you’ve made in the previous step.
Then set “Temp” around -60.
Once you adjust the “Temp” setting, paint over the hills, lake, and the bluer part of the sky.
Step 6: Add Yellow Temperature
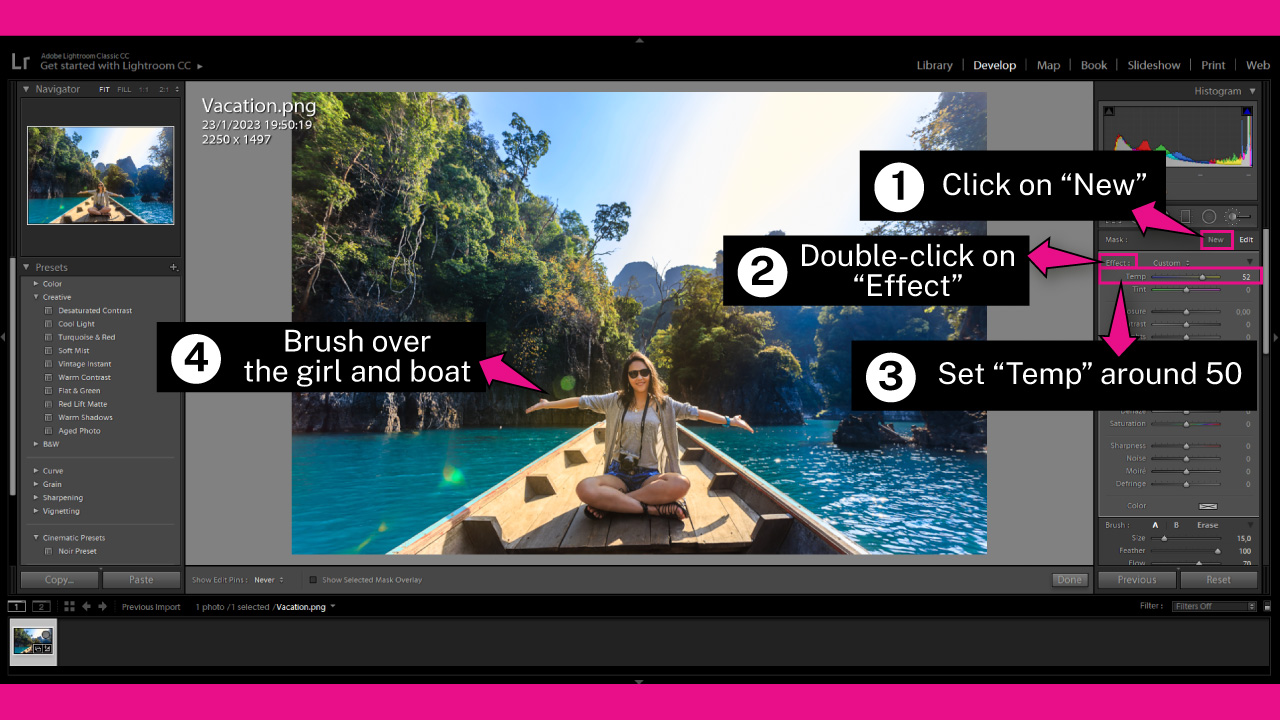
Now it’s time to add some yellow temperature to intensify the sunshine effect over the girl and the boat.
To get this done, first click on the “Add” feature to add a new brush.
Then double-click on the “Effect” title to start a brand new adjustment.
Then set “Temp” around 50.
Once you’ve set your brush, paint over the girl and the sunlit spots over the boat.
Step 7: Add Shadows and Blacks
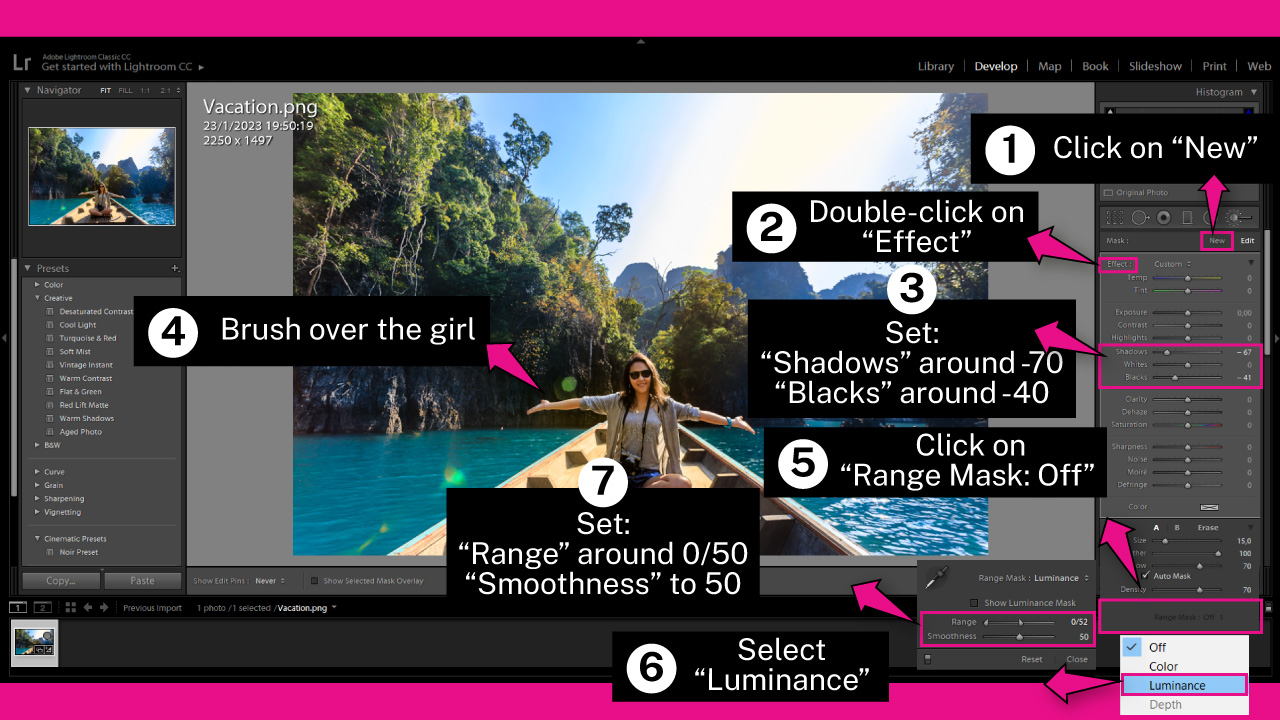
In this step, I’ll add shadows and blacks over the girl. So I’ll get some kind of contrast and will make her stand out from the background.
As we did in previous steps, click on the “Add” feature to add a new brush.
Then double-click on the “Effect” title to start a brand new adjustment.
Next, set:
“Shadows” around -70
“Blacks” around -40
Now paint over the girl.
As we paint over the girl, the stroke will apply pretty much homogeneously to all areas. This means it will also apply to spots we don’t necessarily want to cover.
To avoid losing highlights intensity, we shouldn’t be darkening bright areas of our image. Because of this, we need to constrain the applied range.
To constrain the applied range, we’ll use the “Range Mask” tool.
Click on the “Range Mask: Off” tool, located under the “Brush” settings.
On the popup menu, select the “Luminance” option.
Then adjust the “Range” slider. This control has two handles on each end of the slider.
Drag the right slider to the center, so the range goes from left to center.
The value should be around 0/50
Then set the “Smoothness” around 50.
Now the effect will be working only on shadows, and on a limited range of midtones.
Step 8: Add Highlights and Whites
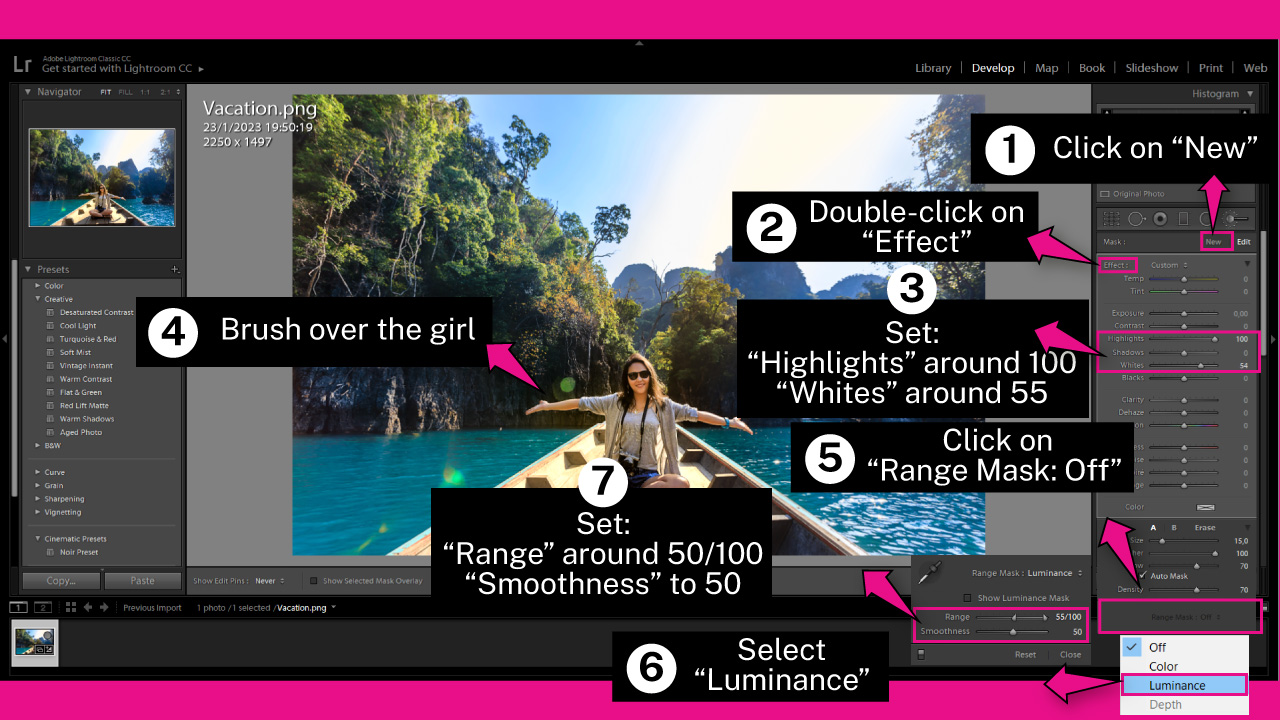
This step is similar to the previous one, but now we’ll apply “Highlights” and “Whites” over the girl.
Click on the “Add” feature to add a new brush.
Then, double-click on the “Effect” title to start a brand new adjustment.
Next, set:
“Highlights” around 100
“Whites” around 55
Now paint over the girl.
To restrict the applied range, we’ll use the “Range Mask” tool.
Click on the “Range Mask: Off” tool, located under the “Brush” settings.
On the popup menu, select the “Luminance” option.
Then set the “Range” slider. Drag the left slider to the center, so the range goes from middle to right.
The value should be around 50/100.
Finally, set the “Smoothness” around 50.
Now the effect will be working only on highlights, and on a limited range of midtones.
Step 9: Add Greens to the Trees
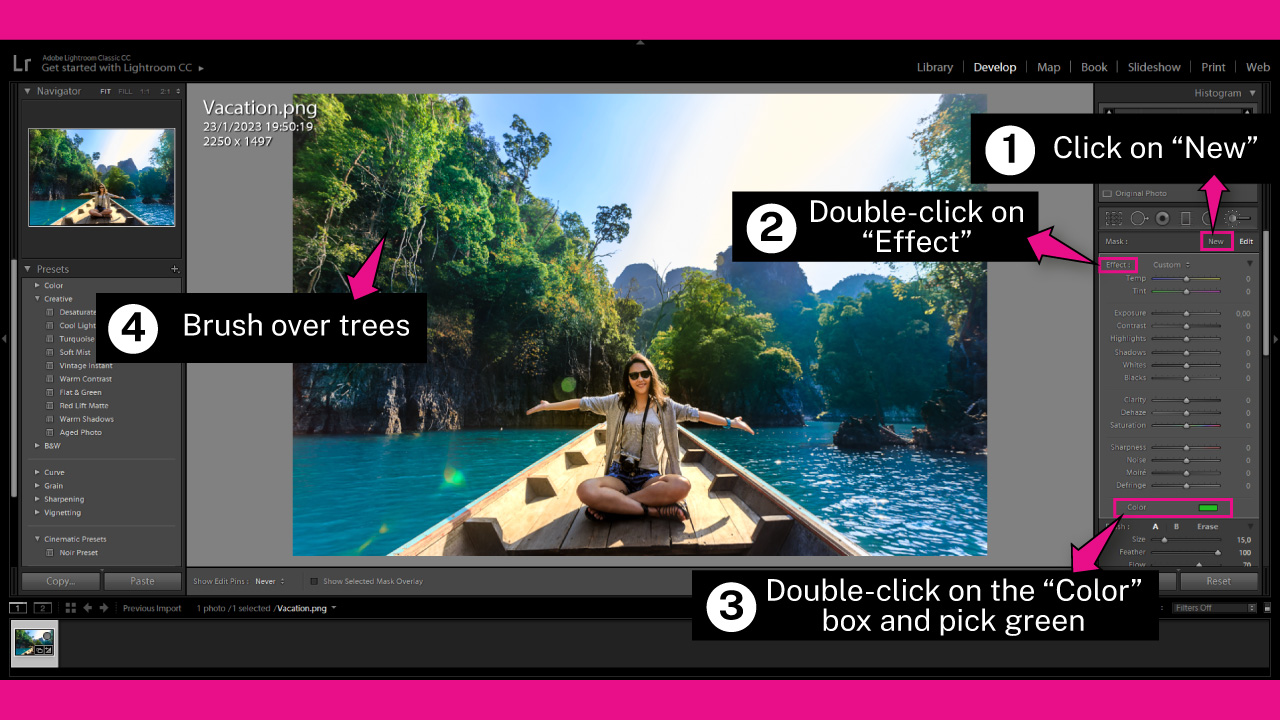
As a final step, we’ll use a vivid green to bring back the background trees to life.
First, click on the “Add” feature to add a new brush.
Then double-click on the “Effect” title to start a brand new adjustment.
Then, click on the “Color” box, set as “None” by default, and pick green.
Next, paint over the treetops to make their color pop.
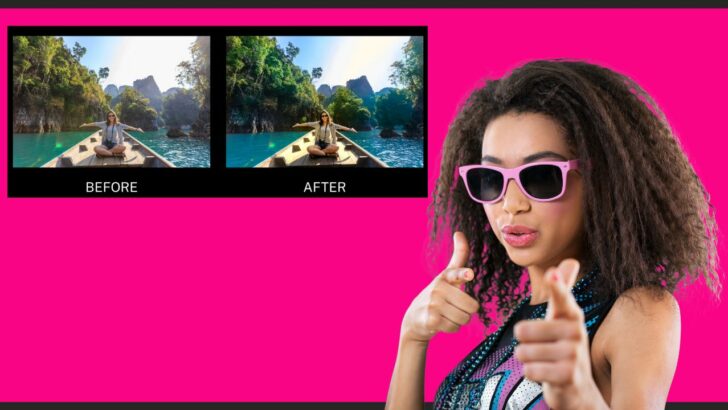
The Result
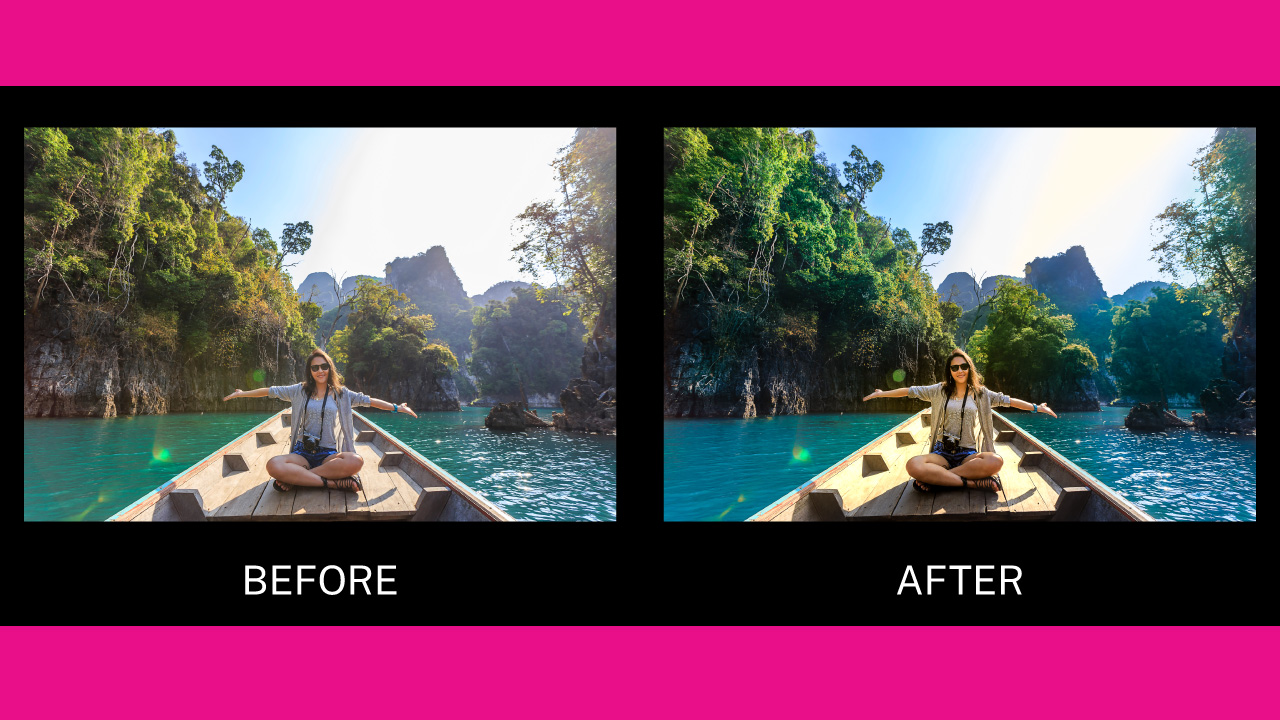
This is the result of how to use brushes in Lightroom.
Frequently Asked Questions on “How to Use Brushes in Lightroom”
How to save brushes in Lightroom?
Go to the “Develop” module and click on “Brush Adjustment” tool. Adjust the brush settings as you want. Click on the “Custom” menu, next to the “Effect” title. On the unfolded menu, select the “Save Current Settings As a Preset” option. On the pop up window, type a name and click on “Create”.
How to install brushes in Lightroom?
Go to “Edit” and then to “Preferences” (Win), or go to “Lightroom” and then to “Preferences” (Mac). Go to the “Preset” tab and click on “Show All Lightroom Presets”. On the pop up window, open the “Lightroom” folder and then paste the downloaded brushes on the “Local Adjustment Presets” folder.
How to edit an applied brush in Lightroom?
Go to the “Develop” module and select the “Adjustment Brush” tool. Click on “Show Edit Pins” at the bottom of the screen, and select “Always”. Each applied brush will be displayed as a pin over the image. Select the one you want to edit and readjust the settings on the right side toolbar.

I am a professional blogger and entrepreneur with a strong interest and passion in photo editing. On MindRelic, I happily share my expertise in the photo editing niche with all of you guys!